 Featured article
Super Mario RPG: Legend of the Seven Stars is a unique collaboration between Nintendo and Square which gave birth to the first in a line of Mario role-playing games.
It's a fairly lighthearted romp fondly remembered for its memorable cast and good bit of humor spread in. Unfortunately, Square parting ways with Nintendo soon after the game's release makes a direct sequel unlikely, much to the dismay of fans around the world. On November 17, 2023, a remake was released for the Nintendo Switch.
Sub-Pages#
 Prerelease Info
 Bugs
 Unused Text"But this is getting ridiculous!"
 Unused Maps and Battle BackgroundsTest maps, early versions of existing locations, and even some completely scrapped areas!
 Unused EnemiesThey didn't bother putting in proper stats for these guys.
 Regional Differences
Developer Message#

|
To do: |
A hidden message from Mitsuo Yoshioka, credited in the game as the menu programmer, which is located at 0x30010 (CPU address C30010) in all versions of the ROM:
|
JP version |
US version |
|---|---|
|
|
大滝秀治命 roughly translates to "The Honorable Hideji Ootaki".
Debug Menu (Battle)#

Not only does this game have a debug menu, but it is a very complex one, at that. To enable it, use Pro Action Replay (PAR) code C106AF80, enter any battle, and simply press Start on your turn. The different options it contains are as follow:
- SCENE - Battle select. Allows you to select any battle/formation in the game, including ones which go unused.
- OBJ - Allows you to view all the uncompressed sprites in the game!
- BG - Allows you to change the current battle background.
- HPMAX - Simply refills your HP to its current maximum. It won't max out your HP to 999.
- MUSIC - Lets you listen to all music tracks.
- SE - Allows you to listen to all the sound effects in the game.
- LINE - Used to measure the CPU usage of what it would use on the SNES, nothing too fancy. Can simply be turned on or off.
- EFFECT - Used to show the background animation of objects like the Star used for Mallow's Star Rain or the rock from Bowser's Crusher attack.
- EVT 1 - Leads directly to the first fight to save Peach from Bowser.
- EVT 2 - Leads directly to the fight with Boomer at Bowser's Keep.
- EVT 3 - Leads directly to the Smithy fight.
- TEST - Simply shows the animation used when Smithy transforms into his true form, after which the game hangs.
(Source: SMRPG Secrets)
Spell Effect Test Menu#

This menu tests several HDMA and translucency effects used in magic attacks. To enable it, add the above debug menu code, in addition with PAR codes C106D2F3 and C106D307. Once that is done, simply enter a battle, and then press Start on your turn.
- MAGIC - Lets you choose from several spell effects that utilize translucency.
- LASTER - Most certainly meaning "Raster" given Japanese phonology, this option displays an image of the Big Boo from Bowser's Terrorize special. Pressing Left and Right lets you manipulate the image.
- BGLASTER - Same function as the one above, but this one tests vertical scaling. Pressing Up and Down scales the image.
(Source: Giangurgolo - Creator of the LazyShell editor)
Debug Menu (Overworld)#

A different debug menu, this one intended for the overworld, which can be accessed with PAR codes D4AFC100 D4AFC226 DF000001, and talking to the Fungi Light in Mario's Pad (please note that you have to enable the codes before entering the pipe house).
Below is a tree showing the page flow in the debug menu. Options shown in bold are blanked out in the English version and have translations filled in, with italicized explanations and differences in parenthesis:
- Next (Event)
- Next
- Next
- Next
- Hillside A (Booster Hill, Booster chase)
- Hillside B (next)
- Next (Beetle Box ON Hill B; Booster Hill, beetle chase)
- Beetle Scenario OFF Hill B (Booster Hill, flower search)
- Beetle Box OFF Hill B (Booster Hill, beetle chase no box)*
- Cart End B (either the scene where the trolley crashes through the roof if it hasn't happened yet, or Moleville Mountain finishes at 02’46’’66 with wagered coins'')
- Falls (start of the Midas River waterfall, NPC waiting at the end)
- Next
- Donut (leads to the second Donut Block of the Sky Bridge in Land's End)
- Sky Troopas (leads to Land's End desert, in front of the cliff area entrance, with Sky Troopas active)
- Next
- Demo (next)
- Next
- Next
- Next (closes menu)
- Wiggler step (INTRO: Jumping on Wiggler; once one of the "demo" options are picked, the game cycles through these demos endlessly, and the player can only soft reset)
- Koopa (INTRO: Koopa Troop at Moleville)
- Star (INTRO: Invincibility at Bandit's Way)
- Hillside (INTRO: Booster Hill, Snifit chase)
- Next
- Fall in (INTRO: Midas River tunnel)
- Downriver (INTRO: Midas River barrels)
- Next
- Option
- Next
- Next
- Next (closes menu)
- To Mole B Villa C (just entered Moleville's Swap Shop)
- Croco page OBJ null (restart from the menu's first page; unknown if that was always the intended function)
- 99 flowers
- Max level up (''Mass level up is more like it; if you want to go all the way from min 1 to max 30, you'll have to reselect it)
- Next
- 500 coins
- 1 level up
- Next
(Source: Translations courtesy of Super Mario RPG: Legend of the Seven Stars ~Rebrick Time Capsule~ SNES-nameset by “LiThL”)
Debug Room#

This game contains not only two debug menus, but also a debug room, found at map 00, which plays the Mushroom Kingdom theme and uses the standard grassland tileset. The map itself is quite large, though all relevant objects are only found in the first part, leaving the rest of the map completely vacant. To access this map, enable PAR codes 7FF40400 7FF40501 and walk through a loading zone.
Upon entering the area, the following message will be displayed:
    The World Map
   Talk to the person of the place
           you wish to go to.
All the NPCs in this map bring up different functions, with the only exception being Mario, who is a useless NPC:
- Toad (top-left) - Saves your game, enables all party members and world map locations, gives you a Signal Ring, and brings you directly to the credits.
- Toad (top-center) - Warps you to Nimbus Land.
- Toad (top-right) - Warps you to Barrel Volcano.
- Toad (center) - Warps you to Bean Valley.
- Toad (bottom-center) - Warps you to Monstro Town.
- Toad (bottom-right) - Warps you to Land's End.
- Bowser - Warps you to Bowser's Keep.
All of these locations appear late in the game, suggesting that these were the last ones the developers tested.
(Source: Map originally ripped by Peardian from The Spriters Resource)
Unused Cutscenes#
There exist two unused alternate versions of the scenes where Peach is trapped in Booster Tower. Both of these scenes can be viewed through the aforementioned Debug Menu, the first one being found under BG:11 SCENE:150, and the second under BG:11 SCENE:151. As the early versions are considered battle scenes, they use the more constrictive battle messages. Note that the dialogue shown in the video has been overwritten in-game by Count Down's announcements.
First Scene
The scene that plays after Mario arrives at Booster Tower for the first time, with Peach overhearing him from the top of the tower. The scene blocking in this early version suggests a bit more emotion.
Early Scene |
Final Scene |
|---|---|
Peach on the ground, shaking and crying. It's 1:00.Time to play. After some more, stops crying, gets up, and looks right and left. It's 3:00. Time to RECOVER! Walks up to the balcony. It's 5:00. Time for a break, huh? Looks down and then jumps high once in surprise. It's 6:00. Time to FULLY RECOVER. Excitedly blows kisses. It's 7:00. DINNER TIME. |
Peach standing up, crying, then stops. TOADSTOOL: Oh? Looks right and left, holding at her right. Did I just hear some voices? Hops and looks toward the camera. It couldn't be...! Runs toward the balcony, then looks down and gets surprised. I can't believe it! Reaches out with her arms and hops twice. Mario~ |
Second Scene
The scene that plays after Mario first tries to access the balcony area of Booster Tower. The early version of this scene seems to repeat the line upon seeing Mario.
Early Scene |
Final Scene |
|---|---|
Mario looks through the door's window, Peach recoiling with surprise upon seeing him. It's 6:00. Time to FULLY RECOVER. She runs toward him, then stops and walks more slowly, nodding twice at the door. It's 10:00. Time to garden. Looks left and right twice. It's 12:00. It's high noon. |
Mario looks through the door's window, Peach jumping with excitement upon seeing him and then running toward the door. TOADSTOOL: Mario! He tries to open the door. TOADSTOOL: The door won't open? |
Unused NPC Data#
Watch on YouTubeThe exterior of Grate Guy Casino is located on the same physical map as Seaside Town. While this in itself is not particularly unusual, there are some NPCs on the Seaside Town portion which are loaded with the Casino but cannot normally be seen, nor interacted with:
- Male Toad - Is assigned the string used by this map's Geno NPC. Is programmed to bob up and down repeatedly, for some odd reason.
- Geno - Walks back and forth repeatedly. When interacted with, he'll exclaim "Come on! Let's get this show on the road." before resuming his endless walk cycle.
- Terrapins – Two Terrapins which are stationary but play their walking animation nonetheless. Touching them triggers a battle against two Goombas, with the battle background used being the Mushroom Kingdom one.
Unused Battle Formations#
Group ID |
Pack ID(s) |
Enemies |
Notes |
|---|---|---|---|
010 |
08 |
K-9 |
Part of an unused, easier version of the K-9 enemy pack in Bandit's Way. |
03F |
N/A |
Sparky x4 |
|
040 |
20 |
Goomba |
Packs 20 and 21 were intended for the Pipe Vault, which instead uses the Goomba packs from Bandit's Way. |
041 |
20, 21 |
Goomba x2 |
|
042 |
20, 21 |
Goomba x2 |
|
043 |
21 |
Goomba |
|
054 |
2A |
Lakitu |
Part of an unused, easier version of the Lakitu enemy pack in Booster Pass. |
06B |
35 |
Lakitu |
Part of an unused, harder version of the Blaster enemy pack in Booster Tower. |
06C |
35 |
Torte |
Both packs are unused. Either you were intended to fight chefs in Marrymore, or Torte replaced a different enemy. |
06D |
35, 36 |
Torte x2 |
|
06E |
35, 36 |
Torte x3 |
|
06F |
36 |
Torte x4 |
|
08B |
N/A |
Bandana Red x2 |
This is an easier version of another unused enemy group that is part of a pack. |
08C |
46 |
Bandana Blue |
Another two enemy packs that are never seen. Bandana Blues are only seen with Johnny. |
08D |
46, 47 |
Bandana Blue x2 |
|
08E |
46, 47 |
Bandana Blue x4 |
|
08F |
47 |
Bandana Blue x2 |
|
09B |
4D |
Greaper |
Part of an unused, harder version of the Greaper enemy pack in the Sunken Ship. |
09C |
4E |
Drill Bit |
Two unused enemy packs with four unused enemy groups populated by an unused enemy. |
09D |
4E, 4F |
Drill Bit x2 |
|
09E |
4E, 4F |
Drill Bit x3 |
|
09D |
4F |
Drill Bit x4 |
|
0A8 |
54 |
Chomp Chomp |
Part of an unused, easier version of the Chomp Chomp enemy pack in Bean Valley. |
0BC |
5E |
Bluebird x2 |
Part of an unused, easier version of the Bluebird enemy pack in Nimbus Castle. |
0BE |
5E |
Bluebird x4 |
|
0C3 |
61 |
Pinwheel x3 |
Part of an unused, easier version of the Pinwheel enemy pack in Nimbus Castle. |
0DF |
6F |
Terra Cotta x2 |
Part of an unused, harder version of the Terra Cotta enemy pack in Bowser's Keep. |
0EB |
75 |
Big Bertha x2 |
Part of an unused, harder version of the Big Bertha enemy pack in Bowser's Keep. |
0EC |
76 |
Magikoopa |
An interesting set! Either the Magikoopa once behaved differently or it replaced a different enemy. Since the Magikoopa is coded as a boss, the other enemies don't show up. Perhaps the Magikoopa was once a regular enemy. |
0ED |
76, 77 |
Magikoopa |
|
0EE |
76, 77 |
Magikoopa |
|
0EF |
77 |
Magikoopa |
|
0F5 |
N/A |
Springer |
This was likely intended for pack 7A, which has two copies of the "Springer, Glum Reaper" group. |
0F8 |
N/A |
Ameboid |
Intended for packs 82 and 83, which instead contain 3 copies each of the 5x Ameboid group. |
0F9 |
N/A |
Ameboid x2 |
|
0FA |
N/A |
Ameboid |
|
104 |
7C, 7D |
Mad Mallet x2 |
Mad Mallets were supposed to appear in large groups as random enemies. |
106 |
7C, 7D |
Mad Mallet x5 |
|
107 |
N/A |
Mad Mallet x4 |
Another old group, likely intended for pack 7D. Clearly, the Clerk wasn't part of the game's earlier design. |
108 |
7E, 7F |
Pounder |
Unlike the Mad Mallet packs, none of these sets are used. |
109 |
7E, 7F |
Pounder x3 |
|
10A |
7E, 7F |
Pounder x5 |
|
10B |
N/A |
Pounder x4 |
Like group 107, but with Pounders. |
111 |
N/A |
Axem Rangers |
An odd group. Whatever this one enemy was, the Axem Rangers enemy now appears in its enemy ID slot. |
117 |
A5 |
(Croco #3) |
A third battle with Croco. The Croco in this battle doesn't have an action script and only has 10 HP. |
11A |
N/A |
Right Eye, Bandana Red |
Another coded-over boss. The Right Eye clearly wasn't supposed to be in these groups... |
11B |
N/A |
Right Eye, Bandana Red x2 |
|
11C |
N/A |
Right Eye, Bandana Red x4 |
|
120 |
N/A |
(Belome #3) |
A third battle with Belome! Like Croco #3, he only has 10 HP and no action script. |
123 |
N/A |
Microbomb |
A very intense boss battle against...oh, a Microbomb. More boss overwriting! |
128 |
N/A |
Axem Yellow |
Yet another boss battle with a boss that's no longer in the game. |
12C |
N/A |
King Bomb, Mezzo Bomb |
This boss duo was overwritten with the two largest Bob-ombs. They sure get around. |
140 |
80, 81 |
Poundette |
Sick of unused hammer enemy groups yet? |
141 |
80, 81 |
Poundette x3 |
|
142 |
80, 81 |
Poundette x5 |
|
143 |
N/A |
Poundette x4 |
Like group 107, but with Poundettes. Yep. |
160 |
BE |
Super Spike x3 |
Possibly used to test the game's random group code. |
161 |
BE |
Super Spike x4 |
|
1FD |
N/A |
Bundt, Raspberry, Terrapin x2 |
A very strange set that appears right before the Bowser battle's ending group. |
Unused Items#
There are a few unused items present in the game, though they're less proper ones and more along the lines of developer items to quickly test status effects on characters. They are as follow:
- Bomb (ボム) - Deals 255 damage to a single enemy.
- Debug Bomb (デバッガーボム, "Debugger Bomb") - Deals 255 damage to all enemies.
- Doom Bomb (ころしボム, "Kill Bomb") - Deals 255 damage to targeted ally.
- Bane Bomb (どくボム, "Poison Bomb") - Causes "Poison" status on targeted ally.
- Fear Bomb (きょうふボム) - Causes "Fear" status on targeted ally.
- Sleep Bomb (ねむりボム) - Causes "Sleep" status on targeted ally.
- Mute Bomb (ちんもくボム) - Causes "Mute" status on targeted ally.
- S.Crow Bomb (カカシボム) - Causes "Scarecrow" status on targeted ally.
- Secret Game (ひみつのゲーム) - It appears that the Beetle Mania game was also supposed to be an item. Its description is "A super popular video game!", and it sells for 999 coins. In the final game, Beetle Mania adds itself to the menu, rendering this item unused.
Note that the used bombs also use a different Japanese term, which more directly translates to "ball".
(Source: SMRPG Secrets - Bombs info, Liliana - Secret Game info, “LiThL” - Japanese)
Unused Attacks#
There are a few unused enemy attacks, as well. The first four can be seen in action here.
- Toxicyst (どくきのこのほうし, "Poison Mushroom Spore") - Throws green spores at the party. Causes Poison status.
- Dahlia Dance (フラワーダンス, "Flower Dance") - Turns one character into a mushroom.
- Chain Saw (チェーンソー) - Same as the Corona attack. Name isn't displayed.
- Knock Out (いしきふめい) - Deals 9999 to all party members.
- Royal Flush (ロイヤルストレート. "Royal Straight") - A physical attack, and the only attack with an 8× modifier in the game. Based on his other moves (Full House and Wild Card, which are 2× and 4× respectively), it was almost certainly intended for Jester, but removed due to being a bit overpowered.
- Sickle (かかしのかま, "S’crow Sickle") - Turns one character into a scarecrow, has a 1.5× modifier.
(Source: SMRPG Secrets, Liliana, “LiThL” - Japanese)
Unused Battle-Related Code#
Under the hood rests unused code.
Unused Status Ailment#
Watch on YouTubeThere exists an unused status ailment which, when cast on an ally, will cause the player to lose control of said character, with them continuously physically attacking random targets, including other party members and themselves until the ailment is cleared. May have been intended as a sort of "Confused" or "Berserk" status ailment, both of them being standards in RPGs. Interestingly, when cast on an enemy, they will also lose control and select random targets, including themselves, but the attacks will miss 100% of the time. In addition, if both the enemy and an ally character have this status effect on them, enemies will use "Scream" and "Hammer Time" randomly with a 100% miss chance, but it is unclear as to why they use these attacks in particular.
Other noteworthy tidbits are the portrait does change to an unused index, sequence 6. If the ally attacks themselves and they fall/are wounded, they will revert back to their standing position when transferring back to their original coordinates. The byte for this status ailment is 10.
This status would reappear, still unused, in Paper Mario.
(Source: Yakibomb)
Unused Item Behavior#
All items (weapons, armors and consumables) are made up of 18 bytes. Consumable items are the only ones to make use of byte 17 for Attack Flags. Setting this to 03 will enable an unused string of code to add stats to a character upon use. Stats that can be modified are Speed, Attack, Defense, Magic Attack, and Magic Defense.
The code can be found at C2:C074 - C2:C0B1.
(Source: Yakibomb)
Unused Equipment Parameters#
Weapons, items, armors and accessories are akin in that they are all made up of 18 bytes for parameters for various functions, with byte 1 setting the type of item or equipment it will be.
Byte 5, Bits 4-7: These bits, dedicated for the elements (Ice, Thunder, Fire, and Jump respectively), set a weapon's damage type to that element if applied to a weapon, armor or accessory. Judging by how weapons, armors and accessories are applied to the character, it was definitely intended for weapons to use elements at some point, but for whatever reason, it was never used. It even has a byte on the character's RAM dedicated to it: 7E:004B, which can be set to 10, 20, 40, or 80 to get that element's effect.
Unused Spell Damage Parameters#
Spells are made up of 12 bytes for parameters, using bits to enable/disable certain functions. Interestingly, Byte 1, Bit 0: Uses atk/def of caster/target to calculate final damage, instead of using mg.attack/mg.defense. This completely ignores adding the spell's power.
Unused Party Member Leftovers#
There are leads within the code that point to what may have been an ultimately cut sixth party member. At a glance, there are unused specials commands and coordinates for the ABXY buttons on the battle screen if said character were to exist. All named "Dummy" (ダミー), these unused specials are most likely leftovers from how the game writes to a character's specials pool, however, they still function as any ally special would. The animations themselves are actually incorrectly read pointers, due to how the code is organized. The animation code is placed just after the pointers, so when the code reads the pointers to play the animation for the dummy specials, the game is actually reading the beginning of the animation script used by Mario's Jump special. Also noteworthy, these dummy specials all share the same timing as the specials Jump, Therapy, Crusher, HP Rain, and Shocker, because the timings themselves (located at C2:CACB) are all read by the same code.
The coordinates for the ABXY buttons for the battle screen do have bytes dedicated for the X/Y position for one more character. The coordinates are the same exact as Mario's. It is loaded at C2:3461 (with the coordinates themselves at C2:3685).
(Source: Yakibomb)
Mushroom Ailment Oddities#
The Mushroom ailment is meant to immediately pass the character's turn if they are afflicted with it, however, disabling the turn skip by pointing the ailment to do something else reveals that it disables the three action commands for attacks, items and specials. Seeing how it leaves the defend/run command enabled, this could suggest the player once had some control over the Mushroom, though this could also simply be a leftover that has no significance whatsoever.
Additionally, the game checks to see if Mushroom or Fear are set to calculate final damage. If either are set, damage is divided by 2.
Unused Bowyer Behavior#
Bowyer's battle script (as well as the one of his Machine Made counterpart) has code that re-enables all buttons if the Carbo Cookie is used on him. In the final game, the Carbo Cookie is an event item that cannot be used in battle, so this is likely leftover code that was meant to target a different item that got cut from the game.
Unused EXP Values#
The Axem Rangers each have EXP values, but because they don't undergo the normal defeat routine, these aren't awarded. Due to this only The Blade, which does undergo the normal defeat routine, actually awards its EXP, which is meager for a boss this late in the game.
(Source: https://youtu.be/lsjKjkcSF0U)
Unused Graphics#
Unused Palettes#
Sprite Palettes#

It seems that every item graphic was given a red, green, blue and yellow palette. A few items, such as bombs, made use of all four palettes. Most items, however, did not. Not a single one of the above item palettes are used.


Unused red and blue palettes for the hammer. These may have been intended as elemental hammers, or just as a way to distinguish the various hammers in the game.
Unused |
Used |
|---|---|
|
 |


Two unused recolors for the NokNok Shell, one red and the other orange.
Unused |
Used |
|---|---|
|
 |


Two unused recolors for the Troopa Shell, one green and the other red.
Unused |
Used |
|---|---|
|
 |


Two unused recolors for the Lazy Shell, one green and the other orange.

An unused greyish-blue palette for Mallow's Cymbals.
(Source: Yakibomb)


Individual palettes for the teleportation animation used by the Axem Rangers, who in the final game inexplicably all use Red's red teleportation palette. The Switch remake rectifies this and gives the Rangers their own teleportation colors.
(Source: Mattrizzle)
Background Palettes#
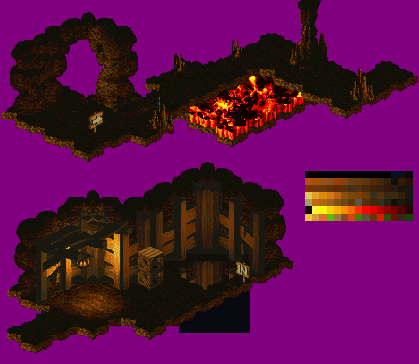
A darker, unused alternate palette for the caves tileset.
(Source: The IT)
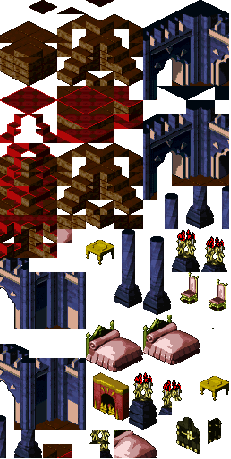
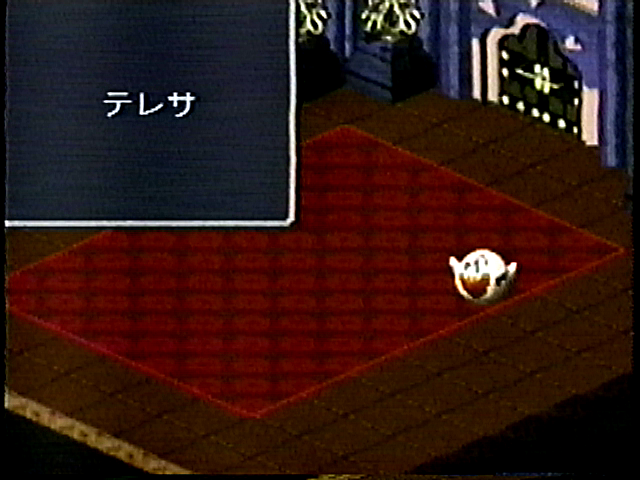 An early palette for the Mushroom Castle which could be seen in the game's 1995 V-Jump Festival presentation.
(Source: The IT)

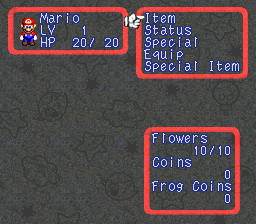
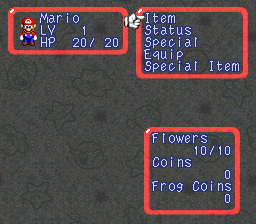
This layer 3 palette is loaded into CGRAM indices $08-$0B on the menu screens, but isn't used.
When the palette is applied to the top left corner tile of each red border, a visible shine can be seen:
|
Used |
Mockup with unused palette |
|---|---|
|
|
Said tile is clearly drawn with this palette in mind and looks rather out of place in the final game, so this palette going unused was probably a mistake.
(Source: Mattrizzle)
Unused Graphics#

A generic placeholder which appears several times in the debug menu.


These are located in the same bank as the other digits. They are just different numbers, likely intended for the battle UI. These are actually very similar to the numbers used for the in-battle page scrolling number display.

Even more unused digits, alongside some other tiles, located just above the rest of the battle UI GFX. Curiously, after the 9 are two tiles that are just two 1, except one is solid and the other is hollow.

Unused graphics which are found right under the chandelier graphic in Bowser's Keep (at 01C000). They appear to lack a proper palette, and depict a Shy Guy idle, sitting, and knocked down, alongside a star and a mushroom. These graphics are rather intriguing, as they don't match the final game’s art style, indicating that they must have been made rather early on in development.

A banana peel with eyes, not unlike the ones seen in the Mario Kart games. It could probably have worked just about anywhere, although the most likely place would have been Booster Hill (probably while chasing Booster himself).

A small sea urchin, which appears to be based on the Urchin enemy from Super Mario World. Probably intended as a trap of sorts for the Sea or Sunken Ship areas. Oddly enough, two instances of this object are actually loaded up in-game, being found out of bounds during the scene where Mario has to gather Peach's belongings during her makeshift marriage with Booster.
|
Unused |
Used |
|---|---|
|
|
|


There are two versions of the Mario doll in the game, with only the one on the right being used in-game. The unused variant is pretty much only a miniature version of Mario's regular sprite, while the used sprite conveys a more toy-like aesthetic. 


Pipes that go into walls, which actually have metatiles defined for them in an unused version of the sewer tileset (L1/L2 tileset setting 59 in Lazy Shell). The used version of the tileset replaces these with the gargoyles from Belome Temple.

Found in the Marrymore tileset, these are just two bouquets of flowers which never get used anywhere.

A Belome statue, unsurprisingly meant for Belome Temple. Due to the statues always being placed on the left walls, this right-facing sprite ultimately went unused.

An early version of the blackjack table from Grate Guy's Casino, this one is a lot less detailed and has a more curved shape. Seeing how this sprite is only found in the lobby, this could either mean that the main area of the casino once used the same graphics, or that this room was the main area at one point.

Within the game's data, there lies graphics for an early version of the Sunken Ship. There, the full ship is present, instead of just the mast, sails, and crow's nest. The ship also faces the opposite direction (top-right instead of bottom-left), and the crow's nest doesn't look like a pipe opening. The latter point is interesting, as it could mean that early in development there must have been another method of entry, or that the ship wasn't originally intended to be explored.
Interestingly, this ship design can be seen in the ending parade, with the early crow's nest fully intact.

Two graphics for the Sunken Ship. The shark is likely a placeholder sprite for the Bandana sharks, while the "30" is a developer's marking.
(Source: The IT)


What looks like smooth stone structures that may have belonged to a different style of cave tileset.
(Source: The IT)

A rather crude drawing of a typical Mario-styled cloud. Most likely an early version of the clouds from Nimbus Land's sky.


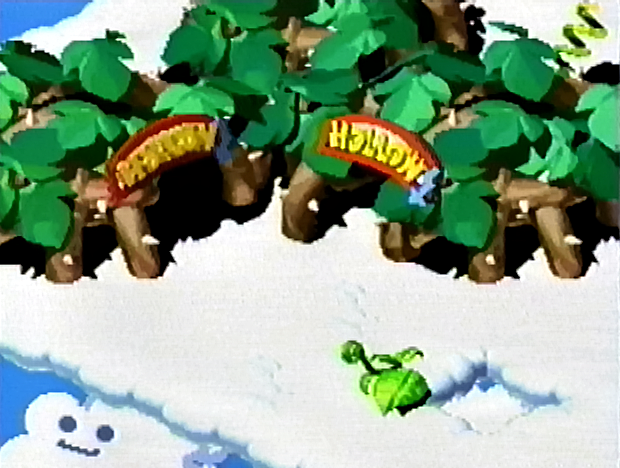
Signs saying "HOLLOW" which were once used in Nimbus Land, and can be seen in early game screenshots.

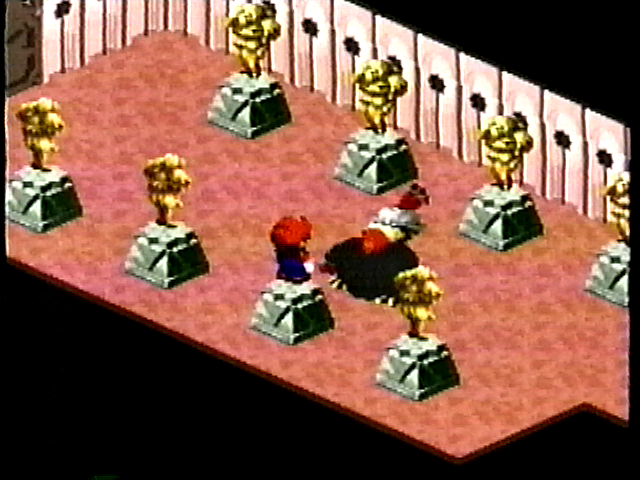
An early version of the trophy stands found in Nimbus Castle. The grey one can be seen in early game screenshots.

An animation for the flowers which only appear during the ending sequence on Yo'ster Isle. They are completely stationary during said sequence, rendering this animation unused.

An unused battle effect which depicts a spiderweb expanding and then disintegrating. While it's not really clear what this may have been intended for, it's possible this was meant for Arachne and/or Spinthra, both of them spider-like enemies.

An unused battle effect which isn't easily seen listed in the game, instead needing a little digging. To view this animation in this game's main editor, Lazy Shell, change the Image to 131 and Animation to 198. While it's not really clear what this may have been intended for, it's possible this may have been intended to be used for Mallow when he uses his cymbals.

An unused animation for a Lakitu using an air pump.

An unused animation for Toadofsky. Presumably this was meant to be used for scenes where he's actually conducting music, like after completing his sidequest or his scene in the credits, but the game reuses his "baton flourish" sprites instead.

An unused sprite of Carroboscis, an enemy in Booster Pass.

An unused variant of the Shyster's bounce animation.


These are found paired with the rest of the elder graphics and would have been used during Bowyer's reign on Rose Town.

An unused animation of Geno holding his head. A similar animation plays when Geno first comes to life and bonks against the staircase, though there he is seen from the back.

An unused animation of Peach crying profusely on the floor. This animation is used in the early version of the cutscene where Mario first arrives at Booster Tower, the final one instead using the animation of Peach crying while standing up. Moreover, the first frame of this animation is actually used during Peach and Booster's wedding after Peach gets knocked down by Mario and Bowser's impromptu entrance.

An alternate, equally unused version of the aforementioned Peach crying animation. This one is rather interesting, as at the end Peach is seen poking her eye out as if to see if whoever she was beside saw that she was crying. It's unknown where this "fake cry" animation would have been used.

An unused variation of Czar Dragon's spell casting animation. Was going to be used for a charge up animation, akin to Valor Up or Vigor up!

An attack which would have been used by the enemy Leuko, as well as its palette-swap Muckle. Due to them only using magic, this physical attack animation goes completely unseen.

The Chester enemy, from the end of one of Bowser's battle doors, has an attack animation which goes unused as this enemy does not physically attack, it only uses spells and summons a Bahamutt. The attack animation reveals that an Ameboid is inside the chest. This also means that this enemy's impressive Attack stat (220, the highest out of all enemies in the game) goes completely unused.

An unused animation of Exor's right eye looking to the left.

An unused animation of Exor's right eye looking to the right.

An unused animation of Exor's left eye looking to the left.

An unused animation of Exor's left eye looking to the right.


A small version of Smithy's head. It is actually used in the transformation cutscene, in which this head morphs into the full-sized head, but Smithy is completely obscured by the beam of light, so it is never seen.

An attack animation for Smithy's normal head, which never attacks. It does play repeatedly during Smithy's death animation if the player somehow defeats him before he changes his head.

A spell casting animation for Smithy's Tank head form. While we can't be sure, it's likely it was for spell casting, as it plays when it uses a spell, if given one.

Unlike most graphics seen in this game, this is one is certainly the most bizarre. Having seemingly no place anywhere to be shown in the game, this graphic, featuring Mario's primary colors, is curiously placed just before Smithy's graphics, whose graphics are just before Mario's!
(Source: Yakibomb, The IT, LightsJusticeZ)
Virtual Console Changes#
- Certain spell animations, such as Static E! and Flame Wall, were toned down due to them originally featuring bright flashing colors that could potentially cause epileptic seizures.
- For unclear reasons, the rocky floor and cliffs in Moleville, Booster Pass, and the beginning portion of Land's End was darkened significantly for the Virtual Console versions.
US |
Europe (Virtual Console) |
|---|---|
CROCO: Oh!You're a persistent bugger!But I'm a 100 miles ahead of ya! |
CROCO: Oh!You're a persistent pest!But I'm a 100 miles ahead of ya! |
- The European English VC release alters one line spoken by Croco early on in the game, changing the word "bugger" to "pest", as "bugger" is a vulgarity in British English. The Nintendo Switch remake uses the European English version of the line in all regions.
(Source: BlazingMan11)
References#
- In-game copyrights↩︎
- Nintendo Power Issue 084 May 1996, pg. 97. "Square Soft, the publisher of the Final Fantasy series of RPGs, developed this hybrid adventure for Nintendo with the help of Shigeru Miyamoto."↩︎
- 5-16 - Super Mario RPG↩︎
- RF Generation: Super Mario RPG (Hyundai Super Comboy)↩︎
- Linha Nintendo ganha novos games "Nintendo line gets new games" - O Estado de S. Paulo, July 29, 1996↩︎
- Help: Kirby's Dreamland II for GameBoy; Kirby's Blockball Released. "Kirby's Blockball for Gameboy has been released along with Mario RPG this week at Best Buy."↩︎