 This article has a talk page!
 Prerelease Info
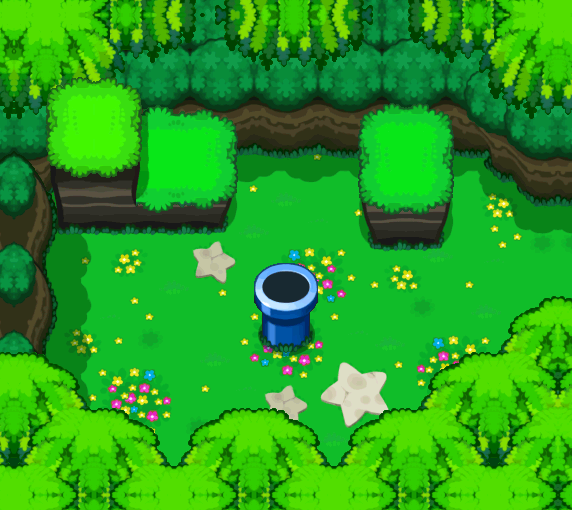 Unused Field MapsAll unused field maps found in the game, including minimaps.
 Unused Battle MapsAll unused battle maps found in the game, although some are leftover from PiT.
Unused Items#
 There's an unused item in the game named "DUMMY". Its design resembles that of the Life Shroom from the Paper Mario series. It restores 60 HP for Bowser when used. If used while Mario & Luigi are fighting an enemy that Bowser inhaled with the Vacuum Block, they will throw it in the air and it will explode, restoring Bowser's HP with its effervescent vapors.
Code (US version):
22056419 00000063
Unused Sounds#
A number of leftover sounds from Yoshi's Story and Mario & Luigi Partners in Time are still in the game.
459-STRM_EON_YS01_PON.STRM
460-STRM_EON_YS02_PERON.STRM
463-STRM_EON_YS05_HO.STRM
462-STRM_EON_YS04_HA.STRM
464-STRM_EON_YS06_AWAWAWA.STRM
465-STRM_EON_YS07_FUNII.STRM
466-STRM_EON_YS08_HAUUUN.STRM
467-STRM_EON_BTL_START.STRM
469-STRM_EON_NINTENDO_ML.STRM
468-STRM_EON_GAME_OVER_ML.STRM
Unused Enemy Behaviors#

|
Please elaborate. |
Watch on YouTubeCertain enemies in the game are only meant to be fought with either Mario & Luigi or Bowser, and the other(s) will never encounter it in normal gameplay. However, if hacking is used to encounter the enemies with the other character(s), you can see that their behaviors change:
- Naplock - Its sleeping snot-bubble is avoided just by standing there, but you can be damaged by it if you jump while it's above you. Its block-drop attack is dodgeable with jump; you can break the bricks by jumping. This is very easy to do just by mashing the button.
- Dark Mechawful - Its punching attack is countered by hammering. Its countdown attack is replaced by one that spawns the stars that the head uses when attacking Mario & Luigi on its own, which slowly move toward you and only hurt you sometimes. Its counter is jump. This could be the game glitching rather than something unfinished, possibly the game trying to use the head's star attack with the body attached.
- Choomba - Makes "M" and "L" smoke signals instead of Bowser's fist and shell. It freezes next turn after charging up.
- Dark Trashure - All of the things it throws can be countered with a jump, just like with the regular Trashure, but they are very fast-moving, In fact, it seems that the more damage the object will do, the faster it moves. Not surprisingly, it still throws mushrooms.
When the Mario Bros. are put in a boss battle they usually can't have, the game simply crashes.
The smaller giant battle enemies can also be spawned in normal battle. This may mess up the top screen graphics. Most of them will crash the game, few of them function properly.
Putting small enemies in battle with Bowser will have them run away most of the time.
- Magifoofa - This small enemy can, for some reason, be inhaled. It is the only small enemy with this function. The vacuum block doesn't blink to indicate this.
- Pendril - Unlike the other small enemies, this one will actually try to attack Bowser. It may softlock the game after attacking.
When Bowser is in a battle against an enemy found in his body, he doesn't even attempt to inhale them; after hitting the vacuum block, the game will immediately cut to the enemy's turn. Other than that, they will act the same.
- Goombule - Bowser can't dodge its attack, as it is too short for him to punch.
- Elite Goombule - Same as Goombule. He can hit them with his regular attacks, whereas the Mario Bros. had to use the Green Shell as it was immune to jumping and hammering.
- Spike Blop - Same as Goombule. He can dodge its dropping attack with his shell.
- Calorite - Bowser cannot jump, therefore he can't dodge its rolling attack.
- Air Cannon - The Bullet Bills are too short for Bowser to punch, and he still can't jump.
- Bubble Blooper - Bowser can't hit these enemies with his regular attacks, as they are floating in the air.
- Air Cheep - Same as Bubble Blooper. Its inflating attack can't be countered despite being large enough for Bowser to punch.
- Tenderling - Bowser can counter punch these enemies. Even if he beats them, their attack will still hit as if they are still there.
- Piranaha Plorp - When it creates smog and spits out blobs to hit Bowser, they will always be green, the color that usually indicates they are aimed at Luigi. When they spit out purple blobs, they don't seem to affect Bowser.
- Napse - These enemies are floating, so Bowser can't hit them. Their shots only seem to hit him randomly.
- Stonk - Their surrounding attack doesn't surround Bowser, instead it goes by his sides (where the Mario Bros. would usually be). If the decoy puffs touch him, they just disappear. If the Stonk puff touches him, it takes damage.
- Pep - The speed Pep's attack once again goes to the sides of Bowser and doesn't hit him. The power Pep can be countered with a punch.
- Protobatter - No dodge prompts will show up when battling this enemy.
- Dried Blooper - Same as Protobatter.
Some enemies that can usually only be battled by Mario & Luigi after Bowser inhales them act strangely when Bowser fights them.
- Vacuum Helmet - From the Dark Fawful fight. It is floating, so Bowser's attacks will miss. When Bowser tries to attack it, it glitches and goes higher up on the bottom screen. If Bowser attacks it again, he will walk over to its new location.
- Ice Pack - From Sniffle Thwomp fights. It still acts as if it is on a Sniffle Thwomp. Even though the vacuum block blinks to indicated they can be inhaled, Bowser does not try to, just like the body enemies.
Unlike the Mario Bros., Bowser can have boss battles he normally shouldn't without the game crashing. However, some of their attacks act strangely. Bowser is not able to fight himself, as the game will crash if the fight is set up.
- Dark Star - It is floating, so Bowser cannot hit it. The attack where it creates shadows of the Mario Bros. still uses their damage amount graphic instead of Bowser's. Any attack that indicates which bro it's aiming for will use the color green as if it's aiming at Luigi.
- Chakron - None of Bowser's attacks do any damage. After the battle stops, the game cuts to the file select screen.
- Junker - It will simply defeat itself. The Junker Cans will defeat themselves after they touch Bowser.
- Alpha Kretin - Does nothing at all.
- Bowser Memories - Soft locks the game.
- Dark Star Core - The game will crash unless its individual parts are loaded separately. The graphics for them don't appear, and it does absolutely nothing.
Unused Graphics#
|
|
To do:
|
Early Bowser Sprite#

A single frame of what appears to be an early version of Bowser's battle stance exists, though scaled up and stored with the maps for some reason. It looks like a cross between his final appearance and his Partners in Time appearance, suggesting it was from before the new sprites were finalized.
(Source: Original TCRF research)
Dummy Mushroom#
|
|
To do: |
A graphic for an unused dummy mushroom.
Early Bros. Sprite#

An image of Mario & Luigi that was also scaled up and stored with the maps. Its room ID is 0x0224. Seems to be a copy of their appearance from Partners in Time, but with their Inside Story colors. It's also a bit blurry, unlike the Bowser sprite above.
Water Fountain#

Seems to be an early version of the Princess Peach fountain in Toad Town. Interestingly enough, it depicts her as a mermaid.
Unused Bird#

Sprites for an unused bird found in the data. Since the sprites are next to Broque Monsieur in the code, it is possible that these birds were intended to be collectible in an early version of the game, as Blitties are in the finished game.
Luigi Carrying Mario Shaped Like a Key#
 |
        |
Unused sprites of Luigi carrying Mario shaped like a key, it is unknown what this form of Mario does.
(Source: https://www.spriters-resource.com/ds_dsi/marioandluigi3/sheet/53763/ Spriters Resource)
Blockhopper#
Apparently, the Blockhoppers from New Super Mario Bros DS were meant to return in this game. It is unclear why they were cut.
Unused Battle Transitions#
Each battle in the game begins with one of four transition animations. However, hacking can be used to play several more animations that are never used in the game:
- ID 1 - The screen morphs into a sphere and drops to the bottom screen, causing a splash effect. This transition appears to be a redone version of the battle transition from Partners in Time, however it is unfinished and causes graphical glitches if it is used.
- ID 4 - The screen rolls into a cylinder and unrolls on the bottom screen. If this transition is called from the bottom screen, the roll appears to suddenly teleport to the top screen halfway through the animation. Not all sprites visible on screen are properly represented on the rolling texture, and the animation frame for those sprites that are represented will not match up once the animation has completed.
- ID 5 - The screen folds into a rectangular prism and unfolds on the bottom screen. If this transition is called from the bottom screen, the prism moves down off screen, and moves up back on screen, unlike transition ID 4. Like ID 4 however, there are the same discrepancies between the sprites on screen and the sprites on the folding texture.
Duplicate Songs#
Partners in Time References#
In the music data (sound_data.sdat) there are many unused duplicates of songs used in the game.
Their names reference all the music tracks from Mario & Luigi: Partners in Time but, excluding some cases, the name prefix was changed from "MUS_SEQ_" to only "MUS_" and sometimes "_OLD" was added as a suffix.
Below the copies are grouped and described in sub-paragraphs named after the internal name of the new song contained in them.
MUS_BOSS#
A single duplicate of "Tough Guy Alert!":
- MUS_BOSS_OLD
MUS_BTLEND#
A single duplicate of "And the Winner Is...":
- MUS_BTLEND_OLD
MUS_LASTBOSS_APPR#
A single duplicate of "Battle Time!":
- MUS_BOS_TOUJOU
MUS_LAST_BOSS#
Two duplicates of "The Grand Finale":
- MUS_LASTBOSS1
- MUS_LASTBOSS2
MUS_ML_BATTLE#
Two duplicates of "Here We Go!":
- MUS_ZAKO
- MUS_SEQ_ZAKO
MUS_SHOCK#
Eight duplicates of "Big News!":
- MUS_KINOPL
- MUS_FACTORY
- MUS_YOSVILLAGE
- MUS_YOSVILLAGE2
- MUS_OYAMA
- MUS_GESSY
- MUS_SEQ_YOSVILLAGE
- MUS_SEQ_YOSVILLAGE2
No MUS_SEQ_YOSVILLAGE2 exists in the sound data from Partners in Time.
MUS_TITLE#
Three duplicates of "On to the Next Adventure!":
- MUS_TITLE_OLD
- MUS_TITLE2
- MUS_SEQ_TITLE
MUS_TUTORIAL#
Twenty-nine duplicates of "Doing It Right":
- MUS_LKINOKO
- MUS_YOSTER
- MUS_KINOCASTLE
- MUS_CHRISTAKE
- MUS_JIKEN
- MUS_KUPACASTLE
- MUS_BABYKUPA
- MUS_KUPPA
- MUS_FUANKAGE
- MUS_DOSUN_OUT
- MUS_DOSUN_IN
- MUS_STARHILL
- MUS_DESERT
- MUS_DOME
- MUS_DOME_UNDER
- MUS_KINOTOWN
- MUS_STARCASTLE
- MUS_INVASION_C
- MUS_GEDONKO
- MUS_GEDONKO_I
- MUS_CARNIVAL
- MUS_LOADSAVE
- MUS_ENDING
- MUS_TUTORIAL_O
- MUS_KUPPABTL
- MUS_ENDROLL
- MUS_TIMEWARP
- MUS_TIMEWARP2
- MUS_ENDORGOR
Bowser's Inside Story#
MUS_DARK_AREA_A1#
A single duplicate exists for "The Path of Secrets", though it's unknown if this one actually gets used anywhere in the game:
- MUS_DARK_AREA_A2
MUS_DARK_AREA_B1#
A single duplicate exists for "The Path of Secrets (Inside Bowser)", though it's unknown if this one actually gets used anywhere in the game:
- MUS_DARK_AREA_B2
Unused Text#
dummyThere are multiple instances of this string in \EDataSave\mfset_EMesSys.dat.
(Source: Original TCRF research)
UNUSEDThere are multiple instances of this string in \SAI\SMes_yo.dat.

|
'...But does it make sense?' |
|
Japanese |
Translation |
|---|---|
|
|
Present in \BAI\BAI_item_ji.dat.
|
Japanese |
Translation |
|---|---|
|
|
Present in \BAI\BAI_scn_cf.dat.
|
Japanese |
Translation |
|---|---|
|
|
Present in \BAI\BAI_scn_ji.dat.
Japanese |
Translation |
|---|---|
|
|
Present in \BAI\BAI_mon_yo.dat. "Burineko" might be an early name for Blitties, which are called "Blockats" (ブロキャット) in the final Japanese game.
|
|
To do: |
Bowser's been blown from Peach's Castle to Dimble Wood. What will he do?Unused save text that appears on the file select screen while saving while Bowser is in Dimble Wood before talking with Fawful. This cannot be seen in-game, as there are no accessible save blocks without the use of cheats. This text can be found in EDataSave/mfset_EMesOutline.dat.
Unused Badge Descriptions#
The Mushroom Badge and Good Badge (given by Princess Lipid), as well as the Excellent!! Badge (given by having Mario and Luigi reach Rainbow Rank) all have description text. Badge descriptions can only be seen in shops, and these badges do not appear in the shop inventory after obtaining them. Despite this, they do have proper text describing them. The Excellent!! Badge description is especially interesting from accurately describing the badge; it specifically says that "successive" Excellents are needed and that the meter's effect is "unrivaled". The Excellent!! Badge is the badge that will reset a side of the meter if an Excellent rating is not earned, while providing the strongest effect out of all of Luigi's badges. This text can be found in BData\mfset_BadgeE.dat.
In the Nintendo 3DS remake, Mario & Luigi: Bowser's Inside Story + Bowser Jr.'s Journey, the descriptions of badges can be seen by equipping them, entering the Status menu, then selecting the badge listed alongside a character's gear. This allows the Mushroom Badge description to finally be seen, but the Good Badge and Excellent!! Badge descriptions cannot be seen because they were reworked with completely different descriptions into the Beginner Badge and Expert Badge respectively.
Mushroom Badge |
Good Badge |
Excellent |
Badge |
|---|---|---|---|
|
|
|
(Source: Original TCRF research)
Unused Scratch Card Text#
A feature so obscure that it went undocumented for 16 years is that it is possible to downgrade scratch cards from shops. This is done by reaching the target for a higher card by equipping gear that boosts STACHE, entering the shop to get the higher card, leaving and unequipping the gear, then reentering the shop. This is obscure because only two gear items boost STACHE: Grown-up Wear, which is a 10% drop from Bowser Memory M and Bowser Memory L and can be permanently missed, and A-OK Wear, a 0.5% drop from Dark Mechawful heads or sold in the Star Shop. Downgrading a scratch card gives unique sets of dialogue in almost every type of shop. While this text is obscure, it is theoretically possible to see all of it in-game, though it may require level/stat manipulation. The problem is that Bowser has no gear that boosts HORN, meaning he cannot get downgrading dialogue from Broque Monsieur or Broggy. Despite this, the localization team still wrote a few in-character lines before realizing and marking the rest as unused or leaving placeholder lines. Bowser's text can be seen in-game by lowering his HORN stat with a save editor, like Cheatoglobin. The HORN requirements for Bowser's scratch cards are 30 for level 1, 40 for level 2, and 55 for level 3. This text can be found in SAI\Smes_yo_.dat.
The text is formatted where there is an opening line which is always said first, then the specific line about getting a higher/lower scratch card is said.
Shop |
Opening text |
Level 3 to 2 |
Level 2 to 1 |
Level 1 to 0 |
|---|---|---|---|---|
Broque Monsieur |
|
|
|
|
Broggy |
|
|
|
|
(Source: Original TCRF research)
Debug Room#

Like its predecessor, this game has a debug room based off the generic inside-Bowser battle background. Select a number, and Mario & Luigi will be sent to some places and cutscenes in the game. The Japanese version has description text, unlike the US version, which replaces them all with "no need to translate". Interestingly, in the Korean version the original text was added back, and uses the English alphabet and English words on occasion.
Action Replay code (hold B while selecting a place inside Bowser's body):
|
Japan |
US |
|---|---|
|
|
Lower-Left Block#
- 0 - Shake animation.
- 1 - "Mario lands in Bowser's Insides" cutscene in the first room of the Trash Pit. Mario only, you cannot switch to Bowser when activated. Luigi is trapped a few rooms below.
- 2 - Brings you right to Luigi in the Trash Pit.
- 3 - The elevator room in the Trash Pit.
- 4 - The room where you get your first Green Shell Attack Piece.
- 5 - The room with the last Green Shell Attack Piece.
- 6 - The first hammer battle room.
- 7-10 - Bowser Room Select Screen. However, you're trapped in one room and cannot move around to other rooms.
- 11 - A room in the Pump Works.
- 12-16, 21, 29-34, 37-59, 61-69, and 71 - Bowser Room Selection Screen corresponding to a certain point in the game, with smaller numbers corresponding to earlier points in the game (with certain areas inaccessible) and larger numbers corresponding to later points in the game (with most or all areas accessible).
- 17 and 19-20 - Bottom screen fades to black, music restarts and game freezes.
- 18 - Shows Fawful Theater on the bottom screen.
- 22 - The Flab Zone room right after the Alpha Kretin boss room.
- 23 - Cutscene with Starlow wondering why Fawful needs Peach and Peach explaining that Fawful may be looking for the Dark Star, then the bottom screen returns to the Bowser Room Selection Screen (but dark as if Bowser is being controlled), the top screen fades to black, and the game freezes.
- 24 - Cutscene with Peach being taken out of Bowser's body and Bowser being blasted out of the castle. After Bowser falls into the Underground Tunnel, the top screen cuts to the first room in the Underground, but with the camera off-center and Bowser in the top-left corner. Bowser is stuck in his walking-northward animation, but can be moved around. However, you are stuck in this room. If the X button is pressed, Bowser becomes stuck in his northward Slide Punch animation and can no longer be moved. If the Y button is pressed, the same thing happens with Bowser's northward fire-breathing animation.
- 25 - Similar to 24, but without the part with Mario, Luigi, Starlow, and Peach inside Bowser's body, instead starting with the part where Fawful takes Peach and carries her away. Also, part of the background during the cutscene is missing up until Bowser accidentally lights the Bob-omb's fuse.
- 26 - Pipe Yard.
- 27 - Shows Mario & Luigi warping back into Bowser's body from the Toad Town pipe. Then, the game suddenly acts as if you're chasing Durmite, with Starlow reminding you to go after it. After that, nothing else, except that areas of Bowser's body unlocked after the Energy Hold are blocked off.
- 28 - Cutscene with chasing Durmite into the Energy Hold and being stopped by the Boo Block barrier.
- 35 - Joint Tower.
- 36 - Bottom screen fades to black and freezes.
- 60 - Chest Station minigame. Freezes almost immediately.
- 70 - Takes you to Bowser Castle, right in front of the cryo-chamber puzzle room. Once you're inside the room, you're stuck inside.
- 72-99 - Shake effect.
Upper-Left Block#
- 0 - Intro cutscene. Game might freeze when loading this.
- 1 - Peach's Castle, where you're greeted by a Toad. Attempting to enter the next room will cause the screens to fade to black and freeze.
- 2 - Shows the background used for the first Giant Bowser Battle, on which you can freely move around. However, Mario & Luigi are not seen.
- 3 - The cutscene which happens after Bowser eats the Vacuum Shroom.
- 4-12, 14-16, 18-24, 29-30, 43-44, 46, 48, 50, and 54-55 - Bowser Room Selection Screen.
- 13 - Nerve Cluster, in the room where Toadbert was trapped.
- 17 - Same as 13.
- 25 - Toad Town Tunnels, in the room where Bowser was zapped, off the map in the top-left corner.
- 26 - Toad Town Tunnels, in the room right before the Dark Star's chamber.
- 27 - Entering Toad Town from the yellow pipe.
- 28 - Dr. Toadley's Clinic, off the map in the top-left corner.
- 31 - Dr. Toadley's Clinic, specifically, Dr. Toadley's room. Attempting to exit the building freezes the game.
- 32 - The reception room in Dr. Toadley's Clinic, where you must rescue Birdley.
- 33 - Plack Beach, at the beginning of the path to Chakron.
- 34 - The room in Dimble Wood where Wiggler blocks your path until you get 6 Attack Pieces.
- 35 - Same as 34.
- 36 - The room where Luigi becomes trapped in the Sockop, but you are off of the map (and offscreen) and cannot move.
- 37 - Dimble Wood as Sockop Luigi, in the room Mario was taken to. However, you cannot talk to the Sockops to save Mario.
- 38 - Chakron (offscreen) asks if you wish to be launched to Toad Town. Once you return to Toad Town, attempting to exit the area freezes the game.
- 39 - Dr. Toadley's Clinic, before you use the Miracle Cure on the blockade.
- 40 - The path to Peach's Castle.
- 41 - Top-leftmost area in Peach's Castle Garden, with the water spout.
- 42 - Area right after 41, where you previously fought Junker.
- 45 - Area shown in the cutscene before the final Dark Bowser battle, with Mario, Luigi, and Starlow. A copy of Luigi's sprite can be seen in the top-left corner. You cannot actually move Mario & Luigi, but if the A button is pressed, the jump sound effect can be heard.
- 47 - The animation of Bowser Castle shaking, seen before the first Giant Bowser Battle.
- 49 - Plack Beach, the area with Kuzzle's house.
- 51 - Plack Beach, Kuzzle's house.
- 52 - Peach's Castle Garden, at the entrance.
- 53 - The cutscene that occurs after the Blorbs are cured, but Mario & Luigi can move freely around the area.
- 55-56 - Screen fades to black and freezes.
- 57-98 - Shake effect.
- 99 - The area in Dimble Wood with the pipe back into Bowser's body...but you can walk over everything, the pipe's color is blue instead of green, and the pad you step on to enter the pipe is yellow. A copy of the pad is north of the pipe. It also plays the incorrect music. Most likely used as a test area.
Upper-Right Block#
- 0 - Pump Works gate room.
- 1 - Flame Pipe room.
- 2 - Screen fades to black. Everything still functions, but you can't see anything on the bottom screen until you switch to Bowser.
- 3 - The Nerve Cluster room where you fight Durmite for the first time.
- 4 - The Nerve Cluster room where Toadbert was originally trapped.
- 5 - The second Flab Zone room.
- 6 - The first Nutsoglobin room in the Flab Zone.
- 7 - The third room in Flab Zone after the "Treasure of E'erlasting Wonder" room.
- 8 - The room in the Flab Zone where you learn the Spin Bros. ability.
- 9 - Same as 8, but in a different spot.
- 10 - The Alpha Kretin boss room.
- 11 - Same as 10, but in a different spot.
- 12 - The first Flab Zone room.
- 13 - The third Flab Zone Room.
- 14 - The second room in the Energy Hold.
- 15 - The fourth room in the Energy Hold.
- 16 - The Star Block room in the Energy Hold.
- 17 - Same as 16.
- 18 - The first room in the bottom-left section connected to the Star Block room, in the Energy Hold.
- 19 - The room right after 18.
- 20 - The first room in the top-right area connected to the Star Block room, in the Energy Hold.
- 21 - The room in the Energy Hold where you learn the Drill Bros. ability.
- 22 - The room right before the boss room in the Energy Hold.
- 23 - The boss room in the Energy Hold, near the entrance.
- 24 - The same room, near the exit to Bowser's body.
- 25 - The room right after 20.
- 26 - The cutscene that happens after you defeat Wisdurm.
- 27-28 - Lumbar Nook.
- 29-35 - Toad Square with the camera weirdly off-center.
- 36 - Bowser Room Selection Screen.
- 37 - Memory Banks.
- 38 - Mario & Luigi enter the Airway and stop. The game then becomes unresponsive. Perhaps it is trying to load the Airway cutscene, but cannot because the room does not freeze over.
- 40 - Third room in the Airway.
- 41 - Fourth room in the Airway.
- 42 - Fifth room in the Airway.
- 43 - Sixth room in the Airway. Are you noticing a pattern yet?
- 44 - Eighth room in the Airway. Poor seventh room gets no love.
- 45 - Eleventh room in the Airway.
- 46 - Gut Check. How this got in the middle, I'll never know.
- 47 - Thirteenth room in the Airway, near the Liftglobin.
- 48 - Same room, up above.
- 49 - Fourteenth room in the Airway, near where the Totemglobin was.
- 50 - Fifteenth room in the Airway.
- 51 - Sixteenth room in the Airway, near the exit to the next room. The devs must have spent a lot of time working on the Airway...
- 52 - Twentieth and second-to-last room in the Airway.
- 53 - Twenty-first and final room of the Airway, beginning with the same "negative" effect seen before the Dark Star battle.
- 54 - Hub that connects the fourth, eleventh, and thirteenth rooms in the Airway.
- 55-56 - Bowser Room Selection Screen.
- 57 - Same as 29-35.
- 58 - Room in the Energy Hold where that really long cutscene with the Bros. trying to catch Durmite took place.
- 59-60 - Same as 29-35 and 57.
- 61 - Room in the Pump Works where the Mini Mario ability is learned.
- 62-63 - Challenge Node.
- 64 - Second room in the bottom-right area connected to the Star Block room in the Energy Hold.
- 65-66 - Same as 62-63.
- 67-99 - Shake effect.
Lower Right Block#
- 0 - Bowser Room Selection Screen.
- 1 - First Arm Center minigame (most likely freezes partway through).
- 2 - Gut Check Giga-Carrot Minigame (acting as if you failed the first time, with a big pile of carrots instead of the Giga-Carrot). Also allows rematch with Wiggler, but the game freezes after the battle.
- 3 - Rump Command Minigame, freezes as soon as the minigame starts.
- 4 - Nose Deck minigame, has second selection of numbers from 0-4 corresponding with each time the minigame was played during the story. Freezes midway through the minigame.
- 5 - Leg Outpost minigame, never ends.
- 6 - Chest Station minigame, game hangs as soon as it starts.
- 7 - Second selection of numbers from 0-19 chooses where a "reaction" occurs, including Toad Square and the Challenge Node. 0 simply sends you back to the Bowser Room Selection Screen.
- 8-9 - Shake effect.
- 10 - Second selection from 0-10 corresponds to each part of the game, and therefore blocks access to some of the areas in Bowser's body. 0 is the start of the game with only the Trash Pit, Funny Bone, Toad Square, and Challenge Node, and 10 is the end of the game where all areas are accessible.
- 11 - Related to 10, prevents access to everything except Trash Pit, Arm Center, Funny Bone, Toad Square, and Challenge Node.
- 12 - Gut Check Giga-Carrot minigame (with Giga-Carrot and tutorial). Also allows rematch with Wiggler, but the game freezes after the battle.
- 13 - Rump Command minigame, freezes as soon as the minigame starts.
- 14 - Nose Deck minigame, freezes midway through the minigame.
- 15 - Leg Outpost minigame, never ends.
- 16 - Chest Station minigame, freezes as soon as it starts.
- 17-20 - Shake effect.
- 21 - Second selection of numbers 2 and 3 chooses either the second or third Arm Center minigames, most likely freezes partway through.
- 22 - Shake effect.
- 23 - Second selection of numbers from 0-3 chooses which time the Rump Command minigame is played in the story. The minigame freezes as soon as it starts.
- 24-29 - Shake effect.
- 30 - Same as 7.
- 31 - Same as 21.
- 32 - Shake effect.
- 33 - Same as 23.
- 34-40 - Shake effect.
- 41 - Same as 21.
- 42-98 - Shake effect.
- 99 - Save screen. Might have been used by developers during the debug process.
Extended Debug Room#
If further hacking is used to move away from the blocks, the "Debug Room" is found to be much larger than expected, with the debug functions to the far left of the room. The upper platforms are not solid, but the lower platforms are. The floor of the room also seems to have a special texture not seen anywhere else.


Regional Differences#
|
|
To do: |
Bowser X Sprite Glitch#
|
|
To do: |
This glitch can happen om North American and European releases, although the exact reasoning of why it does occur is unknown. In fact, when the console is set to German or Italian on the European version, the chances are higher to experience this glitch than in other languages and the North American release. While fighting Bowser X, there is a chance that the entire screen will be filled with corrupted graphics. It happens when Bowser becomes a giant in the battle. After Bowser has attacked the player, and the player chooses an action in his turn, the screen will glitch out. It's still possible to beat Bowser X glitchless, but only when he didn't become giant in the battle. This sprite corruption glitch can happen, however, when playing the European and North American releases in other languages than English as well. To replicate this glitch in these releases, the player has to fight against Bowser X in French or Spanish, and switch his badges after Bowser X became giant. That can be replicated at any point in the fight. This glitch doesn't occur when playing this game in European and North American English, nor in the Japanese version of the game.1 Corrupted graphics are everywhere and can make using a special attack much more difficult. The glitch ends when the battle is won or lost.2
Title Select Screen#
Japan |
US/Europe |
Korea |
|---|---|---|
 |
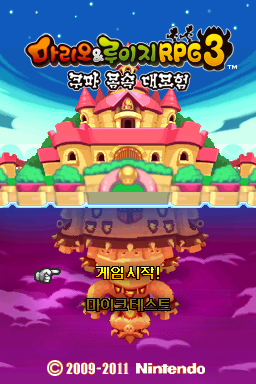 |
The hand cursor is closer to the text in the Japanese version. The text font is slightly different in the Korean version. The Korean version's copyright date was altered to add 2011, as that's when this game came out in Korea.
File Select Screen#
Japan |
US/Europe |
Korea |
|---|---|---|
 |
 |
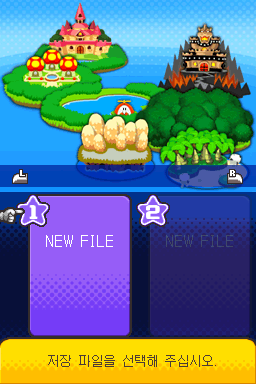 |
In the US, European and Korean version, the L and R buttons look closer to their real life counterparts. When no save files are present, "NEW FILE" is shown in the US, European and Korean version (the latter having slightly bigger text), while "NO DATA" is shown in the Japanese version. The position of the text is also slightly different between versions.
Menu Tabs#
|
Japan |
US/Europe |
|---|---|

|

|
The menus were tabbed in the Japanese version, while in the US and European version, the tabs are moved upward, and those not being used are darkened.
Anti-Piracy#

|
This needs some investigation. |
This game utilizes the DS Protect anti-piracy library to ensure that it is not being run off a flashcart or emulator. If any of the DS Protect checks fail, the game will intentionally cripple itself to make progression a lot more annoying:
- All button inputs can be disabled when reaching the save select screen, preventing the player from actually loading a game.
- The game can freeze randomly.
- The game can intentionally crash during screen transitions.
- Forced softlocks
- Battles freezing (JP)
The Japanese version of the game uses DSProtect 1.06, while international versions use DSProtect 1.20, and the Korean version uses DSProtect 2.03.
(Source: TWiLightMenu AP-patched games list)
References#
- Bringle (April 12, 2026) Bowser is more evil in Europe YouTube. Retrieved May 16, 2026.↩︎
- BroLuigi (February 20, 2010) M&L bowsers inside story glitch. YouTube. Retrieved November 23, 2023.↩︎