 This article has a talk page!
Shining Force III: Bulzome Rising is the fairly rushed conclusion to the series.
Sub-Page#

Debug#
Use the Action Replay code 36023A1E 0001 to enable it.
Menu#
Name |
Explanation |
|---|---|
Scn |
Area Warp - Select the map where you wish to go, hit A then close the menu. The second option chooses what exit you spawn from, or in battle, what cutscenes play. In some maps setting it to -1 allows you to spawn out of bounds. |
Flg |
Sets event flags. |
Prm |
Roster editor. Add or remove characters, what team they're in, skill lvs, and their levels or classes. |
Itm |
Gives you any item in the game, provided you still have space. There is also an option for Max Gold. New to Scenario 3 is an option called "All Item Honjin". This option places 1 of every item in HQ storage. |
Sav |
Saves file. |
Lod |
Loads a save file. |
Snd |
Sound Test. |
12P |
What this does is unknown, currently, selecting it just refreshes the menu. |
Cfg |
The normal Configuration menu. |
(Source: 1 Knight0fDragon)
Controls#
Pressing X+Y+Z together will pause the game. In this mode, pressing any button other than L, R, or Start will advance the game 1 frame, pressing L will enable some printout information and R will disable. To exit, press the Start button. Holding Z will disable collision, allowing you to cross out of bounds. In battle, if you hold Z while an enemy or character ends their turn, the battle instantly ends, or instead you can kill specific characters/enemies by holding Start while ending their turn. Finally, pressing R during a cutscene will skip dialogue, and L will disable it. Pressing it multiple times can advance through scenes slightly faster, though this will crash the game on certain scenes, such as when Fake Benetram leaves the Saraband bridge battle.
Records/Name Changing#
An early version of the Record room from the Premium Disc is present here. To enable it, start new game while debug is active. It gives a bit of unique dialogue but also lets you set the "synchronicity point"(A colorful word for game flags, for example, if you saved Garosh), as well as some other general flags, and allows you to change the name of most Playable Characters.
Controlling Enemies#
If Debug is enabled and you press Start on controller 2 during battle, you will now be able to control enemies in addition to your own characters(If Printout is enabled the message "Sousa On" will appear if done successfully). Alternatively, if the A & B registers at address 0601FC50, are set to 08 and 00 respectively, or setting the bit 0128-6 in Flg to 1 will also enable it.
Fight Menu#

|
To do: |
Setting 0128-0 in Flg will enable a fight menu, with extra options, they are as follows:
- CNO - Unknown, cannot be changed.
- ACT - options are: Fight, EQITM(Equiptment Item), ItemC, and Magic
- NO - Goes from 0-101, it's use depends on what ACT you selected. I.e if you select magic, it selects what spell you'll use.
- LV - Level of attack, likely only for Spells.
- HIT - Controls what the target character(whoever initiates the battle) does. Options are: NRML(Normal Attack), S--H, N--H, SUKA(Guard), and CRTC(Critical Hit.)
- KAI - Controls what Critical Hit attack is played if CRTC is set. Unknown if it does anything else.
- HAN - Unknown
- D - D1 controls the name of the character being hit, while D2 and D3 are Attacks. By default, D2 is always set to -1. Can crash your game, especially if you attempt to set D1 to an invalid character(i.e. One of the PC## characters).
Note: Printout must be enabled in order to see the display, otherwise you'll just be staring at a black screen.
Debug Flags#
Using the Flg option it is possible to enable extra debug functions, format is "Address-Bit" and they are as follows:
0108-0 - Forces the Camera to pan to a specific angle.
0108-2 - Window layer disabled.
0108-4 - Forces the Camera to Zoom in.
0108-5 - Disables Camera Rotation.
0108-7 - Sprites disabled.
0110-0 - Adds information relating to the camera to the right side of the printout. There is also a 3D polygon of an arrow added, regardless of if printout is enabled or not.
0110-1 - Slow Mode(Slows the game's FPS to a crawl.)
0110-2 - Adds a NO menu to printout. It can be moved up and down with the D-Pad, but use is unknown.
0110-3 - Disables the backgound layer.
0118-1 - Asks you to save when leaving an area.
0130-0 - Hitbox display (Overlays a wireframe around collision).
0130-3 - Camera Tilting or alternatively, Drunk Mode.
0130-4 - Slows Camera movement.
0130-6 - Adds "RGB" menu to printout, values can be manipulated using second controller(ABC to increase, XYZ to decrease, Start to reset). What this affects is unknown.
0158-0 - Changes the color of all movement squares during battle to red. May also encounter CD READ ERROR while using this.
Oddities#
- Hero Test
It appears as if an extra three levels were tacked on to the Hero's Test at the last minute. The developers didn't bother to rearrange their otherwise neat level order or flags, and it seems all of the enemies are reused from earlier parts of the game:
BTL330 Ruins 1 (Flag 03E8-6 Lizardman, Killer Fish, Harpy)
BTL331 Ruins 2 (Flag 03E8-7 Ghoul, Green Dragon, Bulzome Golem)
BTL332 Ruins 4 (Flag 03F0-0 Minotaur, Slash Bat, Cerberus)
BTL333 Ruins 6 (Flag 03F0-1 Bugbear, Chimera, Earth Dragon)
BTL334 Ruins 8 (Flag 03F0-2 Skull Warrior, Lesser Demon, Durahan)
BTL335 Ruins 9 (Flag 03F0-3 Salamander, Black Dragon, Colossus)
BTL336 Ruins 10 (Flag 03F0-4 Arch Demon, Colossus, Taros)
BTL337 Ruins 3 (Flag 03F0-5 Red Dragon, Sting Worm, Hydra)
BTL338 Ruins 5 (Flag 03F0-6 Blue Dragon, Hell Hound, Griffon)
BTL339 Ruins 7 (Flag 03F0-7 Cerberus, Skull Fish, Blue Priest)
Unused Areas#
Far more boring compared to the previous two games, it seems as if these maps had all most of their content cleaned out. Use Scn in Debug to access these areas:
Name |
Image |
Notes |
|---|---|---|
TESMAP (Measurement Test) |
 |
Back again, just as unchanged as ever. |
(Store Test) |
N/A |
More or less same as the last game. |
Aspia Roof |
N/A |
Crashes the game. Its inclusion is likely an oversight. |
Special Battle |
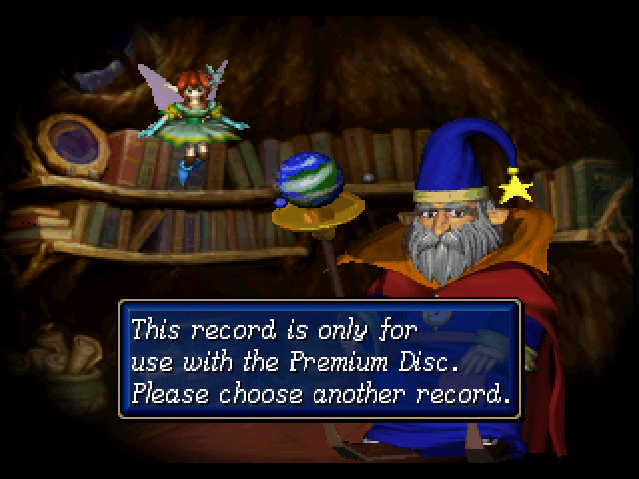 |
According to the developers, there was only supposed to be a single Battle on the Premium Disc originally. As is, you are taken to dream, where the old man tells you that this map was intended for the Premium Disc and cannot be loaded. |
Polygon Character Test |
 |
Broken, though this was likely intended for the Premium Disc. |
Ryuta Test |
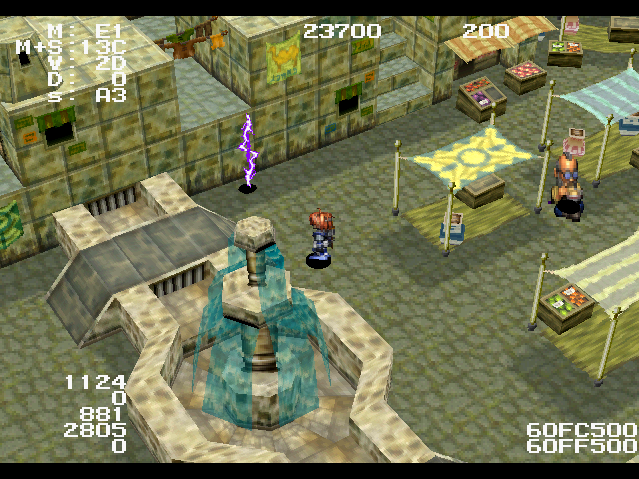 |
Some kind of dev test, but it appears to be missing files. After getting through the GID errors, there's two characters visible when starting up the map, a bouncing Unoma and a Lightning bolt. Talking to either crashes the game, although the thunderbolt brings up a YES/NO prompt before doing so. |
BLACK3.MPD |
 |
They renamed BLACK.MPD, for whatever reason. |
MUHASHI.MPD |
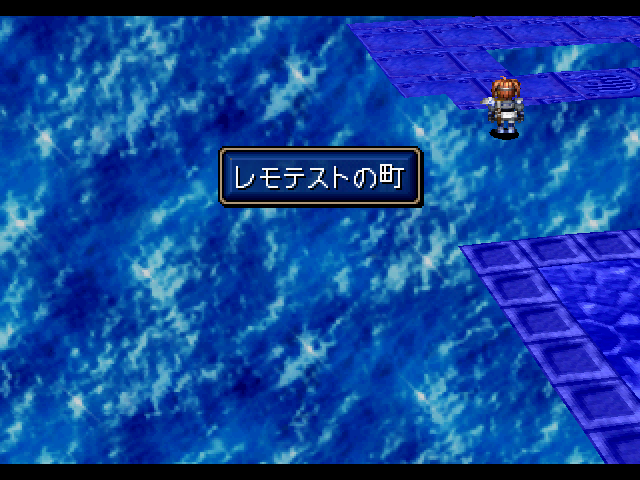 |
Has a habit of crashing upon entering the level. One of the bigger file size maps in the game, likely a Scenario 2 leftover. |
SNIOKI.MPD |
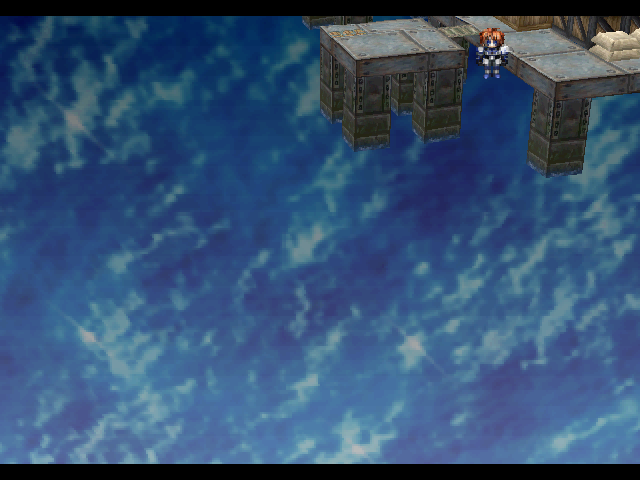 |
What appears to be the opening map for Scenario 2. The camera angle is completely broken, as are the sky textures. |
YSKI00.MPD |
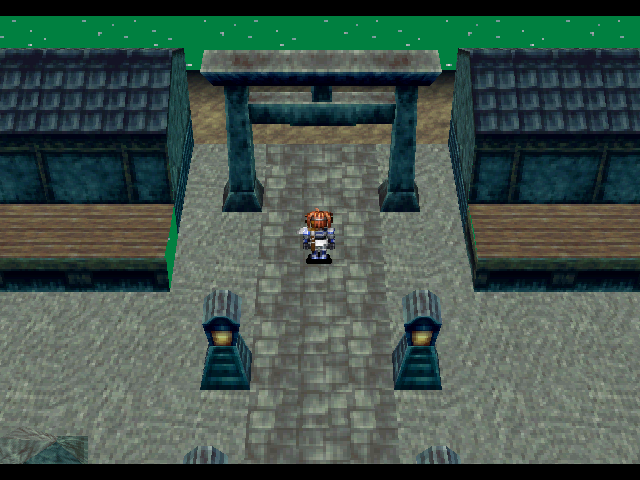 |
An old Japanese style mansion, looks as if it could've been a battle map. |

Unused Characters#
Rogan#


Perhaps the only truly unused character in the entire Trilogy, Rogan is almost complete, only missing 2nd promotion graphics. As-is his sprites do not load, as the files use the wrong ID. His entry and stats suggests he was originally supposed to join at the very start (assuming you obtained the Ship Key in Scenario 1). His reason for being removed, according to the developers on the game's website, had to do with a change in the story. In the final game Rogan is trapped in Executor shortly before Julian Gracia and Donhort leave for Destonia, but another possible change may have been in Scenario 1 as there exists a sprite of what appears to be Edmund (one of the starting characters of Scenario 3) in a death throe.
Penkichi#

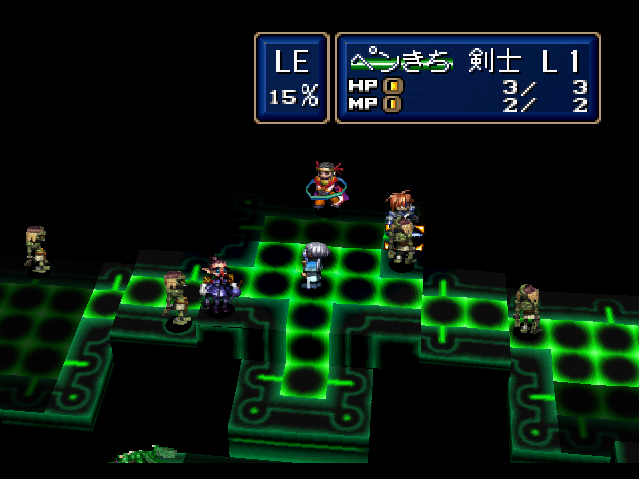

The 60th character slot contains a character named "ペンきち"(Penkichi, Jane in the Fan Translation). According to the official developer website, this was merely a joke character. It was supposedly a flat 2D image of Pen made to fill the lone placeholder slot. Internally, Jane doesn't become a playable character until the Premium Disc and the version used in the final battle draws from the Enemy/NPC entries. Unlike unused characters from the previous game, Penkichi has graphics associated with it!. In-game it uses Basanda's sprite and the icon of Scenario 1's Elbesem Statue. However, like all the other unfinished characters (except Rogan), Penkichi lacks a proper model and will crash the game if it ever goes into battle.
(Source: 2 SF3 Official Website)
Unused Cutscene#
|
|
To do: |
Original on the left, Fan Translation on right:
[Edmund]:
なぜ私を倒さなかったのだ・・・。

私には返る国さえもないというのに
・・・死に場所さえ与えられぬのか?

[Donhort]:
くわしい事情はわからぬが・・・
なぜ死に急ぐのだ{EDMUND}?

[Edmund]:
私は帝国のガーゼル将軍の口車に乗リ
共和国を裏切ってしまった時から・・・
死に場所を探していたのだ{DONHORT}。

[Bresby]:
やリ直せばよかろう{EDMUND}将軍
これだけ崩壊した共和国には・・・
お主のような将軍が必要なはずじゃ。

[Edmund]:
私のような者が・・・必要・・・?

そうかそう言ってくれるのか・・・。

私はべアソイルに戻ろうそして・・・
国境を守リながら自分を見つめ直そう
そしてもしも自信がついたら・・・。
[Edmund]:
Why didn't you kill me...
I've no country to return
to... Can't you at least
grant me a place to die?
[Donhort]:
I don't know of your situation... but
why are you in such a hurry to die?
[Edmund]:
Ever since I was tricked by General Garzel
and betrayed the Republic... I've been
searching for a place to die, Donhort!.
[Bresby]:
You should try to start anew,
General Edmund. The weakened
Republic... needs generals like you.
[Edmund]:
I'm... needed...?
Is that so...
I'll return to Baersol and guard the
border while I do some... thinking.
I may be able to regain my confidence...X5BTL92.BIN contains dialogue for sparing Edmund if he is a boss during a specific battle. While the cutscene itself is in the game and is fully functional, the ability to actually spare Edmund was not programmed into the battle. X5JINMEI.BIN, the dialogue for the encyclopedia even has dialogue to reflect this change:
共和の理念からかけ離れた現状に失望し
新秩序構築のため反乱を起こすが失敗
その失意の中で{JULIAN}軍と戦い敗れる
しかし命は救われたためべアソイルで
自分を見つめ直すことになった共和国武将
Former Republican general who forms
a rebellion. Defeated at Baersol by the
Julian army. His life spared, he's given
a second chance.Unused Enemies#
|
|
To do:
|
Buried in the game are a slew of unused enemy entries all of which still have model files present, though most had their contents dummied out. An unusual amount of these are from previous Shining Force games. They follow X8PC[###].BIN (### being the values below) Note:Number is for the Model IDs. To get the Sprite IDs, subtract 500 from the Model ID (For example: Sara Sldr's Sprite set is 201)
Japanese |
English |
Sprite |
Number |
Notes |
|---|---|---|---|---|
??? |
??? |
N/A |
700 |
|
ブラックナイト |
Black Knight |
 |
710 |
|
セイント |
Saint |
 |
712(Dummy) |
|
仲間になるPC |
(untranslated) |
None |
791(Dummy) |
It's the PC script from Scenario 1. |
ガーゴイル |
Gargoyle |
 |
850 |
|
魔物 |
Monster |
Not Found |
888(Dummy) |
It's a mystery as to what this unusually generic entry might be. It's the second to last on the list. |
パピードラゴン |
Dragon Pup |
898 |
||
? |
??? |
None |
905 |
At the very end of the battle list are these 6 entries, 5 of which contain Model data, and Enemy sprites end at 389, though the 405-408 were used for special effects. |
? |
??? |
None |
906 |
|
? |
??? |
None |
907 |
|
? |
??? |
None |
908 |
|
? |
??? |
None |
909 |
|
? |
??? |
None |
910 (Doesn't exist) |
|
- 3D Models

Unused Items#
|
|
To do:
|
No |
Image |
Name (Fan Translation) |
Description(Fan Translation) |
Stats |
Notes |
|---|---|---|---|---|---|
66 |
 |
シミタ一 |
ン一ド系統の武器 |
5 ATK |
Enemy only weapon, the Mask Monk enemy uses them. |
114 |
 |
シーブスナイフ |
ナイフ系統の武器 |
ATK 13 AGL 5 |
Translates to "Thief's Knife". |
115 |
 |
ジョーカーナイフ |
ナイフ系統の武器 |
ATK 13 |
|
138 |
 |
ビーストスピア |
スピア系統の武器 |
ATK 18 |
|
139 |
 |
コメットスピア |
スピア系統の武器 必殺技発動 |
ATK 18 |
Special Attack is "Meteor". |
152 |
 |
スカイ トマホーク |
トマホーク系統の武器 必殺技発動 |
ATK 20 |
Originally called Ultra Axe. |
169 |
 |
ドラゴンナックル |
ナックル系統の武器 必殺技発動 |
ATK 19 Crit + 5 |
Holy Cestus from Scenario 1. |
178 |
 |
マーリンズワンド |
ワンド系統の武器 必殺技発動 スパーク |
ATK 19 AGL 5 MP Regen + 2 |
It's not known if it even has a special attack anymore. Fan translation adds the Regen 2MP and L3 bits. |
188 |
 |
クイロンの矢 |
矢系統の武器 必殺技発動 |
ATK 24 AGL 3 |
This is Caylon's Bow from Scenario 1. The fan translation is a reference to an admin for a Shining Force fansite. |
192 |
 |
ニ一ドルクォレル |
クォレル系統の武器 必殺技発動 |
ATK 22 AGL 2 Crit + 5 |
|
196 |
 |
クールブラッド |
冷血 |
??? |
Stats don't noticeably change. It might be tied to the battle where a character is frozen in ice, but you're not able to see their inventory during that battle. |
216 |
 |
ライトアンカー |
アンカー系統の武器 |
14 ATK |
|
217 |
 |
へビーアンカー |
アンカー系統の武器 |
20 ATK |
Neither of these are used. The earliest character you can get that even uses Anchors joins in Chapter 6. |
222 |
 |
切り花 |
可憐な花食ベられません |
N/A |
Scenario 1/2 leftover. |
223 |
鶏のエサ |
鶏が好きなおいしいもの |
N/A |
Scenario 1/2 leftover. |
|
225 |
 |
大きな卵 |
話しかけると鳴く大きな卵 |
N/A |
Scenario 1/2 leftover. |
227 |
 |
像の黒水晶 |
アスピアの迫跡に開像があるらしい? |
N/A |
Scenario 1 leftover. |
229 |
 |
牢獄のカギ |
サラバンドの牢獄の扉を開けるカギ |
N/A |
Scenario 2 leftover. |
230 |
 |
神刄の杖 |
バサンダ専用 回復のカを備えた武器 |
ATK 16 |
|
231 |
 |
地獄のロッド |
デスへレン専用の杖 |
ATK 20 |
The fan translation description is a lie. A rough translation would be "Dessheren only - Cane". Item is fairly functional, though you don't get a spell for equipping it like the normal rods. |
240 |
 |
ろうやのカギ |
バーランドのろうやの扉を開けるカギ |
N/A |
Scenario 2 leftover. |
241 |
 |
ロビィズ・アイ |
ロビィを起動するパーツらしい |
N/A |
Scenario 2 leftover. |
242 |
カギ型の金捧 |
カギの形をした大きな金属製の捧 |
N/A |
Scenario 2 leftover. |
|
294 |
 |
風神の |
ゴリアテ専用風の力の源となる扇 |
N/A |
Goriate's Fan. The fan translation's description omits the "Goriate only". Game thinks it's an item. |
295 |
 |
ハルバロッド |
レインブラッドナイト用魔獣槍相性の武器 |
ATK 21 |
Based on the description, it appears to be an exclusive weapon for the Rainbloods, though the fan translation omits that part. |
297 |
 |
カオスメビウス |
大司祭専用 |
N/A |
This appears to be the weapon the Bulzome High priests use at the end of the game. Unlike the Canes from the first game, this isn't even considered a weapon, and cannot be equipped. |
299 |
 |
??? |
??? |
N/A |
This was meant as a placeholder, or was Penkichi's weapon. Either way, it's not functional. |

Unused Spells#
To access these, set 36035154 00XX(Spells, XX being the values below) and 36035155 000X(Level, X being anywhere between 1-4.) to replace one of Gracia's spells with the following:
Value |
Image |
Animation |
Spell |
Max LV |
MP |
Range |
Description |
Notes |
|---|---|---|---|---|---|---|---|---|
13 |
 |
Chant |
2 |
6/12 |
2/3 |
Recover HP for 4 turns |
Strangely, Camelot chose to finish the spell, only to just leave it unused. Stranger still, they then chose to break it for the Premium Disc by removing part of the code. |
|
2A |
 |
Berserk |
1 |
8 |
1 |
Rage increases Attack, Loss of Control |
One of the very few unused spells from previous games to remain intact. Certain items have something similar as a use effect(e.g. the Tiger Claw), but the actual spell itself remains unused. |
|
2C |
 |
*Orb |
1 |
0 |
2 |
*Orb |
The * displays as garbage in-game. |
|
33 |
 |
Blood Cane |
1 |
0 |
3 |
Recovers Everyone |
||
3B |
 |
Fake Charm |
1 |
0 |
2 |
Fakes Charm Spell, Gain XP |
The name the fan translation uses seems to be completely made up and the Japanese description suggests it may be related to the Golden Beak item. It appears to be functionally complete, if used it calls upon a random summon spell, such as Penn or Tiamat. Oddly, while the icon used is similar to the one used for Charm, they aren't the same. This icon features more reflection on the Heart, as well as a pair of pink lines on both sides of the legs. |
|
43 |
 |
Wind Storm |
2 |
8/12 |
2 |
Batters with the Power of Wind |
While the spell is used by the boss Goriate, it's appears to be set up for player use as well. |
|
44 |
 |
Keppyoudo |
1 |
12 |
3 |
Freezes with the Power of Ice |
Likewise, the exclusive spell for the boss Yasha is also much more complete than it needed to be, especially compared to other enemy-only attacks such as Chaos. |
|
49 |
 |
Blessing |
1 |
5/10 |
2/3 |
Heal HP or Damage Enemy |
The only differences to the one the game uses(Value 46) are the icon and the fact that it only targets enemies. |
|
4A |
 |
??? |
4 |
1/18/2/1 |
0(self) |
??? |
The least functional version of the spell yet. |
- Items/Enemy only attacks
Same as the past two games, all items as well as many enemy attacks are considered to be spells internally. They cannot be used by the player through normal methods as the game will show them as "???", with a 0 MP cost and 0 range rendering them useless. However, it is possible to use them through debug if the bit for the Fight menu is set.
Value |
Name |
Description |
Notes |
|---|---|---|---|
16 |
*Heal |
Med Herb, Heal Drop, Potion, Heal Rain |
|
17 |
*Restore |
Goddess Tear, Holy Rain, Magic Ring |
|
18 |
*Cure |
Antidote, Fairy Powder |
|
19 |
*Return |
Angel Wing |
|
1A |
*Raise 1 |
Power Wine, Armor Milk, Quick Chicken |
|
1B |
*Raise 2 |
Agile Onion, Happy Cookie |
|
1C |
*Raise 3 |
Health Bread, Brain Food |
|
1D |
*Level |
Brave Apple |
|
1E |
Fire Breath |
Breath of Fire |
|
1F |
Blizzard Breath |
Breath of Ice |
|
20 |
Thunder Breath |
Breath of Thunder |
|
21 |
Wind Wing |
Breath of Wind |
|
22 |
Demon Breath |
Breath of a Demon |
|
23 |
Bubble Breath |
Breath of Water |
|
24 |
Acid Breath |
Breath of Acid |
|
2B |
*Meat |
*Meat |
|
2D |
X-Spark |
*Titan Laser |
|
2E |
Hammer |
*Titan Punch |
|
2F |
Boomerang |
*Titan Attack |
|
30 |
Panic |
Harpy hyper-sonic blast |
|
31 |
Tremor |
Violently Shakes the Ground |
|
32 |
Rockfall |
Boulder Crushes all in Path |
|
38 |
Bubble Breath |
Breath with Bubbles |
|
39 |
Black Breath |
Spitting Ink Attack, Causes Illusion |
|
3C |
Electric Discharge |
Core Magic |
|
3D |
Negative Bolt |
*Walcuray Attack |
Japanese description is developer notes on where which level should be used, lv 1 on the 3rd battle, and lv 2 on the 4th. |
42 |
Bombardment |
*Cannon |
|
45 |
Blizzard |
Deadly Ice Storm that Freezes and Batters |
Japanese description seems to note that this is for the boss version of Marky |
48 |
Negative Flash |
Walcuray Laser |
|
Unused Text#
X5BTL311.BIN#
#################################################################################The first line is stored just before the dialogue for the battle with Marky, while the second is stored in the middle of it.
X5BTL399.BIN#
For some inexplicable reason, this entire file exists. It's a mix of early Scenario 2 and 3 battle dialogue and a souped up BTL99, which is also present on the disc. The dialogue (fan translation) is as follows:
- Japanese
{NAME}を軍に加えますか?{Yes/No?}

{NAME}は{NAME}を
軍に入れることに成功した{Yes}

{NAME}はそのまま
どこかヘ行ってしまった{No}

ギャオオオオオオン!!

グルルルルルルル~!!

戦いやすい場所にヤツらを誘導するのじゃ
みずから狭い場所に突っこんでいっては
相手の思うつぼじゃぞ{JULIAN}。
それから{GRACIA}様の力なしに
デストニアを救う手だてはない!
是が非でもお守リするのじゃ。

{JULIAN}ヤツらが陣形を変化させ
攻撃に転じるタイミングを見極められれば
戦況が有利に運ぶこと間違いなしじゃ。

{JULIAN}砂地と草原地帯の魔物は
我々の行動に反応して現れるぞ!
危険を感じたらその場を動かぬことだ。

{JULIAN}軍が戦っている本堂前に
増援部隊を送る余裕を作らせぬよう
敵の守備陣形を崩しつつ進むのだ。

{SYNBIOS}よ敵の守備陣形を崩したぞ
あとは西塔のスイッチを入れるため
敵の守リを破ることに専念しよう。

ブルザム教は鉄壁の守備陣形を整えて
本堂前に増援を送ってしまったが
動揺は禁物だ作戦を遂行させよう。

守備隊の陣形を崩して増援を送らせずに
東塔の守備を破るのは容易ではないが
必ず達成させましょうぞ{MEDION}様。

ヤツらは我らの攻撃にたじろぎ
増援を送るタイミングを逸したようじゃ
勝機が訪れましたぞ{MEDION}様。

敵の増援が本堂前に向かったとはいえ
ここで浮き足立ってはなリませんぞ
我が軍の東塔での役割を果たすのじゃ。

三軍の作戦を成功させ目的を果たすには
我らはワルキューレの攻撃をかわしつつ
岩壁に向かうのだよいな{JULIAN}。

##########################################

まずは小手調ベだス
勝利条件は敵の全滅だス
{CURRENTNAME}がやられたら
承知しないだス

{MEDION}様荷をうまく利用なされ
味方の分散を逆手に取るのです
さすれば敵の分散を誘えましょうぞ。

指揮官がそんなところヘ
行ってはいかんだスーっ!

救世主の名前は{LORDSNAME}である。

今私に話しかけているヒマに
奇怪な仮面僧と戦いなさい!

敵は二軍に分かれておリますが
色々面白い話が聞けそうですからな
バルサモ側の方を捕えましょうぞ!

味方同士の戦いは不本意じゃが
ヤツらが仕掛けてくるのであれば
我が軍も応戦しましょう{MEDION}様。

船は行ってしまったがバルサモの町に
手掛かリが残されているかも知れません
バルサモに向かいましょう{MEDION}様。

{NAME}は
遺跡を覗きこんだ

おっとその遺跡の宝は
オレ様がいただくぜ

{CURRENTNAME}軍は遺跡を脱出した

遺跡が崩れてしまった

崩れていて入れない

閉ざされた遺跡がある

ヤツらは宝を狙う盗賊!
{CURRENTNAME}様兵に余裕があるならば
宝を狙う盗賊の企てを阻止するのです。

{CURRENTNAME}様部隊のリーダーが
主戦場の戦列を離れてはなリません
遺跡を荒らす盗賊は仲間に任せましょう。

{NAME}よ持ちきれないようだな
今は私が預かっておこう。

もう持ちきれないようですな
今は私が預かっておきましょう。

{NAME}よ手持ちがいっぱいだな
今は私が預かっておこう。

{NAME}は{ITEM}を
手に入れた。

{NAME}は
炭鉱を覗きこんだ

中は真っ暗で何も見えない

{CURRENTNAME}よ!部隊のリーダーが
主戦場の戦列を離れてはならぬぞ
炭鉱の探索は仲間に任せるのだ!

{CURRENTNAME}よ!部隊のリーダーが
主戦場の戦列を離れてはならぬぞ
盗賊は仲間に任せるのだ!

おっとその炭鉱のお宝は
オレ様がいただくぜ

ヤツは宝を狙う盗賊!
{CURRENTNAME}よ兵に余裕があるならば
宝を狙う盗賊の企てを阻止するのだ!

{CURRENTNAME}軍は炭鉱を脱出した

賢者の遺跡を先ヘと進むには
そのフロアのボスと戦い
打ち破らなければならないぞ。

{SYNBIOS}よ目的を達成するには
その道に向かって進まなければならぬ
そのためにはそれだけの実行力が必要だ。

戦いは先手をとって戦うもよし
相手の動きを見て戦うもよし
時と場合によってその判断を誤るな。

賢者の遺跡を先ヘと進むには
そのフロアのボスと戦い
打ち破らねばなリませぬぞ。

自分の役割を果たすためにも
自分の能力を高めるためにも
賢者の遺跡での修行は重要ですぞ。

戦いやすい相手ととことん戦うもよし
強い相手を求めて先ヘと進むもよし
{MEDION}様の気持ちひとつですぞ。

賢者の遺跡を先ヘと進むには
そのフロアのボスと戦い
打ち破らなければならないぞ。

賢者の遺跡を攻略できれば
ブルザムなど恐るるに足リず
その力を身につけるのだ。

そのフロアの魔物が物足リなければ
中央にいるボスを倒せばよいだろう
経験を積むのに適した相手を選ぶのだぞ。- English(Fan Translation v24)
Will you add {12} to the force?{Yes/No}

{12} recruits {12} into the force!{Yes}

{12} is released{No}

Gyaaaaaoooon!!

Grrururururu!!

Let's use the battlefield to our advantage.
Wedging ourselves into a narrow place
is just what the enemy wants.
Without {11} 's power, we'll
have no way to save Destonia.
Protect him at all costs!

{Julian}, they're changing formation
to distract us from our attack. With
the right timing, there's no doubt
we can turn the battle in our favour.

{Julian}, the beasts of the sand
and grass plain are appearing
as a reaction to our movements!
When you sense danger, don't move!

Don't allow them to send
reinforcements to the front of the main
building where the {Julian} army is engaged.
Break the enemy's formation and proceed.

{Synbios}, we've broken the enemy's
defense. Now all that's left is to activate
the switch in the west tower. Let's
focus on breaching the enemy's guard.

The Bulzome Sect sent reinforcements
to the main building and assumed a
defensive formation, but we mustn't
be shaken. Let's execute our plan.

We need to break their defensive
formation at the east tower without
allowing them to send reinforcements.
It won't be easy, but let's
make it happen, {Medion}.

They have recoiled from our attack.
It seems they missed their opportunity
to send reinforcements. The chance
for victory has arrived, {Medion}.

The enemy's reinforcements have
headed to the front of the main building.
We must not waver. We will
execute our plan at the east tower.

In order to accomplish our goal and
make the three army attack a success,
we must first make our way to the cliff
while avoiding the Vandals' attacks.

##########################################

To pass the trial, the enemy
must be annihilated and
{10} must not be defeated.

{Medion}, use this burden skillfully.
Turn the dispersion of your allies into
your advantage. If you do, you can
cause the dispersion of the enemy as well.

You must go there to progress!

{1A} is our savior.

Instead of talking with me, go fight
that eerie masked monk, please!

The enemy is divided into two battalions.
It appears we could learn some interesting
information, so let's capture some
people from the Balsamo side!

I'm reluctant to battle our allies,
but if they attack us, we must
defend ourselves, {Medion}.

Unfortunately, the ship has already left,
but there may yet be a clue in Balsamo.{03}Let's head there, {Medion}.

{12} looks inside the ruins

I'll be taking that ruin's treasure!{0F}{05}

The {10} army escapes the ruins

The ruins have collapsed

The ruins are destroyed
and not safe to enter

There are ruins here, but
there's no way to enter

{10}, thieves are planning to
loot those ruins! We must stop
them from stealing the treasure!

{10}, as our leader, you should
remain on the battlefield. Your allies
can take care of those ruin looters.

{12}, you're carrying too much.
I'll hold that for now.

You can't carry anything else.
I'll hold that for now.

{12}, you're carrying too much.
I'll hold that for now.

{12} received a {14}

{12} looked into the coal mine

It's pitch black inside.
Nothing can be seen.

{10}, as our leader, you
should remain on the battlefield.
Your allies can search the coal mine.

{10}, as our leader, you
should remain on the battlefield.
Your allies can take care of those thieves.

That ruin's treasure is mine!{0F}{05}

{10}, a thief is after the treasure!
We must send allies to stop him!

The {10} army escaped the coal mine

In order to proceed in the Ruins
of the Wise, you must battle and
defeat the boss of each floor.

{Synbios}, in order to achieve our objective,
we must overcome each level and move on.
We must find the strength to persevere.

It's good to take the advantage early
in battle. It's also good to watch
the movements of your opponent.
Consider the timing and circumstances,
and don't misjudge the situation.

In order to proceed in the Ruins
of the Wise, you must battle and
defeat the boss of each floor.

Training in the Ruins of the Wise
is essential for both fulfilling your
role and enhancing your abilities.

You are free to battle the weaker
opponents, or seek stronger opponents by
advancing. It's entirely up to you, {Medion}.

In order to proceed in the Ruins
of the Wise, you must battle and
defeat the boss of each floor.

If you are able to conquer the Ruins
of the Wise, you will acquire power
that frightens even Bulzome.

If the enemies on a given
floor are not satisfactory, try
defeating the boss in the center.
You will gain experience either
way, but you can choose the
opponent that suits you best.X5BTLAHL.BIN#
###########################################################################################################################################################################################And again, more of these strange lines appear mixed in with dialogue for Bowlet cabin/Marky battle. Seems as if the developers may have blanked out certain lines of dialogue...
X5DREAM.BIN#
゚リに倒れていくのにビクッと気付いてから、立て掛けてある本に見入る。もう一度ティンカーべルのウフフで、爺さんはビクッとして右斜め上を見てそのまま左斜め上に顔を向けて・・・背中越しに後ろに振リ返るのと、ティンカーべルが爺さんの視線の方向に動くのが同時である。近づくに連れ、BGMと一緒に時計の音が聞こえる。)

zしに後ろに振リ返るのと、ティンカーべルが爺さんの視線の方向に動くのが同時である。(近づくに連れ、BGMと一緒に時計の音が聞こえる。)esX5HNEND2.BIN#
船長向こうに灯リが・・・!

何・・・灯リだと・・・。

灯リだと・・・?

あの灯リは・・・陸か・・・?

みんな・・・灯リだ・・・
陸が見えてきたぞ・・・!
This small bit of dialogue for when the ship reaches Destonia simply isn't used.
X5JINMEI.BIN#
傭兵戦士X5KANSHO.BIN#
Japanese:
★あかさたなはまやらわFan Translation(v24):
0123456789This is the only unique line of dialogue in the entire file...
X5LEMO3J.BIN#
kkPresent at the very end of the file, next to captured monster dialogue. Same line also appears in X5LEMO_J.BIN and X5LEMO2J.BIN, in the same spot.
X5NEOPRO.BIN#
|
|
To do: |
This entire file seems to be unused. Has quite a few strange messages at the top, but the rest of the dialogue appears to be similar to X5HNSNOP.BIN.
これがメッセージデータの最後です

救世主の名前は{LORDSNAME}である。

まわっとけ

ジュリやーーん

へレンです

{MEDION}が{PENKO}の卵をふ化させたため
頼まれもしないのに{MEDION}軍に
仲間入リしたはた迷惑なぺンギン?
{PENN}とは同種のモンスター?のようだが
その詳細はいっさい不明である

しかしその共和国も限界に来ている
全てを分かち合うことに慣れた国民が
共和国の財政を圧迫したのだ・・・。

それは・・・どういうことですか・・・
だって財政危機や内乱は天候不順のため
・・・国内の収穫が悪かったからじゃ?

それもあるだが内乱の本質は・・・
将来の災害を見越して備畜を急ぐ首脳と
今を楽しみたい国民との対立にあった!

双方の気持ち・・・わからぬでもないが
それらを愚民として共和国に嫌気がさし
反旗をひるがえす将軍が現れたか・・・。

{EDMUND}殿のことですわね・・・
べネトレイム共和国王の暗殺を企て
ガーゼル将軍と手を組んだのでしょ?

クリュエル将軍の策略じゃろう・・・
本来忠誠心の強い{EDMUND}とて人だ
一瞬の迷いにつけ込まれたのじゃろうよ。

クリュエルとはそういうヤツなのだ
私のフラグシップ号をボロ船と言って
・・・あれだけは決して忘れない!

べネトレイム共和国王の暗殺を狙って
ガーゼル将軍がワナを張った時・・・
それを手伝ったという将軍のことですね。

あの忠誠心の強い{EDMUND}将軍でも
信じるものヘの疑いの心が芽生えた時
卑劣な行動ヘ・・・魔が差したのじゃ。

クリュエルらの周到なワナのためさ
私のフラグシップ号をボロ船扱いし
・・・本質を求めぬ愚劣な将軍だ。

部下を見れば将がわかるという・・・
クリュエル将軍たちの総大将の考えも
・・・これでわかろうというものだ。

それはアロガント王子のことか・・・
確かに強き野心・・・お持ちの方だが。

ブルザムと結託したクリュエル将軍は
皇帝誘拐に絡んでいる可能性は高いが
・・・我々にはどうすることもできぬ。

帝国はやはリ帝国・・・あの頃のままか
罪を犯せば何人たリとも罰せられるだけ
今でも・・・共和国の方がましのようだ。

{DONHORT}お主ワシら帝国の者に
ケンカを売るために来たようだな!X5OP201.BIN#
In addition to the map, the opening dialogue from Scenario 2 is also included as a leftover. It's contents appear to be unaltered from that game.
|
The Shining series | |
|---|---|
|
Genesis |
|
|
Game Gear |
Shining Force Gaiden: Ensei Jashin no Kuni he • Shining Force: The Sword of Hajya • Shining Force Gaiden: The Final Conflict |
|
Sega CD |
|
|
Sega Saturn |
Shining Wisdom • Shining the Holy Ark • Shining Force III (Prototypes) • Shining Force III Scenario 2 • Shining Force III Scenario 3 • Shining Force III: Premium Disc |
|
Game Boy Advance |
Shining Soul • Shining Soul II • Shining Force: Resurrection of the Dark Dragon |
|
PlayStation 2 |
|