 This article has a talk page!
This is a sub-page of Proto:Pokémon Gold and Silver/Spaceworld 1997 Demo.
Sub-Pages#
 Towns & CitiesWelcome to Silent Hill.
 Routes
 InteriorsThe lottery shop was shut down for being a money-laundering scheme.
 Dungeons
 Graphical ComparisonsDown the rabbit hole we go...
Region Map#
PokéGear Map |
In-Game Map |
|---|---|
 |
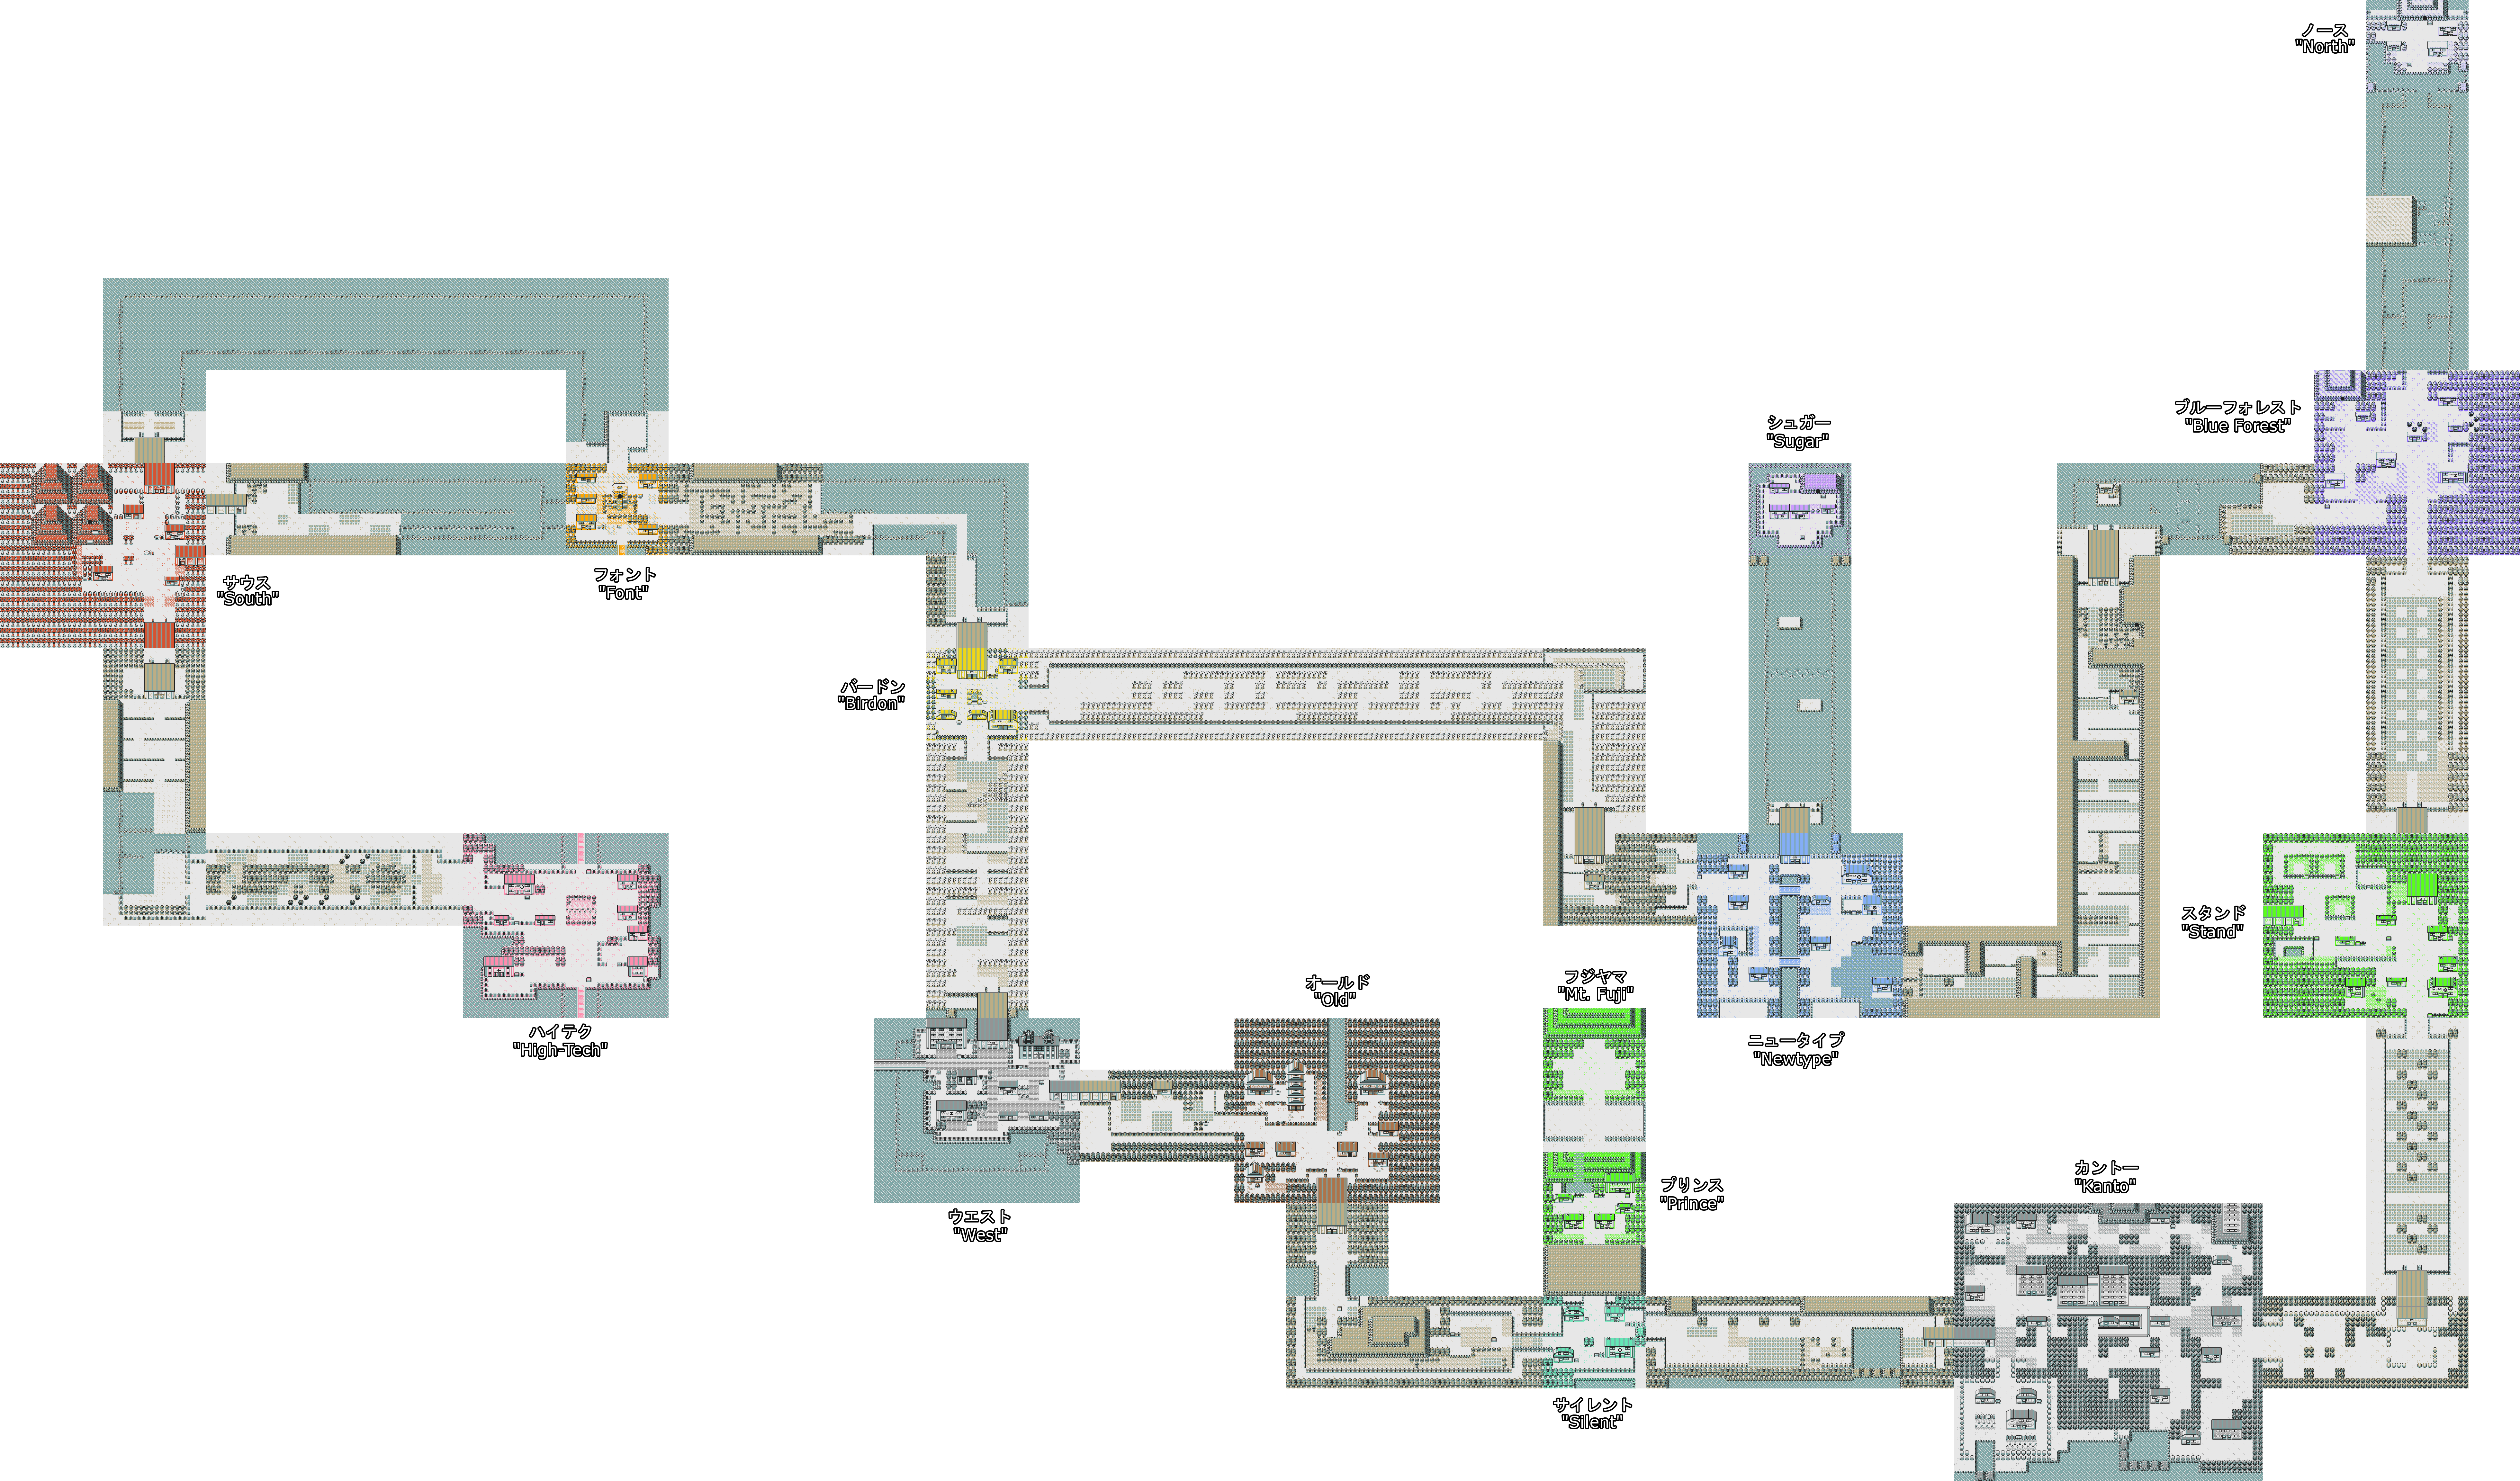 |
The region seen in the prototype is incredibly different from the final Johto region. It seems to be based on the entirety of Japan, with Kanto having been compressed into a single map found in the area of the real-life Kanto region. Most of the region is mapped out, with only a couple of potential routes missing from the prototype. Some of these maps are closed off and do not connect anywhere, even if accessed through Debug Mode.
Most of the maps are missing scripts for NPCs and most trainers are missing scripts for trainer battles, with only the first few areas having working trainers. Also, the collision data for most maps doesn't work properly, and so the player is able to walk through most tiles if these maps are accessed. Due to this, much of the wild grass also does not function as the lack of collision data means it cannot be walked upon. Regardless, every area does contain encounter data, and if loaded in the tileset used in the demo area, these grass patches function.
The Town Map can be accessed by using the PokéGear option in Debug Mode.
Comparing the full overworld with the Town Map shows a few discrepancies between the two:
- Although the Town Map shows routes between West and High-Tech and between High-Tech and Font, maps for these routes do not actually exist in the game's overworld. Their depiction on the map suggests they would have been at least partially water-based.
- The overworld maps for West and High-Tech include a western and southern exit respectively, which suggests a connecting route between the two. However, this still differs from the Town Map's layout, which instead shows the route connecting from West's north side to High-Tech's east side.
- The overworld maps for High-Tech and Font include a northern and southern exit respectively. Unlike above, these do match up with the intended route shown on the Town Map.
- The route north from West to Birdon exists only on the overworld, and is not marked on the Town Map. Combined with the discrepancy noted above regarding the location of the intended route from West to High-Tech, it's possible that this area of the overworld was undergoing redevelopment at the time the demo was compiled, and that the Town Map reflects an earlier plan for the overworld's layout.
- The overworld maps for the route from Silent Hill to Prince and Mt. Fuji do not appear to connect properly, and likely were blocked off for the demo version. Interestingly, the map matching Mt. Fuji's location on the Town Map strongly resembles an empty version of the Prince map, missing both the waterfall and all of the town's buildings. Exactly what this map was intended for, or how the maps on this route were intended to link together, is currently unknown.
- Although the eastern side of Silent Hill is blocked off by a small rock structure, both the Town Map and overworld layout suggest it was supposed to directly connect to the route leading east to Kanto. It's possible this may have been blocked off specifically for the demo, and keep the player in the demo's intended area.
- According to the map, the "forest dungeon" on Route 15 was originally intended for Route 13. Also, the map has dots placed over routes 6 and 21, indicating those routes had dungeons, but these are not reflected on the demo's overworld.
Real-World Analogues#
The prototype overworld is a direct reflection of real-life Japan. These are the likely analogues to the game's locations.
Name |
Translation |
Real Location |
Rationale |
Relation to Final |
|---|---|---|---|---|
サイレント |
Silent |
Shizuoka |
The first kanji for Shizuoka (静) can have the meaning of silent, matching the name of this in-game location, Silent Hill. |
Retooled without the Pokémon Center as New Bark Town. An intermediate map of this town, with some differences to the demo version, still exists in the final ROM. |
オールド |
Old |
Kyoto |
Kyoto was for centuries the capital of Japan, and holds a great deal of its history. |
This concept was split across Violet City and Ecruteak City, which both feature historical wooden towers. |
ウエスト |
West |
Osaka |
Osaka is a major city whose port faces west. |
Ultimately retooled into Goldenrod City, albeit dropping the port. |
ハイテク |
High-Tech |
Kochi |
Kochi is a city on the island of Shikoku whose name means high knowledge (高知). |
No direct match; may have been an influence for Olivine City and Cianwood City. |
フォント |
Font |
Izumo |
The city of Izumo strongly resembles the Japanese word 泉 izumi, meaning a spring or fountain. Izumo is also notable for its tombs, which may be the inspiration for the Ruins of Alph. |
The Ruins of Alph were moved to their own, non-town zone. |
バードン |
Birdon |
Tottori |
Tottori contains tori, which means bird in Japanese. Birdon is a desert town, and Tottori is known for its sand dunes. Additionally, the "-don" suffix seems to come from Slowpoke's Japanese name, Yadon (ヤドン). |
The Slowpoke Well concept was reused for Azalea Town, but the desert town theme was not. |
ニュータイプ |
New Type |
Niigata |
新潟 Niigata is literally "New Lagoon", but -gata is also a possible reading of 型, meaning type. Niigata has a famous bridge, and New Type is a city of bridges. |
Has a functional relation to Mahogany Town. It may be the inspiration for one later revision of the Lake of Rage, which has a town surrounding a lake in the middle. |
シュガー |
Sugar |
Sado |
Sado is an island off the coast of Niigata, in the same relation as Sugar to New Type. The Japanese word for sugar, 砂糖 (さとう), sounds similar to Sado. The area is known for Kinzan gold mine, discovered in 1601, which may be where the minecarts featured in tilesets were intended to be used. |
No clear correspondence, but has a functional relation to the Lake of Rage, the body of water north of Mahogany Town. The Lake of Rage is a Flyable destination in the final for no clear reason; Sugar is a town. |
ブルーフォレスト |
Blue Forest |
Aomori |
The kanji for 青森 Aomori literally translate to blue and forest. Blue Forest is at the very tip of the main island. |
The snowy overworld was scrapped. Generation IX would use northern Tohoku (Aomori, Akita, and Iwate) as the inspiration for Kitakami, which is geographically more similar to that of Towada-Hachimantai National Park. |
スタンド |
Stand |
Sendai |
Sendai is a major city between Tokyo and Aomori. The second kanji 台 in Sendai means "stand" or "pedestal". |
Contains a zoo like Fuchsia City, and a gate on the west possibly leading to its own Safari Zone. May have been deemed redundant when Fuchsia was restored, as the Safari Zone was going to be included early on in the Kanto maps but was later cut itself. |
カントー |
Kanto |
Tokyo |
Unlike the leafy portrayal of Generation I, the Tokyo-Yokohama conurbation occupies most of the real-world Kanto region. Additionally, "Kanto" essentially being a combination of towns could be based on how Tokyo's wards can be seen as their own municipalities. |
"Kanto" in the prototype is heavily compressed down to one map, and left unfinished. It was replaced with an altered port of the original Kanto from Generation I. |
サウス |
South |
Kyushu |
Kyushu in southern Japan is known for its volcanoes. |
The tropical island idea was scrapped. May have been an influence for Cinnabar Island's destruction in the final. Generation III would use Kyushu as the basis for Hoenn, with the volcanoes being repurposed as Mt. Chimney and Sootopolis City. |
ノース |
North |
Hokkaido |
Hokkaido is the northernmost island. |
The snowy overworld concept was scrapped, but an unusual ice cave is found in the final product. Generation IV would use Hokkaido as the basis for Sinnoh. |
プリンス |
Prince |
Fuji |
The current kanji for 富士 Fuji mean wealth and man of status, which matches the definition of a prince. The city of Fuji is northeast of Shizuoka and below Mt. Fuji. In-game, Prince is located directly north of Silent Hill and is similarly located right below Mt. Fuji. |
The Pokémon League is located at Indigo Plateau, adjacent to Mt. Silver, which is Mt. Fuji's in-game counterpart. |
フジヤマ |
Mt. Fuji |
Mt. Fuji |
The real-world basis for this map is obvious, as it's literally labelled Mt. Fuji. |
Ultimately retooled as Mt. Silver. |
Possible Sinnoh Cities#
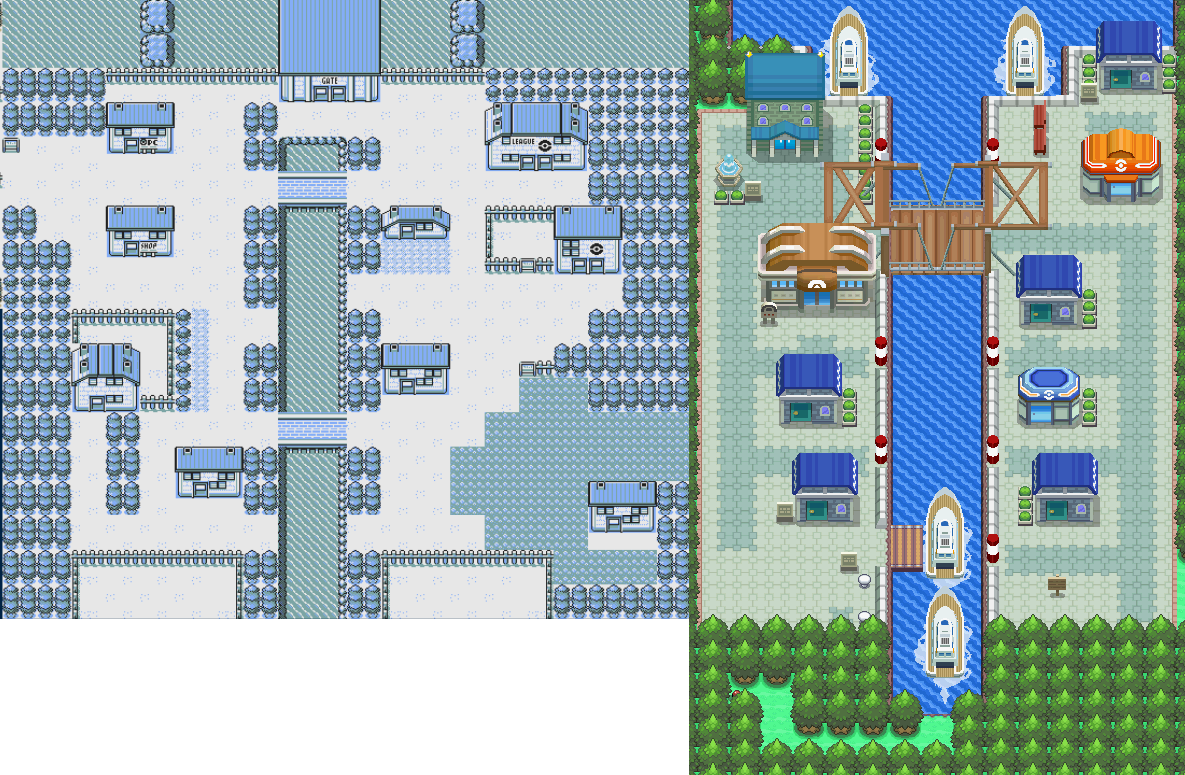
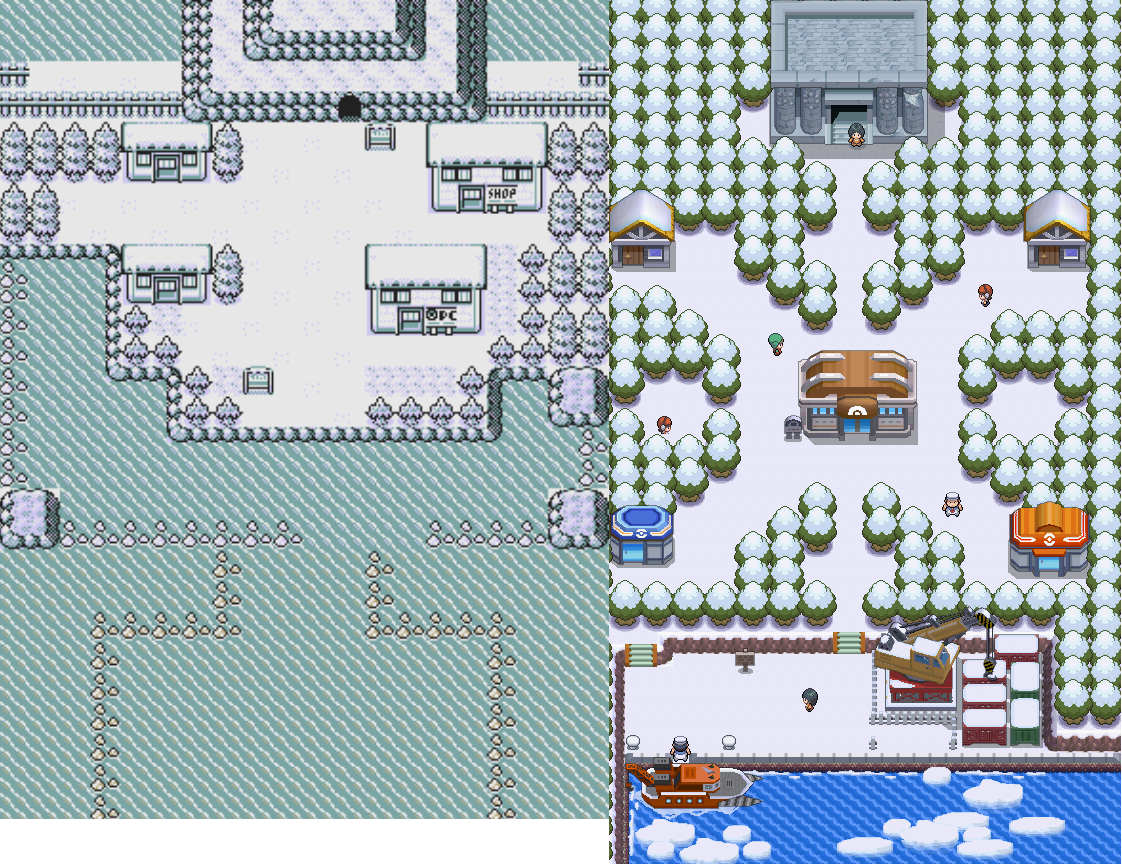
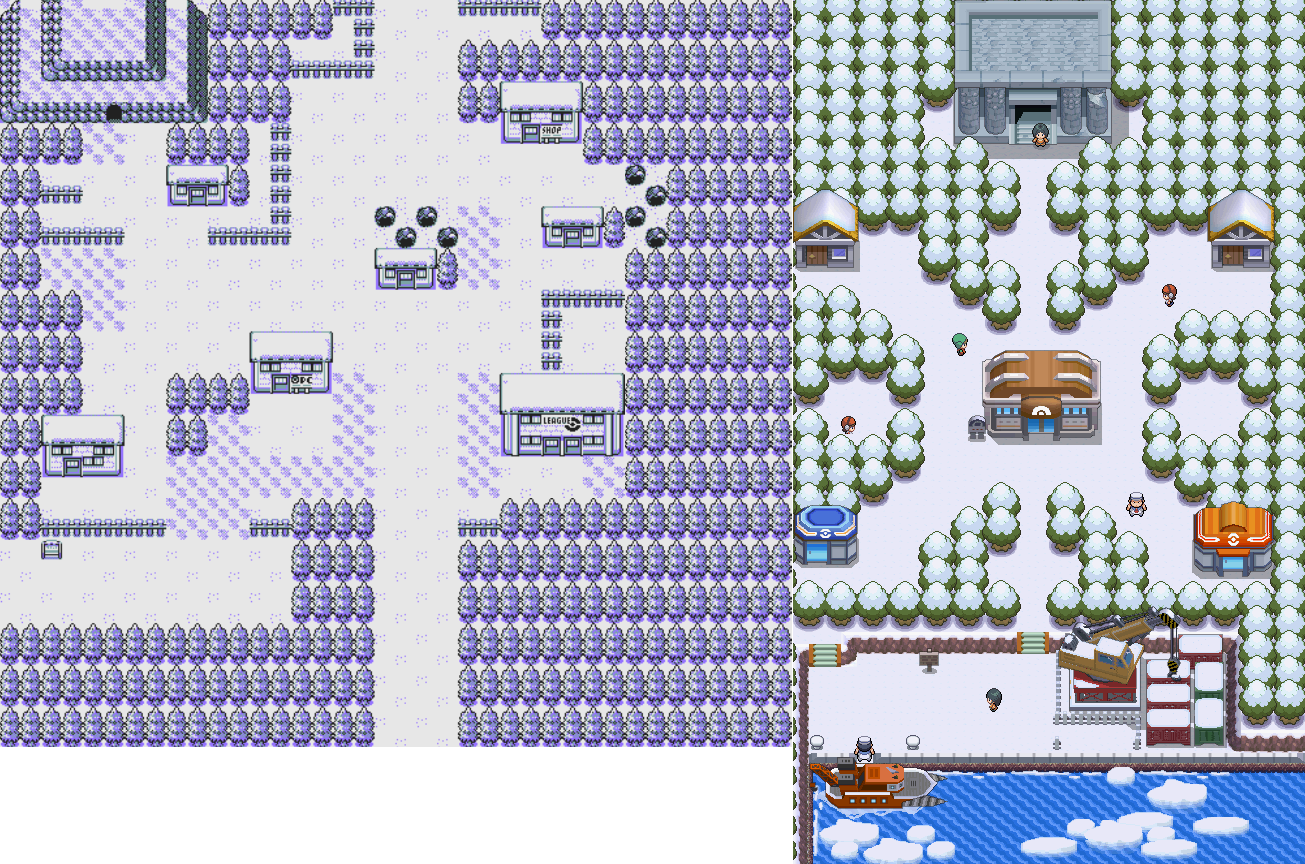
There are three cities that bear a resemblance to ones found in Diamond, Pearl, and Platinum. In the Gold/Silver prototype ROM, they go by "New Type", "North", and "Blue Forest". New Type seemingly features a port (given the presence of sailors and a captain) and bears a very similar layout to Canalave City. North and Blue Forest are both covered in snow, and may have served as inspiration for Snowpoint City. Additionally, the route connecting the two snowy cities is comparable to Route 223, which connects Sunyshore City and the Pokémon League.
New Type vs. Canalave City |
North vs. Snowpoint City |
Blue Forest vs. Snowpoint City |
|---|---|---|
 |
 |
 |
Much like Canalave City, New Type's defining feature is a canal dividing the city into two. It has an ocean to the north, similar bridge and building placement, and a southeast connection to a route. |
North is covered with snow, and the buildings and the cave are arranged roughly into a star shape comparable to Snowpoint City. Both locations also have an ocean located to the south. |
Blue Forest is covered with snow and has its buildings arranged around a central building, much like Snowpoint City. Both locations also have a southwest connection to a route. |
Unused Landmarks#
The following landmarks are not used by any of the maps.
ID |
Visual |
Notes |
|---|---|---|
0x1D |
 |
Possibly intended for the Magnet Train seen in the backup overworld, specifically while traveling between New Type and Kanto. In the final game, the player is only on the Magnet Train during a cutscene, so the Pokégear map can't be checked. Thus, it's possible that the Magnet Train was planned to be a fully playable area, but was ultimately reduced to a cutscene. |
0x1E |
 |
Again, possibly intended for the Magnet Train, but this time while traveling between New Type and West. Another possible explanation is that it was meant for a route connected to Old City's River. |
0x29 |
 |
Intended for Route 5, which is absent from this build’s overworld. |
0x2B |
 |
Intended for Route 8, which is absent from this build's overworld. |
Overworld Object Sprite Lists#
The first two Generations of mainline Pokémon games use a system in which the game draws its overworld sprites from a table that contains ten byte entries. These correspond to the NPC sprites that can appear in each "zone" of the overworld (i.e., not inside buildings). This table can be used to load unique sprite data into memory (like loading the Rival in Silent Hill during the events of Story Mode). The table covers both towns and routes, but not indoor areas. The last two bytes of every entry are always two static sprites, here the itemball (Poké Ball) and Pokédex (the latter being used as padding). For comparison, the Gen I spriteset table instead uses the drunk old man as padding, with the final Gen II table being more versatile, actually using this spot to load relevant sprites (usually a Berry Tree).
As you play, some of the later inaccessible areas in the demo, you may notice that you can find copies of the player's sprite in several towns in the overworld. This is because the sprite data for that NPC hasn't been loaded by the game and instead falls back on the default sprite, which happens to be Gold's. This is because almost every area after West is using an older object layout that uses sprites not loaded by the table for that given area. As such, the overworld object sprite table consists of the NPCs for events that were planned by Game Freak at a relatively late stage of development. Blue Forest's and North's entries are the same, so they utilize the same NPCs.
Several observations can be made thanks to this data. For example, the Rival was meant to appear in High-Tech, New Type, South, and North (or its routes). Giovanni, meanwhile, was meant to make an appearance on the overworld in Stand, as was a male Geruge Member. Both the male and female Geruge Members were meant to appear in Mt. Fuji, too. As for Prof.Oak, he would have showed up in Prince, which doesn't have any objects on the map in the prototype. Below is a representation of the data in the tables:
Silent Hill#
Name: OBJBANK_SILENT
ID No |
Sprite |
Name |
Notes |
|---|---|---|---|
$07 |
 |
Blue (Green) |
Used for the story scenes that occur in the overworld that involve Blue leading the player to the Lab. |
$04 |
 |
Silver |
Used for the story scenes that occur in the overworld, which here happen in Silent Hill and on Route 2. |
$44 |
 |
Officer |
Unused. |
$2A |
 |
Beauty |
Used for an NPC in Silent Hill and for the Kimono Girl on Route 2. |
$2C |
 |
Super Nerd |
Used for an NPC in Silent Hill and on Route 1. |
$28 |
 |
Youngster |
Used on Route 1. |
$3B |
 |
Fisher |
Unused. |
$4D |
 |
Rhydon |
Unused. |
$55 |
 |
Poké Ball |
Unused. Meant for collectible overworld items. |
$56 |
 |
Pokédex |
Unused. Serves as padding. |
Old City#
Name: OBJBANK_KYOTO
ID No |
Sprite |
Name |
Notes |
|---|---|---|---|
$30 |
 |
Old Man |
Unused. |
$27 |
 |
Little Girl |
Used in the city, near Kurt's House. |
$26 |
 |
Little Boy |
Used throughout the city. |
$28 |
|
Youngster |
Used throughout Route 3. |
$2A |
|
Beauty |
Unused. |
$2C |
|
Super Nerd |
Used outside the entrance to Route 3. This NPC unloads as you enter the route, so he was most likely meant to stop you from moving on until you defeated the Gym Leader. |
$31 |
 |
Old Woman |
Unused. |
$4D |
|
Rhydon |
Unused. Likely meant to be paired with an NPC. |
$55 |
|
Poké Ball |
Used, meant for a collectable item near the river in the city. |
$56 |
|
Pokédex |
Unused. Serves as padding. |
West#
Name: OBJBANK_OSAKA
ID No |
Sprite |
Name |
Notes |
|---|---|---|---|
$29 |
 |
Lass |
Used in the city. |
$25 |
 |
Cooltrainer♀ |
Used in the city. |
$2D |
 |
Rocker |
Used in the city. |
$4A |
 |
Sailor |
Used in the city. |
$41 |
 |
Gentleman |
Unused. |
$36 |
 |
Rocket♂ |
Used in the city guarding the house in the west. |
$3B |
|
Fisher |
Unused. |
$4E |
 |
Clefairy |
Used in the city. |
$55 |
|
Poké Ball |
Unused. Meant for collectible overworld items. |
$56 |
|
Pokédex |
Unused. Serves as padding. |
High-Tech#
Name: OBJBANK_HIGHTECH
ID No |
Sprite |
Name |
Notes |
|---|---|---|---|
$04 |
|
Silver |
Unused. Seems to be a planned Rival encounter within the town or somewhere on the western route. |
$27 |
|
Little Girl |
Used in the city. |
$4A |
|
Sailor |
Used throughout the city. |
$2E |
 |
Middle-aged Man |
Unused. |
$32 |
 |
Swimmer♂ |
Unused. Possible trainer for Route 7. |
$33 |
 |
Swimmer♀ |
Unused. Possible trainer for Route 7. |
$3B |
|
Fisher |
Unused. |
$4D |
|
Rhydon |
Unused. |
$55 |
|
Poké Ball |
Unused. Meant for collectable overworld items. |
$56 |
|
Pokédex |
Unused. Serves as padding. |
Font#
Name: OBJBANK_FONT
ID No |
Sprite |
Name |
Notes |
|---|---|---|---|
$29 |
|
Lass |
Unused. |
$26 |
|
Little Boy |
Unused. |
$28 |
|
Youngster |
Used in the city. |
$4A |
|
Sailor |
Unused. |
$49 |
 |
Gym Guide |
Unused. Unclear why he might be on the overworld map (since there is no Gym), but might have prevented the player from going to the eastern route considering there's an NPC that moves around who despawns if you move to that route. |
$32 |
|
Swimmer♂ |
Unused. Possible trainer for the surrounding routes. |
$33 |
|
Swimmer♀ |
Unused. Possible trainer for the surrounding routes. |
$4D |
|
Rhydon |
Used in the city. |
$55 |
|
Poké Ball |
Unused. Meant for collectible overworld items. |
$56 |
|
Pokédex |
Unused. Serves as padding. |
Birdon#
Name: OBJBANK_BIRDON
ID No |
Sprite |
Name |
Notes |
|---|---|---|---|
$36 |
|
Rocket♂ |
Unused. Possible trainer or an unimplemented scenario involving captured Slowpokes around the town. |
$29 |
|
Lass |
Unused. |
$28 |
|
Youngster |
Used in the city. |
$24 |
 |
Cooltrainer♂ |
Unused. |
$2E |
|
Middle-aged Man |
Unused. |
$37 |
 |
Rocket♀ |
Unused. Possible trainer or an unimplemented scenario involving captured Slowpokes around the town. |
$3B |
|
Fisher |
Unused. Possible trainer. |
$4D |
|
Rhydon |
Unused. |
$55 |
|
Poké Ball |
Unused. Meant for collectible overworld items. |
$56 |
|
Pokédex |
Unused. Serves as padding. |
New Type#
Name: OBJBANK_NEWTYPE
ID No |
Sprite |
Name |
Notes |
|---|---|---|---|
$04 |
|
Silver |
Used. Looks like they were planning an encounter with Silver just as you entered New Type. |
$28 |
|
Youngster |
Unused. |
$2B |
 |
Girl |
Used over by the restaurant. |
$2D |
|
Rocker |
Used north in the city. |
$2E |
|
Middle-aged Man |
Unused. |
$41 |
|
Gentleman |
Unused. |
$3B |
|
Fisher |
Used in the city. |
$4D |
|
Rhydon |
Unused. |
$55 |
|
Poké Ball |
Unused. Meant for collectible overworld items. |
$56 |
|
Pokédex |
Unused. Serves as padding. |
Sugar#
Name: OBJBANK_SUGAR
ID No |
Sprite |
Name |
Notes |
|---|---|---|---|
$27 |
|
Little Girl |
Used. South within the city. |
$26 |
|
Little Boy |
Unused. |
$30 |
|
Old Man |
Used over by the Pokémon Center. |
$31 |
|
Old Woman |
Used north in the city. |
$32 |
|
Swimmer♂ |
Unused. Possible trainer on Route 16. |
$33 |
|
Swimmer♀ |
Unused. Possible trainer on Route 16. |
$3B |
|
Fisher |
Unused. Possible trainer on Route 16. |
$4D |
|
Rhydon |
Unused. |
$55 |
|
Poké Ball |
Unused. Meant for collectible overworld items. |
$56 |
|
Pokédex |
Unused. Serves as padding. |
Stand#
Name: OBJBANK_STAND
ID No |
Sprite |
Name |
Notes |
|---|---|---|---|
$0A |
 |
Giovanni |
Unused. Possibly used for an event within the town itself. |
$45 |
 |
Unused. Uses the Captain graphics, meant for sprite $47, due to $45 not being tied to any unique spriteset. |
|
$27 |
|
Little Girl |
Used north in the city by a cage. |
$2A |
|
Beauty |
Used south within the city. |
$2D |
|
Rocker |
Used within the city. |
$4D |
|
Rhydon |
Used in the city. |
$4E |
|
Clefairy |
Used in the city. |
$4F |
 |
Pidgey |
Used in the city. |
$55 |
|
Poké Ball |
Unused. Meant for collectible overworld items. |
$56 |
|
Pokédex |
Unused. Serves as padding. |
Kanto#
Name: OBJBANK_KANTO
Oddly enough, there are no objects used at all in the overworld for this map and the surrounding maps.
ID No |
Sprite |
Name |
Notes |
|---|---|---|---|
$29 |
|
Lass |
Unused. |
$28 |
|
Youngster |
Unused. |
$25 |
|
Cooltrainer♀ |
Unused. |
$24 |
|
Cooltrainer♂ |
Unused. |
$2E |
|
Middle-aged Man |
Unused. |
$41 |
|
Gentleman |
Unused. |
$3B |
|
Fisher |
Unused. |
$4D |
|
Rhydon |
Unused. |
$55 |
|
Poké Ball |
Unused. Meant for collectible overworld items. |
$56 |
|
Pokédex |
Unused. Serves as padding. |
Prince#
Name: OBJBANK_PRINCE
Oddly enough, there are no objects used at all in the overworld for this map and the surrounding maps.
ID No |
Sprite |
Name |
Notes |
|---|---|---|---|
$05 |
 |
Professor Oak |
Unused. Possibly used for an event within the town itself. |
$27 |
|
Little Girl |
Unused. |
$26 |
|
Little Boy |
Unused. |
$2C |
|
Super Nerd |
Unused. |
$2F |
 |
Middle-aged Woman |
Unused. |
$30 |
|
Old Man |
Unused. |
$31 |
|
Old Woman |
Unused. |
$4E |
|
Clefairy |
Unused. |
$55 |
|
Poké Ball |
Unused. Meant for collectible overworld items. |
$56 |
|
Pokédex |
Unused. Serves as padding. |
South#
Name: OBJBANK_SOUTH
ID No |
Sprite |
Name |
Notes |
|---|---|---|---|
$04 |
|
Silver |
Unused. An encounter with Silver was planned here. |
$27 |
|
Little Girl |
Used. |
$2A |
|
Beauty |
Unused. |
$2D |
|
Rocker |
Used. |
$3C |
 |
Fishing Guru |
Used. |
$32 |
|
Swimmer♂ |
Unused. Possible trainer used for a route, but none uses this zone data in the prototype. |
$33 |
|
Swimmer♀ |
Unused. Possible trainer used for a route, but none uses this zone data in the prototype. |
$3B |
|
Fisher |
Unused. Was originally a Pokémon in the current object layout but was planned to include a Fisher instead. |
$55 |
|
Poké Ball |
Unused. Meant for collectible overworld items. |
$56 |
|
Pokédex |
Unused. Serves as padding. |
Fuji#
Name: OBJBANK_FUJIYAMA
Oddly enough, there are no objects used at all in the overworld for this map and the surrounding maps.
ID No |
Sprite |
Name |
Notes |
|---|---|---|---|
$28 |
|
Youngster |
Unused. |
$2B |
|
Girl |
Unused. |
$24 |
|
Cooltrainer♂ |
Unused. |
$3D |
 |
Scientist |
Unused. |
$45 |
|
Unused. Uses the Captain graphics, meant for sprite $47, due to $45 not being tied to any unique spriteset. |
|
$46 |
|
Unused. Uses the Captain graphics, meant for sprite $47, due to $46 not being tied to any unique spriteset. |
|
$3B |
|
Fisher |
Unused. |
$4D |
|
Rhydon |
Unused. |
$55 |
|
Poké Ball |
Unused. Meant for collectible overworld items. |
$56 |
|
Pokédex |
Unused. Serves as padding. |
Blue Forest / North#
Name: OBJBANK_COLDZONE
Both areas share the same table.
ID No |
Sprite |
Name |
Notes |
|---|---|---|---|
$04 |
|
Silver |
Unused. Possibly one of the last encounters with Silver if this was meant for North. |
$27 |
|
Little Girl |
Used in both maps. |
$28 |
|
Youngster |
Used only in Blue Forest. |
$2A |
|
Beauty |
Used only in Blue Forest. |
$2C |
|
Super Nerd |
Unused. |
$29 |
|
Lass |
Unused. |
$32 |
|
Swimmer♂ |
Unused. Possibly a trainer meant for Routes 19 and 26. |
$33 |
|
Swimmer♀ |
Unused. Possibly a trainer meant for Routes 19 and 26. |
$55 |
|
Poké Ball |
Unused. Meant for collectible overworld items. |
$56 |
|
Pokédex |
Unused. Serves as padding. |
Wild Encounter List#
While the final games use a separate 7-entry encounter table for each time of day, the demo uses a part of the same 18-entry table for each time of day; the first 11 entries are used in the morning, entries 4-13 are used during the day, and the last 11 are used at night. Due to this, there are no daytime-exclusive enocunters in the demo. Additionally, there are no separate grass and water encounter tables, often resulting in grass encounters in the water and vice-versa.
Regarding version exclusive encounters, while they already exist at this stage of development, they are limited to the areas normally accessible in demo mode, with those being the first two routes, and their forest dungeon.
The route numbers come from the leaked source code, and are listed here alongside their placement on the overworld map for ease of reading.
Route 1#
Version |
Gold |
|---|---|
Time |
Morning |
Pokémon |
|
Levels |
7 |
Version |
Silver |
Time |
Morning |
Pokémon |
|
Levels |
8 |
 サニー
 ポッポ
Used on the route west of Silent Hill.
Route 2#
Version |
Gold |
|---|---|
Time |
Morning |
Pokémon |
|
Levels |
6 |
Version |
Silver |
Time |
Morning |
Pokémon |
|
Levels |
8 |
Used on the route south of Old.
Route 3#
Time |
Morning |
Morning/Day |
|||
|---|---|---|---|---|---|
Pokémon |
|
|
|
|
|
Levels |
9 |
9 |
8 |
7 |
10 |
 キャタピー
 トランセル
Used on the route west of Old.
Route 5#
Time |
Morning |
Morning/Day |
|||
|---|---|---|---|---|---|
Pokémon |
|
|
|
|
|
Levels |
19 |
20 |
18 |
17 |
21 |
 メタモン
 オニドリル
Used on the route between West and Birdon.
Route 6#
Time |
Morning |
Morning/Day |
|||
|---|---|---|---|---|---|
Pokémon |
|
|
|
|
|
Levels |
12 |
12 |
11 |
10 |
13 |
 タマタマ
 コンパン
 オニスズメ
Used on the route west of High-Tech.
Routes 7, 9-10, 24-25#
Time |
Morning |
Morning/Day |
|||
|---|---|---|---|---|---|
Pokémon |
|
|
|
||
Levels |
25 |
25 |
20 |
15 |
35 |
 メノクラゲ
 ハネエイ
Used on the sea routes between Font and South (all four of them), as well as the water portion of the route between South and High-Tech. 5 copies of this encounter table are present in the game.
The route directly connecting Font and South uses these encounters even in the tall grass.
Route 11#
Time |
Morning |
Morning/Day |
|||
|---|---|---|---|---|---|
Pokémon |
|
|
|
||
Levels |
16 |
16 |
15 |
14 |
17 |
 ワンリキー
Used on the route east of Font.
This encounter table is also used in the water due to a lack of a corresponding sea table.
Route 12#
Time |
Morning |
Morning/Day |
|||
|---|---|---|---|---|---|
Pokémon |
|
|
|
||
Levels |
17 |
17 |
16 |
15 |
18 |
 ドードー
Used on the route north of Birdon.
This encounter table is also used in the water due to a lack of a corresponding sea table.
Route 13#
Time |
Morning |
Morning/Day |
|||
|---|---|---|---|---|---|
Pokémon |
|
|
|
||
Levels |
21 |
21 |
20 |
19 |
22 |
Unused. Intended for the route directly east of Birdon, which lacks tall grass entirely.
Route 14#
Time |
Morning |
Morning/Day |
|||
|---|---|---|---|---|---|
Pokémon |
|
|
|
|
|
Levels |
23 |
23 |
22 |
25 |
24 |
 ハネコ
 ポポネコ
 サンド
Used on the route north of Route 15.
Route 15#
Time |
Morning |
Morning/Day |
|||
|---|---|---|---|---|---|
Pokémon |
|
|
|
|
|
Levels |
24 |
24 |
23 |
22 |
25 |
Used on the route directly west of Newtype.
Route 16#
Time |
Morning |
Morning/Day |
|||
|---|---|---|---|---|---|
Pokémon |
|
|
|
||
Levels |
25 |
25 |
20 |
15 |
35 |
 イカリ
Used on the sea route between Newtype and Sugar.
Route 17#
Time |
Morning |
Morning/Day |
|||
|---|---|---|---|---|---|
Pokémon |
|
|
|
|
|
Levels |
28 |
28 |
27 |
27 |
30 |
Used on the route east of Newtype.
Route 18#
Time |
Morning |
Morning/Day |
|||
|---|---|---|---|---|---|
Pokémon |
|
|
|
|
|
Levels |
28 |
28 |
27 |
28 |
31 |
 レディバ
 マンキー
Used on the route east of Route 17.
Route 19#
Time |
Morning |
Morning/Day |
|||
|---|---|---|---|---|---|
Pokémon |
|
|
|
|
|
Levels |
29 |
29 |
28 |
29 |
32 |
 ミルタンク
Used on the route west of Blue Forest.
This encounter table is also used in the water due to a lack of a corresponding sea table.
Route 20#
Time |
Morning |
Morning/Day |
|||
|---|---|---|---|---|---|
Pokémon |
|
|
|
||
Levels |
32 |
32 |
31 |
32 |
35 |
 オコリザル
Used on the route between Blue Forest and Stand.
Route 21#
Time |
Morning |
Morning/Day |
|||
|---|---|---|---|---|---|
Pokémon |
|
|
|
|
|
Levels |
29 |
29 |
28 |
29 |
32 |
 カラカラ
 ガラガラ
 サイホーン
Used on the route directly south of Stand.
Route 22#
Time |
Morning |
Morning/Day |
|||
|---|---|---|---|---|---|
Pokémon |
|
|
|
|
|
Levels |
28 |
28 |
27 |
28 |
31 |
 ピチュー
 ピカチュウ
 ナゾノクサ
 クサイハナ
Unused. Intended for the route directly east of Kanto, which lacks tall grass entirely.
Route 23#
Time |
Morning |
Morning/Day |
|||
|---|---|---|---|---|---|
Pokémon |
|
|
|
|
|
Levels |
29 |
29 |
28 |
29 |
32 |
Used on the route east of Silent Hill.
This encounter table is also used in the water due to a lack of a corresponding sea table.
Route 26#
Time |
Morning |
Morning/Day |
|||
|---|---|---|---|---|---|
Pokémon |
|
|
|
||
Levels |
25 |
25 |
20 |
15 |
35 |
 ドククラゲ

Used on the sea route between Blue Forest and North.
Silent Hills#
Version |
Gold |
|---|---|
Time |
Morning |
Pokémon |
|
Levels |
7 |
Version |
Silver |
Time |
Morning |
Pokémon |
|
Levels |
7 |
Used in the dungeon that makes up the majority of the demo.
(Source: Pokémon Gold Spaceworld Disassembly.)
Leftover Older Collision Format#
All of the tilesets other than those used in the maps intended to be accessible in the demo use an alternate collision mapping that is mostly incompatible with the demo's near-final implementation.
Tile type |
Earlier mapping |
Proto mapping |
|---|---|---|
floor |
0 |
0 |
solid |
1 |
7 |
ledge |
11 |
7 (beside the tile you hop from, like A3) |
water |
21,2C |
21,29 |
whirlpool |
44 |
N/A |
waterfall |
48 |
22 |
cave pit |
57 |
60 |
skate pit/minetrack |
59 |
6a (unused) |
warp |
60, 61 |
71 |
ladder |
62 |
72 |
sign |
70, 71 |
95 |
cut tree |
80 |
12 |
grass |
82,8C |
18 |
tree |
FF |
05 |