 This article has a talk page!
This is a sub-page of Proto:Crash Bandicoot: Warped.

|
This prototype is documented on Hidden Palace. |
The May 14th, 1998 prototype of Crash Bandicoot: Warped is a demo version made for the E3 1998 showfloor dated five months before the final NTSC-U release version. It got repurposed as a preview build and was sent out by SCEA and SCEE. It is the first pre-release build distributed by SCEE, from the green "News Version" disc. It was released on June 1st, 2026.
Cheat Features#
Debug Mode#
To enable debugging features, you can turn on debug mode with the following GameShark code:
80069F40 0100
Some of the debug features present in the final game are missing at this point. The player and pause menu button combos are still leftovers from Crash 2.
Inaccessible Super Powers#
To enable the Fruit Bazooka or the Speed Shoes, use the following GameShark code:
8006A0B0 00??
Replace the "?" with one of the following:
- 0F - Fruit Bazooka
- 17 - Speed Shoes
- 1F - Both (cannot use both separately; mapped to the same button)
General Differences#
- The game still uses the same product code as the American version of Crash 2.
- A dongle protection is present in this build, which is a memory card containing specific data that needs to be read in order to boot the game. The game will reach the title screen before halting if the dongle is not inserted in memory card slot 1. The dongle protection is bypassed if debug mode is enabled.
Startup#
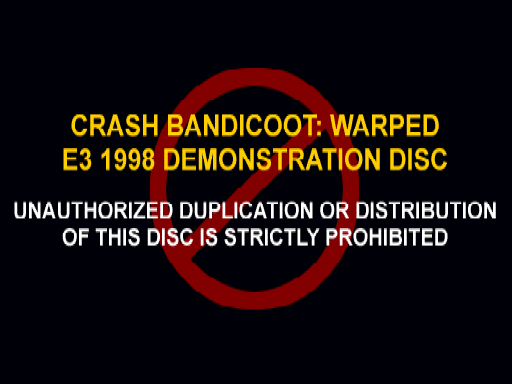
- The game starts with a warning screen labeling this preview as an E3 1998 Demonstration Disc and explicitly prohibiting any duplication or distribution of the disc content.
- A music track not used in the final version of the game is played here as a placeholder for the main theme. See the Soundtrack section for more details.
- There is no announcer presenting the company entities and the game's title.
- The Sony Computer Entertainment screen is similar to Crash 1, being a static text on a plain background.
- Universal's screen looks mostly identical to the Crash 2's one, just with the copyright info updated.
- There is no Naughty Dog box animation - it simply shows the company's logo with "Developed by" text above on a plain background.
|
E3 Demo |
Final |
|---|---|
|
|
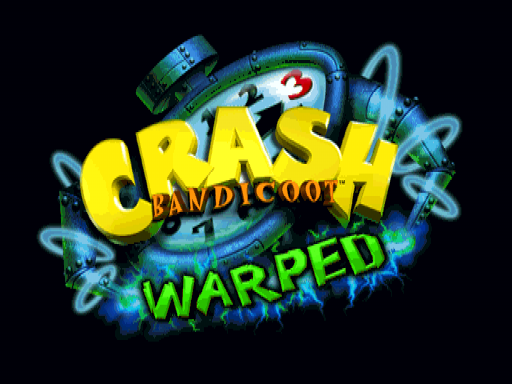
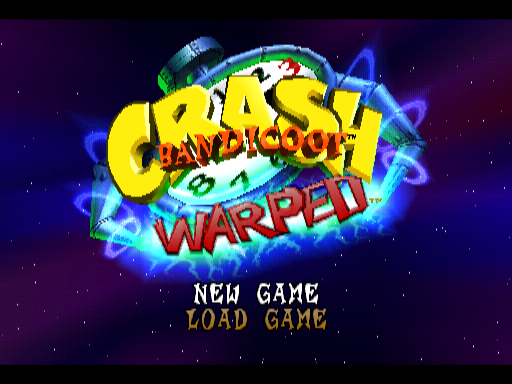
- The title screen uses an earlier pre-rendered variant of the Crash 3 logo, with a green tint for the Warped subtitle. The logo is static, centered and accompanied by a black background. It lacks any form of interaction and will automatically skip to gameplay after a few seconds.
- Because of this, there are no idle demo modes.
Gameplay#
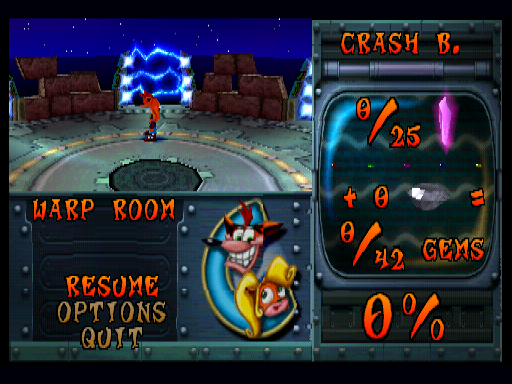
- Crash still has a round shadow like the previous games.
- This applies to all enemies and NPCs as well - All shadows in the final game use more accurate shapes.
- The pause menu is based on Crash 2, featuring crystal and gem stats all in the same screen instead of separate tabs for each collectible.
- The player name is positioned slightly upwards.
- There is no Vibration option, despite being supported.
- The Calibration option has been removed in the final game.
- Slider controls contain an extra spacing between the left arrow symbol and the text.
- The "Music Vol" and "FX Vol" labels are displayed in orange and flash by default, rather than only when the option is highlighted.
- There are no box counters placed at the end of the levels, so breaking all boxes in a level has no way of awarding a gem. They are still functional and appear in the pause menu.
- Time Trial is completely absent from this version - no trace of relics, clock boxes, time trial menus or anything like that exists at this point, so it appears this feature had not begun implementation or perhaps even been conceived at this point in time.
|
E3 Demo |
Final |
|---|---|

|

|
- The Time Twister's portal graphic features a totally different design for the load/save screen, which appears to be the same one from this build. See the Warp Room section for more details.
- A white screen is used for loading transitions, rather than a distorting vortex effect.
- Loading times seem to be slightly longer.
- The music does not fade out when entering a portal either.
- Cutscenes are all missing throughout the game.
- There are no specific music tracks for bonus rounds and alternate routes - the main path music is always used in both instances instead.
- Much of the music is incomplete and differs from their final variants, usually with slightly different melodies or rhythm. The processing is much rougher and playback glitches are therefore frequent in this build, particularly at the beginning of certain tracks.
- All tracks are in mono, regardless of the output option.
- Music volume defaults to 100% as opposed to 75%.
- Crash has only the two idle animations inside the levels: sighing and repeatedly glancing side to side, which are the same ones used in Crash 2. Additionally, he can also perform the dance while in the warp room.
- Coco does not blink her eyes in any of her animations.
- Crystals (and gems, despite being unavailable) do not play the choir sound effect, nor do they drop firework particles when collected.
- Checkpoint crates lack the chime sound when opened.
- Aku Aku floats on the right side of the character when they are facing away from the camera, rather than on the left.
- He also does not float alongside the character when riding Pura or when you start running with the Speed Shoes, causing him to fall behind offscreen most of the time or even obstructing the player's visibility at certain times.
- Bounce crates can be bounced up to six times, and you get one Wumpa fruit on the sixth bounce.
- The sixth bounce will always give you the fruit, regardless of how long you leave it be.
- In some levels, the sixth bounce counts towards the main tally even when the player is in a bonus round.
- Body slamming on the crate or breaking it while invincible will provide one Wumpa fruit instead of two.
- Slot crates drop their contents instead of being picked up automatically if there is no crate on top of them.
- Fruit slots give 9 Wumpa fruit instead of 20.
- Blank slots give one Wumpa fruit instead of nothing.
- The box tally does not show the total in bonus rounds.
- Crystals will add 2% to the completion percentage, as in the international versions of Crash 2.
- The dynamic difficulty adjustment system can only provide one Aku Aku mask regardless of the number of deaths, identically to Crash 2 and the European release.
- The yellow aura visual effect is missing when Aku Aku is summoned or lost.
- During Aku Aku invincibility, Crash's speed will always be locked to his default running speed, meaning that every move he performs will retain the same speed, whether he is sliding, crawling, or running with the Speed Shoes.
- As a result, his crawling speed will be faster.
- Breaking another Aku Aku crate while invincible does not reset the invincibility timer.
- Double jumps can be only chained once with enemy and object bounces.
- Crash does not faceplant into the ground when falling from a high place.
- Crash can display idle animations while invincible or standing on any surface, such as buttons, lifting and moving platforms.
- The angel death animation reuses the wing flapping sound from Crash 2.
- When spawning in a level, the character's facing direction upon landing is different, even for spawn positions that are the same as the final game.
- A number of textures across the game have different lighting or UV mapping.
- The portal graphics are slightly brighter.
- The sound the portals make when they open/close is higher pitched.
- The game over screen matches the one seen in Crash 2.
- Quitting the game will return to the startup intros instead of the title screen.
- Music and FX volumes also retain their current values, rather than resetting to default.
- If debug mode is enabled, pressing Triangle as soon as the level starts makes the character skip the cinematic entrance sequence and spawn immediately, allowing you to take control earlier.
Super Powers#
Super Powers abilities are unlocked by default, aside from the Fruit Bazooka and Speed Shoes.
Death Tornado Spin
Jumping from a certain height and then performing a tornado spin while standing over reflective surfaces will make Crash's reflection incorrectly appear below him in mid-air.
Super Charged Body Slam
The Super Charged Body Slam has a significantly larger shockwave radius, nearly double that of the final game. As a result, it is much easier to detonate TNT crates from a safe distance, although Nitro explosions will still hurt you.
- It cannot pick up Wumpa fruit and extra lives nearby.
- Crates in midair will be affected by the shockwave.
- Crash does not display his usual goofy expression when performing the Super Charged Body Slam. Instead, he retains whatever facial expression he was displaying beforehand.
Fruit Bazooka
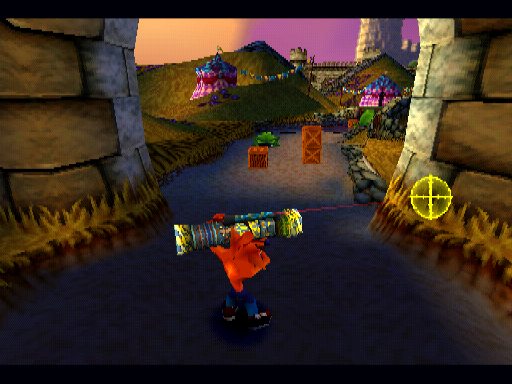
The Fruit Bazooka controls feel rather clunky at this point. The most notable change is the unlocked movement, allowing the player to aim with a full 360° rotation.
- It is mapped to R2 instead of L2, which conflicts with the Speed Shoes, making the latter unusable.
- Textures are corrupted.
- It often does not register when hitting a target.
- There is no sound effect for humming, aiming a target or shooting.
- You can pull out the bazooka anywhere.
- Crash will always aim the bazooka straight ahead when pulling it out, regardless of which direction he is facing. This is particularly annoying in side-scrolling sections, as he usually aims it as if he were in 3D sections.
- Depending on how long you press to aim up or down, the aim does not stop instantly, but rather decelerates.
- The animation of Crash pulling out and putting away the bazooka was drastically sped up in the final game.
- You have to wait until the animation of Crash putting the bazooka away ends before you can move again.
- The shooting range is unlimited, allowing you to destroy objects and enemies from a greater distance.
- Crash can pull the bazooka while invincible, although the invincibility will immediately be cancelled.
- Crash's torso is not affected by ambient lighting when holding the bazooka.
- Wumpa shots will despawn as soon as Crash puts the bazooka away.
- The Wumpa explosion visual effect shares the same one as the TNT explosion.
- Crystals, checkpoints, and lifting platforms are detected as a target when you aim at them.
- Getting hit by something while holding the bazooka causes an unusual glitch where Crash's torso pose holding the weapon will remain alongside his regular animations - and pressing Circle will both shoot Wumpa fruit and crouch at the same time. This also applies during all death animations.
- If Crash has a mask, certain enemies will play the kill animation as if Crash was defeated (goats, frogs, knights).
Speed Shoes
|
E3 Demo |
Final |
|---|---|
|
|
Crash's running animation while the Speed Shoes are active reuses the boost pad running animation from Crash 2, complete with the jittery nature of the run motion seen above. A unique animation was later created for the final game.
- Crash's speed reverts to the default while he is jumping.
- There are no dust particles.
- The footstep sounds continue to play at their normal rate.
Warp Room#
This demo features the first chamber with five playable levels: Gee Wiz, Under Pressure, Bone Yard, Midnight Run, and Tomb Time. It should be noted that these levels were rearranged for showcase purposes and did not represent the level order originally envisioned.
- The early underwater theme is used as a placeholder. The warp room theme is not present in this version.
- The Time Twister is explicitly located on top of the ruins of Cortex Castle, as the two other islands can be seen in the background. These are also based on the secret warp room background from Crash 2.
- Unlike in Crash 2, however, the islands are images, rather than being actual scenery models.
- Only the first chamber is available, and the other chambers are missing their geometry from the map entirely.
- Despite this, camera paths are present for the other four areas as a leftover.
- Crash spawns in front of the fourth chamber entrance.
E3 Demo |
Later Prototypes |
Final |
|---|---|---|
 |
 |
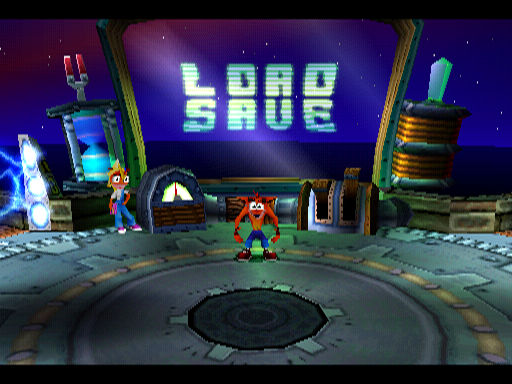 |
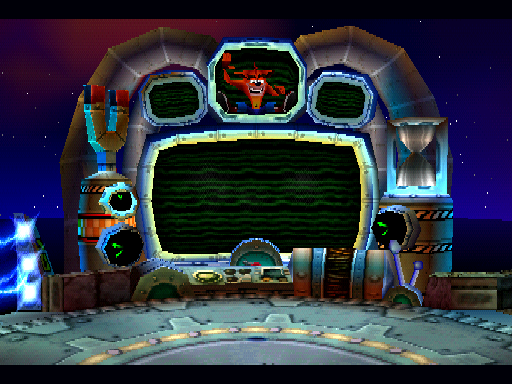
- The load/save screen features a much more detailed and larger design, so much so, that only Crash's double jump allows you to see all of it. The monitor displays a black screen with animated green scanlines, and has a more round shape. It is surrounded by more ornamental elements, such as spinning dials on the sides, and three smaller screens at the top.
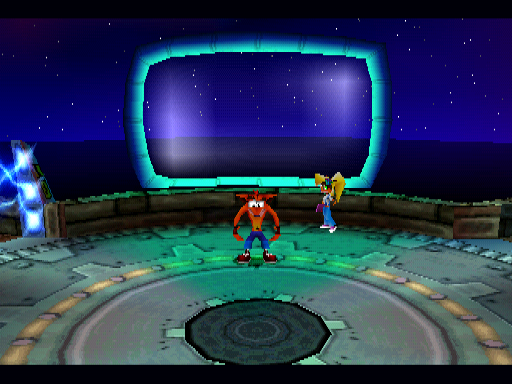
- This design was used as the Time Twister portal graphic throughout most of the game's development, as well as in some promotional materials such as the European cover art of the game. However, comparing it to the actual warp room reveals some differences that appear to be from an earlier revision. For instance, the portal graphic only features a path leading to the first chamber, there are no electric fences or walls, and there is a small object on either side of the load/save screen.
- As this is a demo, the saving function is disabled. The "LOAD/SAVE" text imprinted on the monitor is also absent, though it was not added until much later in development.
- Coco is absent. Consequently, animations of her entering and exiting a level are missing as well.
- Electric gates feature blue textures and do not push Crash back when touching them. In fact, the barriers appear to be purely decorative, as the collision blocking access is baked into the level geometry.
- The electric currents are also animated differently.
|
E3 Demo |
Final |
|---|---|
|
|
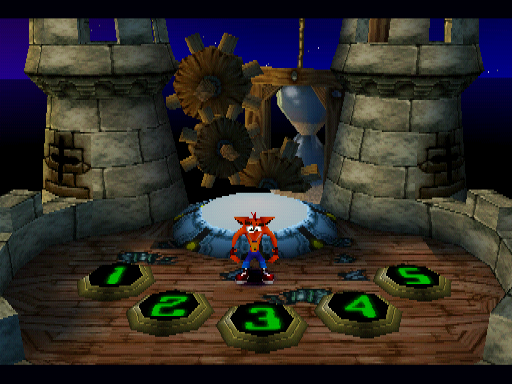
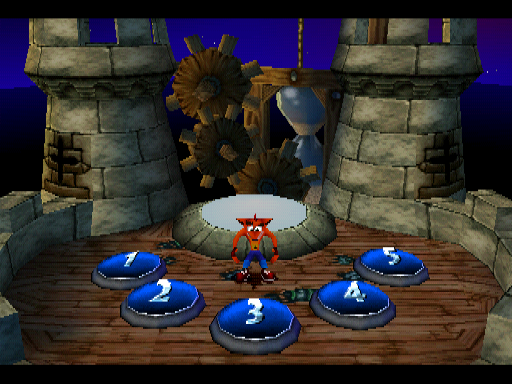
- Buttons have a completely different style, being pitch black and using a green 80's computer font, similar to the "LOAD/SAVE" text in the final game. The button frames are also tinted yellow.
- They remain visible at all times, even when the player is far away.
- The HUD displays the box tally (0/0).
- There is no HUD showing collectibles or the level name upon stepping on a button.
- The portal pad has a different design, which was eventually reused for the secret chamber.
- The camera is unlocked in the first chamber and can pan horizontally when the player moves to either side.
- When Crash enters a portal, his warp sucking animation always points forward instead of toward the center of the portal sphere, causing the animation to point away from it when entering from the edges.
- Crash's shadow is already where he lands upon returning to the warp room.
- Level portals will close instantly as soon as Crash gets out of them.
- Level portals will remain open over a greater distance.
- The player can stand on top of the walls in the first chamber.
- Some of the textures have different lighting, such as the bricks and the scenery in the first chamber.
- There is some collision on the floor completely surrounding the portal pad, forcing the player to jump in order to enter the portal.
- After respawning from a game over, a portal appears for a brief moment showing Orient Express.
Level Differences#
Gee Wiz#
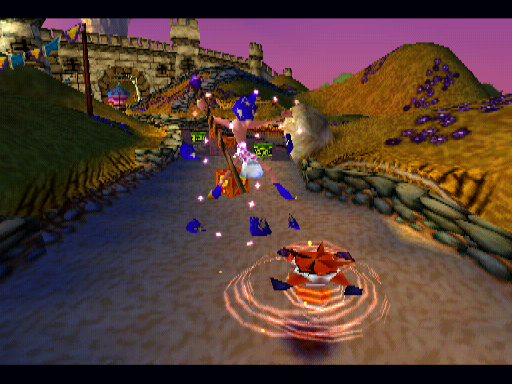
- The level features a completely different music track that was never used in the final game.
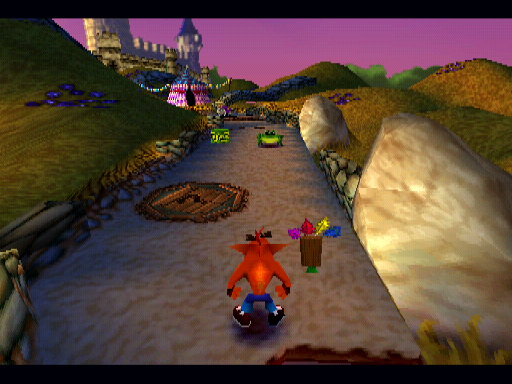
- The lighting has an evening scheme rather than an afternoon one, with the ground appearing darker overall.
- The sky has a purple coloration and the background is just a part of the castle wall with a few bushes misplaced across the skybox.
- There are no swallows or butterflies at all.
- Crash will tap his left foot before his legs walk away after being cut in half by a knight lab assistant.
- Wizard lab assistants take two hits to defeat. The first hit destroys their wizard costume, exposing their underwear. This still occurs in the final American version if you hit them with the bazooka, but otherwise they go down in one hit. This behavior was reimplemented in the European release to increase the game's difficulty.
- They lack a grunt when hit.
- Spinning the magic orbs will simply make them go through Crash and leave him unharmed, whereas in the final game they also get destroyed.
- Magic orbs do not make a sound or emit purple particles when hitting Crash.
- Crash is pushed back when spinning on the wizards even on the second hit, which does not happen in any of the final releases.
- They can still be defeated in one hit if you slide on them, though.
- The hitbox when they are in underwear does not work properly - you can clip through them without taking damage.
- The goat kick animation does not loop properly.
- There are no invisible boundaries preventing the player from standing on top of the stone bridge fences.
|
E3 Demo |
Final |
|---|---|
- An extra sound effect plays when the frogs are about to kiss Crash.
- No frog sounds are made when Crash is turned into a frog.
|
E3 Demo |
Final |
|---|---|

|

|
- Chickens have corrupted textures on its face and comb.
- They do not scream or drop feathers when killed.
- Crash will respawn higher up in the air at the start of the level.
- The large wooden logs placed across the path are baked into the level geometry. In the final game, they are their own entities and do not exist in the geometry of the level itself.
Main Level#
|
E3 Demo |
Final |
|---|---|
|
|
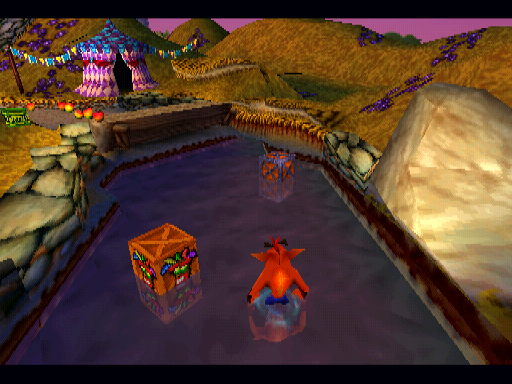
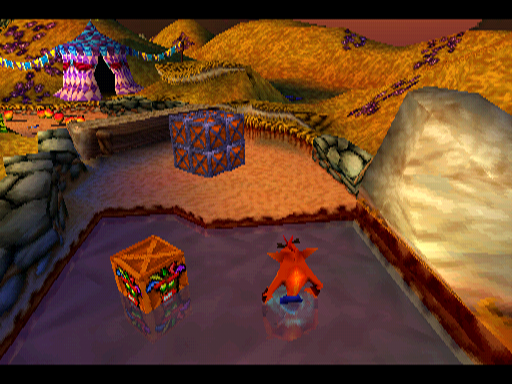
- The 2x2x2 locked crates found in the final game are just a single one here.
- The puddle of water originally reached the wooden log just after it, where it stopped between the Aku Aku crate and locked crates in the final game.
- The pit before the third puddle of water is larger.
- Shallow water properties are present in the pit before the fourth puddle of water, which become visible when falling into it.
- The pile of crates containing the third slot crate before the final checkpoint is placed on the left side of the scenery.
- The pit before the last wizard lab assistant has a larger gap on the left side.
- There is a TNT crate in the stack of crates in the uphill ahead before the sixth puddle of water.
- Amusingly, the chicken can be blown up by the TNT explosion if you make it stand next to it. This cannot be seen in the final game as there are no TNT crates placed near the chickens.
- The camera angle is much closer to the player in the area with the bonus round entrance.
|
E3 Demo |
Final |
|---|---|
|
|
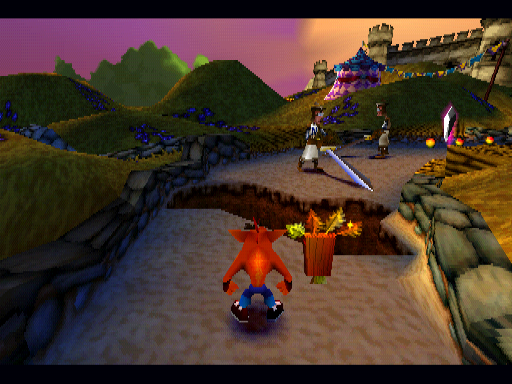
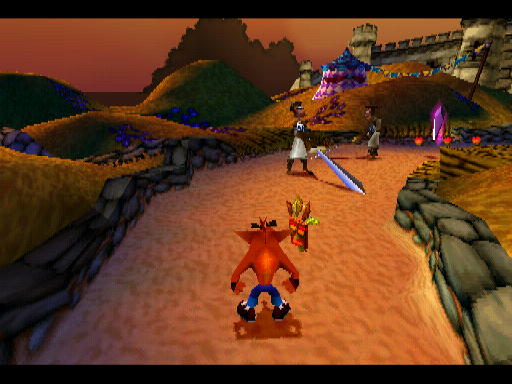
- There is a pit before the two knight lab assistants next to the crystal.
Bonus Round#
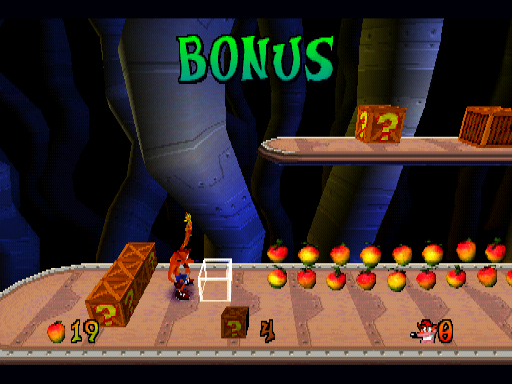
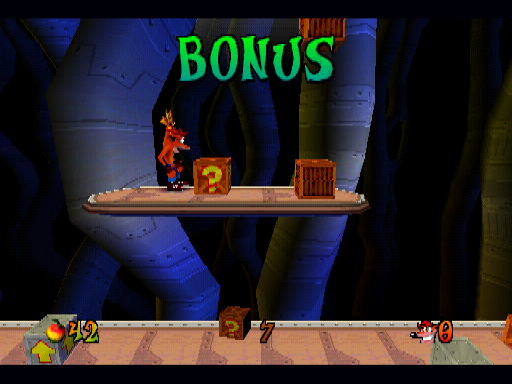
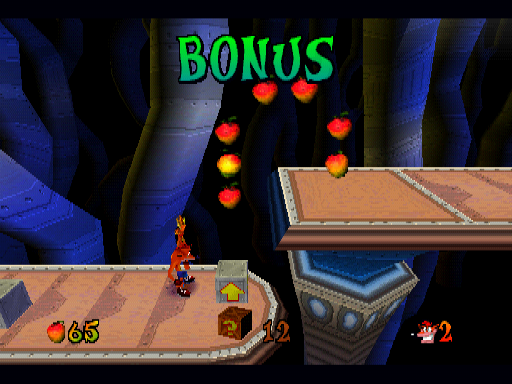
Perhaps the most striking difference in this build, Gee Wiz originally featured an underground bonus theme filled with metallic structures and advanced machinery. This was likely removed because it did not make sense in the medieval setting.
|
E3 Demo |
Final |
|---|---|

|

|
- The entrance to the bonus stage is a ? trapdoor that opens down, making Crash fall. These were commonly used in Crash 2 levels but were later entirely replaced with the hovering platforms.
- The trapdoor uses a unique wooden texture that does not appear in the final game.
- The general layout does not resemble any bonus round in the final game - it begins with an iron arrow crate leading to some Wumpa fruit airborne and a few crates nearby. The path then descends to a lower floor with a line of three crates arranged diagonally - an usual setting for 2D sections, especially bonus rounds - followed by an outline crate leading to an upper platform with more crates. Going forward there is a ! switch that activates the aforementioned outline iron arrow crate required to reach the upper platform. Finally, the iron arrow crate at the end leads to the upper path where the round ends.
|
Crash 2 |
E3 Demo |
|---|---|

|

|
- The exit platform has a different style from the entrance, something that is never seen. The texture for this platform is a recolored variant of the platform used in Crash 2's Dynamo bonus rounds.
- There are 12 crates in total, bringing the total number of crates to 87 instead of 100.
Despite the bonus being overhauled shortly after, leftovers of this crate layout would not be removed from the level until much later after the final bonus was already in place, surviving in the game as late as the August 14th, 1998 build.

Under Pressure#
- The level features the aforementioned early underwater theme, which also served as a placeholder track for the main theme throughout the development.
- The background lacks the city details, and is more of a navy-blue color.
- The jet sub has a longer cooldown between torpedo shots.
- You cannot fire torpedoes by pressing X.
- Crates have a delay before breaking when you boost slightly above them. In the final game, they never break in this case.
- Sometimes, one of the jet subs may spawn further up, clipping into the scenery.
|
E3 Demo |
Final |
|---|---|

|

|
- The pufferfish are purple instead of red.
|
E3 Demo |
Final |
|---|---|
- Moray eels make a different sound when attacking.
|
E3 Demo |
Final |
|---|---|
- The jet sub makes a different sound when shooting.
Main Level#
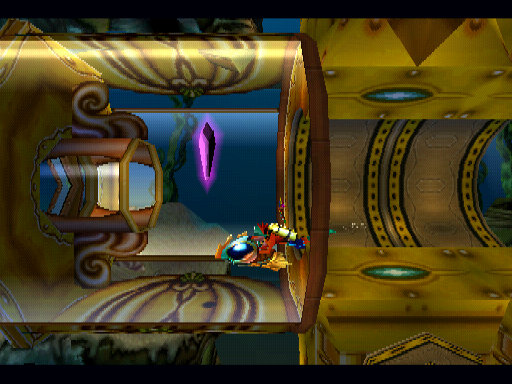
- A coral texture under the starting point can be seen applied incorrectly when the camera pans over at the beginning of the level.
- The rock formation in the upper right corner of the level outside the first electric tunnel was altered a bit.
- The first slot crate contains a life in the cycle pattern.
- There is more seagrass at the bottom of the first descent.
- A rock formation is missing under the small tunnel afterwards.
- Seagrass is present before the first checkpoint.
- The first jet sub is placed further away from the tunnel exit.
- The two sharks above the trio of coral reefs covering crates are placed slightly to the right, which was likely changed due to the second one overlapping with the mine ahead.
- There is an iron crate inside the third tunnel, right before the final checkpoint.
- There are rock formations above and under the exit portal tunnel that were removed in the final game.
- The crystal is placed inside the tunnel leading to the exit portal, where the box counter would be located in the final game.
Bone Yard#
- The level is called "Dino Might!" in the pause menu instead, as it swapped names with the third chamber's prehistoric level.
|
E3 Demo |
Final |
|---|---|

|

|
- Bone Yard uses a different portal graphic.
- There are no butterflies at all.
- No ambience sound effects are present.
- Lava pits do not emit any smoke.
- The bonus round is entirely absent, bringing the total number of crates to 53 instead of 66.
- The majority of the vines on tree trunks that creep along the ground, in particular those on the right side of the scenery, are absent in the final game.
- Killing the wave lab assistants will produce a pinkish smoke effect rather than a gray one.
- Collisions around bones have a lower resolution. Because of this, Crash stops moving instead of "slipping" when walking on certain parts of the edges.
|
E3 Demo |
Final |
|---|---|
- The sound the wave lab assistants make when attacking is less compressed and contains an additional segment with bubble noises, which is played in-game when they submerge into the tar and bubbles appear.
- When Crash is burned by lava, he uses the same animation frames from the land mine stun animation from the chase levels in Crash 2. As a result, the final five frames are still intended to transition into the standing animation, leaving him stuck in his regular running pose upon touching the ground.
- He will only bounce once, even if touching the lava again.
- He does not shout "Whoa!" either.
- The collision is finicky around chase segments. If you run along the right side of the path, you will keep getting stuck behind things.
|
E3 Demo |
Final |
|---|---|
- Mini-volcanoes make a different sound.
- You cannot automatically destroy the grass while invincible.

- You can walk on the sides of the crates in side-scrolling sections.
- Some minor differences can be seen in the scenery of the levels:
- Dinosaur skulls in the scenery have an extra hole in front of the eye sockets.
- Ground textures are different, featuring a different grass shape, with small rings inside.
- They also lack a proper transition to the swamp floor around chase sections.
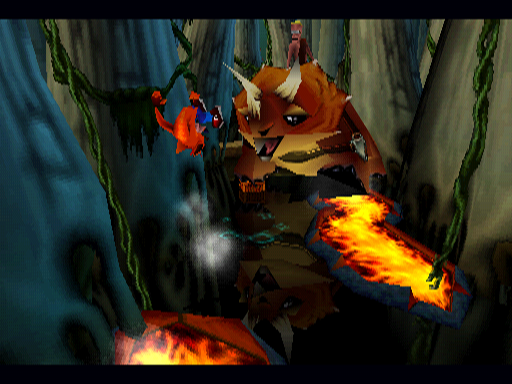
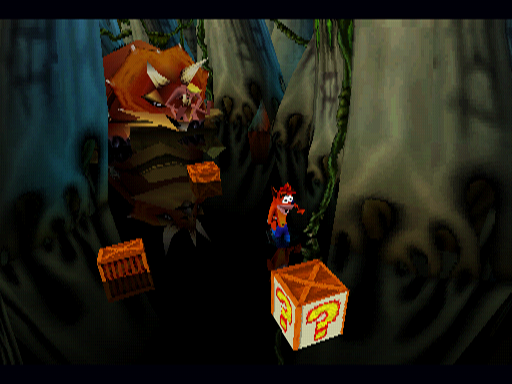
- The triceratops that chases Crash is ridden by a caveman lab assistant (also seen in concept art), who is completely absent in the final game. The caveman has two poses for riding the triceratops: one on top of its body, and the other clinging to its front horn. When the triceratops stops moving, the caveman is flung forward and ends up hanging onto the horn.
- In addition to the saddle, the triceratops model also features more textures such as toes on its feet and a tongue, which were later removed.
- The triceratops shakes its head when it stops moving, as if trying to get the caveman off its horn.
- It will only make the growling noise when Crash is caught or at the end of the final chase sequence.
- The sound of it destroying its cave and its footsteps are quieter.
- No sound is played when logs are destroyed.
- Instead of being flattened when Crash is caught by the triceratops, the same animation where Crash gets run over by the boulder in the previous game is used.
- The triceratops also keeps running after catching Crash, rather than stomping on Crash's flattened body.
- Crash can still be killed by the triceratops even after it has stopped moving if you get too close.
- During the invincibility frames, you cannot pass through the triceratops' body.
- Pulling out the Fruit Bazooka while the triceratops is chasing you will make it instantly despawn.
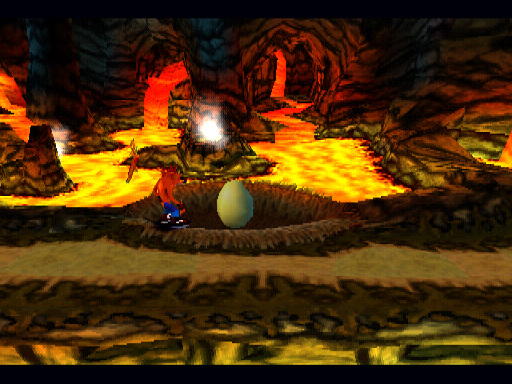
- While riding Baby T, stopping causes him to slide forward slightly.
- Body slamming close enough to Baby T or on his back does not make Crash automatically mount on him - rather, he will simply clip through his body.
- Body slamming on the egg will not hatch it either.
- Baby T will not respawn in the nest if the player dies or loses him.
- Crash is not be able to stand on top of Baby T by landing on him while spinning.
- Aiming with the Fruit Bazooka at Baby T will detect him as a target.
- The invisible walls in the side-scrolling sections are less narrow. As a result of this, you can get into the side of the crates without breaking them.
- Most of the crates placed on the swamp surfaces are rotated differently.
- The reflection of Crash's torso when pulling out the bazooka erroneously appears on certain parts of the normal ground.
- The red gem platform retains its collision even in its ghost form.
Main Level#
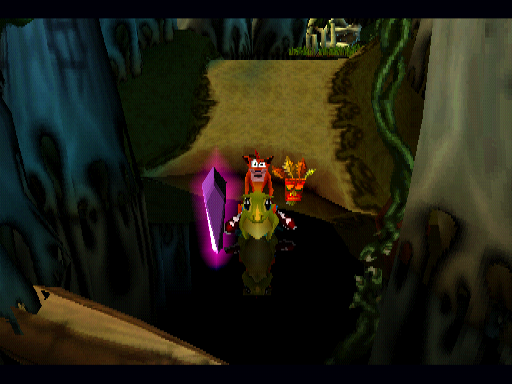
- The skybox color is light-blue in the volcanic crater area instead of pitch black.
- Pulling out the Fruit Bazooka at the start of the volcanic crater 2D area will teleport Crash to a specific spot right in front of the path of Wumpa fruit where the
obj_dino_blockerobject is placed, which normally prevents the player from backtracking with Baby T.- If Crash is not directly aligned with the object's coordinates, he will instead be placed out of bounds and get stuck outside the level geometry.
- The camera may break at the end of the volcanic crater area and not follow the player when attempting to backtrack while walking on the edge.
- A nest with an egg is present in front of a lava pit; the Baby T that comes out can be used for the final chase sequence that follows right after. This explains the crate layout in front of it being originally designed with Baby T in mind.
- Entering the chase sequence while mounted on Baby T will not make the triceratops appear.
- The crystal is placed during the last chase sequence, rather than in the volcanic crater area.
- The second pterodactyl from the last chase sequence is present here - due to an oversight, it cannot be seen in the final game as it is drawn before the player reaches this area, causing it to fly away prematurely. In particular, its growl can be heard from a distance in the swamp after the third checkpoint.
Gem Path#
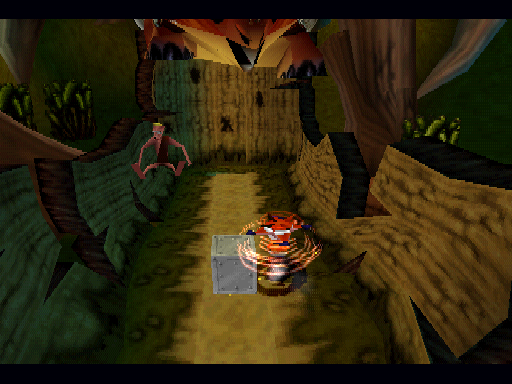
The gem path can be accessed by activating the debug mode and pressing R1 in the pause menu to get all gems. Alternatively, you can obtain only the red gem to unlock the path using the combo item exploit, or the GameShark code 80069EEF 0004.
- The red gem path camera transition has a different angle.
- The first checkpoint crate is a regular one instead of iron.
- There are invisible steps behind the start area of each chase sequence.
- When the second chase sequence begins, the caveman lab assistant will fall off from his saddle and be squashed by the triceratops. This animation does not play anywhere else.
- You can interact with him by turning around as soon as the triceratops starts moving, such as spinning him away, jumping on him, or even taking damage upon contact.
- While there is an iron checkpoint box before the last chase segment like in the final game, it will never spawn as this build uses a slightly older version of box code that does not have iron checkpoint boxes implemented (see later section).
- In the second chase, the second mini-volcano is placed further to the right.
- The last mini-volcano and current are placed further to the left.
- The clear gem is placed offscreen after the exit portal and has no assigned ID, defaulting to the level's box gem. This means that once you've collected it, it will be aligned to the left in the inventory.
- It is only drawn at a specific camera position (internally set as position 18, which is when you go down to the exit portal area), so you have to jump in a certain way for the camera reach that spot. If you walk away from it, the gem object will despawn.
- If you do a high jump and go towards the camera at the end of the path without triggering the exit portal, it will not appear when you approach its spawn area, unless you jump.
Midnight Run#
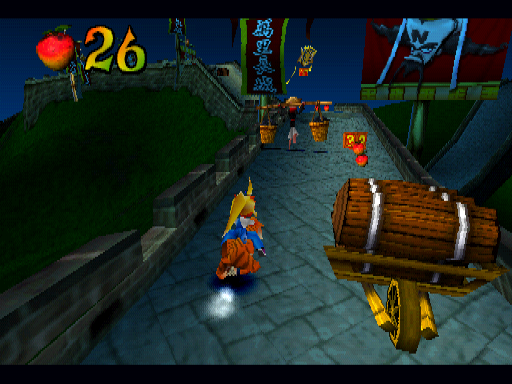
- The level is called "Orient Express" in the pause menu, a name that was later repurposed for Level 3 in the final game.
|
E3 Demo |
Final |
|---|---|

|

|
- Midnight Run uses a different portal graphic that features crates in the distance.
|
E3 Demo |
Final |
|---|---|
- The "RAAAH" that Pura makes when sprinting is different.
- You cannot sprint by holding R2.
- Coco retains her default facial expression during her jump animation.
- Coco does not close her eyes during her landing animation.
- You can stand on the sides of the scenery, as invisible boundaries are less restrictive.
- No sound effect is played when Coco rides on Pura.
- No dizzy sound effect is played for Coco during the regular death animation.
- Hanging life crates are ? crates but with extra lives. They also do not automatically give you the contents within.
- Barrel wagons are smaller as the model is not stretched.
- Invincibility frames do not protect you against enemies and hazards.
- When killed by a hazard near the edge of a bottomless pit, Coco and Pura will play their regular death animation without falling, leaving them floating over the pit.
- Crates have a delay before breaking if you barely touch their edge while jumping. In the final game, they never break in this case.
|
E3 Demo |
Final |
|---|---|
- Bouncy ramps make a creaking sound.
|
E3 Demo |
Final |
|---|---|
- Chinese guard lab assistants make a different sound effect.
- Pura does not make a purr sound when Coco gets off him at the end of the level.
- If you move far enough away from the exit portal to close it and then approach it again, some sound effects will stop playing properly until the player loses a life.
- An audio bug may also occur after the portal reopens: if the player jumps, the landing sound effect will play and loop indefinitely.
- It is not possible to use the player debug cheat to obtain Aku Aku masks for Coco.
Tomb Time#
- Crash makes the regular dirt footstep sound throughout the level.
|
E3 Demo |
Final |
|---|---|

|

|
- The black dog hieroglyph texture (a tribute to Naughty Dog's mascot, Morgan) that appears on the walls of the pyramid was redrawn.
|
E3 Demo |
Final |
|---|---|
|
|
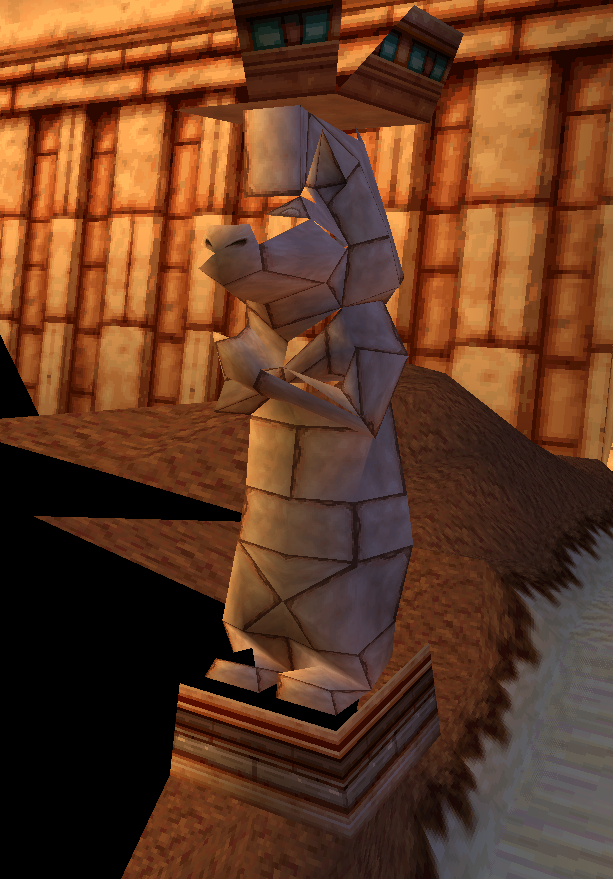
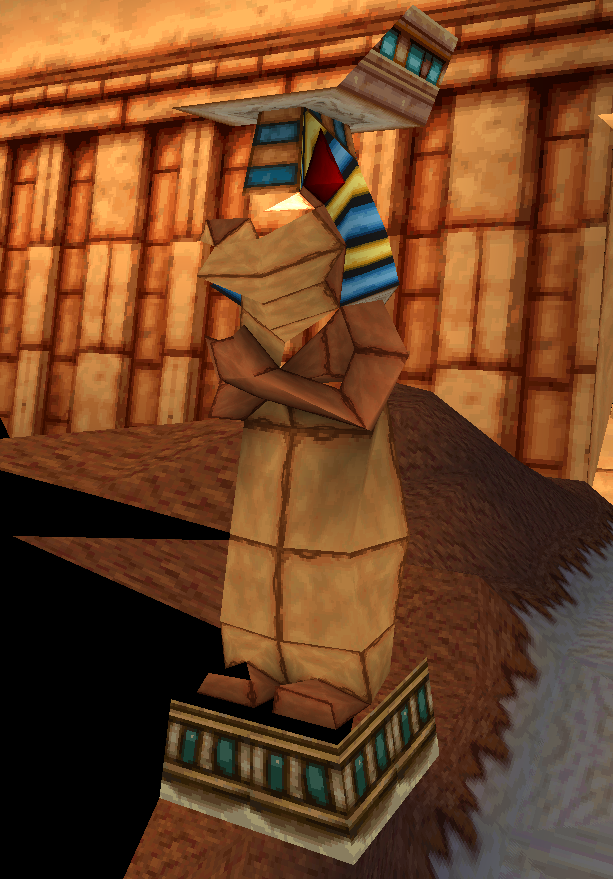
- The Egyptian Dingodile statue prop was overhauled for the final game. On one hand, the early version of the model has different texture mapping and lacks any colorful textures, using the same stone texture for most of the model. On the other hand, the model is realistically affected by the level's lighting unlike the final's "glowing" appearance, it uses a new texture for the statue base, and Dingodile has an unique texture for his eyes and nostrils here which are never seen in the final game.
|
E3 Demo |
Final |
|---|---|
- Snakes make a different sound effect.
- A bug involving the snake enemy causes the game to award a crystal or clear gem whenever the player is hit or killed by it. However, this behavior does not appear to be consistent.
|
E3 Demo |
Final |
|---|---|
- Switches make a different sound effect.
|
E3 Demo |
Final |
|---|---|
- The poison dart shots from walls sound a bit different.
- The spotlights are brighter.
- The fire from the flamethrower lab assistants has a shorter range.
- They will not be immediately defeated when the player is hit by the fire.
- The stone blocks dropped by the lever pulling lab assistants retain their collision after crushing Crash, meaning he can be carried along by the blocks while in his squashed state.
- Crash still blinks his eyes after being covered in dust by the jar monkeys. In the final game, his eyes are always static.
- There is no explosion sound effect when Crash is hit by such projectiles.
- Crash cannot use the Fruit Bazooka to earn additional Wumpa fruit from the helpless monkey.
- The jar monkey's laugh plays at a slower rate.
- You cannot bounce on the pull levers in succession.
- There are no sound effects when Crash is poked by the spear floors.
- Moving platforms only make a sound when moving from right to left.
- If you get crushed by a door while holding the Fruit Bazooka, Crash will play the death animation of being crushed to his feet instead.
- Crash cannot use the Fruit Bazooka to hit the switches to open the doors.
- Aiming the bazooka at the spear floors, platforms, and doors will be detected as a target.
- Wumpa shots can pass through closed doors and hit objects behind them.
- There are no invisible barriers in the column gaps of the pyramid walls.
- The purple gem path acts like a hard path in this version. Rather than needing a gem to unlock the door, you must reach the entrance within a set time or the door will close. If you get to the split-path section in time, you have 120 frames after the door is drawn on the screen to enter the hard path (regardless of how fast you get there). If you get there after the timer has expired, the door will close immediately and will not open again until you re-enter the level. If you reach the hard path entrance before the door closes, it will remain open permanently until you re-enter the level.
- The large floor tiles have a more saturated beige coloring.
- Crash plays the balancing animation when on the edges of the green snake tiles.
- When Crash is killed by the jar monkeys in the first section, the death animation of him being covered in dust always plays, whereas in the final game an oversight causes the angel animation to be used interchangeably.
- Sometimes an audio bug can happen when breaking the stack of crates before the final oil floor section, causing a specific sound effect to loop indefinitely.
Main Level#
- There are no extra lives on each side of the Cortex sphinx head at the start of the level.
- The camera angle in the corridor before the first set of falling scarab platforms is slightly to the left.
- The ! switch after the bonus is placed further ahead.
|
E3 Demo |
Final |
|---|---|
|
|
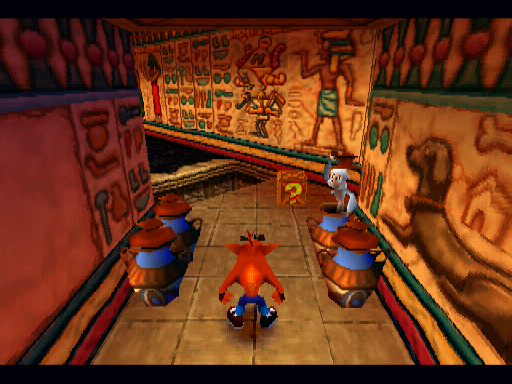
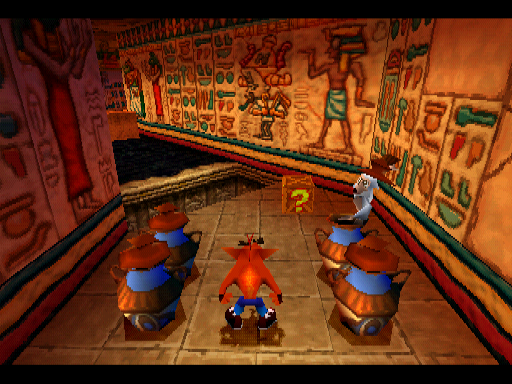
- The corridor with the first set of jar monkeys is narrower.
- The first lever pulling lab assistant pulls the lever much faster, rather than waiting a few seconds after each stone block slides into the pit.
- The Aku Aku crate afterwards is placed further behind, next to the lab assistant.
- After the first wall trap section, a flamethrower lab assistant was replaced by a row of four Wumpa fruit, although this still remains the case in the European release.
|
E3 Demo |
Final |
|---|---|
|
|
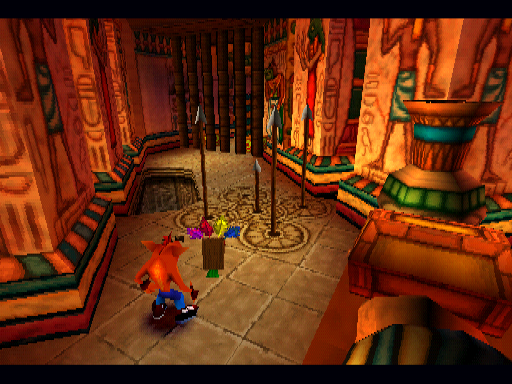
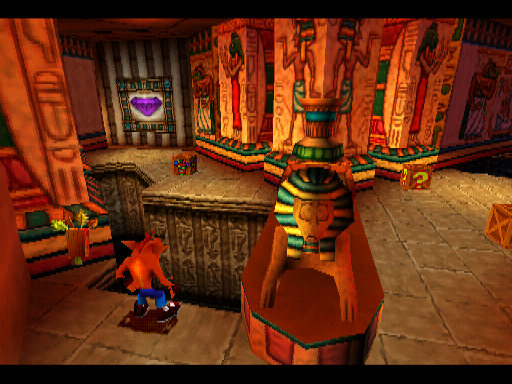
- The hard path has a unique gate made of vertical slats that can be seen through. The texture for the sliding door in the final version presents similar bars.
- A staggered spear trap is placed instead of a large gap at the beginning of the left path.
- The second Aku Aku crate is also missing.
- The pair of bounce crates at the start of the right path is placed further back.
- There is a crocodile in the pit afterwards.
|
E3 Demo |
Final |
|---|---|
|
|
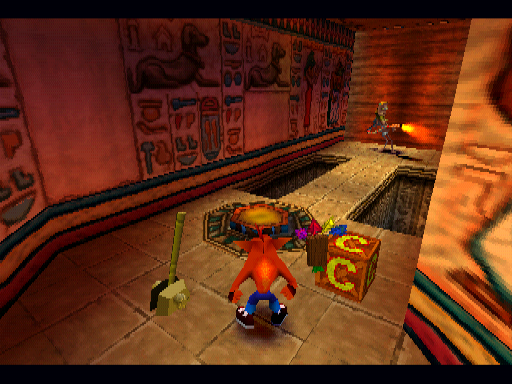
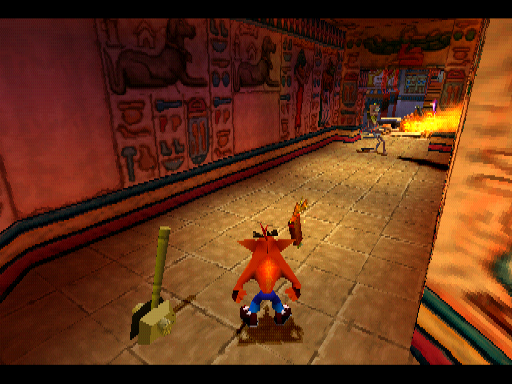
- The final checkpoint crate before the last oil floor section is placed after the oil floor, next to the lever pulling lab assistant.
- There are two pits on each side and a switch to open the door ahead that were removed in the final game.
|
E3 Demo |
Final |
|---|---|
|
|
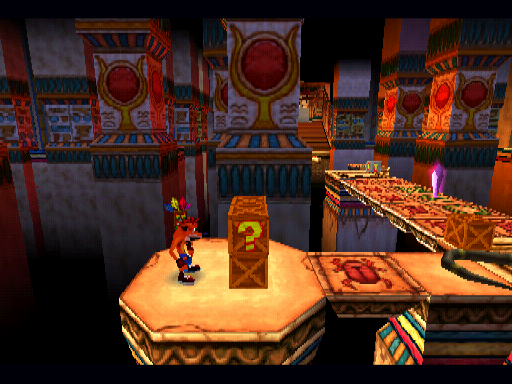
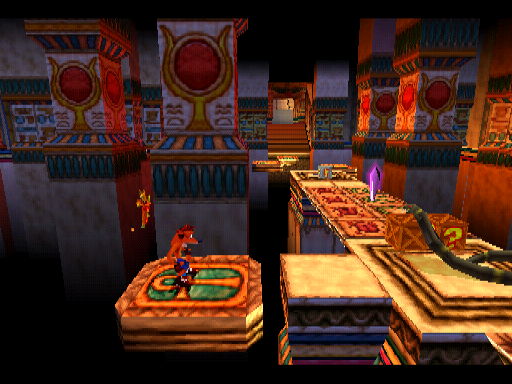
- The connection back from the alternate path to the main path near the end of the level is different: the deactivated moving platforms are always present, and there is an extension of the ground next to them, which makes entering the alternate path from the back as easy as slide-jumping onto the platforms. There are also four extra crates on said new ground, bringing the total number of crates to 98 instead of 95.
- The final two crates are placed on each side of the floor.
- There is an extra row of two red scarab platforms at the very end, which was replaced by a solid floor in the final game.
- The ! switch is placed on the right edge.
Hard Path#
- There is no clear gem at the end of the path.
Soundtrack Differences#
Most of the tracks are early variants of their respective themes, featuring different melodies or rhythm.
Level |
E3 Demo |
Final |
Notes |
|---|---|---|---|
Title Screen |
An early version of the underwater theme that also acted as a placeholder for the main theme and the warp room. It could be heard on the game's official website, as well as in the demo featured as a hidden unlockable in Spyro the Dragon upon booting it up. In 2013, composer Josh Mancell posted the "pre-console" version of this track on his SoundCloud, labeling it as a demo for the underwater levels. |
||
Warp Room |
|||
Atlantis |
|||
Medieval |
Gee Wiz features an entirely unique and previously unheard theme. |
||
China |
The "decrescendo" sample plays at the beginning, and the woodblocks that start playing at 0:25 play with snares alongside them. |
||
Prehistoric |
This track is more similar to its pre-console version as there's an additional shaker beat that plays throughout the song, and the part at 1:16 has less percussion. |
||
Egyptian |
It lacks the tambourine beats that start playing at 0:07, and the samples are quieter. |
Unused Content#
Unused Text#
WALLSTREET
An early name for Midnight Run can be found in the pause menu strings of Gee Wiz and Bone Yard.
The pause menu contains an array of level strings grouped in with the other text, which is intended to display the name of the current level while the game is paused. Since each level file contains its own pause menu code, the menu text is also stored separately in each file and is loaded within the level. However, there are two different sets of level strings in this version where the name for Midnight Run will differ.
The title screen and game over level data contain even fewer names, retaining only the Crash 2 boss level names listed below.
INTRO
RIPPER ROO
K. BROS
TINY
N. GIN
N. CORTEX
Leftover level names for the Crash 2 bosses can be found among the level strings across all levels.
VIBRATION: OFF
VIBRATION: ON
Despite supporting vibration, the menu option is not used in this build. The text used in the final game omits the colons.
PAD: FLIGHT
PAD: DIRECT
Leftover menu option for the Jet Pack levels in Crash 2.
Unused Graphics#
Mutato Muzika#

The title screen level data contains an unused splash screen (bmutD) of Mutato Muzika - the game's composers - which would be displayed after the Universal logo. Interestingly, the exact same screen originally appeared in the June 15th, 1997 prototype of Crash 2.
Jet Ski textures#

Under Pressure contains one of the texture pages for the Jet Ski levels (Wat0T), which includes a texture of stone seen in the medieval levels.
Early Medieval Textures#


Gee Wiz contains is a set of textures not used anywhere, including a question mark that differs from the one used in-game for the bonus round platform.
Iron Checkpoint Textures#


Despite the box code predating the iron checkpoint crate, its texture is already present in the global texture pages.
Additionally, a texture for the letter C (lifted from the iron checkpoint crate), likely for the same purpose as the lone exclamation mark sprites that pop out of action crates when they are hit. Interestingly, this behavior can be seen in Crash Bandicoot 2: N-Tranced.
Unused Models#
Button Light#
An emerging round light beam can be found in the warp room files (Bl12V). Also seen in early footage, it would light up from below when Crash stood on a button.
Unused Animations#
The warp room level data contains two leftovers from Crash 2's warp room:
- Crash's thumbs up and pointing down animation from using the warp room elevator (Cw72V).
- Crash's animations for watching the hologram projector and scratching his head (Cw32V, Cw42V). These two animations were later updated to become an idle animation of Crash scratching his head before being replaced with a new, unified animation.
Unused Objects#
Button 6#


A sixth button for the warp room that can be seen in earlier footage. The object for this will attempt to use these graphics, but will also immediately kill itself after it spawns. However, since the warp room itself only has five buttons placed in the level and the destination level is needs to be configured through the individual placement of those buttons, and as there are no other levels on the disc, it is not known where it would have lead if it was meant to appear in the demo at all.
On-touch Checkpoint#
Box (BoxsC) subtype 26 is an unused type of "box" which is simply a checkpoint that is automatically triggered upon touch. It uses the C sprite from the "CHECK POINT" text itself as its graphic and has a collision box the size of any normal box. When Crash touches it, it triggers a checkpoint exactly like checkpoint boxes - plays the same sounds, spawns the "CHECK POINT" text, saves a checkpoint correctly, even tracks dynamic difficulty adjustment. It is completely identical in function to an actual checkpoint box, but isn't a box. The code for this 'automatic' checkpoint was removed from later versions and subtype 26 was made invalid. Curiously, subtype 27, the iron checkpoint box, has no valid mapping in any levels in this build as if the box code predates the creation of the iron checkpoint box, despite there already being one placed in Bone Yard's red gem path.
Leftover Data#
Crash 2 Leftovers#
Title Screen
The title screen level data contains leftover texture pages for the Crash 2 title screen logo (LogoT) and Cortex (CrtxT).
UIS Startup Logo
The Universal logo screen with Crash 2 copyright info can also be found.
Placeholder Save Icons

In the warp room level data, the texture page containing placeholder save icons found in Crash 2 that are loaded in memory until the menu is accessed is also here (Car1T).
Memory Card Icon
Also stored in Car1T are the memory card icon sprites.