 This article has a talk page!

|
To do: |
Panzer Dragoon Saga is one of the last games released for the Saturn in US and Europe. Its high production values and unusual open-ended, open-world RPG structure have allowed this title to have a cult following. The fact that you can now fly a dragon through a fully 3D world is pretty neat. Its low print run, partially because it comes on four discs, and high demand for a rerelease have led to this game going for a pretty penny.
Debug Mode#
Unlock Debug Options#
Debug Access on original hardware#
The Game will check certain conditions during boot up:
- "Andromeda_3" savefile in memory?
- keyboard on controller port2?
-if both are true, the HUD can be activated (Print Key on KBD, input 2).
-the Title Screen Debug Menu can now be activated by holding Start Button on Controller 2 (ESC on KBD, input2), while Press Start on the Start Menu Screen (no need to edit the code)
-a worldmap with all story points can be accessed, when highlighting the "Continue"-Option and holding Start Button on Controller 2 (ESC on KBD, input2) and then press Start on Controller 1.
If no keyboard is available, the following hex edit can help access the Title Screen Debug Menu.
(Source: Yaz0r)
Title Screen (Hex Editing or Patch)#
To enable extra options at the title screen, alter the code in each of the four CD image files using hex-Editor to open image files and searching for the following hex strings:
US/EU Version (Panzer Dragoon Saga) |
Alter the line to |
Script Details (US/EU) |
Debug Result (US/EU) |
|---|---|---|---|
89 2E E0 07 D3 15 1E 32 A0 34 81 E3 00 F6 00 00 |
8B 2E E0 07 D3 15 1E 32 A0 34 81 E3 00 F6 00 00 |
 |
 |
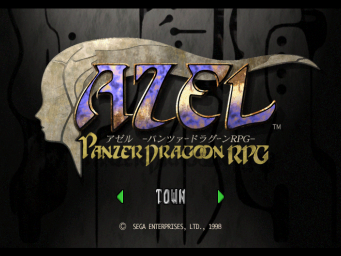
JP Version (Azel: Panzer Dragon RPG) |
Alter the line to |
Script Details (JP) |
Debug Result (JP) |
43 0B 00 09 20 08 89 04 D3 2E E0 07 1E 32 A0 0A |
43 0B 00 09 20 08 8B 04 D3 2E E0 07 1E 32 A0 0A |
 |
 |
JP Prototype (Sep 16 1997) |
Alter the line to |
Script Details |
Debug Result |
94 31 D3 1D 43 0B 00 09 20 08 89 03 D3 1B 1E 32 |
94 31 D3 1D 43 0B 00 09 20 08 8B 03 D3 1B 1E 32 |
 |
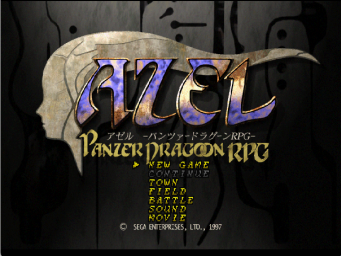 |

Save & close the Hex Editor, scan image files for corruption (i.e with CDmage) and rebuild sector fields (the above image shows what will happen if this isn't done correctly). The game will now always start with the Debug Menu activated, basically unlocking a detailed level/stage select:
- TOWN - all "per pedes" levels available on the respective CD image; world map not accessible
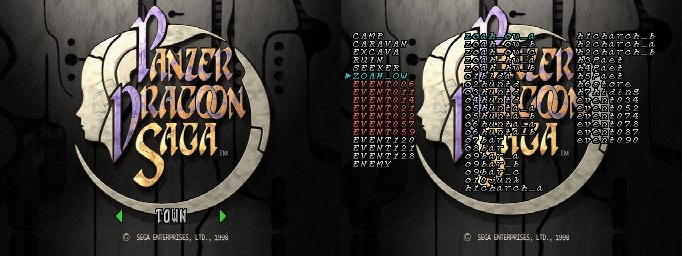
- FIELD - all "open world" levels available on the respective CD image; in-game save points may not work properly
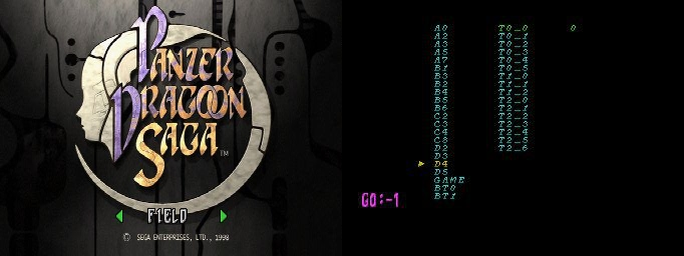
- BATTLE - all enemies & battles available on the respective CD image; Dragon always starts on LV1; Enemy names are different to the western releases
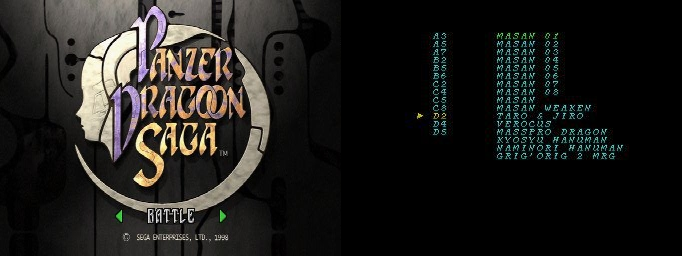
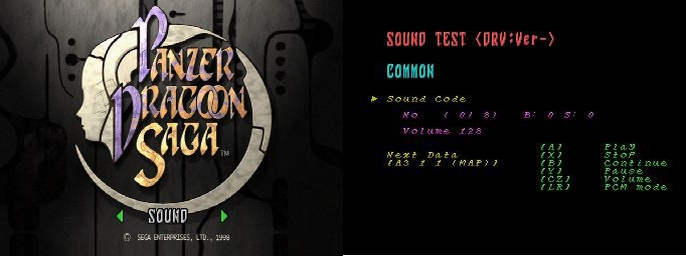
- SOUND - access to all sounds and music available on the respective CD image; grouped for each event
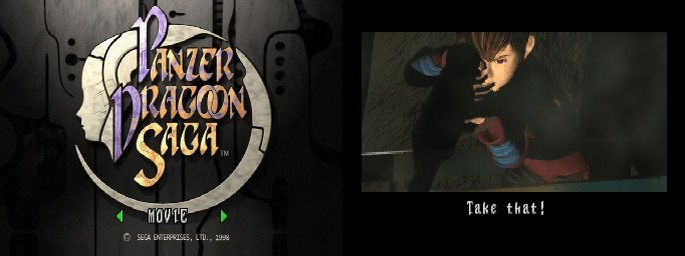
- MOVIE - plays all movie sequences available on the respective CD image
(Source: Yaz0r)
In-Game Debug Menu (Using Save Data)#
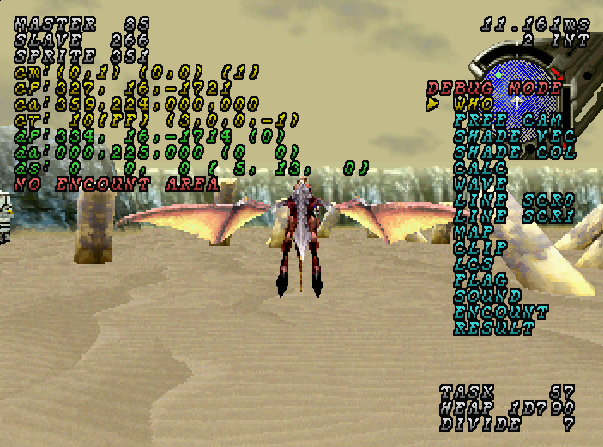
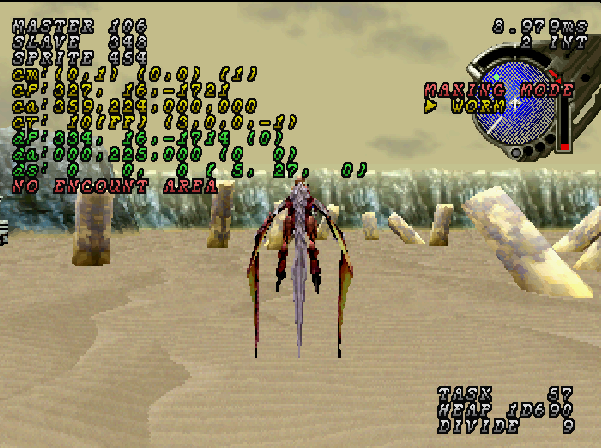
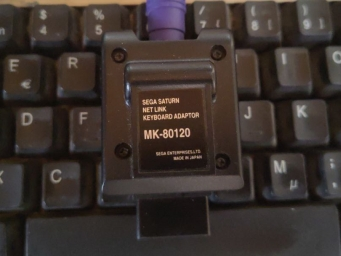
- NOTE: Either the official Saturn Keyboard (Model No. HSS0129) or the Keyboard Netlink Adapter (Model No. MK80120) can be used here, plugged into Port 2. Both of these methods have been successfully tested. To date, very few emulators have keyboard support and there are no keyboard options available while playing on Android devices.
- Hex-editing will unlock the extra options in the main menu. However, additional Debug options will only be visible, if the save file named "ANDROMEDA_3" is present in the system's internal memory. A few more options are available when using a keyboard (via the adaptor) with the JIS layout. While this is easier to achieve even with physical copies of the game, most controls will only be accessible with additional peripherals either on Port 1 or Port 2 on the system.
Debug Menu while on Field |
Debug Menu while on Field / Worm Editor |
Debug Menu while in Battle |
Saturn Keyboard Adaptor |
|---|---|---|---|
 |
 |
 |
 |
Basic Controls#
KBD |
TOWN |
FIELD |
BATTLE |
|---|---|---|---|
ESC |
back |
back |
back |
show HUD |
show HUD |
show HUD |
|
F1 |
Flaglist |
Flaglist |
Flaglist |
F2 |
Not used |
Making Mode |
Dragon Select (pg up/down) |
F3 |
Not used |
Debug Mode |
Battle Options (Listed below) |
F7 |
Not used |
Not used |
Max gauge |
半角/全角 |
Momentary key; draw all on-screen animation steps |
||
1 |
Not used |
Main map toggle grig1 |
Stun status |
2 |
Not used |
Main map toggle grig2 |
Poison status |
3 |
Not used |
Main map toggle mel kava |
Slow status |
4 |
Not used |
Main map toggle Tower |
Stop status |
5 |
Not used |
Main map toggle Destinations |
Pain status |
6 |
not used |
Not used |
Bind status |
7 |
Not used |
Not used |
Hurt dragon |
TAB |
Not used |
Change padmode/Main Map Options (Listed below) |
Not used |
Y(Z)/A |
Confirm |
Confirm (A) |
Confirm (A) |
X / S |
B/Y |
B/Y |
B/Y |
C / D |
C/Z |
C/Z |
C/Z |
Q / E |
L/R |
L/R |
L/R |
PAUSE |
(Un)Freeze Screen |
(Un)Freeze Screen |
(Un)Freeze Screen |
無変換 (Muhenkan) / 変換 (Henkan) |
Choose any event in-game as HEX#Nr (無変換=up 変換=down) / load event with [無変換 + 変換] |
||
カナ (Kana) |
|||
Event Flag List#
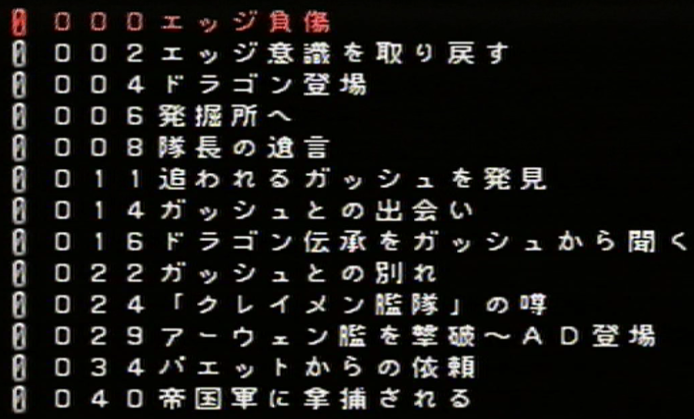
Press F1 to reveal the following options:
- Up/Down: select flag
- Left/Right: set flag to zero/non-zero
- Page Up/Page Down: select flag page
Page No. |
JP |
EN |
Details |
|---|---|---|---|
01 |
エッジ負傷 |
Edge wounded |
Plot Advance Flags 000-040 |
エッジ意識を取り戻す |
Edge regains consciousness |
||
ドラゴン登場 |
Dragon appears |
||
発掘所へ |
Go to the Excavation Site |
||
隊長の遺言 |
The captain's will "last will and testament" |
||
追われるガッシュを発見 |
Gash found on the run |
||
ガッシュとの出会い |
Meeting up with Gash |
||
ドラゴン伝承をガッシュから聞 |
Gash tells the legend of the dragon |
||
ガッシュとの別れ |
Farewell to Gash |
||
「クレイメン艦隊」の噂 |
The Rumors of the Craymen fleet |
||
アーウェン艦を撃破〜AD登場 |
Mel Kava is defeated ~ Atolm Dragon appears |
||
パエットからの依頼 |
A request from Paet |
||
帝国軍に拿捕される |
Seized by the Empire's armies |
||
02 |
帝国軍の尋問 |
Interrogation by the Imperial Army |
Plot Advance Flags 041-072 |
シーカーの襲撃 |
Sheikah attack |
||
ガッシュとの再会 |
Reunion with Gash |
||
パエットとの交渉 |
Negotiations with Paet |
||
透視版の映像 |
X-ray footage |
||
ツァスタヴァ少尉登場 |
Lieutenant Zastava appears |
||
AD登場2 |
AD appears 2 |
||
ウル地下へ |
To the underground of Ur |
||
アゼルとの出会い |
Meeting Azel |
||
エレベーター乗る |
Getting on the elevator |
||
アゼルの独白 |
Azel's monologue |
||
再会の予感 |
Premonition of a reunion |
||
パエットと空へ |
To the sky with Paet |
||
03 |
帝国からの先遣隊 |
Advance party from the Empire |
Plot Advance Flags 074-128 |
バイマンからの依頼 |
A request from Byman |
||
バイマンの陰謀 |
Baiman's conspiracy |
||
クレイメン部下深夜の襲撃 |
A late-night attack by Claymen's subordinates |
||
Aメル=カヴァが見える |
Amel-Kava is seen |
||
遺産の見せたもの |
What the legacy showed |
||
アゼル助けるエッジ/帝国軍登場 |
Edge saves Azel/The Imperial Army appears |
||
街消滅 |
The city is destroyed |
||
クレイメン艦登場(前半) |
Claymen's ship appears (first half) |
||
クレイメン艦登場(後半) |
Claymen's ship appears (second half) |
||
クレイメンの告白 |
Claymen's confession |
||
アゼルの覚醒/クレイメンの死 |
Azel's awakening/Claymen's death |
||
攻性生物対帝国軍 |
Aggressive creatures vs. the Imperial Army |
||
04 |
シーカーの正体 |
The Seeker's true identity |
Plot Advance Flags 134-155 |
アゼル目覚める |
Azel awakens |
||
帝国軍襲来 |
The Imperial Army attacks |
||
アゼルの説得 |
Azel persuades |
||
アゼルの決意 |
Azel makes a decision |
||
塔再潜入 |
Re-entering the tower |
||
エッジとアゼルの別れ |
Edge and Azel part ways |
||
セストレンへ、塔爆破 |
To Sestren, the tower explodes |
||
_1戦闘ムービー1 |
_1 Battle movie 1 |
||
_2戦闘ムービー2 |
_2 Battle movie 2 |
||
_3戦闘ムービー3 |
_3 Battle movie 3 |
||
_4戦闘ムービー4 |
_4 Battle movie 4 |
||
_5戦闘ムービー5 |
_5 Battle movie 5 |
||
05 |
159ドラゴンとの別れ |
159 Farewell to the Dragon |
Plot Advance Flag 159 |
160荒野にてエッジを待つガッシュ |
160 Gash waits for Edge in the wilderness |
Plot Advance Flag 160 |
|
発掘所上空クリア |
Cleared the skies above the excavation site |
areas cleared |
|
渓谷地帯クリア |
Cleared the valley area |
||
ガリル砂漠クリア |
Cleared the Galil Desert |
||
禁止区域クリア |
Cleared the restricted area |
||
ゲオルギウス2クリア |
Cleared Georgios 2 |
||
ゲオルギウス3クリア |
Cleared Georgios 3 |
||
ウルクリア |
Cleared Ur |
||
ウル地下遺跡クリア |
Cleared the Ur Underground Ruins |
||
帝国軍空中艦隊駐屯地クリア |
Cleared the Imperial Air Fleet Garrison |
||
メル=カヴァクリア |
Cleared Mel-Kava |
||
帝国軍空中艦隊クリア |
Cleared the Imperial Air Fleet |
||
06 |
塔1クリア |
Cleared Tower 1 |
areas cleared |
ゾアの森クリア |
Cleared Zoa Forest |
||
ウル地下2クリア |
Cleared Underground of Ur 2 |
||
塔2クリア |
Cleared Tower 2 |
||
セストレンクリア |
Cleared Sestren |
||
発掘所上空進入可 |
Can enter the air above the excavation site |
show targets on map |
|
発掘所進入可 |
Can enter the excavation site |
||
キャンプ(発掘所)進入可 |
Can enter the camp (excavation site) |
||
渓谷地帯進入可 |
Can enter the valley area |
||
カイナスの村進入可 |
Can enter Kainas Village |
||
キャンプ(カイナスの村)進入可 |
Can enter Camp (Kainas Village) |
||
ガリル砂漠進入可 |
Can enter Galil Desert |
||
キャラバン(砂漠A)進入可 |
Can enter Caravan (Desert A) |
||
07 |
キャンプ(砂漠A)進入可 |
Camp (Desert A) allowed |
show targets on map |
キャラバン(砂漠B)進入可 |
Caravan (Desert B) allowed |
||
キャンプ(砂漠B)進入可 |
Camp (Desert B) allowed |
||
キャラバン(平原A)進入可 |
Caravan (Plains A) allowed |
||
キャンプ(平原)進入可 |
Camp (Plains) allowed |
||
キャラバン(平原B)進入可 |
Caravan (Plains B) allowed |
||
キャラバン(ゾアの街)進入可 |
Caravan (Zoa Town) allowed |
||
キャンプ(ジアの森)進入可 |
Camp (Zia Forest) allowed |
||
キャラバン(ジアの森)進入可 |
Caravan (Zia Forest) allowed |
||
>禁止区域進入可 |
Restricted area allowed |
||
ゲオルギウス2進入可 |
Georgios 2 allowed |
||
ゲオルギウス2.5進入可 |
Georgios 2.5 allowed |
||
ゲオルギウス3進入可 |
Georgios 3 allowed |
||
08 |
ゾアの街進入可 |
Can enter Zoa City |
show targets on map |
帝国軍空中艦隊 |
Imperial Air Fleet |
||
帝国軍空中艦隊駐屯地進入可 |
Can enter Imperial Air Fleet Garrison |
||
メル=カヴァ進入可 |
Can enter Mel-Kava |
||
塔1進入可 |
Can enter Tower 1 |
||
塔2進入可 |
Can enter Tower 2 |
||
ウル進入可 |
Can enter Ur |
||
ウル地下遺跡進入可 |
Can enter Ur Underground Ruins |
||
ゾアの森進入可 |
Can enter Zoa Forest |
||
シーカーの里進入可 |
Can enter Seeker Village |
||
キャンプ(シーカーの里)進入可 |
Can enter Camp (Seeker Village) |
||
セストレン進入可 |
Can enter Sestren |
||
プレイヤーのマップ上の位置 |
Player's location on the map |
||
09 |
渓谷地帯中ボス戦(ヘビムシの巣A) |
Valley Area Mid-Boss Battle (Snake Bug Nest A) |
Bosses cleared |
渓谷地帯中ボス戦(ヘビムシの巣B) |
Valley Area Mid-Boss Battle (Snake Bug Nest B) |
||
渓谷地帯ボス戦(ガケオコリ) |
Valley Area Boss Battle (Gakeokori) |
||
ガリル砂漠中ボス戦A (ズースー) |
Galil Desert Mid-Boss Battle A (Zusuu) |
||
ガリル砂漠ボス戦(ハイシュ&ハイガ) |
Galil Desert Boss Battle (Haish & Haiga) |
||
禁止区域中ボス戦(クレイメン艦) |
Restricted Zone Mid-Boss Battle (Claymen's Ship) |
||
禁止区域ボス戦(AD#1) |
Restricted Zone Boss Battle (AD#1) |
||
ゲオルギウス2中ボス戦(ヴァルナ) |
Georgios 2 Mid-Boss Battle (Varuna) |
||
ゲオルギウス2ボス戦(GD) |
Georgios 2 Boss Battle (GD) |
||
ウル連続戦闘1 |
Ur Consecutive Battle 1 |
||
ウル連続戦闘2 |
Ur Consecutive Battle 2 |
||
ウル連続戦闘3 |
Ur Consecutive Battle 3 |
||
ウル中ボス戦(ヌリシンハ) |
Ur Mid-Boss Battle (Nurisinha) |
||
10 |
ウルボス戦(AD#2) |
Ur boss battle (AD#2) |
Bosses cleared |
ウル地下遺跡中ボス戦(ミヤビレイ) |
Ur Underground Ruins mid-boss battle (Miyabiray) |
||
ウル地下遺跡ボス戦(ダイオウビレイ) |
Ur Underground Ruins boss battle (Daioubiray) |
||
帝国軍空中艦隊駐屯地中ボス戦(ヴリトラ) |
Imperial Air Fleet Garrison mid-boss battle (Vritra) |
||
帝国軍空中艦隊駐屯地ボス戦(噴進弾) |
Imperial Air Fleet Garrison boss battle (Rocket Missile) |
||
メル=カヴァ中ボス戦 |
Mel-Kava mid-boss battle |
||
メル=カヴァボス戦(AD#3) |
Mel-Kava boss battle (AD#3) |
||
帝国軍空中艦隊中ボス戦(グリグオリグ) |
Imperial Air Fleet mid-boss battle (Grigorigu) |
||
帝国軍隊ボス戦(ソーマ) |
Imperial Army boss battle (Soma) |
||
塔1ボス戦(バリオー) |
Tower 1 boss battle (Bariou) |
||
ゾアの森中ボス戦(マサーンA) |
Zoa Forest mid-boss battle (Masan A) |
||
ゾアの森中ボス戦(マサーンB) |
Zoa Forest mid-boss battle (Masan B) |
||
ゾアの森中ボス戦(マサーンC) |
Zoa Forest mid-boss battle (Masan C) |
||
11 |
ゾアの森中ボス戦(マサーンD) |
Zoa Forest mid-boss battle (Masan D) |
Bosses cleared |
ゾアの森中ボス戦(マサーンE) |
Zoa Forest mid-boss battle (Masan E) |
||
ゾアの森中ボス戦(マサーンF) |
Zoa Forest mid-boss battle (Masan F) |
||
ゾアの森中ボス戦(マサーンG) |
Zoa Forest mid-boss battle (Masan G) |
||
ゾアの森中ボス戦(マサーンH) |
Zoa Forest mid-boss battle (Masan H) |
||
ゾアの森ボス戦(寄生グリグオリグ) |
Zoa Forest boss battle (Parasitic Griguorigu) |
||
ウル地下ザコ戦(攻性生物) |
Ur Underground weak enemy battle (Offensive creature) |
||
塔2中ボス戦A |
Tower 2 mid-boss battle A |
||
塔2中ボス戦B |
Tower 2 mid-boss battle B |
||
セストレン中ボス戦(タイプロ) |
Sestren mid-boss battle (Type R) |
||
セストレン中ボス戦(タイプ1) |
Sestren mid-boss battle (Type 1) |
||
セストレン中ボス戦(タイプ2) |
Sestren mid-boss battle (Type 2) |
||
セストレン中ボス戦(タイプ3) |
Sestren mid-boss battle (Type 3) |
||
12 |
セストレン中ボス戦(タイプ4) |
Sestren mid-boss battle (Type 4) |
Bosses cleared |
セストレンボス戦(アンチドラゴン) |
Sestren boss battle (Anti-Dragon) |
||
セストレンボス戦(アンチドラゴン最終形 |
Sestren boss battle (Anti-Dragon final form) |
||
ゾアの森中ボスA弱り |
Zoa Forest mid-boss A weakened |
||
ゾアの森中ボスB弱り |
Zoa Forest mid-boss B weakened |
||
ゾアの森中ボスC弱り |
Zoa Forest mid-boss C weakened |
||
ゾアの森中ボスD弱り |
Zoa Forest mid-boss D weakened |
||
ゾアの森中ボスE弱り |
Zoa Forest mid-boss E weakened |
||
ゾアの森中ボスF弱り |
Zoa Forest mid-boss F weakened |
||
ゾアの森中ボスG弱り |
Zoa Forest mid-boss G weakened |
||
ゾアの森中ボスH弱り |
Zoa Forest mid-boss H weakened |
||
銃入手 |
Obtain gun |
Item flag |
|
ドラゴン遺跡の鍵入手 |
Obtain key to Dragon Ruins |
Item flag |
|
13 |
地図入手 |
Obtain map |
Item flags |
塔の絵入手 |
Obtain tower painting |
||
シップパーツ?入手 |
Obtain ship parts? |
||
エンジンユニット入手 |
Obtain engine unit |
||
プロテクトキ-1入手 |
Obtain Protect Key-1 |
||
プロテクトキ-2入手 |
Obtain Protect Key-2 |
||
プロテクトキ-3入手 |
Obtain Protect Key-3 |
||
大広間への鍵入手 |
Obtain key to great hall |
||
神聖区への許可証入手 |
Obtain permit to sanctuary |
||
教会の鍵 |
Church key |
||
クレイメンからの手紙入手 |
Obtain letter from Claymen |
||
サーチライトカウントフラグ |
Searchlight count flag |
for Imperial Air Fleet; 0-255 |
|
ディスクチェンジ用 |
For disc change |
||
14 |
ゲームクリア |
Game cleared |
trigger Dermots Ranch |
森での中ボスの説明用 |
Explanation of the mini-boss in the forest |
Item flag |
|
コアのバリアの説明用 |
Explanation of the core's barrier |
Item flag |
|
駐屯地、本読んでの台詞変化 |
Dialogue changes after reading the book at the garrison |
||
ひみちゅのフラグby MたかはC |
Himichu's flag by M Takaha C |
see chapter below |
|
ドラゴンに名前付けた |
Named the dragon |
condition flag |
|
プレイヤーのマップ上の位置(保存) |
Player's location on the map (saved) |
choose location on next exit to main map |
|
Himichu's Flag#

Flag 5 of Page 14 reads, "Himichu's flag by M Takaha C". "M Takaha C" could possibly refer to Mitsuru Takahashi, who was the Field and System programmer on the game. It's possible that "Himichu" is a misspelling of Himitsu ("Secret" in Japanese). It's not known how this flag can be triggered outside of the Debug Mode.
When this flag is set to 1 and the player enters the main map, it will lead directly to the Box Game Map. However, if the player exits the map, the game will loop back to the same map. By setting the flag back to "0", the player can exit the map, and a screen (shown here on the right) will display. Pressing A/C at this screen will take the player directly above Georgios and after entering the storm, it will be possible to enter Shelcoof outside of the normal flow of the plot.
Making Mode#
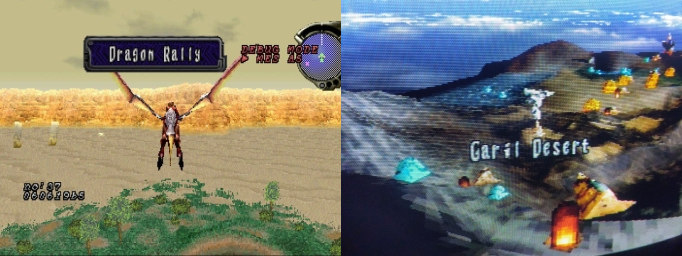
Press F2 to display this menu in the field. Depending on the field map that is loaded, different options are available.
Field Map |
Option |
|---|---|
Garil Desert |
Worm editor (Number of worm joints, worm type, play/record sequences) |
Uru Underground |
Elevator Editor & selectable Enemy Traps |
Inside Zoah Forest |
Naga Worm Editor |
MelKava Reactor |
Fire/Explosion Editor |
Battle Mode#
Press F3 to display this menu during battles. The Debug options are as follows:
Key |
Action |
|---|---|
F1 |
Display Event Flag list |
F2 |
Display the Dragon Morph Screen; use pg up/down to select a model & home/end to browse animations |
F3 |
Pressing this key will allow the following:
|
F6 |
Increase EXP points (only when "19 -No Death Mode" is active) |
F7 |
Instant full gauge |
F8 |
Obtain all items (only when "19 -No Death Mode" is active) |
To restore control, press F3 again to leave this menu.
Debug Menu # |
Name |
Details |
|---|---|---|
1 |
PCM Mode |
? |
2 |
Shot Equip Change |
? |
3 |
Laser Equip Change |
Change laser lock-on mode (R on Controller 1)
|
4 |
PreLock Change |
Change target optic (L on Controller 1)
|
5 |
Colli Entry Number |
Col# (total targets in reach) |
6 |
Camera Spring |
D-pad Up/Down on Controller 1: k value; Left/Right: m value |
7 |
Camera Fix |
Alt/無変換 on Keyboard: Zoom |
8 |
Camera Distance |
Up/Down: 999m to 999m |
9 |
Camera SCRN ANG |
D-pad Up/Down on Controller 1 to Zoom on Target |
10 |
Player Speed |
D-pad Up/Down or Left/Right on Controller 1 to adjust movement speed for [27 - MOVE MODE] by values 0.00 to 20.99 |
11 |
Axis Rotate |
? |
12 |
Scroll Dot Ratio |
Up/Down: Magnify surface texture |
13 |
Cam Data Display |
Show camera position data |
14 |
Light Setting |
Four sets of shading and light values |
15 |
Colli Sphere |
Show grid box around targets |
16 |
Colli Value Display |
Show coordinates data for all targets |
17 |
Gauge Invalid |
Gauge remains charged |
18 |
Battle Data Display |
Show battle parameters |
19 |
No Death Mode |
No damage
|
20 |
Cylinder Size |
Show dragon positioning radius & radar position |
21 |
FUTAKAWA MODE |
? |
22 |
YAMAKEN MODE |
? |
23 |
MITA MODE |
? |
24 |
SHINYA MODE |
? |
25 |
YASUHARA MODE |
? |
26 |
TAKAMA MODE |
? |
27 |
MOVE MODE |
Move dragon freely without restrictions |
28 |
HEIGHT SET |
Show dragon z-coordinates |
29 |
ENEMY GAUGE |
Show enemies gauge cycles |
World Map#
Pad Modes (TAB to select) |
Controls (Keyboard) |
|---|---|
SELECT |
1: Show grig orig |
MAP CAMERA |
Page Up/Page Down: Camera tilt |
GRIG ORIG |
No controls |
CARAVAN |
No controls |
OBJ |
Z(Y)/A: Camp fire sprite size |
DRAGON |
Z(Y)/A: Angle Move Distance |
SCROLL |
Z(Y)/A: Dot Ratio |
MAP |
No controls |
Unused Items#
Item Name |
|
|---|---|
|
Kamuseki |
|
Dummy 272 |
|
Pendant |
|
Battle Memory |
|
Pet Food |
|
Tent |
|
Sack |
|
Drone Report |
References#
|
The Panzer Dragoon series | |
|---|---|
|
Sega Saturn |
Panzer Dragoon • Panzer Dragoon II Zwei • Panzer Dragoon Saga |
|
Game Gear |
|
|
Windows |
|