This article has a talk page!
This is a sub-page of Development:Super Mario World (SNES)/Background Graphics and Tilemaps.
Style 1 - Flat Rectangular Island#
S1: Maps#
map.CGX contains early map tiles used for marking levels, land, and Mario and Luigi's starting positions. They're very reminiscent of the tiles used to make up the overworld of Super Mario Bros. 3.
map.CGX 01 April 1989 22:19 |
Super Mario Bros. 3 World Map |
|---|---|
 |
 |

|
To do: |
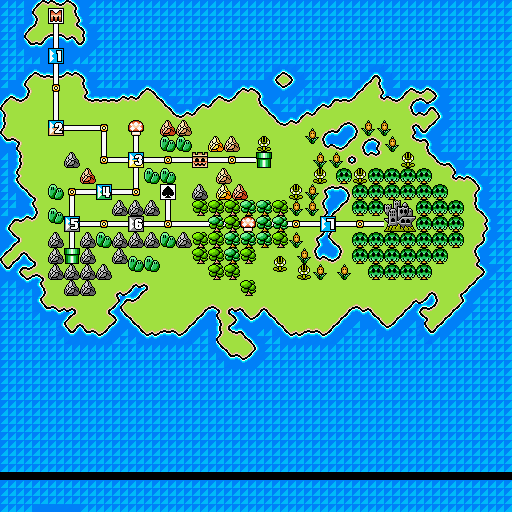
Two early versions of the overworld are seen below. The island in map-A.SCR is positioned lower than the one in map.SCR and has tile differences in its upper-left quadrant. The graphics in map.CGX don't quite work with it.
map.SCR 01 April 1989 22:19 |
map-A.SCR 03 April 1989 07:08 |
|---|---|
 |
 |
Style 2 - Flat Mushroom Island#
S2: Maps#
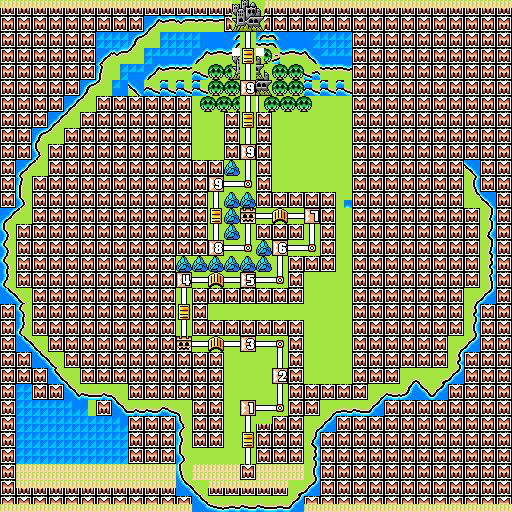
Another incarnation of the overworld map, also reminiscent of Super Mario Bros. 3. Now the island is shaped like a mushroom. Two different custom .CGX files were used to create these images, as map.CGX isn't compatible with these .SCRs without some modifications. Tile placements are speculative and based, in part, on palette assignments.
The number of levels has increased from the last overworld style.
map-B.SCR 18 April 1989 19:31 |
map-C.SCR 19 April 1989 17:40 |
|---|---|
 |
 |
Style 3 - Irregular Island#
S3: Maps#
The next versions of the world map use a new tileset called map-rom.CGX.
map.CGX 01 April 1989 22:19 |
map-rom.CGX 23 June 1989 16:19 |
|---|---|
|
 |
The names of the following tilemaps reference the SNES's Background Mode 7, which enabled the system to perform stretches and rotations on one background layer. This means that the developers may have originally intended to apply perspective to the overworld, like in The Legend of Zelda: A Link to the Past, or for players to be able to zoom in and out when viewing it. Because Mode 7 can only operate on one layer, the overworld panels and paths would have been on the same layer as the actual terrain itself. In the final game, Mode 1 is used for the overworld. Most of the terrain is placed on Layer 2, while paths and level tiles are placed on Layer 1.
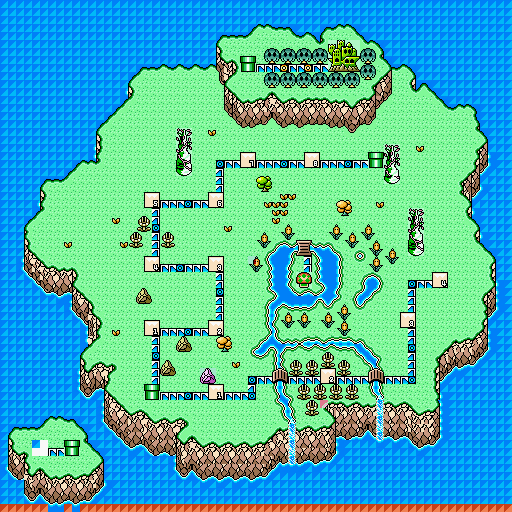
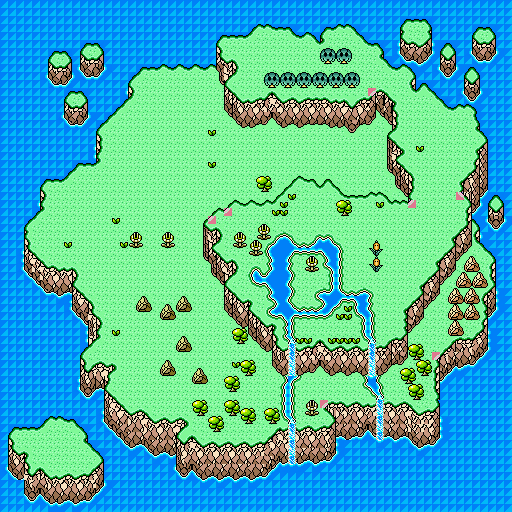
The developers were experimenting with multiple path layouts. The first version of these, map-mode7.SCR, has two paths forking from the pipe near the bottom left of the main island. This could've been Mario's starting point, with one pathway apparently having a dead end and the other leading to a pipe to Bowser's Castle. This tilemap is also not fully compatible with map-rom.CGX.
The shape of the island changed from April to June. April's map-rom.SCR depicts a very similar overworld to June's map-mode7.SCR, but parts of the map have been raised, and a new, continuous pathway travels around the world.
map-mode7.SCR 25 April 1989 21:26 |
map-rom.SCR 06 June 1989 17:40 |
|---|---|
 |
 |
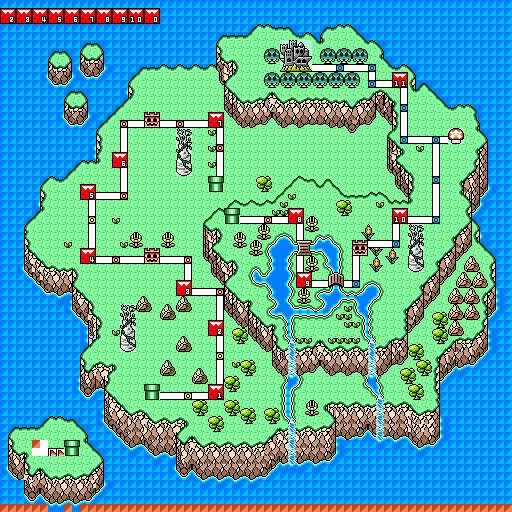
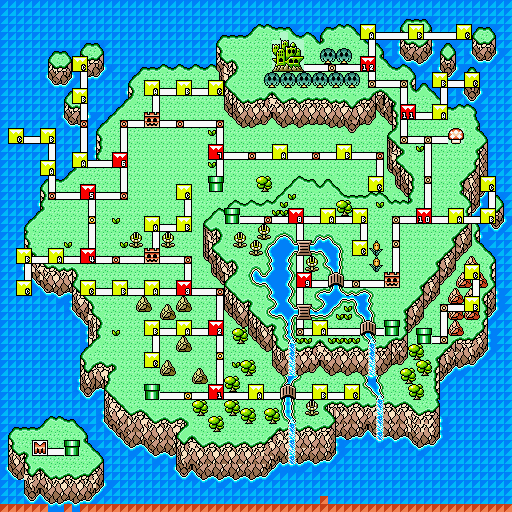
map-mode7-A.SCR has the same shape as map-mode7-B.SCR, but a small branch of paths, leading to three smaller yellow tiles, exits from each numbered red tile. The former file has some broken tiles near Mario's starting point at the bottom left, as it also isn't totally compatible with map-rom.CGX.
map-mode7-B.SCR 06 June 1989 16:42 |
map-mode7-A.SCR 06 June 1989 17:35 |
|---|---|
 |
 |
Developers revisited this world map design in the process of creating Yoshi's Island.
Style 4 - Irregular Landmass#
S4: Maps#
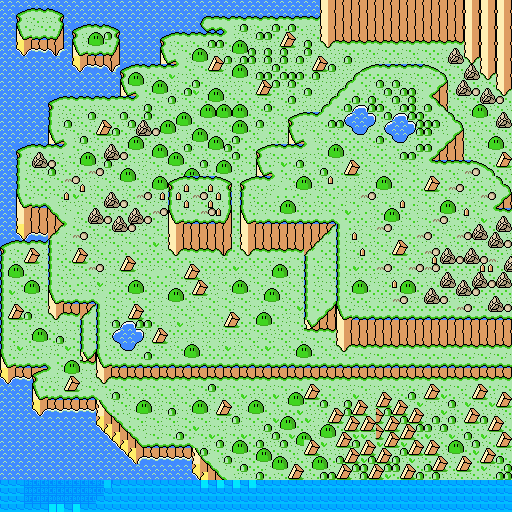
Two tilemaps, chizu-2.SCR and map-UNIT-1.SCR, contain overworld data that dates from between the Irregular Island and Raised Mushroom Island phases of the overworld design. (Indeed, the four rows of tiles along the bottom match the bottom of the Mode 7 overworld .SCRs.) Because none of the other tilesets are good matches for it, a custom tileset had to be created by rearranging tiles from yet another custom tileset that itself was created to view the Raised Mushroom Island maps below. Once again, tile placements are somewhat speculative and based, in part, on palette assignments.
chizu-2.SCR 29 June 1989 14:08 |
Reconstruction |
|---|---|
 |
 |
Style 5 - Raised Mushroom Island#
S5: Maps#
S5 MP: Overworld#
Unfortunately, once again, there's no tileset that works with this style of overworld. Luckily, by rearranging tiles from X-I-P-master.CGX and creating some custom ones, it's possible to construct a set that's compatible. Many tiles from the final game could be used as-is, some improvision was required, including manually mirroring cliffsides and creating particular grass, cliff, and water tiles.
X-I-P-master.CGX 17 December 1990 15:48 |
Improvised Tiles |
|---|---|
 |
 |
Now it becomes evident that, a few months after the Irregular Landmass-style overworld, the developers return once again to the mushroom island idea.
kinoko.SCR 13 July 1989 14:01 |
kinoko.SCR (Restored) 13 July 1989 14:01 |
|---|---|
 |
 |
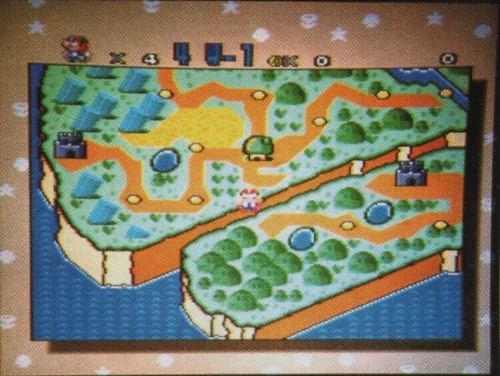
This design was originally seen in early prerelease material for the game.
1989 Prerelease Screenshot |
|---|
 |
|
|
To do: |
This design persisted through to September 1989, when versions of the map were created to reflect the overworld's "before" state prior to paths and natural features being unlocked, like the waterfalls in kinoko-TEST.SCR. In map-bg-2-0.SCR, the whole island was moved from a central position to the lower left, perhaps to make space for the landmass that would be added a few days later.
kinoko.SCR (Restored) 13 July 1989 14:01 |
kinoko-TEST.SCR (Restored) 07 September 1989 10:21 |
map-bg-2-0.SCR (Restored) 21 September 1989 14:06 |
|---|---|---|
|
 |
 |
S5 MP: Underworld#
|
|
To do: |
At last, the overworld gets an underworld.
map-chika.SCR (Restored) 05 August 1989 01:22 |
map-chika-hoshi.SCR (Restored) 13 August 1989 00:06 |
|---|---|
 |
S5: Layer Data#
A tilemap with a blank background and raindrops.
map-rain.SCR 30 September 1989 22:43 |
|---|
 |
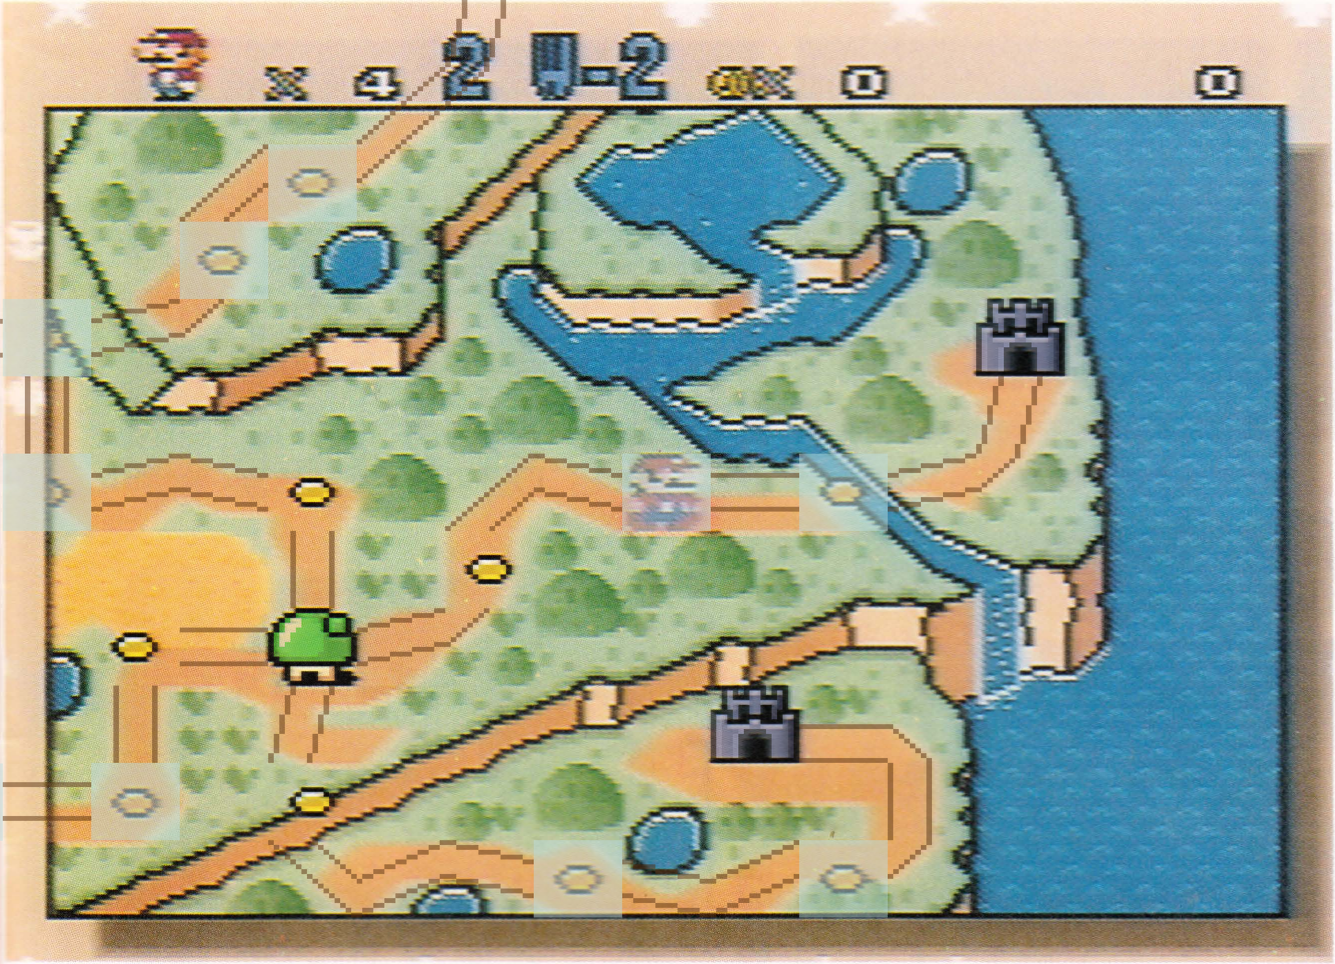
A tilemap called map-bg-1-0.SCR that shows the layout of paths, levels, and castles that would have appeared on Layer 1. While no existing .CGX file is compatible with this .SCR, level icons from v-ram-map-kuppa-shima.CGX and path tiles from v-ram-map.CGX can be combined in order to create a custom tileset that works with it.
map-bg-1-0.SCR (Restored) 21 September 1989 16:49 |
1989 Prerelease Screenshot with Overlay |
|---|---|
 |
 |
S5: Event Tiles#
By September, the overworld had become dynamic, changing based on player actions as new paths were opened up and new features emerged, such as the waterfalls on the island. Like the final game, this style of overworld uses Mode 1, meaning that paths, level tiles, pipes, and some additional decorations are placed on Layer 1, while most of the terrain is placed on Layer 2. MAPTABLE.SCR and MAPPANEL.SCR lay out 12×12 sections of Layer 2 tiles that are are used on the overworld map as part of events that trigger upon completion of a level.
MAPPANEL.SCR 06 September 1989 21:47 |
MAPTABLE.SCR 07 September 1989 10:20 |
|---|---|
 |
 |
These event tiles would result in the initial version of the overworld on the left turning into the unlocked version of the overworld on the right.
kinoko-TEST.SCR (Restored) 07 September 1989 10:21 |
kinoko.SCR (Restored) 13 July 1989 14:01 |
|---|---|
|
|
S5: Animations#
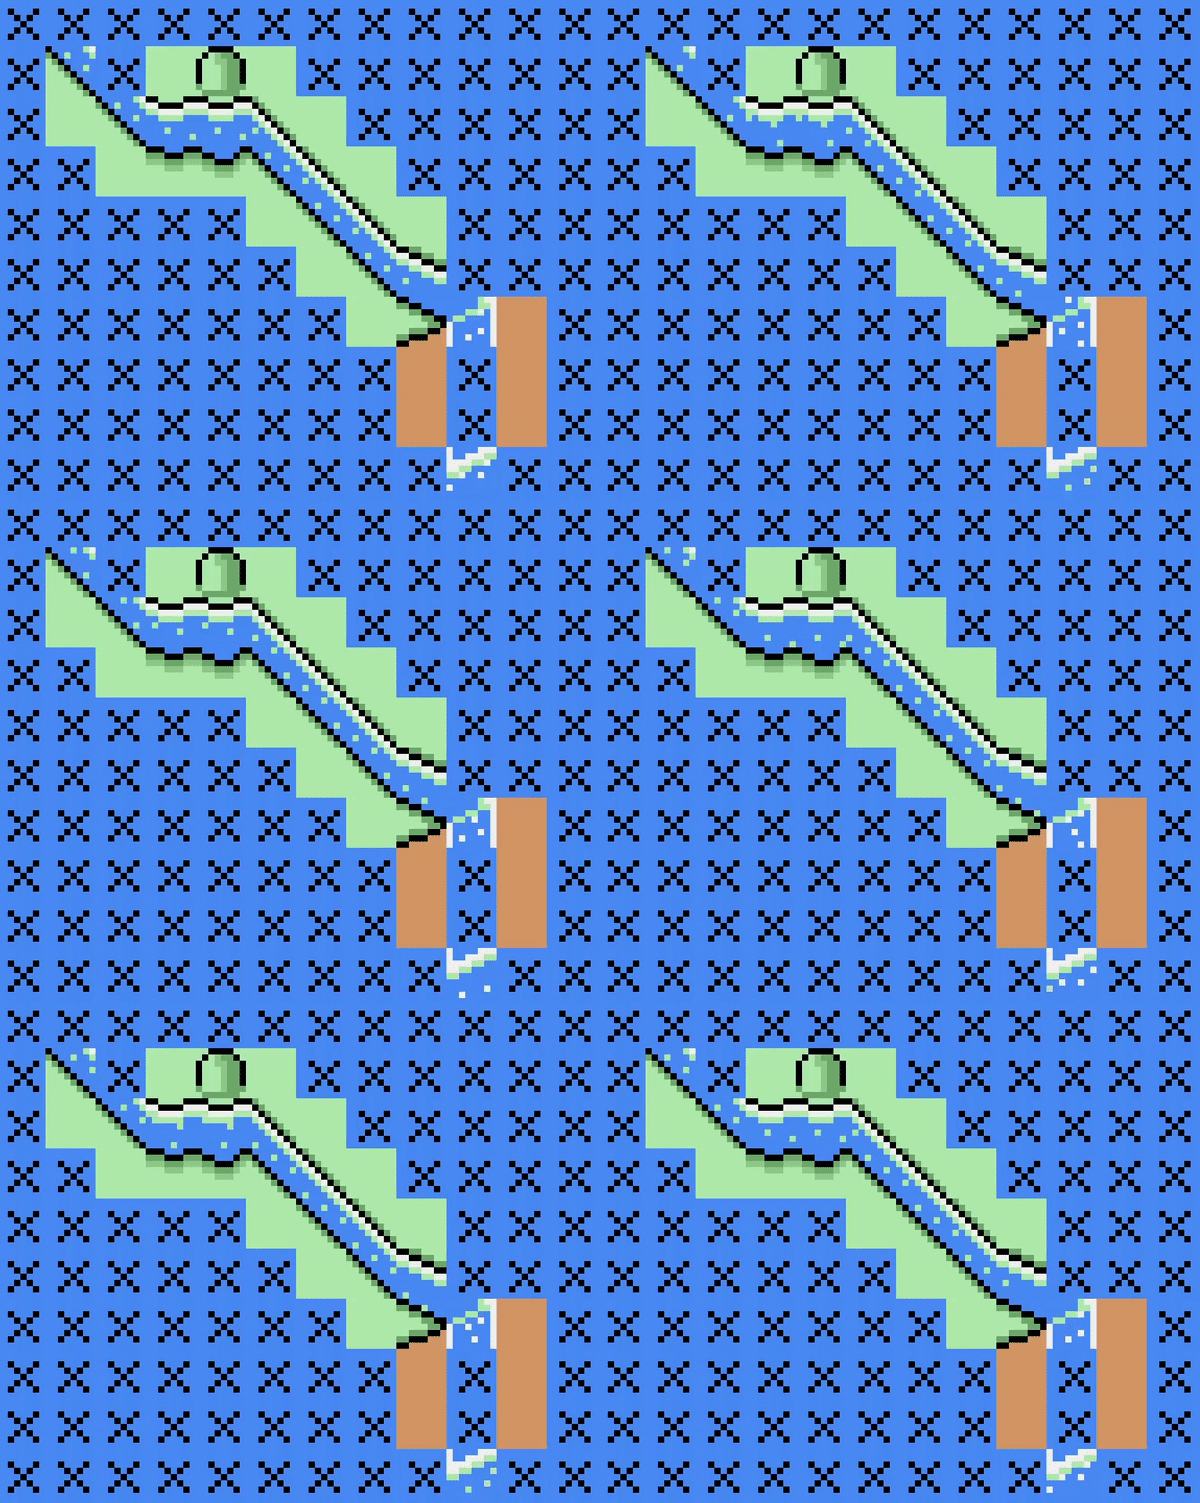
v-ram-kuppa-big-block.CGX contains waterfall animation tiles. With some tweaking of the palette, a quick mockup can be made.
v-ram-kuppa-big-block.CGX 3 July 1990 16:53 |
kinoko-TEST.SCR Waterfall Mockup |
|---|---|
 |
 |
Style 6 - Raised Mushroom Island & Landmass#
S6: Maps#
S6 MP: Overworld#
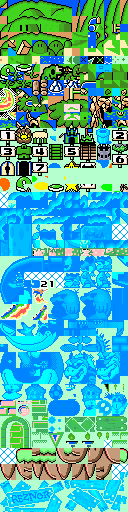
Next, the developers expanded the world by adding more traversable territory. These .SCRs work relatively well with a file called v-ram-map-kuppa-shima.CGX, which is quite similar to the final game's map graphics, though some broken tiles are present.
Custom Mushroom Island Tileset |
Custom X-I-P October 1989 (Recreation) |
Custom X-I-P November 1989 (Recreation) |
v-ram-map-kuppa-shima.CGX 28 July 1990 15:13 |
X-I-P-master.CGX (Final) 17 December 1990 15:48 |
|---|---|---|---|---|
|


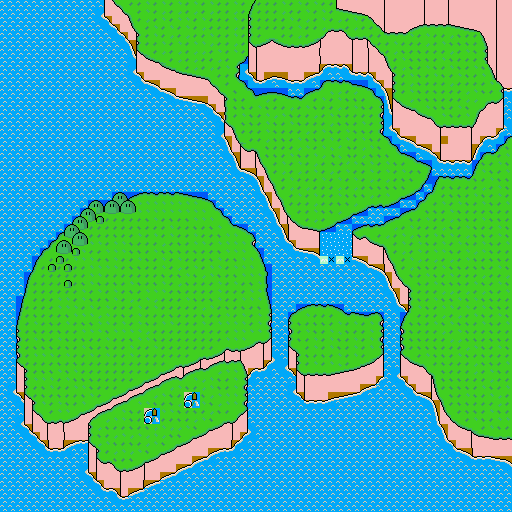
Four days after shifting the mushroom island to the bottom left of the map, they added an additional island that led to a large mainland.
map-bg-2-0.SCR (Restored) 21 September 1989 14:06 |
map-bg-2-new.SCR 25 September 1989 17:25 |
|---|---|
|
 |
|
|
To do: |
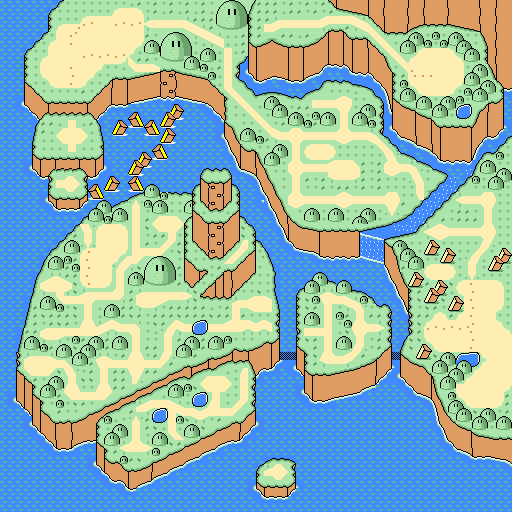
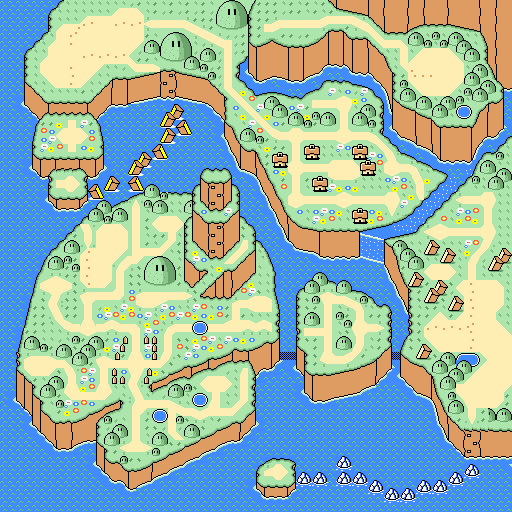
Next, they laid out paths and placed various decorations around the map, in addition to making minor terrain changes.
map-bg-2-taki.SCR 20 October 1989 10:30 (Restored) |
map-bg-2-end.SCR (Restored) 26 October 1989 09:49 |
|---|---|
 |
 |
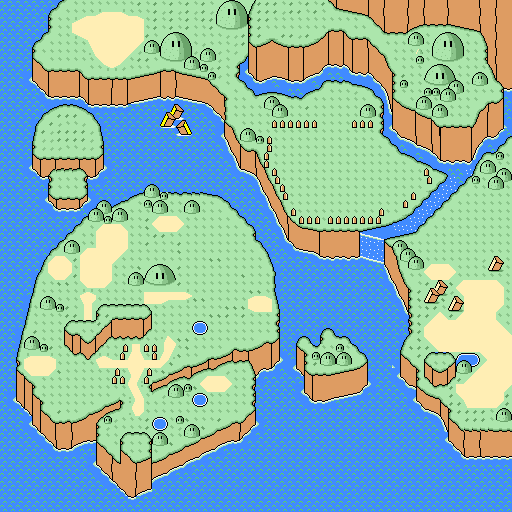
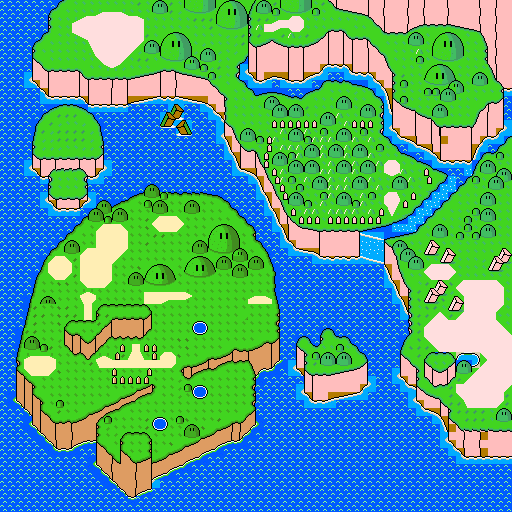
Once again, it appears that, after they created the full version of the overworld, they created a "before" state that would have been used prior to the player completing any levels.
X-map-bg-2-end.SCR (Restored) 19 December 1989 10:34 |
X-map-bg-2-first.SCR (Restored) 15 March 1990 14:53 |
|---|---|
 |
 |
S6 MP: Underworld#
Here, we see an early version of the game's underworld. "Chika" means "underground" in Japanese. map-bg-2-chika.SCR is notable for having the word "TEST" written at the top of the map. The bottom four rows of 8×8 tiles reveal that this map was drawn over the overworld shown in .SCRs like map-bg-2-taki.SCR.
map-bg-2-chika.SCR 23 October 1989 10:02 |
|---|
 |
S6: Layer Data#
S6 LD: Overworld#
There are two more sets of Layer 1 tilemaps that correspond to the two versions of the fully unlocked mushroom overworld.
map-bg-1-end-sfx.SCR (Restored) 16 October 1989 17:42 |
map-bg-1.SCR (Restored) 26 October 1989 09:48 |
|---|---|
 |
 |
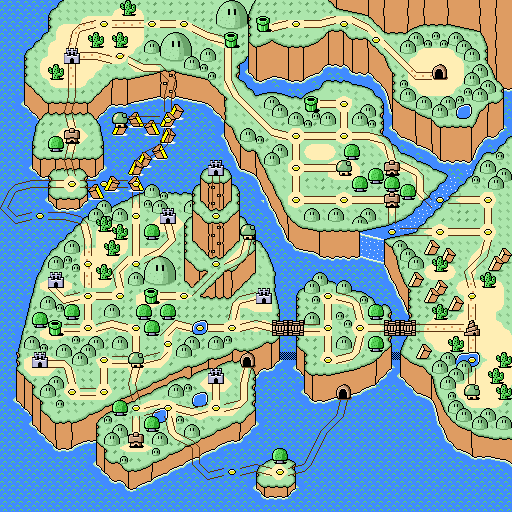
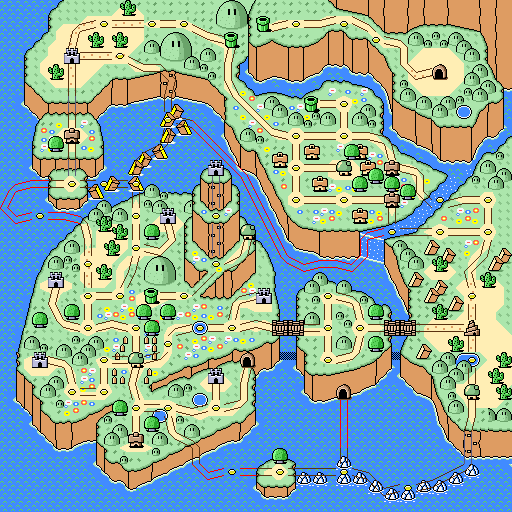
Overlaying the Layer 2 terrain data with the Layer 1 path data provides additional detail about how Mario would have traversed this overworld and where decorations were placed.
At this point in development, large castle icons did not yet exist, and the tileset spots that would later house castle sign graphics in the final game instead contained graphics for Layer 1 tiles like horizontal bridges, cactus and tree decorations, cave entrance tiles, and the tower from Super Mario Bros. 3.
There are multiple Yoshi houses, with the amount differing between map versions: five on the left and four on the right.
The lefthand overworld uses a single palette for the level paths, while the righthand one uses multiple in order to indicate what type of path it is (ground, water, or ladder). Some of the Layer 1 tiles that form the diagonal paths through the water in this tileset don't exist in the final game.
The second righthand overworld uses four sets of 16×16 water tiles on Layer 1. The final game only uses three of these water tiles on Layer 1 to cover up the fish sprite that jumps from the water. This may indicate that there were originally more fish or more water sprites.
map-bg-2-taki.SCR Overlay 20 October 1989 10:30 |
map-bg-2-end.SCR (Restored) Overlay 26 October 1989 09:49 |
|---|---|
 |
 |
A version of the overworld with pathing similar to what's seen here can be glimpsed in a Nintendo Direct from 2025.
S6 LD: Underworld#
There's also Layer 1 path data for the underworld, which can be overlaid to show Mario's route and the levels within.
map-bg-1-chika.SCR (Restored) 23 October 1989 10:01 |
map-bg-2-chika.SCR Overlay 23 October 1989 10:02 |
|---|---|
 |
 |
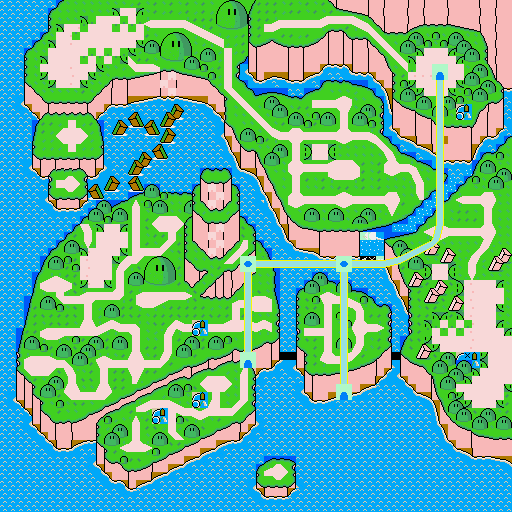
The cave entrances on this incarnation of the overworld map appear to overlap exactly with the cave entrances in the underworld. This and the similar dates for these files (Oct. 20 to 26, 1989) suggest that the two would link up.
map-bg-2-taki.SCR (Restored) Overlay |
|---|
 |
S6: Map Tables#
MAPTABLE-6.SCR lays out large event tiles for the known graphics variant of the mushroom overworld, perhaps giving a link in certain places between the overworld in its undetailed state to the state with all the paths revealed.
MAPTABLE-6.SCR 23 March 1990 09:46 |
|---|
 |
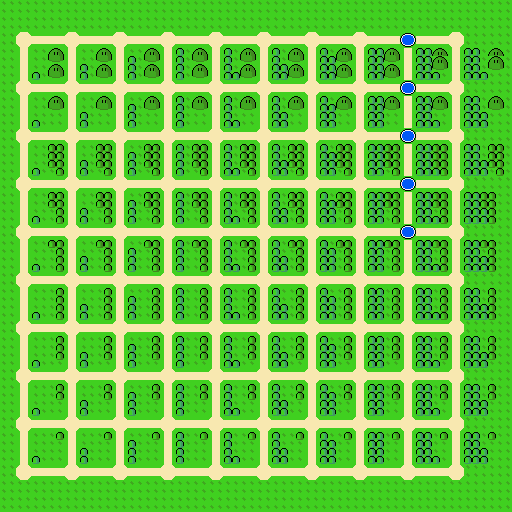
Next, this peculiar outlier of a tilemap bridges the gap between the mushroom overworld and the overworld in the final game. It appears to lay out different configurations of large and small hills, with each square adding another hill. The filename suggests that it would be used for Layer 3. However, in previous tilemaps and in the final game, the main terrain pieces of the overworld map are placed on Layer 2, while Layer 3 is used for the overworld border and status bar.
X-map-bg-3.SCR 16 April 1990 21:16 |
|---|
 |
MAPTABLE files B, C, and D are formatted like the tilemap for large event tiles, but are all identical to this one in the one shown below in that they're completely empty.
MAPTABLE-6-B.SCR 28 May 1990 11:01 |
|---|
 |
S6: Sprites#
Mario riding a cloud on the world map. This might have been Jugem's Cloud from Super Mario Bros. 3, where it was used to skip a level.
z-mario-4/map-obj.OBJ 25 October 1989 10:43 |
|---|


|
Style 7 - Final Overworld#
|
|
To do: |
There are a few tilemaps that correspond to the overworld that appears in the final game. A few of them give insight to the developers' plans for Dinosaur Land after the previous versions of the overworld were scrapped. They date from relatively late in the development cycle, as the game was released in Japan on November 21, 1990.
Final game world maps for comparison purposes can be found here at the first and fourth links, both listed as World Map.
S7: Maps#
S7 MP: Overworld#
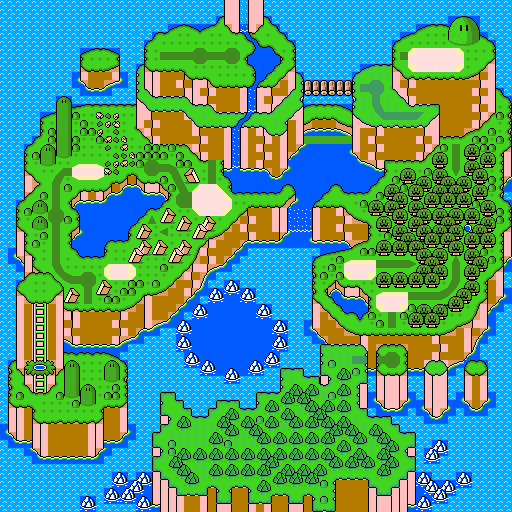
X-map-bg-2.SCR is identical to the final game.
X-map-bg-2.png 08 September 1990 22:59 |
|---|
 |
S6 MP: Underworld#
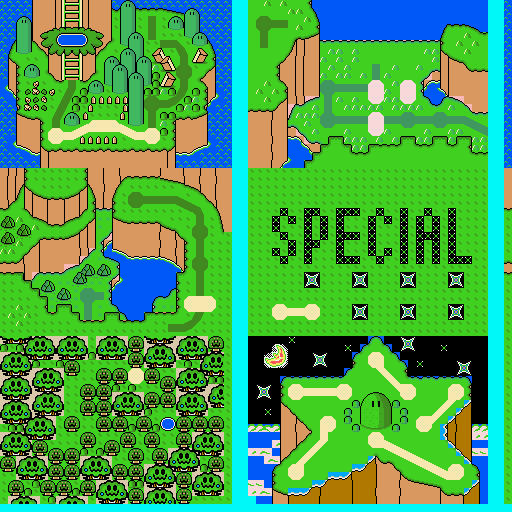
X-map-bg-2-chika.SCR has light blue vertical lines obscuring edges of the map that are normally visible.
X-map-bg-2-chika.png 09 September 1990 15:00 |
|---|
 |

|
Please elaborate. |
This tilemap contains only Bowser's Castle, but there's a four-tile strip on the bottom that shows Layer 1 data containing two paths from Forest of Illusion. The version of Bowser's Castle seen here uses palette and tile data that remains in the final game.
map-bg-1-chika-kuppa.SCR 12 June 1990 21:44 |
|---|
 |
S7: Layer Data#
S7 LD: Layer 1 Tiles#
X-map-unit.SCR lays out 16×16 Layer 1 tiles, which includes paths, levels, warps, and other decorative tiles. Two .CGX files from different points in time can be used to view the icons laid out by this file: v-ram-map-kuppa-shima.CGX (28 June 1990 15:13) and v-ram-map.CGX (08 September 1990 02:41).
X-map-unit.SCR with v-ram-map-kuppa-shima.CGX 07 September 1990 04:32 |
X-map-unit.SCR with v-ram-map.CGX 07 September 1990 04:32 |
|---|---|
 |
 |
S7 LD: Overworld#
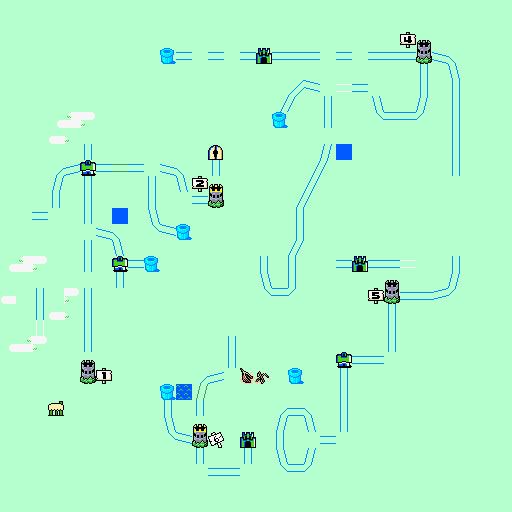
Files X-map-bg-1.SCR and X-map-bg-1-chika.SCR correspond to the layer 1 data of the main map and submap, respectively. There don't appear to be any changes between this version and that of the final game.
X-map-bg-1.SCR 07 September 1990 04:32 |
|---|
 |
S7 LD: Underworld#
|
|
To do: |
X-map-bg-1-chika-shiro.SCR contains an earlier version of the Layer 1 data for the submaps which, in the final game, from top to bottom and left to right, include Yoshi's Island, Valley of Bowser, Vanilla Dome, Special World, Forest of Illusion, and Star World. However, it appears that only Yoshi's Island (top left), Valley of Bowser (top right), and Vanilla Dome (middle left) existed as of May 1990. It also contains different versions of Bowser's Castle, including one with a locked key entrance. It appears that the castle was once much larger and that the Back Door (the tower on the righthand side of Bowser's Castle that serves as an alternate entrance) was part of the main structure, rather than an offshoot. Some additional observations, listed below, give key development insights.
X-map-bg-1-chika-shiro.SCR (Restored) 16 May 1990 17:16 |
X-map-bg-1-chika.SCR 06 September 1990 21:10 |
|---|---|
 |
 |
General:
- No castle tower icons are present, with fortress icons being used instead.
- There are no signs that indicate castle numbers.
Yoshi's Island:
- There's a dot for a level between Yoshi's Island 1 and the Yellow Switch Palace. From the palette data and position, this level was meant to be a water level (like Yoshi's Island 4) on the way up Kappa Mountain.
- Based on its palette, the level dot marking Yoshi's Island 4 was not going to be a water level.
Valley of Bowser:
- In the Donut Plains part of the map (on the upper left), Donut Secret 2 is located two tiles below where it is in the final game. In the released version, the exit of the level is directly left of the pipe, making a straight connection that would be consistent with the positioning on the overworld. In this version, there is a curved path from the level tile to get to the pipe.
- In the main part of the map, all level dots to the right of Valley of Bowser 3 and 4 (the levels to the left of Castle 7 and the Ghost House) are one tile further to the left [?], making the path from Valley of Bowser 3 and the Ghost House, as well as Valley of Bowser 4 and Bowser's Castle, one tile long instead of two.
- The warp into Valley of Bowser is placed directly below Valley of Bowser 1 with a straight path connecting them. In the final version, the player enters Valley of Bowser from the bottom and swings left to approach Valley of Bowser 1 from the right.
- Instead of a Star Road that's level with the castle's Front Door, there's a pipe placed tile higher than the Front Door and doesn't connect to it.
- in Valley of Bowser there is no trace of the unused Red Switch Palace present in the final game. If Switch Palaces weren't in the game at this point in development, then what was on top of Kappa Mountain?
Vanilla Dome:
- Vanilla Secret 1 is missing a secret exit that would lead to a Star Road, and the level tile isn't even marked as such [?].
- For Chocolate Secret, the level between the two pipes at the bottom of Valley of Bowser, there is no path that connects the level with the pipes. This conflicts with the warp tile on the path [?]. Presumably, either the path had not been created yet, or hardcoded paths were once used instead.
- There's no secret exit attached to Vanilla Dome 2 that would lead to the Red Switch Palace.
Unfortunately, the existence of the big dot level tiles gives no further information to solving the mystery of the big dots [?].
S7 LD: Star World#
|
|
To do: |
This tilemap has two copies of the paths in Star World, with one at the top left and one at the bottom right, the position in which it's located in the final game. In these, Star Road warps don't use star tiles, instead using regular level dots. Also, the paths that enter the dots are different from the final version: these ones enter at a 45-degree angle from the side. This type of path actually breaks if implemented in the final game, as it refers to a different niche tile for this purpose.
majikant-bg-1-michi.SCR 18 May 1990 00:53 |
|---|
 |
S7: Event Tiles#
MAPTABLE-6-A.SCR and MAPTABLE-2.SCR respectively contain 12×12 and 2×2 Layer 2 event tiles that correspond to the final game.
MAPTABLE-6-A.SCR 07 September 1990 20:44 |
MAPTABLE-2.SCR 07 September 1990 11:06 |
|---|---|
 |
 |
S7: Animations#
This tilemap lays out the animation frames for the entrance to Valley of Bowser rising out of the water. Unlike to the final game's 11 frames of animation, this version only has 5.
kuppa-shima.SCR 02 July 1990 10:11 |
|---|
 |
Miscellaneous#
Bowser's Castle Designs#
|
|
To do: |
map.SCR 01 April 1989 22:19 |
chr-stock-8.CGX 11 July 1990 18:44 |
|---|---|
chr-stock-8.CGX 11 July 1990 18:44 |
|
X-map-bg-1-chika-shiro.SCR (Restored) 16 May 1990 17:16 |
|
X-map-bg-1-chika-shiro.SCR (Restored) 16 May 1990 17:16 |
|
map-bg-1-chika-kuppa.SCR 12 June 1990 21:44 |
|
X-map-unit.SCR 07 September 1990 04:32 |
X-map-unit.SCR 07 September 1990 04:32 |
X-map-bg-1-chika.SCR 06 September 1990 21:10 |
|