 This article has a talk page!
This is a sub-page of Proto:The Legend of Zelda: Ocarina of Time Master Quest/Test Maps.
Room 116: Ganondorf Test Room#
Description#
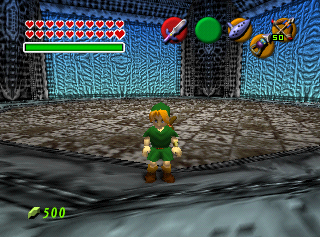
This map is known as ベっしつ (たからばこワープ), or "Special Room (Treasure Chest Warp)" in the Map Select menu. The name of its map file is "besitu", which means "special room". Its name and map filename seem to have been mixed up with Room 119, which is called テストルーム, or "Test Room".
The floor, walls, and ceiling of the rooms are patterned in textures that are not used anywhere else. However, there are similarities between the animated blue texture of the walls and the appearance of Ganon's Castle during the cutscene in which it collapses.
It may have been used to test Link's battle with Ganondorf.
Layout#
The map consists of an empty, circular room with animated textures on the walls.
It has similar dimensions to Ganondorf's Lair, and adding the boss fight with Ganondorf into the room reveals that it functions perfectly, with the exception of some graphical glitches.
It also shares some similarities with the look and shape of Majora's Lair in Ocarina of Time's sequel.
(Source: airikitascave - Adding Ganondorf Battle)
Environment Settings#
xxx
Actors#
None.
物品#
None.
出口#
None.
Room 117: Sasa Test#
Description#

This map is known as ささテスト, or "Sasa Test", in the Map Select menu. The name of its map file is "sasatest". It may have been named for an Ocarina of Time cinema scene programmer called Makoto Sasaki.
Unlike the other test maps, Room 117 has four different setups, corresponding to Child (Day), Child (Night), Adult (Day), and Adult (Night).
Layout#
The map consists of a flat plane divided into squares. Viewing the map from above reveals that the ground is textured with the acronym SRD, which stands for "Systems Research and Development", the development team at Nintendo that worked on Ocarina of Time. (These initials are also displayed by the game's crash debugger.)
Various sections of ground are linked to sound effects for different ground types, including water, wood, grass, and magma.
Environment Settings#
xxx
Setup 00 - Child (Day)#
Actors#
Actor |
Filename |
ID |
Object |
Variable |
ID |
Used |
|---|---|---|---|---|---|---|
01CA |
ovl_En_Kakasi3 |
xxx |
0154 |
FFFF |
xxx |
✔ |
01C9 |
ovl_En_Kakasi2 |
xxx |
0154 |
053F |
xxx |
✔ |
0185 |
ovl_En_Wonder_Talk2 |
Checkable Spot |
0001 |
003F |
xxx |
✔ |
0185 |
ovl_En_Wonder_Talk2 |
Checkable Spot |
0001 |
003F |
xxx |
✔ |
0185 |
ovl_En_Wonder_Talk2 |
Checkable Spot |
0001 |
003F |
xxx |
✔ |
0185 |
ovl_En_Wonder_Talk2 |
Checkable Spot |
0001 |
003F |
xxx |
✔ |
0185 |
ovl_En_Wonder_Talk2 |
Checkable Spot |
0001 |
003F |
xxx |
✔ |
0185 |
ovl_En_Wonder_Talk2 |
Checkable Spot |
0001 |
003F |
xxx |
✔ |
0185 |
ovl_En_Wonder_Talk2 |
Checkable Spot |
0001 |
003F |
xxx |
✔ |
01A0 |
ovl_Obj_Kibako2 |
Wooden Crate |
0170 |
00FF |
xxx |
✔ |
0019 |
ovl_En_Niw |
Cucco |
0013 |
0004 |
Flees on Approach |
✔ |
0117 |
ovl_En_G_Switch |
Silver Rupee |
0001 |
0140 |
xxx |
✔ |
0117 |
ovl_En_G_Switch |
Silver Rupee |
0001 |
1FFF |
xxx |
✔ |
0117 |
ovl_En_G_Switch |
Silver Rupee |
0001 |
1FFF |
xxx |
✔ |
0117 |
ovl_En_G_Switch |
Silver Rupee |
0001 |
1FFF |
xxx |
✔ |
0117 |
ovl_En_G_Switch |
Silver Rupee |
0001 |
1FFF |
xxx |
✔ |
0117 |
ovl_En_G_Switch |
Silver Rupee |
0001 |
1FFF |
xxx |
✔ |
0185 |
ovl_En_Wonder_Talk2 |
Checkable Spot |
0001 |
469D |
xxx |
✔ |
0185 |
ovl_En_Wonder_Talk2 |
Checkable Spot |
0001 |
46DD |
xxx |
✔ |
物品#
Object |
Filename |
ID |
Used |
|---|---|---|---|
0154 |
object_ka |
Pierre & Bonooru |
✔ |
0013 |
object_niw |
Cucco |
✔ |
0170 |
object_kibako2 |
Wooden Crate |
✔ |
Setup 01 - Child (Night)#
Actors#
This Gold Skulltula won't appear if Link has already collected every Gold Skulltula token.
Actor |
Filename |
ID |
Object |
Variable |
ID |
Used |
|---|---|---|---|---|---|---|
0095 |
ovl_En_Sw |
Skulltula |
0024 |
FF01 |
xxx |
✔ |
物品#
物品 |
文件 |
ID |
使用了 |
|---|---|---|---|
0024 |
object_st |
骷髅蜘蛛 |
✔ |
Setup 02 - Adult (Day)#
Actors#
One of the Flying Pots is suspended in mid-air, and will not engage Link unless the Moon Jump code or Free Movement Mode is used to fly up to it.
Actor |
Filename |
ID |
Object |
Variable |
ID |
Used |
|---|---|---|---|---|---|---|
01C9 |
ovl_En_Kakasi2 |
xxx |
0154 |
02BF |
xxx |
✔ |
01CA |
ovl_En_Kakasi3 |
xxx |
0154 |
FFFF |
xxx |
✔ |
011D |
ovl_En_Tubo_Trap |
Flying Pot |
0003 |
FFFF |
xxx |
✔ |
011D |
ovl_En_Tubo_Trap |
Flying Pot |
0003 |
FFFF |
xxx |
✔ |
0112 |
ovl_En_Wonder_Item |
Invisible Collectable Items |
0001 |
1178 |
xxx |
✔ |
0185 |
ovl_En_Wonder_Talk2 |
Checkable Spot |
0001 |
4178 |
xxx |
✔ |
物品#
Object |
Filename |
ID |
Used |
|---|---|---|---|
0154 |
object_ka |
Pierre & Bonooru |
✔ |
012C |
object_tsubo |
Pot |
✔ |
Setup 03 - Adult (Night)#
Actors#
The Enemy Spawner is normally used to spawn Leevers and Stalchildren. Variable 0AB2, which is unique to Room 117, causes it to spawn Red Tektites on approach, two at a time. When Link kills them, more appear, up to about 75.
Actor |
Filename |
ID |
Object |
Variable |
ID |
Used |
|---|---|---|---|---|---|---|
00A7 |
ovl_En_Encount1 |
Enemy Spawner |
0001 |
0AB2 |
xxx |
✔ |
0112 |
ovl_En_Wonder_Item |
Invisible Collectable Items |
0001 |
0FFF |
xxx |
✔ |
0112 |
ovl_En_Wonder_Item |
Invisible Collectable Items |
0001 |
0FFF |
xxx |
✔ |
0112 |
ovl_En_Wonder_Item |
Invisible Collectable Items |
0001 |
0FFF |
xxx |
✔ |
0112 |
ovl_En_Wonder_Item |
Invisible Collectable Items |
0001 |
00FF |
xxx |
✔ |
物品#
物品 |
文件 |
ID |
使用了 |
|---|---|---|---|
0016 |
object_tite |
玻石虫 |
✔ |
出口#
None.
Room 118: Jungle Gym#
Description#
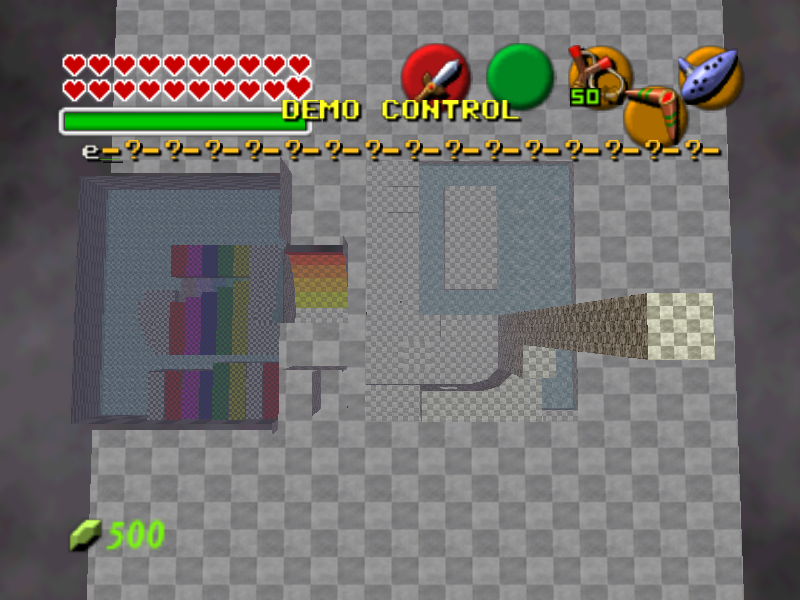
This map is known as テストマップ, or "Test Map" in the Map Select menu. The name of its map file is "test01". An identical map exists in the Japanese version of Majora's Mask.
It was likely used to test Link's actions. As such, it is filled with various types of terrain that exploit all of Link's abilities.
The smaller of the two checkerboard textures that span the map's floors and walls is connected to Link's height. Child Link is 1 square tall, while Adult Link reaches 1.5 squares.
Layout#
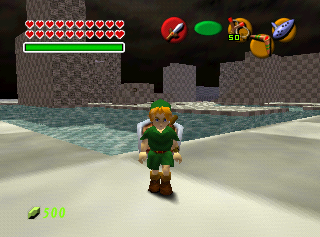
- Grey Pool: A simple pool of water. Possibly used to test swimming.
- Grey Drop-off: A slope leads gradually into the grey pool. Possibly used to test water depth. For example, at which depth does Link begin to swim? At which depth will bombs be extinguished?
- Grey Ladders: Adjacent to the grey pool are ladders of various heights.
- Jumping Platforms: Just beyond the ladders are a series of medium-sized platforms, spaced just closely enough that Link can jump between them. Possibly used to test jumping between platforms.
- Series of Towers: Next to the jumping platforms sits a linked series of tower platforms of ever increasing height. Possibly used to test Link's freefall, or the effect of throwing or using items across long distances.
- Alcove: Possibly used to test a similar puzzle in the Fire Temple.
- Steep Slope: In the center of the map sits a multicolored slope that becomes gradually redder as it gets steeper. with the topmost color being plain unclimbable. This slope is set to cause you to slide down should you stand on it.
- Tunnels: Below the steep slope are two grey monoliths that are penetrated by tunnels through which Child Link should be able to crawl in order to reach the other side. However, the tunnels cannot be interacted with.
- Rainbow Lake: At the west of the map is a rainbow-coloured area with a giant lake. It is much deeper than the grey pool.
- Rainbow Ladders: On the righthand side of the pond are four ladders of different heights that lead to the top of a platform with a stair-like gradation. However, the ladders cannot be used, as their surface is not set to be climbable.
Environment Settings#
Time passes, albeit much slower than it does in Hyrule Field.
Actors#
None.
物品#
None.
出口#
None.
Room 119: Treasure Chest Room#
Description#
This map is known as テストルーム, or "Test Room", in the Map Select menu. The name of its map file is "testroom". Its name and map filename seem to have been mixed up with Room 116, which is called ベっしつ (たからばこワープ), or "Special Room (Treasure Chest Warp)".
0室 |
1室 |
2室 |
3室 |
4室 |
|---|---|---|---|---|
 |
 |
 |
 |
 |
It contains five rooms, two of which are filled with treasure chests and other collectibles. It was likely used to test item pickups.
The floors, walls, and ceilings of the rooms are patterned in textures that are not used anywhere else.
The doors between rooms have no collision and can be walked through, but the next room will not load unless Link activates the door normally.
Layout#
Room 0 - Treasure Chest Room I#
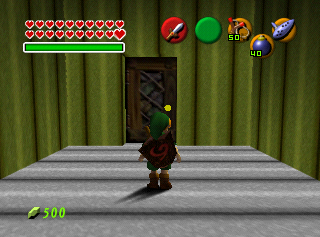
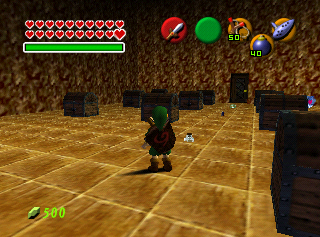
Upon loading Room 119 from the Map Select menu, Link appears in a striped green room with a door in front of him.
Entering the door brings him to a large, square room filled with treasure chests and collectible items.
Overview |
Entrance Room |
Main Room |
|---|---|---|
|
 |
 |
Room 1 - Treasure Chest Room II#
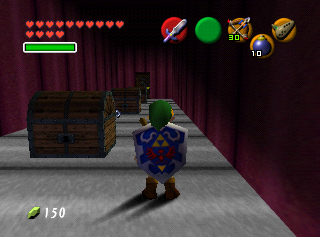
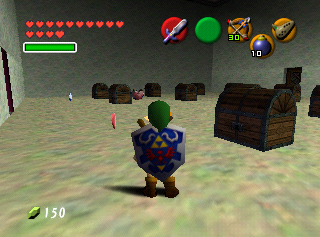
Taking the north exit from Room 0 leads Link through a hallway with four treasure chests. The hall ends in another square room filled with more chests and collectible items.
Overview |
Hall |
|---|---|
|
 |
Main Room |
Main Room Ceiling |
 |
 |
Room 2 - Flying Tile Room#
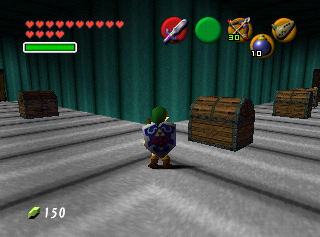
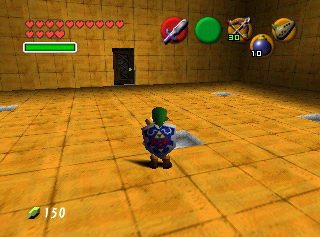
Taking the north exit from Room 1 leads Link through another hallway with four treasure chests. The hall ends in an empty square room with eight depressions in the floor.
Overview |
Hall |
Main Room |
|---|---|---|
|
 |
 |
Room 3 - Castle Room#
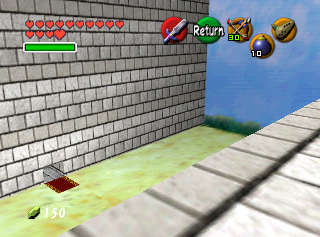
Taking the east exit from Room 0 leads Link through Room 4, a tunnel through which Link must crawl to reach Room 3.
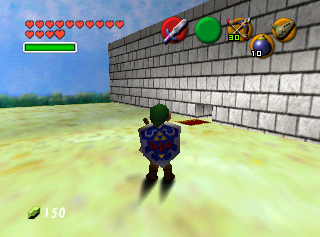
Room 3 is invisible. However, players can use the code 803CA08A 0000 803CA098 0003 prior to entering the room in order to make it appear.
This room has a sky texture on the walls, and a ground texture on the floor. It is bisected by a brick wall, which has another tunnel through which Link can crawl to reach the other side.
Overview |
Main Room |
Looking at Entrance Tunnel |
|---|---|---|
|
 |
 |
4室 - 隧道#
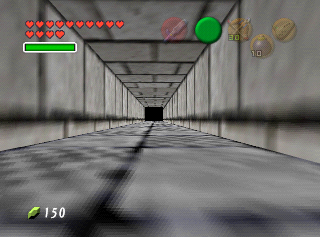
This room is a tunnel that connects Room 0 and Room 3.
Overview |
Main Room |
|---|---|
|
 |
Environment Settings#
xxx
Actors#
Room 0 - Treasure Chest Room I
This room has several collectable items on the floor that are not normally found lying around.
- Empty Bottle:
- Normally obtained by completing challenges for the Cucco Lady, Talon, and the Poe Collector.
- Deku Shield:
- Normally obtained by purchasing one from the Kokiri Shop.
- Hitting the shield with a projectile will cause it to do a little jump, and then fade away after a few seconds. This item has a similar behaviour to the Ordon Shield in Twilight Princess.
- Big Quiver:
- Normally obtained by shooting 10 targets at the Shooting Gallery in Kakariko Village.
- The quiver was once obtained by shooting it during the target practice game.
- Silver Scale:
- Normally obtained by collecting all the rupees in the Diving Game at Zora's Domain.
- The scale was once a collectable item.
- Golden Scale:
- Normally obtained by catching a fish that breaks the Fishing Pond record by at least 4 pounds.
Actor |
Filename |
ID |
Object |
Variable |
ID |
Used |
|---|---|---|---|---|---|---|
0015 |
En_Item00 |
Field & Dungeon Collectable Items |
0000 |
0806 |
Piece of Heart |
✔ |
010F |
ovl_Item_Etcetera |
xxx |
0001 |
0002 |
Hylian Shield |
✔ |
010F |
ovl_Item_Etcetera |
xxx |
0001 |
0005 |
Golden Scale |
✔ |
010F |
ovl_Item_Etcetera |
xxx |
0001 |
0004 |
Silver Scale |
✔ |
010F |
ovl_Item_Etcetera |
xxx |
0001 |
0000 |
Empty Bottle |
✔ |
00F1 |
ovl_Item_Ocarina |
Ocarina of Time |
00DE |
0003 |
Ocarina of Time |
✔ |
00EE |
ovl_Item_Shield |
Collectable Deku Shield |
0015 |
0000 |
Collectable Deku Shield |
✔ |
010F |
ovl_Item_Etcetera |
xxx |
0001 |
0001 |
Ruto's Letter |
✔ |
010F |
ovl_Item_Etcetera |
xxx |
0001 |
0003 |
Big Quiver |
✔ |
000A |
ovl_En_Box |
Treasure Chest |
000E |
008D |
Big Find - Fairy Bow |
✔ |
000A |
ovl_En_Box |
Treasure Chest |
000E |
00A2 |
Big Find - Fairy Slingshot |
✔ |
000A |
ovl_En_Box |
Treasure Chest |
000E |
00C6 |
Big Find - Boomerang |
✔ |
000A |
ovl_En_Box |
Treasure Chest |
000E |
0103 |
Big Find - Hookshot |
✔ |
000A |
ovl_En_Box |
Treasure Chest |
000E |
014C |
Big Find - Lens of Truth |
✔ |
000A |
ovl_En_Box |
Treasure Chest |
000E |
01A5 |
Big Find - Megaton Hammer |
✔ |
000A |
ovl_En_Box |
Treasure Chest |
000E |
0568 |
Big Find - Mirror Shield |
✔ |
000A |
ovl_En_Box |
Treasure Chest |
000E |
05C7 |
Big Find - Iron Boots |
✔ |
000A |
ovl_En_Box |
Treasure Chest |
000E |
05EB |
Big Find - Hover Boots |
✔ |
000A |
ovl_En_Box |
Treasure Chest |
000E |
0644 |
Big Find - Bomb Bag |
✔ |
000A |
ovl_En_Box |
Treasure Chest |
000E |
06A9 |
Big Find - Silver Gauntlets |
✔ |
000A |
ovl_En_Box |
Treasure Chest |
000E |
06CA |
Big Find - Golden Gauntlets |
✔ |
000A |
ovl_En_Box |
Treasure Chest |
000E |
07C0 |
Big Find - Piece of Heart |
✔ |
000A |
ovl_En_Box |
Treasure Chest |
000E |
0801 |
Big Find - Compass |
✔ |
000A |
ovl_En_Box |
Treasure Chest |
000E |
082E |
Big Find - Dungeon Map |
✔ |
Room 1 - Treasure Chest Room II
This room has contains an early version of the Heart Container, which doesn't appear anywhere else in the game.
Actor |
Filename |
ID |
Object |
Variable |
ID |
Used |
|---|---|---|---|---|---|---|
000A |
ovl_En_Box |
Treasure Chest |
000E |
0031 |
Kick Open - Blue Rupee |
✔ |
000A |
ovl_En_Box |
Treasure Chest |
000E |
0050 |
Kick Open - Deku Nuts (5) |
✔ |
000A |
ovl_En_Box |
Treasure Chest |
000E |
0073 |
Kick Open - Bombchu (10) |
✔ |
000A |
ovl_En_Box |
Treasure Chest |
000E |
00EF |
Kick Open - Deku Stick (1) |
✔ |
000A |
ovl_En_Box |
Treasure Chest |
000E |
017A |
Big Find - Zelda's Letter |
✔ |
000A |
ovl_En_Box |
Treasure Chest |
000E |
0192 |
Big Find - Ocarina of Time |
✔ |
000A |
ovl_En_Box |
Treasure Chest |
000E |
01D4 |
Big Find - Cojiro |
✔ |
000A |
ovl_En_Box |
Treasure Chest |
000E |
02D7 |
Kick Open - Magic Bean (1) |
✔ |
000A |
ovl_En_Box |
Treasure Chest |
000E |
04FB |
Big Find - Kokiri Sword |
✔ |
000A |
ovl_En_Box |
Treasure Chest |
000E |
051C |
Big Find - Giant's Knife |
✔ |
000A |
ovl_En_Box |
Treasure Chest |
000E |
0555 |
Kick Open - Hylian Shield |
✔ |
000A |
ovl_En_Box |
Treasure Chest |
000E |
0596 |
Big Find - Goron Tunic |
✔ |
000A |
ovl_En_Box |
Treasure Chest |
000E |
05B8 |
Big Find - Zora Tunic |
✔ |
000A |
ovl_En_Box |
Treasure Chest |
000E |
0739 |
Big Find - Stone of Agony |
✔ |
0015 |
En_Item00 |
Field & Dungeon Collectable Items |
0000 |
0911 |
Small Key |
✔ |
0015 |
En_Item00 |
Field & Dungeon Collectable Items |
0000 |
0A00 |
Green Rupee |
✔ |
0015 |
En_Item00 |
Field & Dungeon Collectable Items |
0000 |
0B01 |
Blue Rupee |
✔ |
0015 |
En_Item00 |
Field & Dungeon Collectable Items |
0000 |
0C02 |
Red Rupee |
✔ |
0015 |
En_Item00 |
Field & Dungeon Collectable Items |
0000 |
0D07 |
Early Heart Container |
✔ |
0125 |
ovl_En_Kusa |
Grass |
0001 |
FF01 |
Regenerating Grass |
✘ |
Room 2 - Flying Tile Room
This room contains eight unloaded flying floor tiles that fill its depressions. Even if one adds their object to the object list in order to make them load, they are not easily seen. This is because they audibly launch themselves the moment that Link loads the room by entering through the door, which is at the far end of the L-shaped hallway. This means that the tiles will crash before Link ever reaches them.
Actor |
Filename |
ID |
Object |
Variable |
ID |
Used |
|---|---|---|---|---|---|---|
006B |
ovl_En_Yukabyun |
Flying Floor Tile |
005F |
FFFF |
xxx |
✘ |
006B |
ovl_En_Yukabyun |
Flying Floor Tile |
005F |
FFFF |
xxx |
✘ |
006B |
ovl_En_Yukabyun |
Flying Floor Tile |
005F |
FFFF |
xxx |
✘ |
006B |
ovl_En_Yukabyun |
Flying Floor Tile |
005F |
FFFF |
xxx |
✘ |
006B |
ovl_En_Yukabyun |
Flying Floor Tile |
005F |
FFFF |
xxx |
✘ |
006B |
ovl_En_Yukabyun |
Flying Floor Tile |
005F |
FFFF |
xxx |
✘ |
006B |
ovl_En_Yukabyun |
Flying Floor Tile |
005F |
FFFF |
xxx |
✘ |
006B |
ovl_En_Yukabyun |
Flying Floor Tile |
005F |
FFFF |
xxx |
✘ |
000A |
ovl_En_Box |
Treasure Chest |
000E |
07BD |
Big Find - Heart Container |
✔ |
000A |
ovl_En_Box |
Treasure Chest |
000E |
08BE |
Big Find - Adult's Wallet |
✔ |
000A |
ovl_En_Box |
Treasure Chest |
000E |
08DF |
Big Find - Giant's Wallet |
✔ |
000A |
ovl_En_Box |
Treasure Chest |
000E |
08E0 |
Big Find - Weird Egg |
✔ |
Room 3 - Castle Room
None.
4室 - 隧道
None.
物品#
Room 0 - Treasure Chest Room I
Actor |
Filename |
ID |
Used |
|---|---|---|---|
000E |
object_box |
Treasure Chest |
✔ |
005F |
object_yukabyun |
Flying Floor Tile |
✘ |
0081 |
object_lightbox |
Four Grey Rectangular Blocks of Increasing Size |
✘ |
0085 |
object_trap |
Sliding Blade Trap |
✘ |
008B |
object_vm |
Beamos |
✘ |
00AA |
object_gi_key |
Small Key |
✘ |
00BE |
object_gi_arrowcase |
Quivers |
✔ |
00C6 |
object_gi_bottle |
Empty Bottle |
✔ |
00DB |
object_gi_scale |
Scales |
✔ |
00DC |
object_gi_shield_2 |
Hylian Shield |
✔ |
00DE |
object_gi_ocarina |
Ocarina of Time |
✔ |
010B |
object_gi_bottle_letter |
Ruto's Letter in Bottle |
✔ |
010E |
object_gi_ocarina_0 |
Fairy Ocarina |
✘ |
Room 1 - Treasure Chest Room II
Actor |
Filename |
ID |
Used |
|---|---|---|---|
000E |
object_box |
Treasure Chest |
✔ |
005F |
object_yukabyun |
Flying Floor Tile |
✘ |
0081 |
object_lightbox |
Four Grey Rectangular Blocks of Increasing Size |
✘ |
0085 |
object_trap |
Sliding Blade Trap |
✘ |
008B |
object_vm |
Beamos |
✘ |
0025 |
object_bw |
Torch Slug |
✘ |
005D |
object_Bb |
Bubble |
✘ |
0056 |
object_vali |
Bari |
✘ |
0021 |
object_bl |
Biri |
✘ |
0026 |
object_ei |
Stinger |
✘ |
00AA |
object_gi_key |
Small Key |
✘ |
Room 2 - Flying Tile Room
Actor |
Filename |
ID |
Used |
|---|---|---|---|
000E |
object_box |
Treasure Chest |
✔ |
0081 |
object_lightbox |
Four Grey Rectangular Blocks of Increasing Size |
✘ |
0085 |
object_trap |
Sliding Blade Trap |
✘ |
008B |
object_vm |
Beamos |
✘ |
Room 3 - Castle Room
Actor |
Filename |
ID |
Used |
|---|---|---|---|
000E |
object_box |
Treasure Chest |
✘ |
005F |
object_yukabyun |
Flying Floor Tile |
✘ |
0081 |
object_lightbox |
Four Grey Rectangular Blocks of Increasing Size |
✘ |
0085 |
object_trap |
Sliding Blade Trap |
✘ |
008B |
object_vm |
Beamos |
✘ |
4室 - 隧道
Actor |
Filename |
ID |
Used |
|---|---|---|---|
000E |
object_box |
Treasure Chest |
✘ |
005F |
object_yukabyun |
Flying Floor Tile |
✘ |
0081 |
object_lightbox |
Four Grey Rectangular Blocks of Increasing Size |
✘ |
0085 |
object_trap |
Sliding Blade Trap |
✘ |
008B |
object_vm |
Beamos |
✘ |
出口#
None.
Room 120: Stalfos Miniboss Room#
Description#
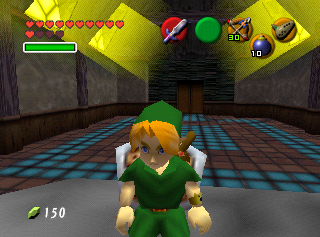
This map is known as ちゅうスタロフォスベや, or "Stalfos Miniboss Room" in the Map Select menu. The name of its map file is "syotes", which may be short for 勝負テスト, or "combat test". It shares many similarities with Room 121, whose map file is called "syotes2".
|
1996年十月 |
调试ROM |
|---|---|

|
|
Despite being re-added to the Debug ROM, the fact that the map is missing its room header renders it inaccessible without some tinkering to repair the problem. A patched Debug ROM has been released by a hacker named cooliscool to amend the issue.
Layout#
The room consists of a large, rectangular hall. One end of the room has a door, while the other has a raised dais. Its floors, walls, and ceiling are patterned in textures that are not used anywhere else, though the blue texture on the back wall and the sides of the dais can be seen in other early prerelease screenshots.
The door is nonfunctional, as it is simply textured into the wall, rather than being an object Link can interact with.
Environment Settings#
xxx
Actors#
Unknown, missing header.
物品#
Unknown, missing header.
出口#
None.
Room 121: Stalfos Boss Room#
Description#
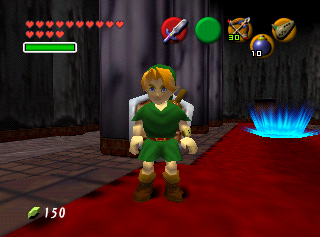
This map is known as ボススタロフォスベや, or "Stalfos Boss Room", in the Map Select menu. The name of its map file is "syotes2", which may be short for 勝負テスト, or "combat test".
|
1996年十月 |
调试ROM |
|---|---|
|
|
|
Link is seen fighting a Stalfos in this room in early prerelease screenshots dating from 1996.
Layout#
The room consists of a large, red-carpeted hallway lined with pillars. Its floors, walls, and ceiling are patterned in textures that are not used anywhere else. One end of the room has a door, while the other has a raised dais.
The door is nonfunctional, as it is simply textured into the wall, rather than being an object Link can interact with.
Environment Settings#
The carpet uses the "wet floor" sound effect, which suggests the sound effects were rearranged during development.
Actors#
Despite its map select and scene name, as well as prerelease screenshots that depict Link fighting a Stalfos here, the room contains nothing but a warp that brings the player to Hyrule Field, in front of the drawbridge.
Actor |
Filename |
ID |
Object |
Variable |
ID |
Used |
|---|---|---|---|---|---|---|
005D |
ovl_Door_Warp1 |
Blue Warp |
0048 |
0000 |
Blue Warp - Brings You to Entrance of Map |
✔ |
物品#
Object |
Filename |
ID |
Used |
|---|---|---|---|
0048 |
object_warp1 |
Blue Warp |
✔ |
出口#
None.
Room 122: Sutaru#
Description#
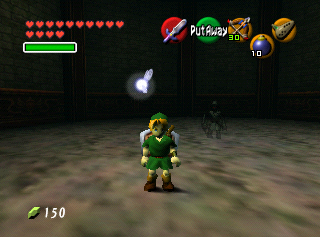
This map is known as "Sutaru", or "Stal", in the Map Select menu. It is presumably short for "Stalfos". The name of its map file is "sutaru".
|
1997年十月 |
调试ROM |
|---|---|
|
|
|
Link is seen fighting two Stalfos in this room in prerelease screenshots from October, 1997. The room, with its Stalfos miniboss battle, was featured in the first-ever playable Ocarina of Time demo at Nintendo's trade show, Spaceworld, the following month. To quote a contemporary report from N64.com (a Nintendo 64 coverage site created by IGN):
"You could also try out three different boss battles. The first one pits you against two pretty tall and scary Stalfos skeltons in a round arena that both attack you at the same time. When you kill them, they crumble to a heap of bones."
(Source: "EVERYTHING about Zelda 64" - N64.com, Nov. 24th, 1997)
Layout#
The map consists of a large, circular room. The developers added a lower level and doors to this room, incorporating it into the Forest Temple. There, Link must undergo a miniboss fight against two Stalfos in order to escape the room and obtain the Bow.
Environment Settings#
xxx
Actors#
Reenable Stalfos: 812B0BD0 0032
Reenable Other Actors: 802B0BC1 0005:
Actor |
Filename |
ID |
Object |
Variable |
ID |
Used |
|---|---|---|---|---|---|---|
0033 |
ovl_En_Torch2 |
Dark Link |
0020 |
FFFF |
xxx |
✔ |
0069 |
ovl_En_Bb |
Bubble |
005D |
05FB |
xxx |
✘ |
0002 |
ovl_En_Test |
Stalfos |
0032 |
FFFF |
xxx |
✘ |
0002 |
ovl_En_Test |
Stalfos |
0032 |
FFFF |
xxx |
✘ |
005D |
ovl_Door_Warp1 |
Blue Warp |
0048 |
0001 |
xxx |
✘ |

|
To do: |
物品#
Object |
Filename |
ID |
Used |
|---|---|---|---|
0183 |
object_wf |
Wolfos |
✘ |
0020 |
object_torch2 |
Dark Link |
✔ |
00A6 |
object_dh |
Dead Hand |
✘ |
0098 |
object_rd |
Redead |
✘ |
005D |
object_Bb |
Bubble |
✘ |
0048 |
object_warp1 |
Blue Warp |
✘ |
00B7 |
object_gi_heart |
Recovery Heart |
✘ |
00F2 |
object_gi_clothes |
Tunics |
✘ |
出口#
None.
Room 123: Shooting Gallery Test#
Description#
This map is known as "jikkenjyou", or "Test Area", in the Map Select menu. In truth, both Room 123 and Room 22 bring the player to the map file "syatekijyou", which means "Shooting Gallery".
It was evidently used as a test area at some point during development.
Layout#
xxx
Environment Settings#
xxx
Setup 00 - Normal Gameplay#
Actors#
Actor |
Filename |
ID |
Object |
Variable |
ID |
Used |
|---|---|---|---|---|---|---|
00C0 |
ovl_En_Syateki_Itm |
xxx |
0001 |
0000 |
xxx |
✔ |
0141 |
ovl_En_Kanban |
Square Sign |
012F |
0329 |
xxx |
✔ |
物品#
Object |
Filename |
ID |
Used |
|---|---|---|---|
005B |
object_ossan |
Shooting Gallery Owner & Bazaar Owner |
✔ |
00B7 |
object_gi_heart |
Recovery Heart |
✘ |
00BB |
object_gi_nuts |
Deku Nut |
✘ |
00BD |
object_gi_hearts |
Piece of Heart & Heart Container |
✘ |
00BE |
object_gi_arrowcase |
Quivers |
✔ |
00CE |
object_gi_bomb_1 |
Bomb |
✘ |
00D8 |
object_gi_arrow |
Arrow Bundles |
✘ |
0013 |
object_niw |
Cucco |
✘ |
0119 |
object_gi_seed |
Deku Seeds |
✘ |
012F |
object_kanban |
Square Sign |
✔ |
017B |
object_gi_dekupouch |
Deku Seed Pouches |
✔ |
017F |
object_gi_rupy |
Rupees |
✔ |
016B |
object_dog |
Dog |
✘ |
出口#
Exit |
Appear At |
From |
|---|---|---|
7FFA |
xxx |
Shooting Gallery |
Setup 04 - xxx#
Actors#
None.
物品#
None.
出口#
None.
Setup 05 - xxx#
Actors#
Actor |
Filename |
ID |
Object |
Variable |
ID |
Used |
|---|---|---|---|---|---|---|
008C |
ovl_Demo_Kankyo |
xxx |
0001 |
0007 |
xxx (0001) |
✔ |
008C |
ovl_Demo_Kankyo |
xxx |
0001 |
0008 |
xxx (00B6) |
✔ |
008C |
ovl_Demo_Kankyo |
xxx |
0001 |
0009 |
xxx (00B6) |
✔ |
008C |
ovl_Demo_Kankyo |
xxx |
0001 |
000A |
xxx (00B6) |
✔ |
008C |
ovl_Demo_Kankyo |
xxx |
0001 |
000B |
xxx (00B6) |
✔ |
008C |
ovl_Demo_Kankyo |
xxx |
0001 |
000C |
xxx (00B6) |
✔ |
物品#
Object |
Filename |
ID |
Used |
|---|---|---|---|
00B6 |
object_gi_melody |
Music Note |
✘ |
出口#
Setup 00 |
|
|---|---|
Exit |
Appear At |
7FFA |
xxx |
Setup 06 - xxx#
Actors#
Actor |
Filename |
ID |
Object |
Variable |
ID |
Used |
|---|---|---|---|---|---|---|
005D |
ovl_Door_Warp1 |
Blue Warp |
0048 |
0003 |
Zelda's Pink Rupee Prison |
✔ |
物品#
Object |
Filename |
ID |
Used |
|---|---|---|---|
00B6 |
object_gi_melody |
Music Note |
✘ |
0048 |
object_warp1 |
Blue Warp |
✔ |
0075 |
object_warp2 |
xxx |
? |
出口#
Setup 00 |
|
|---|---|
Exit |
Appear At |
7FFA |
xxx |
Room 124: Depth Test#
Description#
This map is known as depthテスト, or "Depth Test", in the Map Select menu. The name of its map file is "depth_test".
Prerendered Background |
Background Disabled |
|---|---|
 |
 |
Fog Disabled |
Room Editor |
|---|---|
 |
 |
It may have been used to test at which distance the quadrilaterals described in the Layout section stop being rendered. The white, orange and blue squares turn grey when the fog effect is enabled in the emulator's video plugin settings. The orange square may even disappear, depending on the video plugin used.
Layout#
This map has no collision. As a result, Link starts to fall the moment he spawns, eventually reaching the kill plane, which causes him to respawn at the top of the map and fall again. This process continues until he runs out of hearts.
The room has a prerendered 2D background depicting nine blue squares. When the background is removed, nine more quadrilaterals of various colours can be seen. In addition to disabling the background manually, these hidden shapes can also be seen if the player waits for the fade-out animation to kick in when Link dies. This animation disables the background texture for a time.
The nine quadrilaterals are each positioned at varying distances. These are the shapes in order, listed from the closest to the furthest from the camera: Cyan / Purple / Red / Green / Yellow / White / Blue / Orange / Pink.
The pink square cannot normally be viewed, as it is too far away from the camera.
Environment Settings#
The map uses the same music as the last room Link entered.
Actors#
None.
物品#
None.
出口#
None.
Room 125: Early Hyrule Garden Game#
Description#
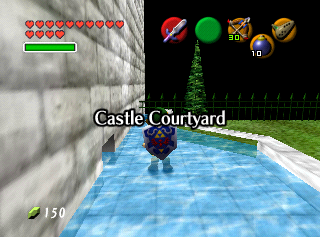
This map is known as ハイラルにわゲーム2, or "Hyrule Garden Game 2", in the Map Select menu. The name of its map file is "hairal_niwa2", or "hyrule_garden2". It is an earlier version of the Hyrule Castle Garden Game map.
The map causes severe graphical glitches on certain emulators, and crashes on N64 hardware. One of these graphical glitches prevents the interface from appearing on emulators. The reason for these glitches is that the moat water's display list is trying to execute additional commands, presumably for texture animation, in RAM segments 0x08-0x0B. These segments have not been set up correctly, which results in the game executing garbage instead of correct commands.
|
|
To do: |
Layout#
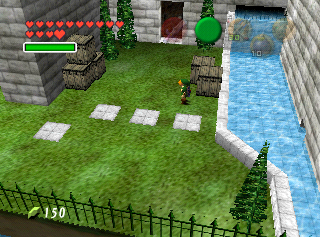
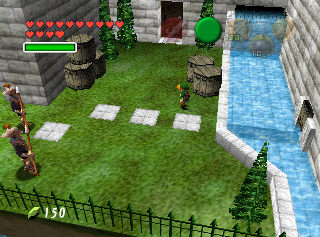
There are several differences between Room 125 and the garden that appears in the final game. For example, the C and B buttons are not disabled. Additionally, the player is able to control the camera freely, rather than being forced to view the scene from predetermined angles depending on their position.
|
Early Garden Game |
Final Garden Game |
|---|---|
|
|
Room 125 lacks the wooden shutter above the moat entrance through which Link crawls. Absent, too, are the stone pillars which support it. The barrels were originally boxes. However, the missing water is merely the result of the aforementioned graphical glitch.
|
Early Garden Game |
Final Garden Game |
|---|---|
|
|
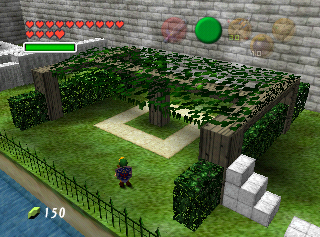
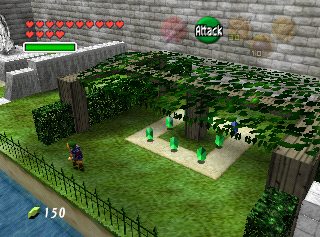
As there is no actor list for the map, this area lacks the final version's Rupees.
|
Early Garden Game |
Final Garden Game |
|---|---|
|
|
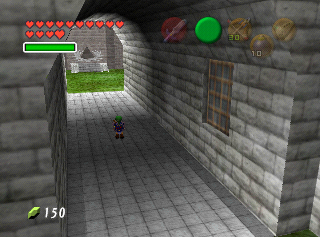
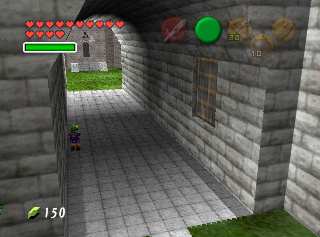
The window that Zelda peers through is shaped like a triangle. In the final version, it's rectangular. Naoki Mori, credited as one of Ocarina of Time's cinema scene directors, mentioned the shape of the window in an interview:
"At first, it wasn’t a window Zelda was looking through, but a peephole. But then someone asked 'Why would there be a peephole in a castle courtyard?' Unfortunately, when we asked the the mappers to change the peephole to a window, I think we made one cry..."
Environment Settings#
xxx
Actors#
None.
物品#
None.
出口#
None.