 This article has a talk page!
This is a sub-page of The Legend of Zelda: Tears of the Kingdom.
Tutorial Master Sword#
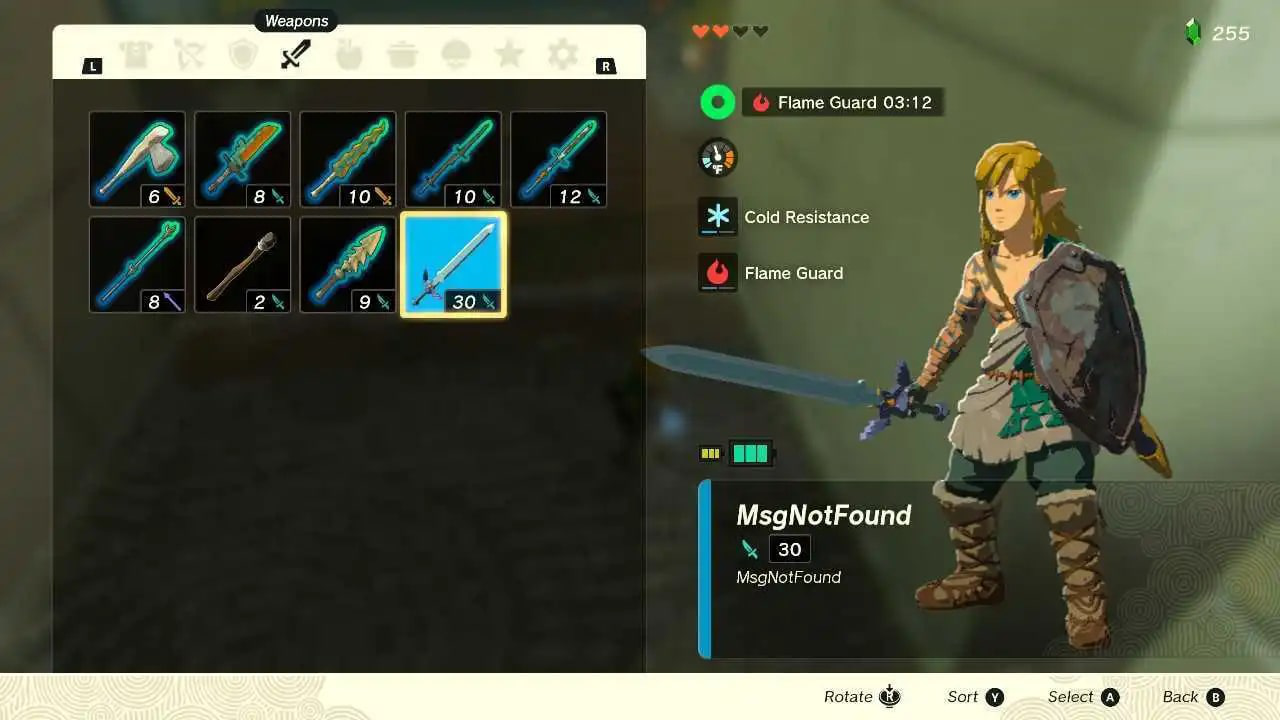
The Master Sword that Link uses in the tutorial intro is different from the one you obtain in the main game, both having a different model due to story reasons and because Nintendo gave it infinite durability to prevent a softlock from occurring. That said, it is possible to obtain this sword in the main game either through hacking or glitches, and has strange effects and odd behaviors when interacting with various elements of the main game it was never meant to. It has a unique inventory icon that isn't glowing despite it always glowing when held, not even near Gloom. When trying to use Fuse, a message saying "You can't use Fuse on this equipment" will appear and prevent you from using fuse on this equipment. However, if you glitch the game to fuse the weapon, its name will actually change back to "Master Sword" in the inventory, though its icon will remain unchanged aside from indicating it's a fused weapon and its description also remains the same.
(Source: Dot eSports)
Sage Weapons#
The weapons the sages use in both NPC and sage avatar form are also different from their regular counterparts. They have no icon in the menu, are strapped to Link's back horizontally when sheathed rather than being displayed vertically, transform into their normal counterparts when displayed on a weapon stand, and are impossible to fuse anything to.
Weapon_Lsword_154#
This is the Boulder Breaker used by Yunobo as a sage. It is weaker than the normal one, with only 33 attack power, but looks identical in-game.
Weapon_Spear_150#
This is the Lightscale Trident wielded by Sidon as a sage. It's actually stronger than the normal one, with 40 attack power, and again looks identical in-game.
It does however have a strange property when things are fused to it, in that the fused material will just float in mid-air about a foot away from the end of the spear.
Weapon_Sword_152_Main and Weapon_Sword_152_Sub#
These are the Scimitars of the Seven used by Riju. They're weaker than the normal one, with 25 attack power rather than the 28 that normal version has.
Weapon_Bow_116#
Tulin's Swallow Bow. This has 9 attack power compared to the 8 the normal one has, but otherwise looks and functions identically in-game.
Weapon_Bow_128#
A strange single-shot version of the Great Eagle Bow wielded by Tulin. It's significantly weaker than the normal one, with only 26 attack power in total.
Weapon_Bow_129#
A carbon copy of the normal Great Eagle Bow only used by Tulin. It looks and acts exactly the same as its regular counterpart, and even transforms into it if dropped on the floor.
Weapon_Bow_016_Event#
Tulin's Bow from the cutscene where it's carried by an Aerocuda. It looks and acts the same as its regular counterpart.
Ganondorf's Weapons#
Ganondorf also has his own version of the Demon King's Bow, which is identical to the normal one minus the inventory icon. It's labeled Weapon_Bow_166_For_Ganondorf in the files.
Miscellaneous Weapons#
Finally, there are also some interesting NPC only weapons that can be obtained via save editing. These are the weapons for Mineru's Construct, the Seized Construct and Yunobo, and aren't meant to be used by Link, leading to some odd behavior.
Weapon_RaumiGolem_Left and Weapon_RaumiGolem_Right#
These are the left and right arms of Mineru's Construct, which are treated as weapons internally. When added to the inventory, they have 38 attack power, no icon or description, and are invisible when wielded in-game.
Using fuse when one of these is equipped will freeze the game, though they work as expected in most other ways.
Weapon_DungeonBossZonau#
A copy of one of the above weapons used by the Seized Construct boss. Has the exact same properties when added to the inventory.
Weapon_RaumiGolem_Back#
This is the weapon/item slot for the back of Mineru's Construct. It displays as a blank icon with no attack power, and cannot have anything fused to it. If placed on a weapon stand, it'll be added as expected, but will become impossible to collect again afterwards.
Weapon_DungeonBossZonau_Front#
The other arms for the Seized Construct. Unfortunately, these do not appear to function in-game, and cause the game to freeze before loading the file.
Weapon_Goron_Knuckle#
Yunobo's ability as a weapon. It displays as an invisible item with no icon and 0 attack power, and acts like a cross between Weapon_RaumiGolem_Left and Weapon_RaumiGolemRight, being usable in-game, but also getting stuck on any weapon stand it's displayed on.
For some reason, doing a spin attack with this item equipped freezes the game.
Monster Control Crew Mop#
The mop used by Monster Control Crew soldiers as a weapon is a separate item to the regular one, with the file name of Weapon_Spear_036_MercenarySoldier. Other than having no icon and fused objects float in front of it, it's functionally identical to a normal mop.
Selmie's Shields#
All wooden shields displayed in Selmie's Spot are separate items from their standard counterparts, with _NoBurned added to the end of their file names. These are fireproof variants that won't be destroyed by flames or scorching climates.
Interestingly, Breath of the Wild did not handle these shields this way, and merely added extra parameters to the standard items instead.
Display Items#
All vegetables grown by NPCs are separate variants with either _OwnedByNpc, _TemporaryOwnedByNpc, or another similar value suffixed to the end of their file names. Ones with _TemporaryOwnedByNpc in their names act the same as their regular counterparts (albeit without an inventory icon), while ones with _OwnedByNpc cannot be collected once put down and are impossible to cook with.
Boar Meat#
The meat displayed on spitroasts in enemy camps is a separate item by the name of BoarMeat. It has the same name and description as a Seared Steak, but lacks an icon or any default meal properties.
Out of Bounds Oddities#
The entirety of Hyrule is surrounded by a 1000-unit thick invisible wall cube that encloses its sky, ground and underground. That wall will attempt to push Link inwards back to the playable field when inside it, and would despawn most actors including constructs and companions, except for some rare objects like migratory birds and wind effects. The game adds a variety of smaller invisible walls to discourage players from reaching that wall in the first place, that mainly exert strong winds or floors that cause instant death. On the unlikely event Link ventured outside of it, there's some unfinished collision in the overworld terrain, and if Link ventures too far from the origin coordinates (around 8000 units) the camera would stop following him to avoid floating point related visual corruption glitches.
With that being said, two of the surfaces of that cube that are interesting: the ceiling and the floor. The outer side of ceiling is a normal invisible walkable surface with a metallic sound. The inner side of the floor for that cube is never meant to be accessible in any way, and all of the terrain geometry in the Depths are modeled with that in mind, including the bottomless pit in the demon army showdown which has an unused normal terrain floor just below the death barrier. If the player abuses glitches to get to that inner floor at the boundary of the world, most of it behaves like gloom terrain. Spawning constructs on it will cause them to roll towards the lateral invisible walls and eventually despawn, because the floor has no friction. Spawning normal objects on it will cause them to clip through the floor and fall in the void. It's possible this was deliberate in order to quickly kill any player who ventured there, although it's possible to escape by warping from the map screen.
During the final boss battle, Dragon Zelda would automatically never fail to catch Link whenever he falls too far from the final boss. Her path finding logic is especially aggressive, and she would clip through terrain and speed through most of Hyrule in a matter of seconds if Link somehow escaped the final boss arena. As a result, most players would never fall low enough to reach the invisible floor that causes the game to tell the player they can't go in that direction, then respawn them in the coordinate where the Demon Dragon final battle begun. This invisible floor has a similar yellow visual effect to the barrier surrounding Demon Beast Ganon in the previous game.
More interestingly, during the last catch sequence right after it, Link and Zelda are spawned inside of an invisible funnel where they fall endlessly. Under normal circumstances, Link can't die and can't go lower than a certain amount. Zelda would reach the "floor" of that funnel first, then Link would catch up to her. This invisible funnel isn't covered from the top, but it's normally impossible to gain altitude in this sequence without glitches because the player is locked into different controls and player actions. If Link and Zelda escaped this funnel somehow, which is normally impossible, there's a different unused invisible floor that behaves just like the final boss one, that's located just above Hyrule Castle. Reaching it would respawn Link back in the beginning of the last catch sequence with a unique camera preset. If they bypassed this invisible floor somehow and reached solid ground, they would simply continue to be locked in that falling animation, and would glide on top of the terrain. If Link were to somehow die in this sequence, the player would resume from the beginning of the demon dragon boss fight.