 This article has a talk page!
This is a sub-page of Proto:GoldenEye 007 (Wii).

|
This page or section needs more images. |
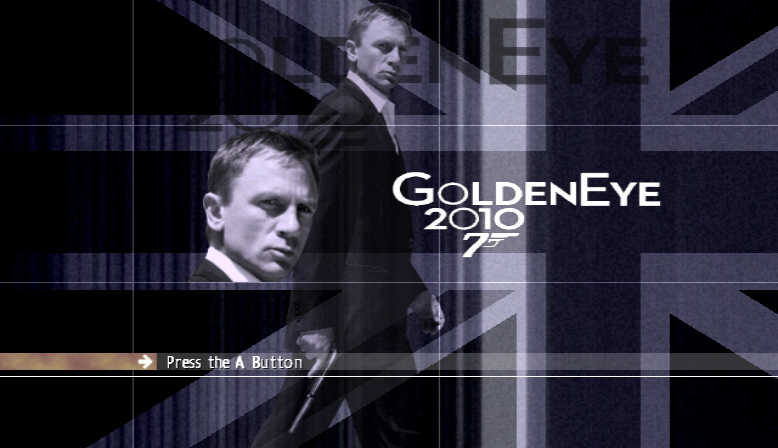
The earliest prototype, under the title of "GoldenEye 2010". According to the sound team's logs found in a beta build of 007 Legends, initial development began around early March 2009, dating this build at about two months into development. As was standard for Eurocom, new games were built using older games as their base. In this case, GoldenEye was built up from Quantum Of Solace. As such, the game looks, sounds and plays like Quantum Of Solace but in first-person.
Build Date#
This build is the only of the four to not display its build date anywhere in-game. However, as with every other build, it can be found in DATA\sys\main.dol (the game's executable.). Time is assumed to be BST (British Summer Time).
May 15th 2009, 10:06:22Maps#
Only three maps are available from the game's menu. The rest are accessed through the debug menu, by using a GameCube controller in port 1.
White Box Test Range [m_jamie.edb]#
This map starts you out in a white room that load you into three different test areas which run a timer in the top left corner:
- AI and Assault Course: A large outdoor area with an interior complex on one side. Bond's movement tech such as vaulting have not been implemented yet, making this more of a gunfight test area that consists of about 25 enemies. The actual objective is to obtain and return a keycard found in the internal area to a computer near the start point. Elimination of guards is optional, and upon completion, the player is returned to the white room.
- Stealth and Multi-Route: An even bigger map for testing stealth functionality. Bond can initially either go around the side of the building and evade/disable/shoot the camera, or pass through the building and deal with a guard inside. If the camera spots Bond, the nearby door turns from grey to red and the camera panel declares that the door is locked. After circling around up to the building's upper floor, the map begins to test environmental takedowns, with a destructible box that, when shot, falls and kills the enemy beneath it. The next area opens up into a further maze, where the end is in sight but unreachable. More camera and guard placements are along the way to the finishing point, upon reaching which you are put back to the initial white room.
- Shooting Range: A killhouse shooting range consisting of about 13 stations against stationary and moving targets. At the end, you are given the option to return to the white room or replay the range.
Destructibility Test [m_annex.edb]#
An industrial area used to demo destructible objects and environments, such as furniture, brick walls and barricades used for cover. These barricades are destructible in the final game, but take a lot more ammo to wear down in this map. Cutout targets pop up from behind cover in the final accessible area.
Annex survived the development process as the multiplayer map Industrial. It is also visible at the end of the attract trailer when the main menu is left running, itself cut from a motion capture test video leftover in the retail build.
Prop Room [m_propsroom_gfx.edb]#
A large open space that houses probably most of the game's new assets. These include lots of barrels, paint cans and crates, but also a helicopter, Bond's model and the enemy guard model seen in the first map.
The following maps can only be loaded through the debug menu's "Level" folder.
m_annex_gfx.edb#
A second version of Annex, previously seen in the Destructibility Test map, but with the destructible objects missing. A lens flare is added in the starting room and Bond's model is standing outside the door in an inaccessible area (visible through the window). Another copy of Bond's model is standing before the stairs.
m_dam_gfx.edb#
A stunning test map of the Dam top in a grittier, older architectural style. The mountains surrounding the dam bear resemblance to the original GoldenEye 007's Dam mountains, and similarly, there is an open spot midway down the road for Bond to jump off from. The watchtowers are a completely different shape and are accessed by ladders at its base rather than steps, though the ladders cannot be climbed yet. On the opposite side are rooms allowing Bond to precariously walk along an open ledge just below the main road.
As in the final game, there is no secret island.
m_firing_range.edb#
The killhouse, also accessible from the White Box Test Range map.
m_test.edb#
Another white hub room, only smaller, and with four rooms to visit. None of the doorways load in a new map, but there is also no way back from the rooms once entered. Positions are taken from map spawn direction:
- First from the left: It's difficult to tell exactly what was being tested in this room. In front of Bond's spawn are some cover blockouts and a room, and to the right are a lot of solid cubes, a small shooting range target on the floor that falls and rises by itself, and a red cube that can be worn down by shooting at it, which regenerates when Bond moves far enough away that the cube fades out. At the far back of a room is a... greyed out geometry shape that lacks collision.
- Second from the left: An assault course. Unfortunately, vaulting has not been implemented, meaning Bond cannot leave the first area. The intended path is to vault through the window, turn around the corridor, climb the ladder and follow the raised path.
- Second from the right: Nothing happens.
- First from the right: Loads the "AI and Assault Course" map mentioned earlier. When complete, sends you back to m_jamie.edb.
Test Maps
- These maps are found in the Level folder's submenu Test Maps. Submenus for Visual Maps and Other are also present but empty.
mt_ai.edb#
A hub room with eight doorways leading to rooms testing AI in different situations. All of these are lacking the functionality to demonstrate what the rooms are set up for, which may be why this map is not available from the frontend.
- Interrogation: On the left is a drop down and a brick wall with a window, marked "Window Hang". On the opposite side is the same, marked "Standard/Dragging". Further back from the start on the left side is an empty, unmarked drop. Enemies spawn and shoot Bond in the first two, while the unmarked drop actually spawns an enemy unaware of the player's presence. However, none of the tech intended to be demonstrated in this area has been implemented.
- Path Finding: Spawns an enemy in a small area. The enemy will aim at Bond but does not move.
- Investigation: A large room with some blocks, a raised wooden shelf housing crates, a wooden door. Connected to the room is a corridor leading to an empty room. There is no trace of "investigation" yet.
- Suprise Attacks [sic]: A corridor of 6 walls, doors and windows on either side. Directly to the left and right of the entryway are brick walls with windows and a guard facing away behind it, but Bond cannot attack them. The fifth wall on the left spawns a guard that Bond can shoot.
- Luring (Door Traps): Four oversized doors with guards behind them. Guards that do not react to gunshots and thus cannot open the doors.
- Grenades: The grenades room inexplicably has a different entryway to the other seven. Inside is a large, blocked out area with a single guard and no grenades.
- Cover Points: A grassy area with some rocks and a few trees.
- Following AI: A large area with three enemies, and behind them are grassy hills to the left and tree barks to the right.
mt_fight.edb#
A reused map from Batman Begins.
mt_fx.edb#
Loads infinitely. *Explore more with Eurochef*
mt_fx_props.edb#
Another hub room. Large and small pieces of cloth are hanging from an invisible clothesline in the centre of the corridor and react to Bond's player model. All rooms besides the three empty ones contain a bright yellow light that warps Bond back to the hub area. However, after warping back, it is not possible to return back to the room Bond came from.
- LOD Props: Contains two oil barrels and a floating window with destructible panes of glass. If Bond moves far enough away after destroying the objects, they return to normal.
- Physic Props: Four destructible objects consisting of four wooden planks.
- Bake Anim Props: A room containing a broken wooden crate, a chair and a wooden pallet with exaggerated destruction animations when shot.
- ???: Unmarked. Another test area in the same art style as Annex. Similarly survived as part of the Industrial multiplayer map.
- ???: Unmarked. Empty space and no warp back to the hub.
- ???: Unmarked. Empty space and no warp back to the hub.
- ???: Unmarked. Empty space and no warp back to the hub.
- OS Props: A small room in the style of Annex. Contains destructible chairs, barrels, crates, pallets and windows.
mt_fxtst.edb#
Loads infinitely. Currently also crashes Eurochef.
mt_ihigh.edb#
Another white room of 8 doorways. This test map originated from Batman Begins, which Quantum Of Solace was likely built up from.
- Doors: Contains 8 doors and two windows split five on each side. "Context Open" does nothing, "Auto Open" opens when Bond moves towards it, "Barred" does not open, "Kick Down" (the metal door) is knocked down after walked into a few times while "Kick Down" (the wooden door) breaks after being walked into several times. On the other side, "Punch Open" is missing its door, "Climb Through" (two sets of windows) cannot be vaulted through on either side, "Lock Pick" and "Key" also do nothing.
- Hacking: Contains an old console in the middle of the room and an untextured safe to the right.
- Health / Supplies: Contains a red, circular thing on the floor and oversized health packs to the right. In Batman Begins, this was probably used to test health draining and healing, but none of the functionality remains.
- Explosives: On the middle of the floor are bombs, to the left is a locked door and to the right and further back is wooden scaffolding.
- ???: Unmarked. Does nothing.
- ???: Unmarked. Does nothing.
- Batarang: An area with three pits to the side used as testing grounds. The closer left pit was used for "Disarming Enemies" and is empty, the further back has no marking and is also empty, and the big area to the right is marked "General Interaction" and contains some raised wooden scaffolding. As Batman's true identity is not James Bond, there are no Bondarangs for 007 to play with here.
- Interactive Objects: A small area with office furniture, such as vending machines, a projector, photocopier, filing cabinet, desk and... a stove cooker. None of these objects have their interactivity anymore. A vending machine does appear in Facility in the final game, and its design was tweaked for Reloaded, neither of which resemble these test machines.
mt_phys.edb#
Reloads the game's frontend, for some reason. Crashes Eurochef.
mt_pmove.edb#
Another hub room. In front of Bond is a destructible basket(?), and rooms 6-8 use images of Daniel Craig which were left in the final game and can be seen here. In GoldenEye, Bond's parkour abilities are limited to waist-high ledge climbs and vaults, meaning these rooms are largely unusable.
- Ledges: Ledge-climbing tests. To the left is "Ledge No Jump", to the mid-left is "Stealth Climb Up", in the middle are three climbing ledges, the latter two marked "No Fwd Move", the mid-right is "No Jump Climb Up", and the right is "Normal". No functionality remains.
- Horizontal Pipes: A large room with a chasm, intended to be crossed over by a horizontal pipe marked "normal transition". Bond cannot grab the pipe anymore.
- Vertical Pipes / Ladders and Fences: On the left are two pipes and on the right are two ladders, thinner than those Bond can climb in the final game. Nothing is climbable anymore.
- ???: A heavily unfinished room lacking a ceiling and walls higher than Bond's head. Inside the space is a door and some walls attached to it. The room is unmarked, so it's unknown what exactly this was intended to be used for.
- Combinations & Navigational Ideas: Does nothing. Need to check the map in Eurochef to see what this area was.
- Environmental Finish: Another room with walls like the unmarked area. This section starts Bond behind three enemies and nothing environmental at all.
- Interrogate: Same as last time, but with one enemy. Most interesting part of this room is, instead of the rest of the map being visible, all that can be seen out in the void are green directional arrows that glow in and out of visibility.
- Cover Mode: A large area with four large sets of what look like the shape of destructible boxes in this build. While there's technically nothing else of note here besides both another room and the arrows being visible outside, this appears to have been used to test the one unique ability to this build leftover from Quantum: wall-hugging. By holding crouch while facing a wall, Bond will take cover against it and hold his P99 upwards against it. If there is cover opposite, Bond can lean out and press A to run across to it. Since there is no aiming, Bond can only blind-fire out of cover, which is an interesting mechanic to see in first-person. If to the right of cover, Bond will fire out as if out of cover, with the cover blocking most of the screen. If against the left side of cover, Bond awkwardly leans his right arm over 90-degree anti-clockwork angle. If against low cover, Bond will similarly twist his arm to the left, albeit more comfortably, and poke his arm up out of cover to fire. If the AK-47 is used instead of the P99, Bond holds the AK downwards and out of sight when against the wall, blind-firing to the right has even more clipping issues against the cover being used, upwards fire is the same, but from the left, Bond holds the gun normally, taking away the point of blind-firing by leaving most of his body exposed in doing so. Cover mode also has its quirks; it is also possible for the P99 to be stuck facing upright until shot again, while the AK-47 can also get stuck in its equivalent position, but will refuse to fire or reload when out of ammo, and remains unusable again until the player switches to the P99 and back to the AK-47.
- Game Path Camera: A large room with two wall dividers and a guard inbetween. This area has two green polygonal cylinder shapes which alternate red and green when shot. Some panels depicting scale near the shapes also reflect the colour of the shapes. It is not clear what this room is for.
mt_ropes.edb#
A map of... ropes, and inaccurate scale.
mt_scale.edb#
Used to measure scale. The vent on the right can be shot off. The scale is not as obscene as mt_ropes.edb, but objects such as doors are still noticeably too big.
mt_sci_ext_gfx.edb#
The Science Center Exterior level from Quantum Of Solace without any triggers. As such, the map can be explored up to the point where Bond has to shoot a ladder down, and there are no NPCs or vehicles driving along the road. *Explore more with Eurochef*
mt_sci_ext_main.edb#
The Science Center Exterior level from Quantum Of Solace. The map fails to read objectives and triggers, meaning the player cannot progress past the electronic lock. However, cars are driving on the road and there are two prototype Russian soldiers, one outside the front entrance of the building and another to the side of the building, where an NPC is in the original map, before reaching the side door. For whatever reason, bullets phase through the enemies so they cannot be killed. *Explore more with Eurochef*
mt_sci_gfx.edb#
Internal variant of the Science Center Exterior GFX map, lacking triggers, enemies and doors. It is impossible to progress too far due to the lack of pipe traversal. *Explore more with Eurochef.*
mt_sci_hall_gfx.edb#
The hall from the end of Science Center, again lacking triggers and enemies.
mt_sci_hall_main.edb#
Supposed to be the normal version of the hall from the end of Science Center, but the gate at the bottom of the stairs never opens, locking down what little of the area can be explored to begin with.
mt_sci_main.edb#
Supposed to be the normal version of the internal half of Science Center. However, the doors at the start are locked, preventing progress. As an oddity, the game seems to detect an enemy if the gun is aimed at the door in a certain position as the reticule turns red, to which firing at it will turn the reticule back to normal when pointing there.
Movies#
TEST.thp#
A test video containing a white background and a green oval for 4 seconds.
LOGO2.thp#
A silent, black and white supercut of footage from GoldenEye, Casino Royale and Quantum of Solace, with attempts to splice shots of Craig into action scenes from GoldenEye. At 1:19 in length it's not known what this would've been used for, besides maybe a different attract video before the main menu.
_LOGO2.thp#
The Eurocom logo from Pirates of the Caribbean: At World's End, leftover from that game as it was built off of that.
Misc.#
- Bond's footsteps and the AK47 firing sound effects play in the left and right audio channels a few miliseconds apart, causing an automatic double-tracking effect where the two channels phase cancel each other out if played back in mono. This effect also applies to all enemy gunfire (as they only use AKs in this build) due to enemy gunfire being to play in mono. It is odd that this ever happened in the first place, needless to say it does not happen in the final game, nor the BondX proto.
- Pressing L+R or L+Dpad R pauses the game. This is the input to noclip in the BondX and Sep 7th builds, but movement in this mode has not been implemented yet in this build.
- Bond can move enemies by moving into them.
- In the assault course from m_test.edb, the build will sometimes crash with one of two errors when destroying the glass. Other times it works fine.
- Bond can interrupt reload animations by firing the gun again. If done while wall-hugging, the animation plays in full, uninterrupted. However, the gun can still be fired from about halfway through the animation, causing Bond to shoot at the sky as it is facing upwards to account for the wall. Still though, it somehow manages to hit where the reticule is targeting. This works with both the P99 and AK-47.
(Source: Alpine Escape)