 This article has a talk page!
This page details pre-release information and/or media for Banjo-Tooie.

|
Development/Planning Timeline#
1998#
- June-August: Development begins on Tooie during these months for "most of the team."1
- September: The scrapped mine world from Kazooie (Glitter Gulch Mine) is redesigned for Tooie.
- October: The scrapped fairground world from Kazooie (Witchyworld) is redesigned for Tooie.
- October 28: IGN reports from Rare's Uncle Tusk that Banjo-Tooie's release is scheduled roughly for late 1999. 2
1999#
- January: Terrydactyland is drafted.
- c. January-November: Jamjars takes Bottles' place as move tutor.
- March: Grunty Industries is drafted (and/or implemented).
- June: Rare releases a Q&A page on Banjo-Tooie, reporting that about 13 people are working on the game at the time, and that they are 'undecided' on use of the 4MB Expansion Pak. 3 4
- c. March-November: The scrapped lava world from Kazooie (Mount Fire Eyes) is redesigned as Hailfire Peaks' fire side.
- November: Cauldron Keep is drafted as a full-sized world, before being downsized due to time/cartridge space constraints.
2000#
- March 31: Nintendo announces that Banjo-Tooie's release date is July 24, 2000. 5
- June 20: IGN reports that Banjo-Tooie is being delayed until February 2001.6
- July 10: IGN reports from a Nintendo of Canada representative that the game is actually being released not in 2001, but on 12/26/2000.7
- Between July 11 and August 15: IGN updates Banjo-Tooie's release date to its final date of 11/20/2000. 8
- September 1: Rare releases btlarge.mov, a movie file of Banjo-Tooie footage with some differences and an early version of the title theme.9
- November 20: The final game is released.
Developer Testimonials#

- According to a YouTube comment by Steve Malpass, the first level he ever designed was Grunty Industries, supervised by Gregg Mayles. This is evidenced by one of the crate textures in the level listing both of their names as a sort of "developer signature" with a date in March 1999. 10
- Malpass also stated that warp pads were not implemented until nearer to the end of development, which is corroborated by their nonexistence in several of the map plans.
- According to the Glitter Gulch Mine exhibit in Banjoland in Nuts & Bolts, Canary Mary's races were initially meant to be won by rotating the Control Stick instead of mashing the buttons. It's said there that the mechanic was changed due to blisters on the beta testers' palms (which did end up hurting players of Mario Party to the point of Nintendo being forced to pay legal fees) and potential damage to the stick due to the methods of rotation.
Planning Documents#
Stop 'N' Swop#
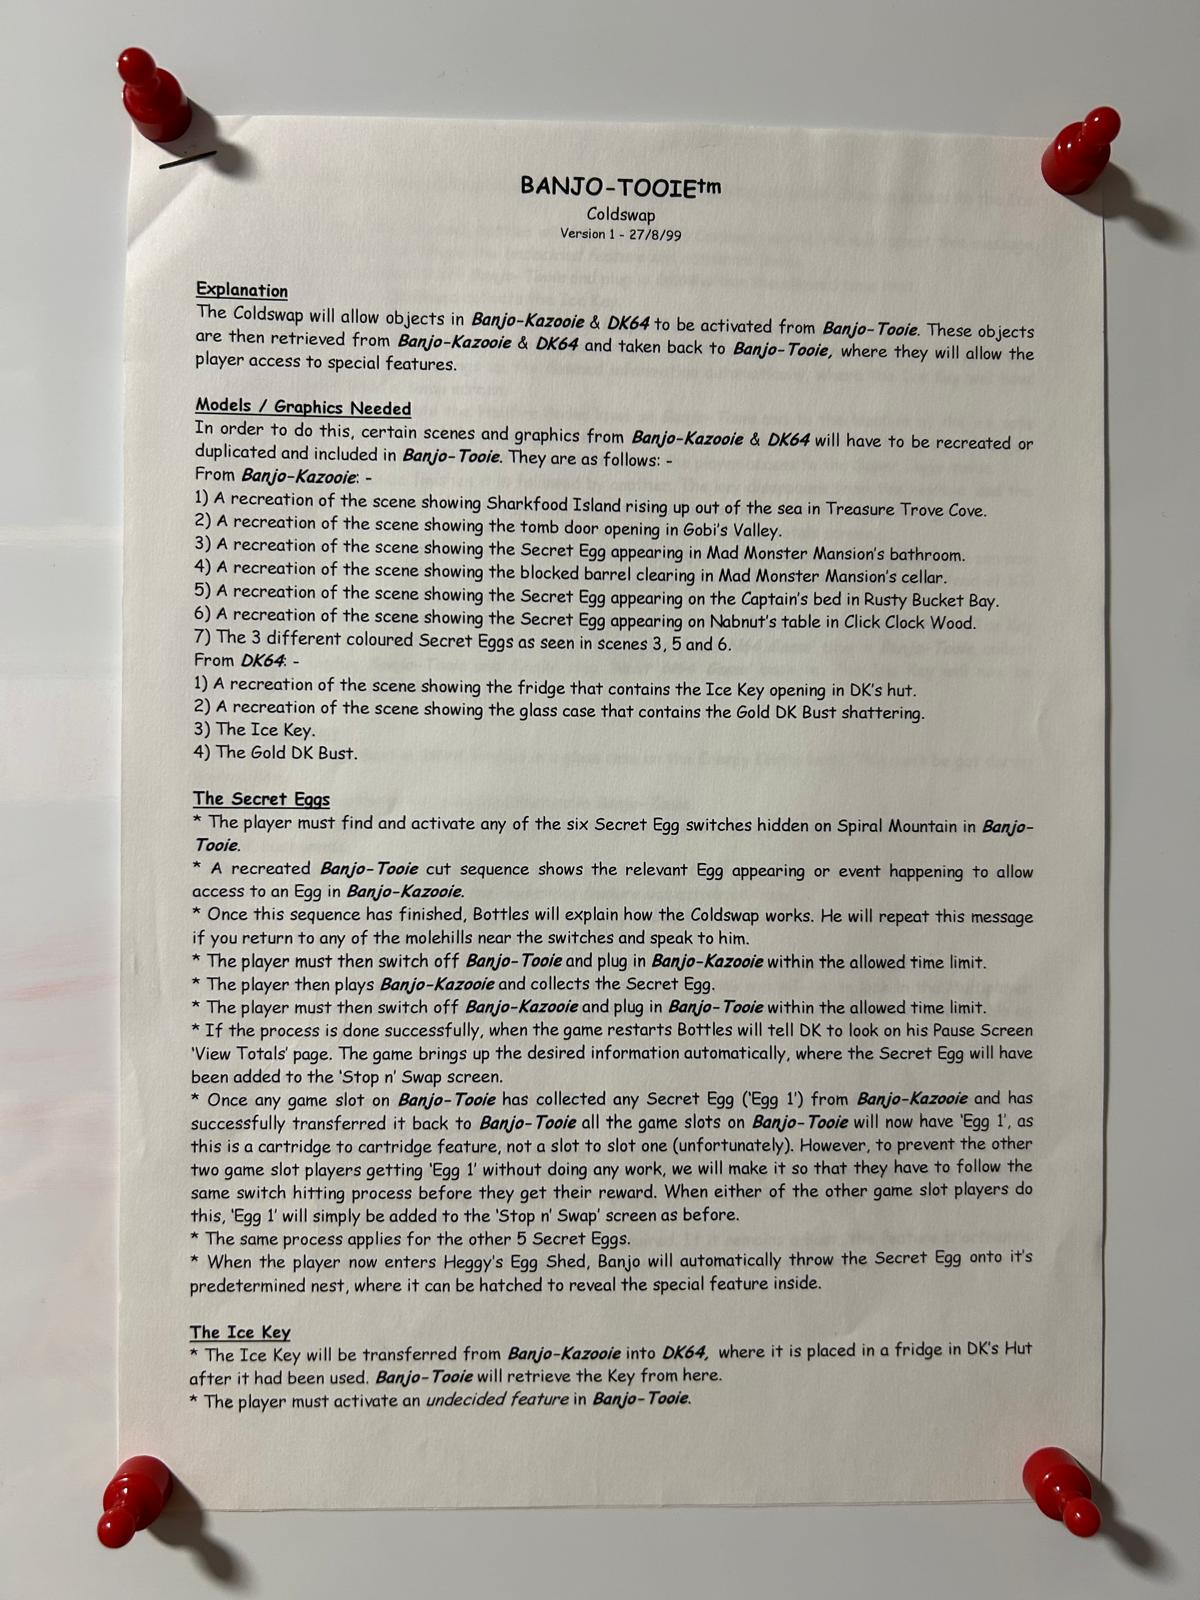
Coldswap Version 1 - 27/8/99 (Page 1) |
Coldswap Version 1 - 27/8/99 (Page 2) |
|---|---|
 |
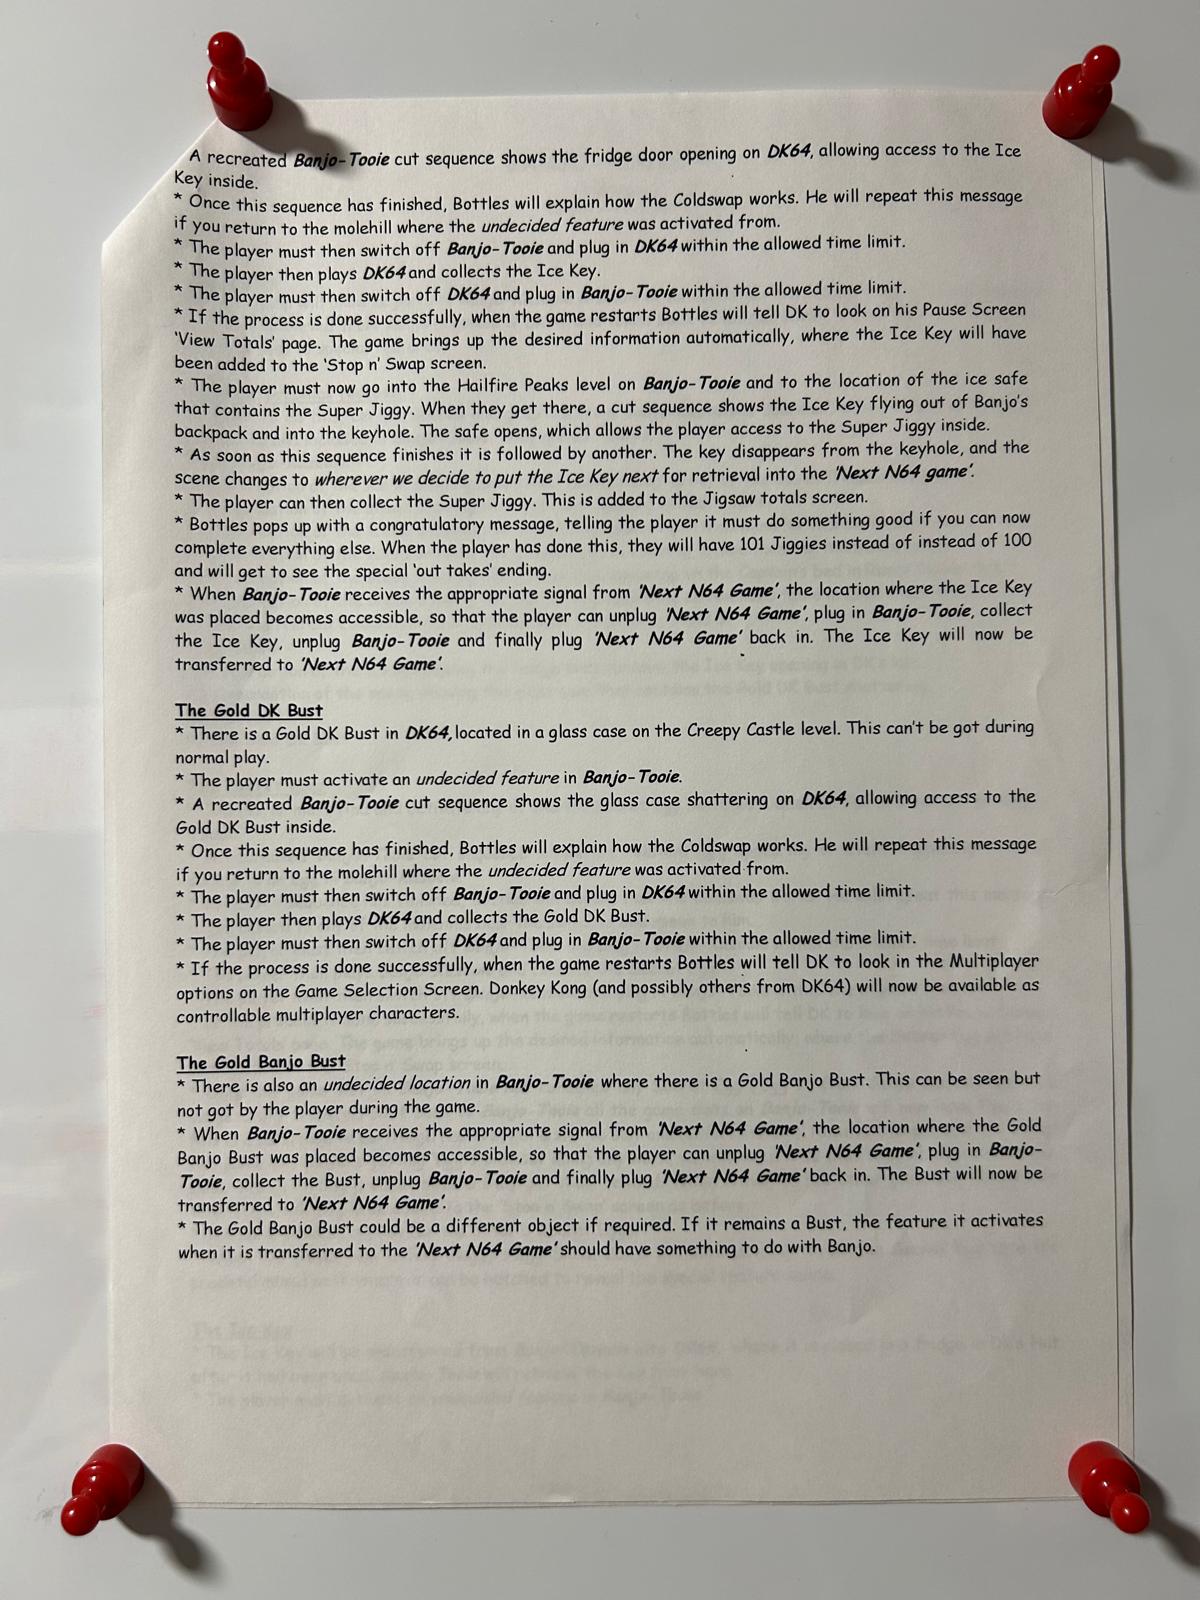 |
On December 22, 2025, Banjo-Kazooie designer Gregg Mayles shared the "Coldswap" document on his Twitter/X account. Dated August 27, 1999, the document outlines early plans to incorporate the Stop 'n' Swop feature within Banjo-Tooie that would allow for connectivity between Banjo-Kazooie, as well as Donkey Kong 64''. The plan is divided into the following sections:
Explanation
An abstract that briefly describes the connectivity of Stop 'N' Swop within the three titles - Banjo-Tooie will receive the items found within Banjo-Kazooie and Donkey Kong 64, and utilize them to unlock bonus features.
Models/Graphics Needed
To create continuity between Banjo-Tooie and the former titles, cutscenes depicting the environments harbouring the secret items in Banjo-Kazooie and Donkey Kong 64 would need to be faithfully recreated within Banjo-Tooie, intended to play when the relevant Stop 'N' Swop connection is activated. For the connection to Banjo-Kazooie, cutscenes within Banjo-Tooie would depict the six Mystery Eggs now obtainable in their Banjo-Kazooie locations. For the connection to Donkey Kong 64, cutscenes within Banjo-Tooie would depict the Banjo-Kazooie freezer opening and the Museum glass protecting the Golden DK Bust shattering.
The Secret Eggs
At this stage in development, it was intended for players to discover 'six Secret Egg switches' around Spiral Mountain that would begin the Stop 'N' Swop process when activated. The aforementioned cutscenes would play for their respective switch, along with a speech from Bottles prompting players to turn off Banjo-Tooie, and switch it with Banjo-Kazooie following a power cycle. Following this instruction would allow for the data sent from Banjo-Tooie to be read by Banjo-Kazooie, unlocking the relevant locations within the game to enable the Mystery Eggs to be collected. Coldswapping back to Banjo-Tooie would have the collected eggs transferred to the sequel where they could be taken to Heggy the Hen to access special features, just like the final game. At this time, it was unknown what the six Mystery Eggs would unlock in Banjo-Tooie, with the document simply alluding that hatching a Mystery Egg in Heggy's predetermined nest would reveal the 'special feature.'
The Ice Key
While the Ice Key is initially seen in Banjo-Kazooie, players would not have been able to access it directly from Banjo-Tooie, as they had done with the Mystery Eggs. Instead, players would have needed to transfer the Ice Key into Donkey Kong 64 first, via Coldswapping. Surviving documentation reveals that the Ice Key would have been used to unlock the Big Icy Door in Crystal Caves, where it would then be transported to the Banjo-Kazooie freezer in Donkey Kong's Treehouse for safekeeping. Once this was accomplished, players would start the undecided process for Stop 'N' Swop in Banjo-Tooie, which would prompt them with the aforementioned cutscene that depicted the Banjo-Kazooie fridge opening. Coldswapping to Donkey Kong 64 would allow the Ice Key to be retrieved from the Treehouse, and Coldswapping back to Banjo-Tooie would allow for the Ice Key to appear on the 'View Totals' page, having been successfully transferred. The Ice Key would then be taken to the Ice Safe in Hailfire Peaks, just as it appears in the final game. However, instead of discovering a Mega Glowbo that would unlock a Dragon transformation for Kazooie, players would instead find a "Super Jiggy" that would have been otherwise unobtainable. As the unused Cauldron Keep 'Castle' level would have resulted in 10 further Jiggies, the Super Jiggy would have brought the total to 101:
“Bottles pops up with a congratulatory message, telling the player it must do something good if you can now complete everything else. When the player has done this, they will have 101 Jiggies instead of instead of 100 and will get to see the special 'out takes' ending.” - Banjo-Tooie Coldswap Document, 27/8/99
The outtakes ending for 101% completion might seem familiar to players who have completed Donkey Kong 64, as returning to the Banana Fairy Queen after photographing all 20 Banana Fairies during that game will reward the player with the 201st Golden Banana. Provided that players collect the remaining 200 Golden Bananas and defeat King K. Rool, they will unlock an 'out takes' ending that plays following the end credits. Given this logic, it's possible that the 201st Golden Banana was originally held behind the Big Icy Door, and unlocked the 'out takes' ending.
After unlocking the Ice Safe in Hailfire Peaks, the Ice Key would then be transported to an undetermined location for safekeeping, just as it had been held previously in the Banjo-Kazooie Fridge within Donkey Kong's Treehouse in Donkey Kong 64. Banjo-Tooie would then rely on the 'Next N64 Game' to allow for the Ice Key to be retrieved once more, and whisked away for use in an undetermined future Rare title.
The Gold DK Bust
In Donkey Kong 64, players would have been able to discover a Golden Donkey Kong Bust atop a pillar in the Museum area of Creepy Castle. The Golden DK Bust would have been kept behind glass, appearing to be unobtainable for the duration of Donkey Kong 64. During the events of Banjo-Tooie, however, players would start a Stop 'N' Swop process in motion that allowed them to witness the Museum glass shattering, which then prompted players with Coldswapping to Donkey Kong 64 to confirm the changed environment. Venturing beyond the glass, players would collect the Golden Donkey Kong Bust and Coldswap back to Banjo-Tooie where they would be informed that the relic unlocked the ability to play as Donkey Kong (and possibly others from DK64) in Banjo-Tooie's multiplayer mode.
The Gold Banjo Bust
Intended as the item within Banjo-Tooie that could be passed along to the 'Next N64 Game', The Gold Banjo bust would have served a similar purpose as its Donkey Kong 64 counterpart; players would discover an unobtainable item kept out of reach, which would become obtainable via Coldswapping to a future N64 title. The document notes that the Gold Banjo Bust could be replaced with a different object if required, but if it remains then the feature should be relevant to Banjo in the 'Next N64 Game', just as the Golden DK Bust would have unlocked the ability to play as Donkey Kong in Banjo-Tooie.
Just a few months after the Coldswap document had been drafted, Nintendo would witness the planned feature during the review process for Donkey Kong 64, and raise issue with the functionality and potential liability of Stop 'N' Swop on October 1st, 1999. The Director of Technical Support would send Tim Stamper a fax ordering for the removal of Stop 'N' Swop ahead of Donkey Kong 64's holiday release on November 22nd. While the Director made suggestions on salvaging the feature by using the Sandcastle codes in Banjo-Kazooie, it was ultimately decided to redact any reference of the feature from Donkey Kong 64 entirely. Banjo-Tooie followed suit, removing the ability to play as Donkey Kong within its multiplayer mode, as well as the cutscenes that would have depicted unlocking the secret areas within Banjo-Kazooie and Donkey Kong 64.
As Rare had only teased the Pink Egg, Blue Egg and Ice Key in the 100% ending of Banjo-Kazooie for its sequel, players experiencing Banjo-Tooie can find three sentient 'Banjo-Kazooie Game Paks' in Spiral Mountain and Jinjo Village that will relinquish the two aforementioned Mystery Eggs and the Ice Key when attacked. Taking the Mystery Eggs to Heggy the Hen in the final game will unlock Homing Eggs and Breegull Bash, with a further Yellow Egg found in her shed unlocking the ability to play as a Jinjo in the multiplayer mode. Taking the Ice Key to the Ice Safe in Hailfire Peaks will reveal the Mega Glowbo, which when taken to Humba Wumba in Pine Grove will unlock the Dragon Kazooie Transformation.
Story#
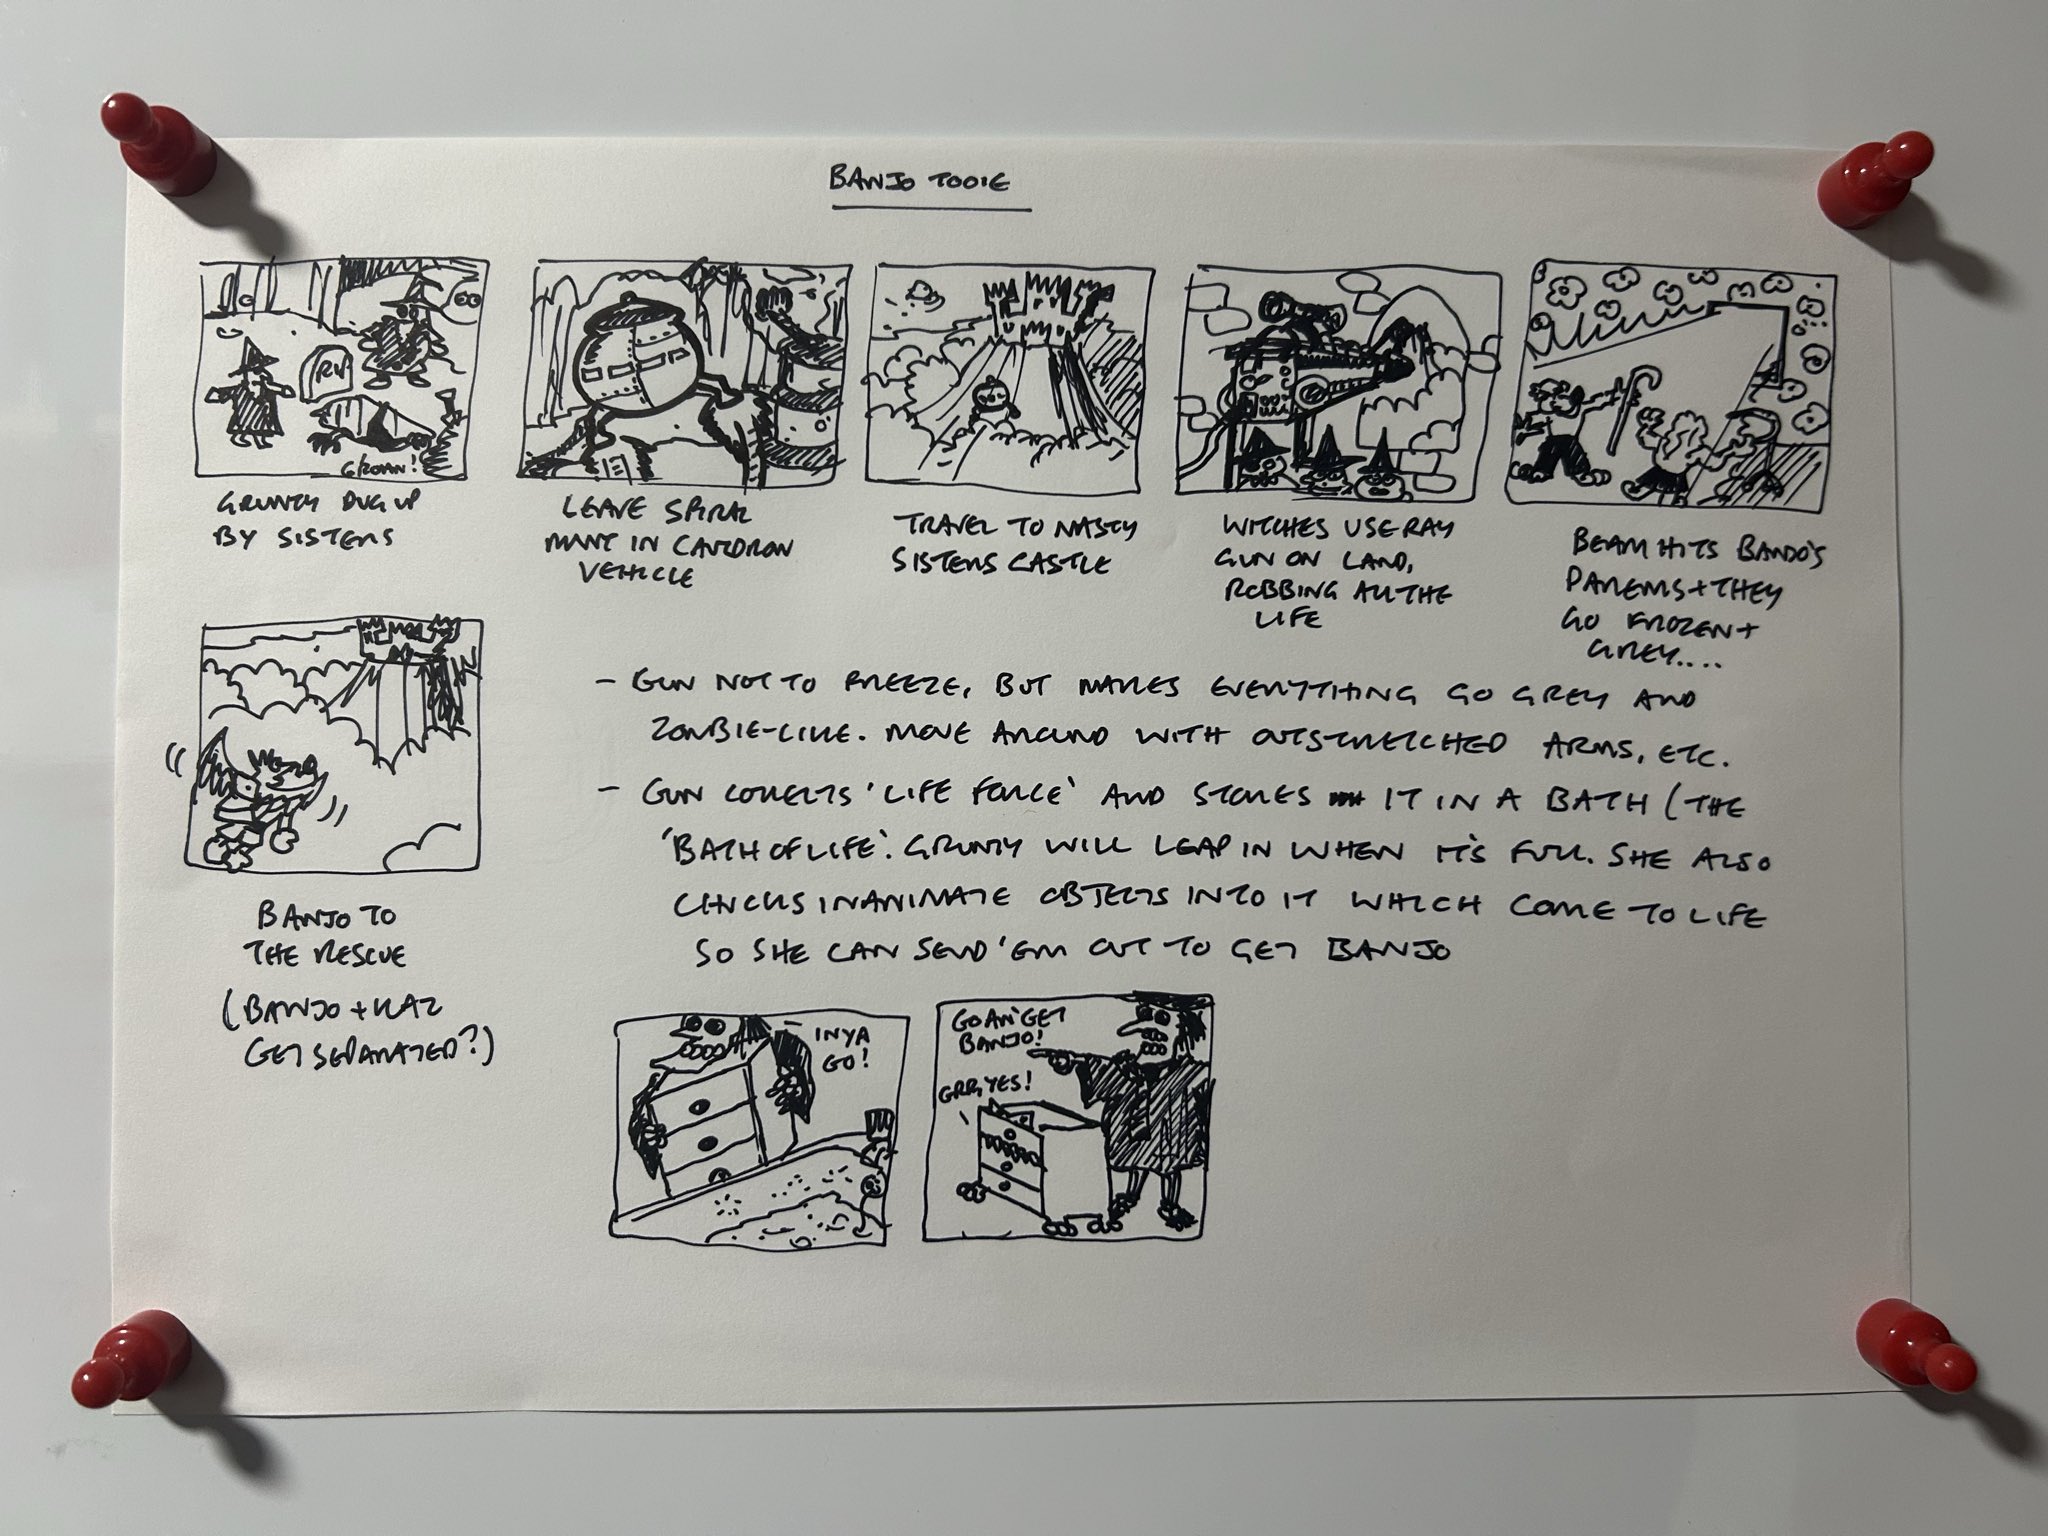
- Grunty's sisters originally escaped from Spiral Mountain by flying off in a mechanical Cauldron vehicle, rather than the digging their way through the Isle O' Hags in the Hag 1.
- While King Jingaling famously gets zapped in the final release, the life-sapping B.O.B was originally planned to target Banjo's elderly parents, seen using a cane and a walker. At this point it's unlikely that Bottles would have been killed, as he took up the previous mentor role as the move tutor, so it's likely that sole the motivation for Banjo-Tooie (aside from pecking Gruntilda a second time) would be restoring the life force to Banjo's parents.
- One idea considered was to separate Banjo and Kazooie at the start of their new adventure. This would put the Split-Up mechanic at the forefront, presumably having the pair relying on their own individual skills and abilities until such time that they were reunited again. This would have drastically changed the game.
- The zapped life force that B.O.B had accumulated would be stored in a bathtub, called "The Bath of Life". Gruntilda would dive into this bathtub when it was filled with life to restore her former body, warts and all.
- Gruntilda would also be able to throw inanimate objects into the Bath of Life to imbue them with consciousness and mobility. These former objects (a chest of drawers in the concept drawing) would then serve Gruntilda, becoming her minions.
Planned Worlds#
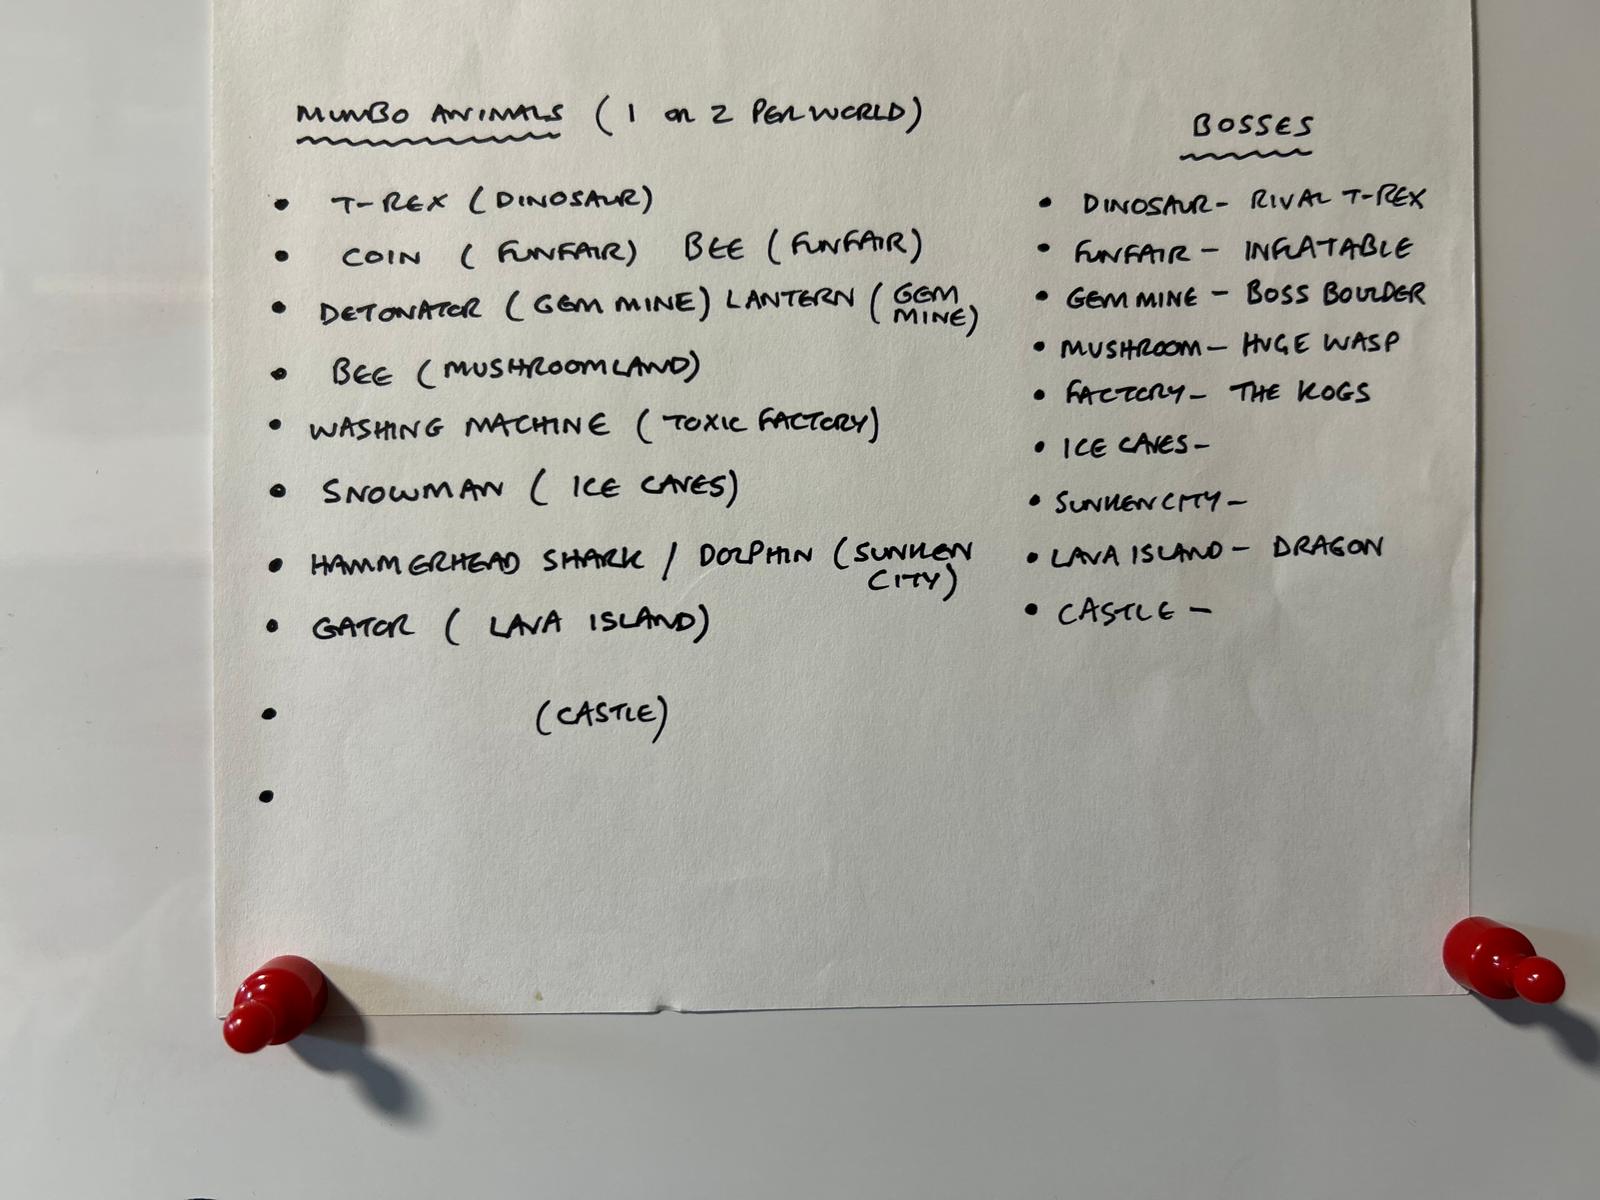
From a list of prospective Banjo-Tooie transformations, we can see a much different plan for the nine worlds you'd have explored in the game:
- Mayahem Temple is missing, giving its spot to Terrydactlyland, or "Dinosaur" as the first world.
- WitchyWorld, or "FunFair" is the second world, featuring a first for the series with a pair of transformations (Coin and the Bee)
- GlitterGulch Mine or "Gem Mine" would have served as the third world. In addition to playing as the Detonator, Banjo would have been able to transform into a Lantern to illuminate particularly dark caverns - this would have been made redundant by the Fire Eggs. At this point in development, Banjo and Kazooie would have also fought Boss Boulder in place of Old King Coal.
- "Mushroom" or "Mushroomland" was originally titled Fantasy Level, and would have originally appeared in Banjo-Kazooie before it was cut for time. Like GlitterGulch Mine, the fairytale world was planned to be re-purposed for Banjo-Tooie, featuring a "Huge Wasp" as the level four boss, but was overhauled entirely to become the surreal world of Cloud CuckooLand. This is why the internal files refer to Cloud Cuckooland as "FANTASY". One surviving idea that existed from concept to execution was having Mumbo Jumbo perform a Rain Dance in order to create a rainbow bridge to a Pot Of Gold.
- Grunty Industries, or "Factory"/"Toxic Factory" is the fifth world. The dreaded level would have retained the Washing Machine transformation, but would have forgone Weldar in favour for "The Kogs".
- The "Ice Caves" would have been the sixth level in Banjo-Tooie. It's possible that this level, and the later "Lava Island" on the list were combined into one to create Hailfire Peaks. It's also entirely possible that the appearance of "Crystal Caves" in Donkey Kong 64 meant that "Ice Caves" would need to undergo a transformation to set it apart, which was accomplished with the combination of fire and ice.
- Jolly Rogers Lagoon or "Sunken City" would have served as the seventh world. While diving to Atlantis, Banjo and Kazooie would be able to transform into a Hammerhead Shark and a Dolphin.
- The "Lava Island" would have been the seventh level in Banjo-Tooie. Originally designed for Banjo-Kazooie as the "Lava level" before it was cut for time, the "Lava Level" would be combined with the former Ice Caves to create the duelling climate of a fully realized Hailfire Peaks. This shift would see Banjo and Kazooie fighting two dragons instead of one, but would also mean losing the returning Gator transformation from Banjo-Kazooie.
- Cauldron Keep or "Castle" was originally planned as the final level of the game; a medieval stronghold that had been renovated with modern military technology in an interesting clash of timelines. While the sheet doesn't provide a transformation, Cauldron Keep would have tasked players with facing off against Mingella and Blobbelda before working their way up to Gruntilda in her central tower. Unfortunately, Cauldron Keep was removed as the last level due to time constraints, and was re-envisioned to serve as the base of operations for Gruntilda and her sisters in the final game.
Mayahem Temple#
Mayahem Temple Overview |
Code Chamber/Treasure Chamber |
Mayahem Temple Enemies/Jiggies |
Goliath/Isometric Plan 28-8-98 |
|---|---|---|---|
 |
 |
 |
 |
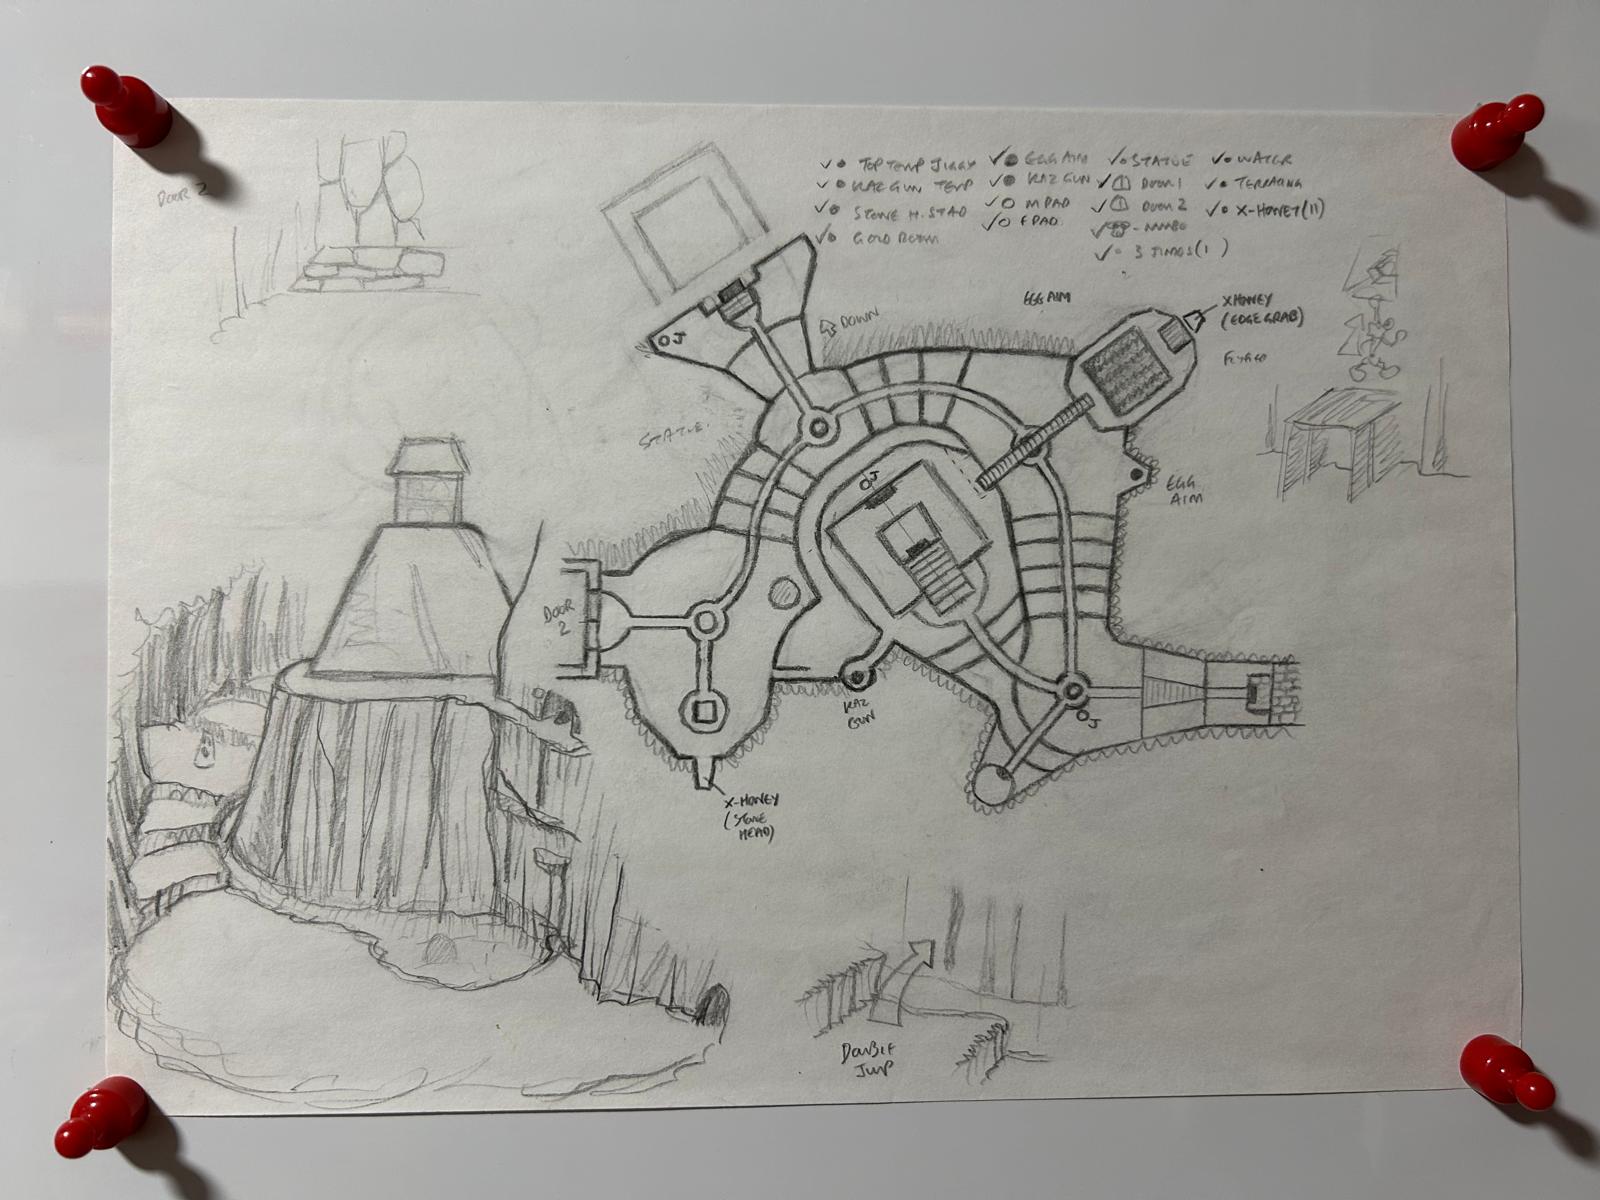
Mayahem Temple Overview
- The plan for Mayahem Temple remained largely consistent through its development. One addition on paper that never made it to the final game is a small underwater grotto at the start of the level.
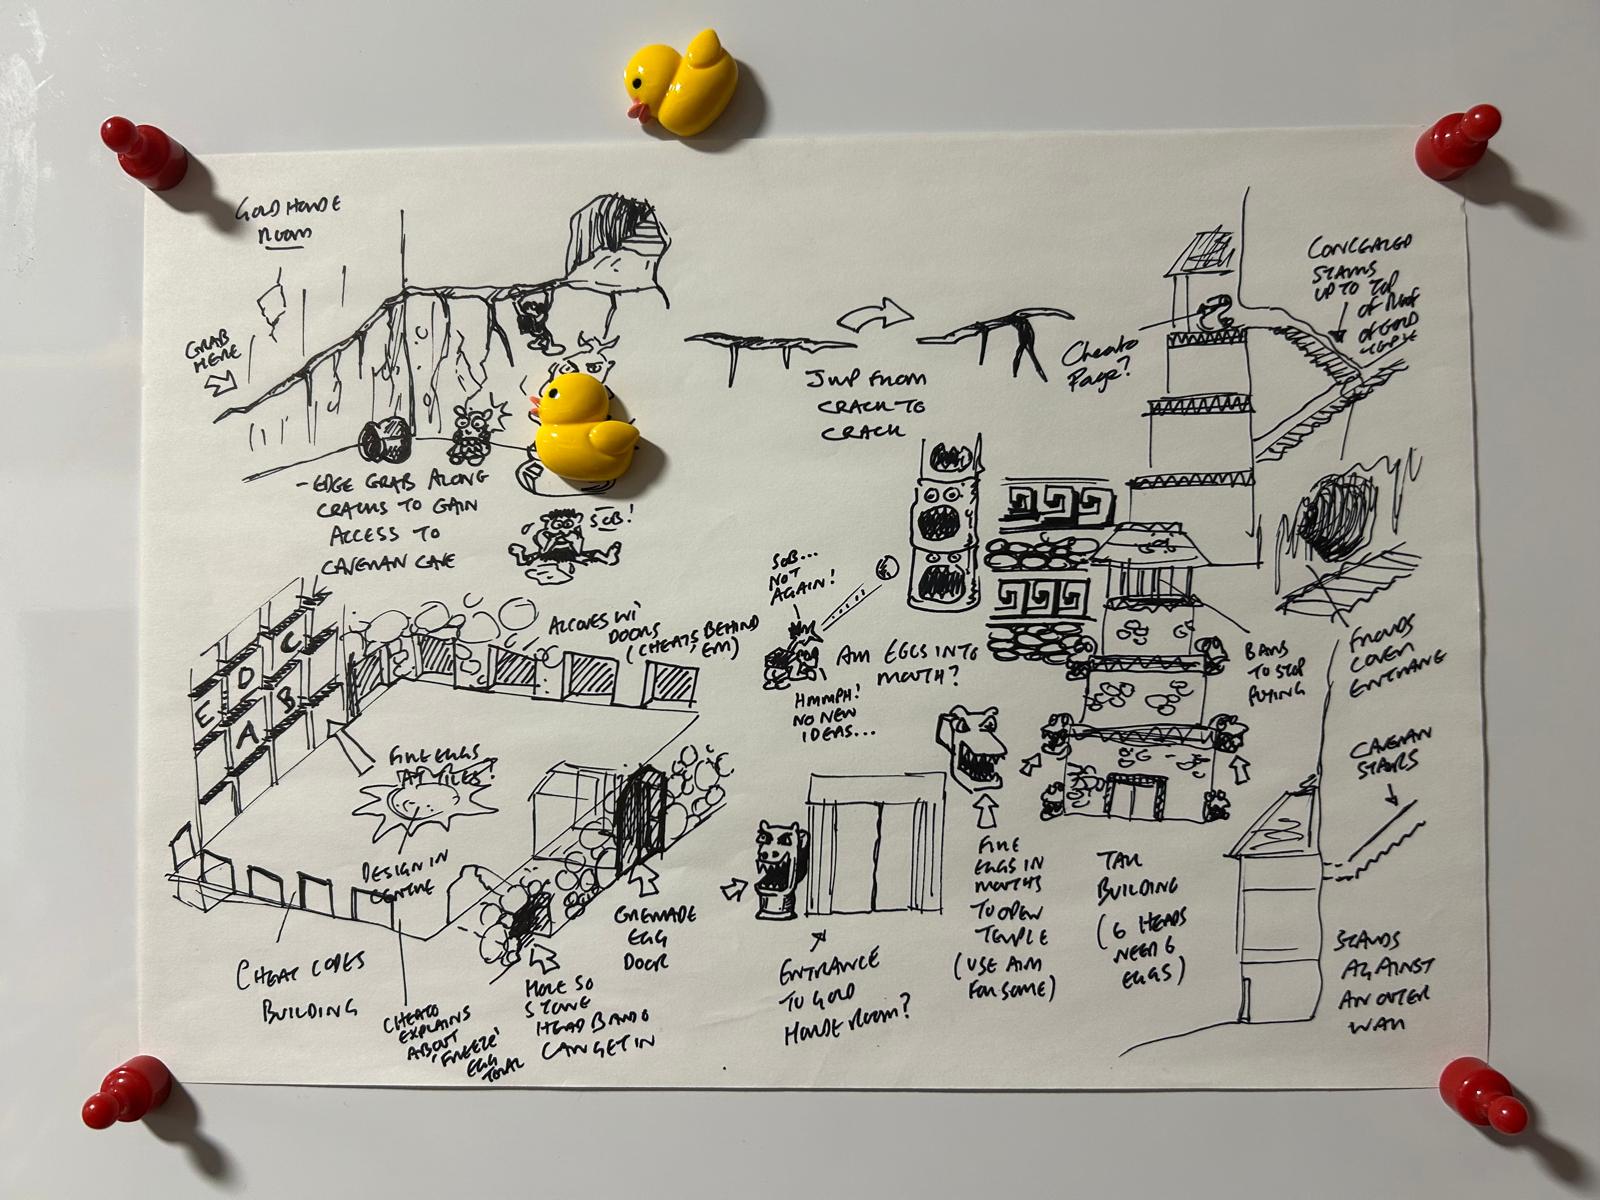
Code Chamber/Treasure Chamber
- Early drafting for the Code Chamber shows that the room would have featured several doors set in alcoves around the perimeter with "cheats behind 'em". In the final game, there is one single alcove on the right side of the room where a menu can be found to toggle cheats on and off.
- The exterior of the Treasure Chamber originally featured its Cheato Page behind bars to prevent players from simply using the flight pad to collect it from the air. In the final game, players can do exactly that. In addition, it's entirely possible to skip the Grip Grab sequence inside the Treasure Chamber by using the flight pad to enter the upper area of the Chamber once you've spoken to Chief Bloatizan. Both of these exploits seem to have had preventative measures in design, but were left out.
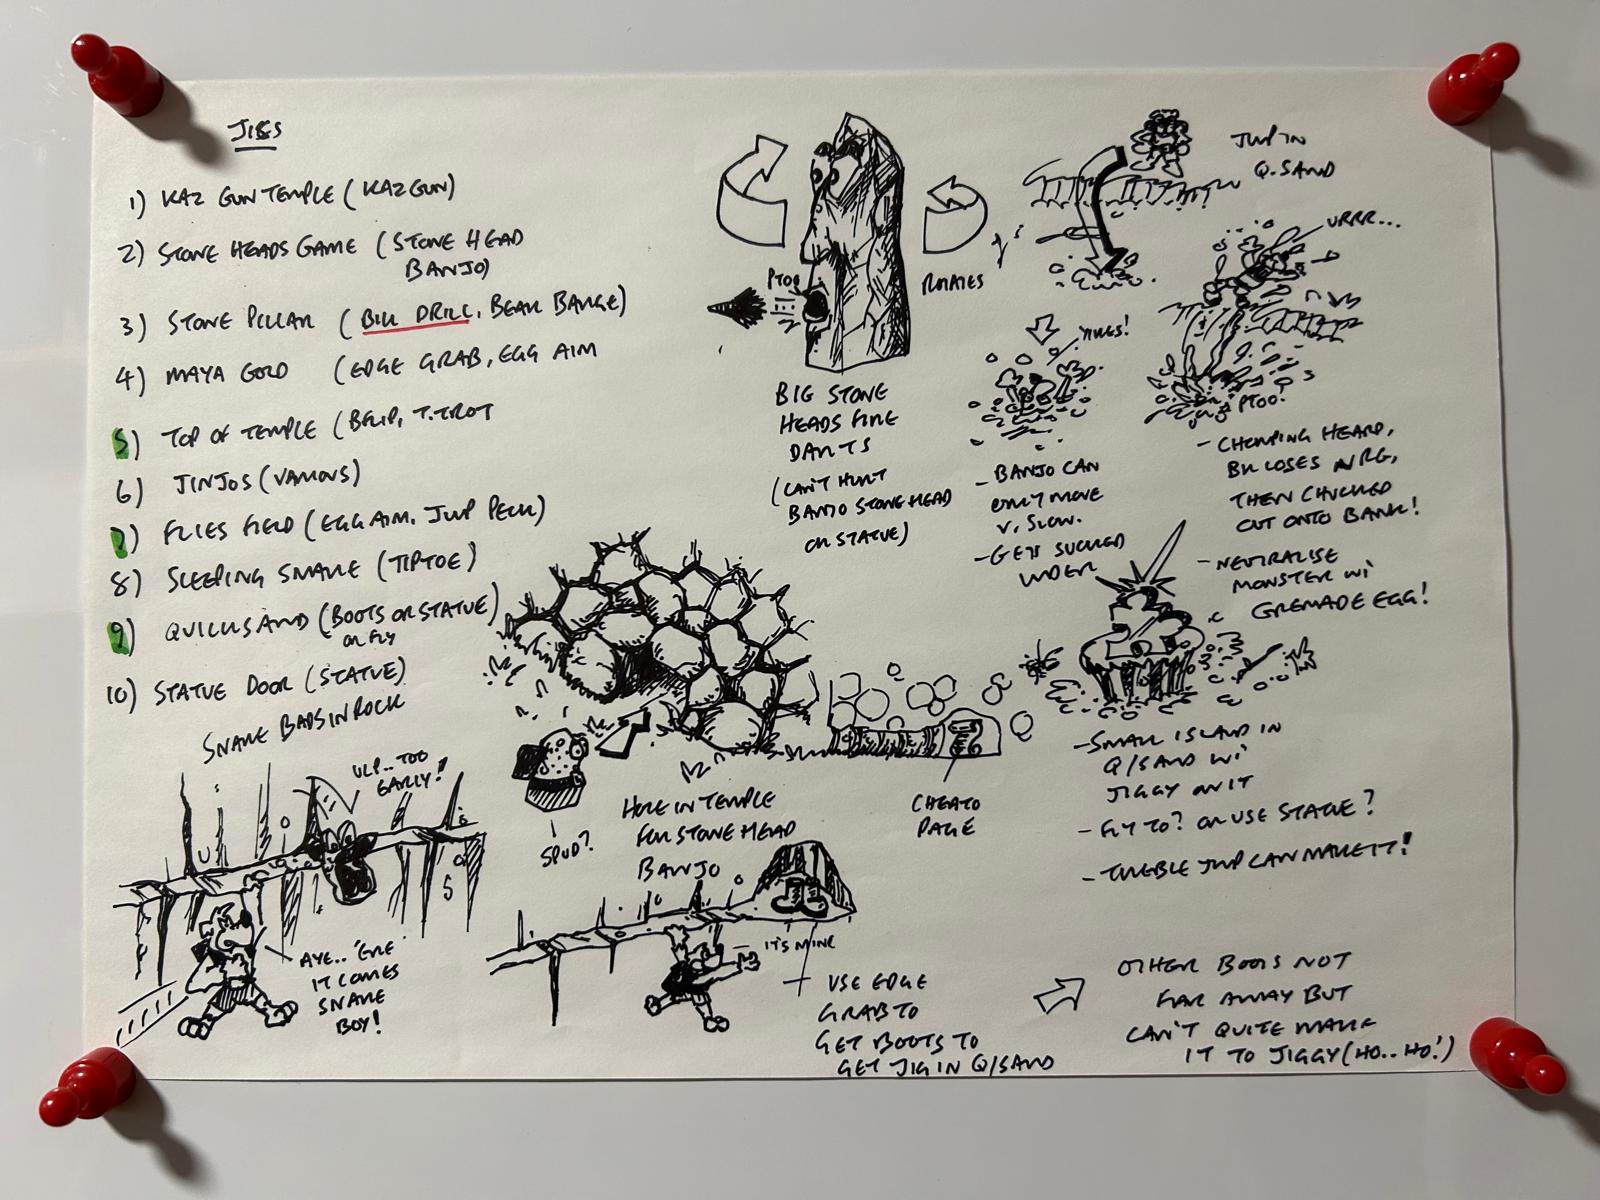
Mayahem Temple Enemies/Jiggies
- The list of Jiggies in Mayahem Temple is consistent with the final game, except for entry 6: "Jinjos (Various)". While Jinjos can be found in each world, the jiggy is awarded on completing a Jinjo family of the same colour, not rescuing five in a given world, as was the case in Banjo-Kazooie. The Jiggy that would be earned in the final game missing from the documentation is defeating the boss of Mayahem Temple, Targitzan.
- The Snapdragon enemies that attack Banjo during Grip Grab segments were originally designed to be Snakes that jut out from crevices.
- While the darts from the Sput-Sput do not inflict damage on the Golden Goliath, as the document specifies, the darts can harm Banjo in his Stoney transformation.
- The document suggests that players can neutralize a Dragunda with a Grenade Egg to allow for safe passage in the swamp - this is not possible in the final game.
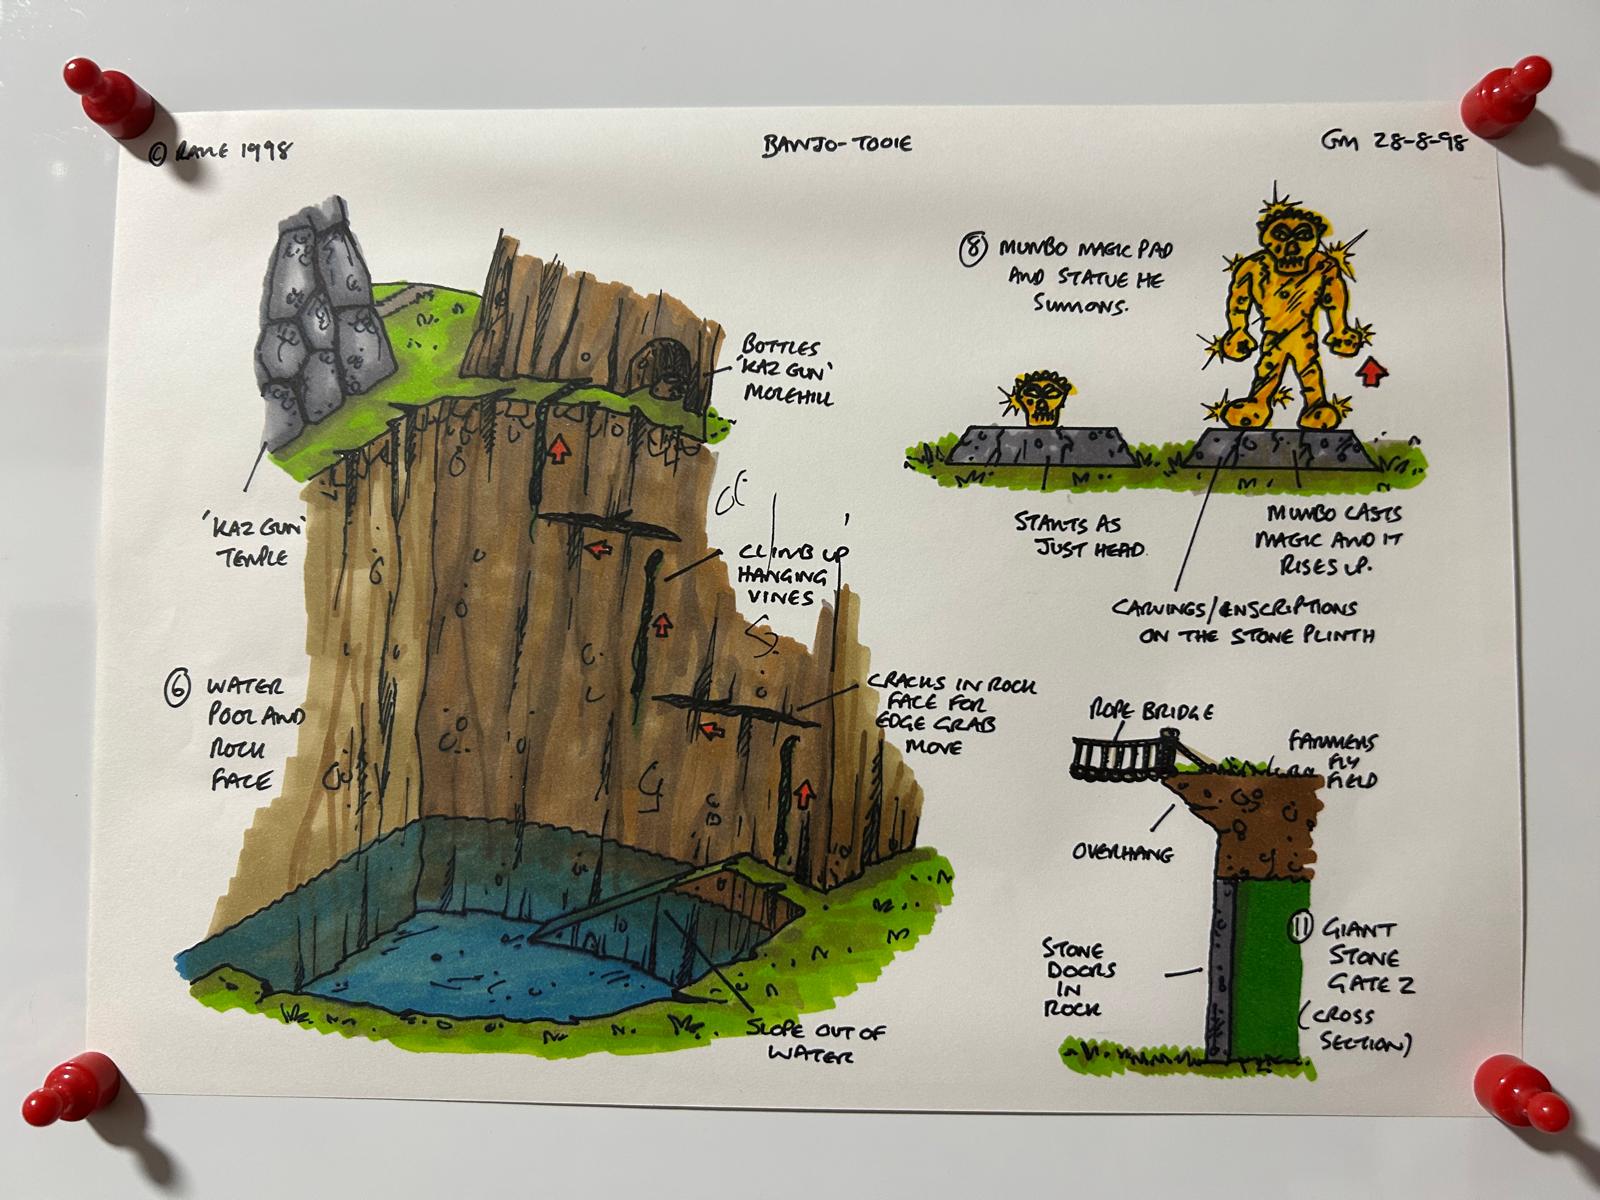
Goliath/Isometric Plan
- Bottles was originally intended to resume his post as move mentor in Banjo-Tooie, teaching the duo new moves for their next adventure - hence the appearance of Bottles' Molehill for the Breegul Blaster has been used in place of JamJars Silo's on the document. In the final game, Bottles is a little busy decomposing in Banjo's front garden at the hands of Gruntilda to teach the duo any useful moves...
Glitter Gulch Mine#
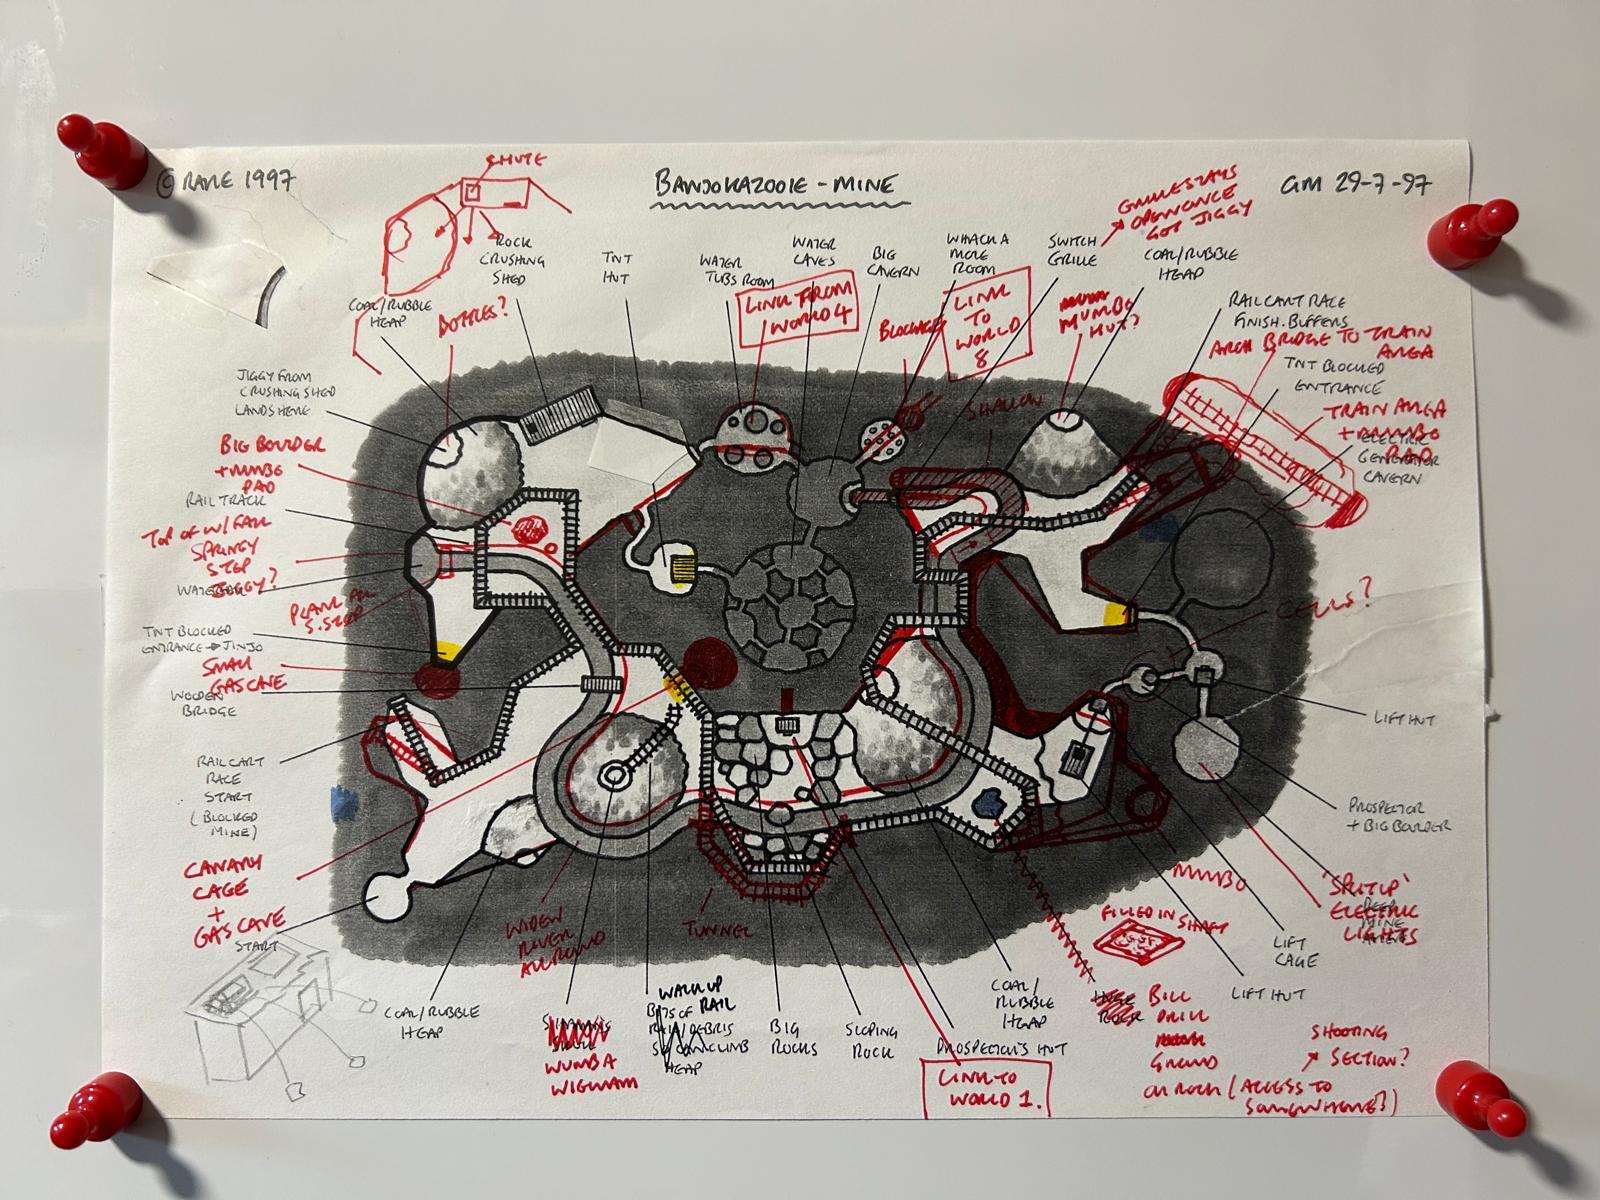
Banjo-Kazooie Mine Overview: 29-7-97 |
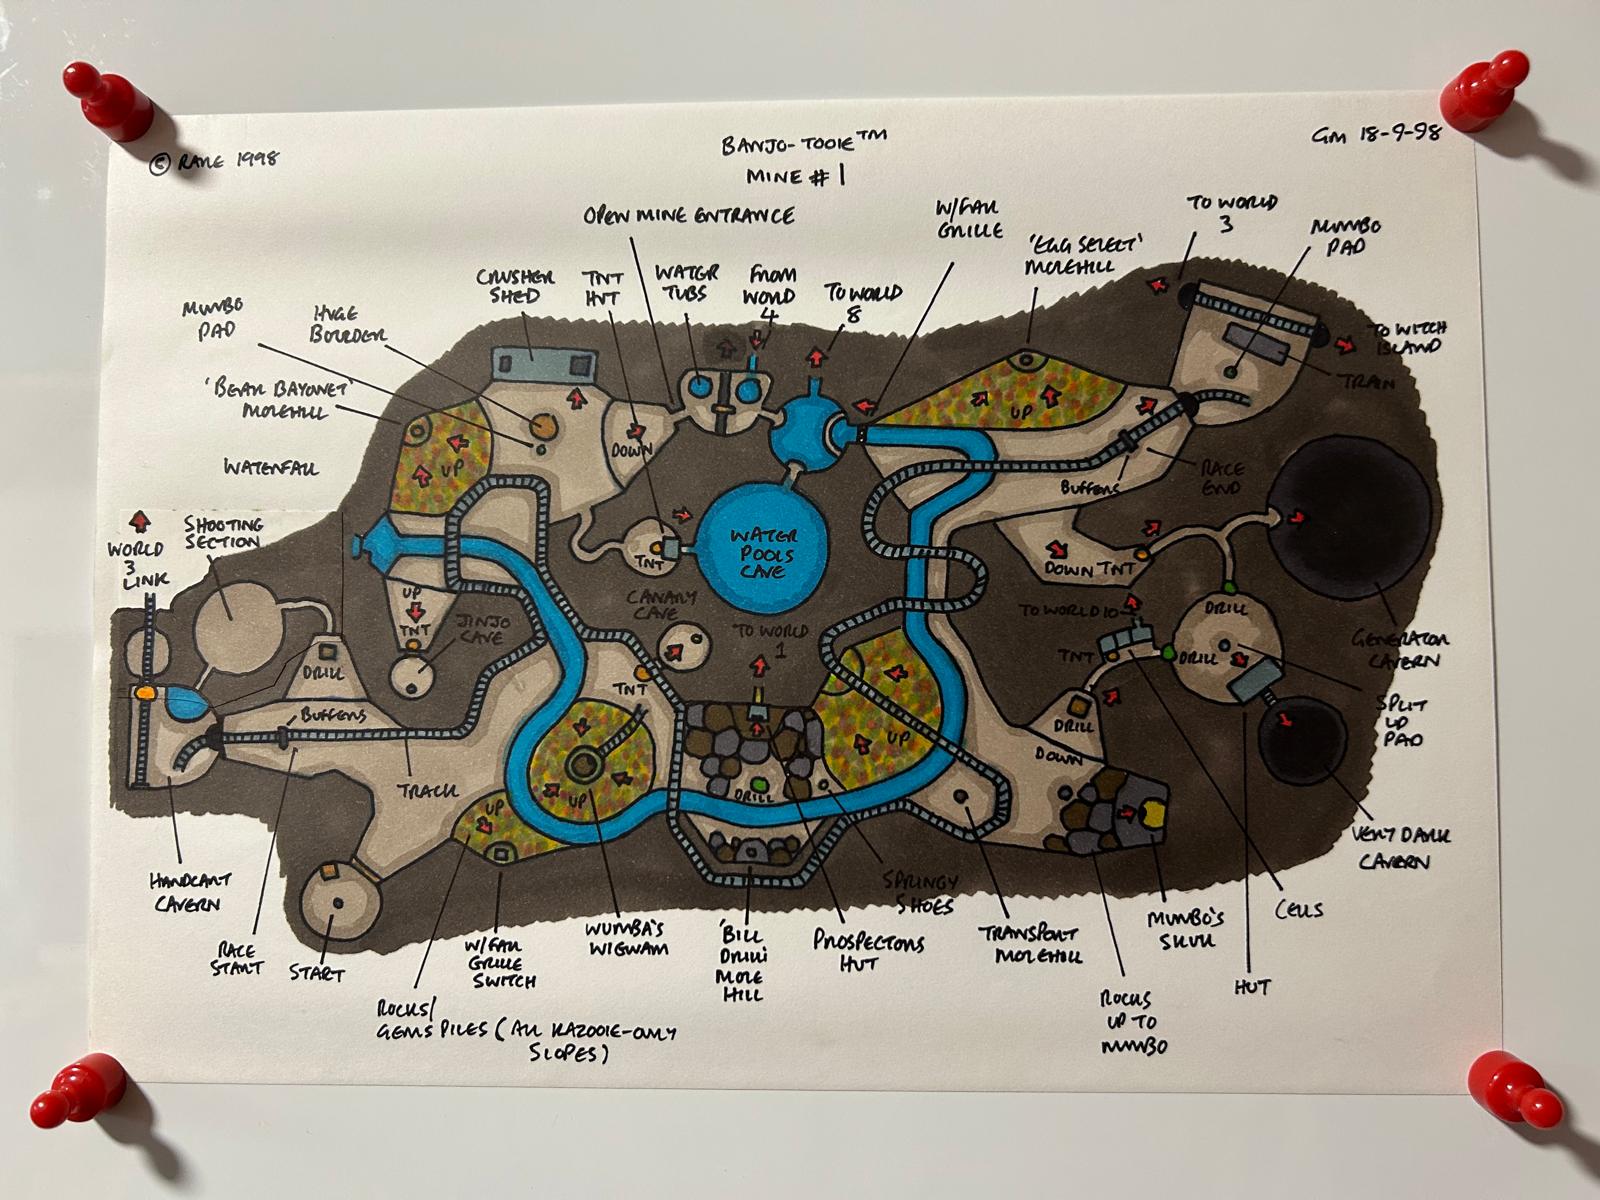
Banjo-Tooie Mine Overview: 18-9-98 |
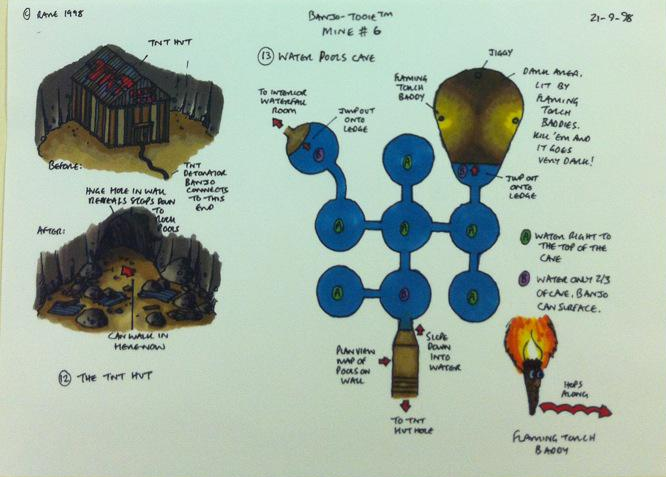
Banjo-Tooie Flooded Caves Overview: 21-9-98 |
|---|---|---|
 |
 |
 |
Banjo-Kazooie Mine Overview: 29-7-97
- This overview of GlitterGulch Mine was originally planned to be used in Banjo-Kazooie, dated July 29th, 1997, about a year prior to its release. The world was repurposed for Banjo-Tooie, and this document details this transitional period; the original document has been photocopied, with the designer using red pen to denote changes for the sequel.
- The Fuel Depot, and the connection to WitchyWorld's Saucer of Peril does not exist yet, with the start of the Railcart backed up on a blocked mine instead.
- In the waterfall area, a plank of wood was going to be placed across the river to aid in crossing with the Springy Step Shoes. In the final game, players can use the mine cart tracks instead.
- "Shaman Skull" has been scribbled out and replaced with Wumba's Wigwam, as Humba would be doing the transforming magic in Tooie. Interestingly, the addition of "Bottles?" on the north-west corner of the map means that Wumba's addition to the game predates Jamjars.
- Wumba's Wigwam originally featured a minecart rail leading up the gem pile to the entrance. In the final game, players can simply climb up the gem pile using Talot Trot. A wooden bridge near Wumba's Wigwam was also removed.
- The south-east area of GlitterGulch Mine in Banjo-Kazooie would have featured a 'Lift Hut' and 'Lift Cage' that would have allowed players to reach a higher elevation. In Banjo-Tooie, the hut and cage has been removed, and the area slopes down instead, leading to Mine Entry 2: Gloomy Caverns.
- The Gloomy Caverns jail cell area was originally where players would meet the Prospector when the level was intended for Banjo-Kazooie. In the final game, Bullion Bill can be found in his hut near Wumba's Wigwam.
- There's a bit of confusion on where the designer wanted to place Mumbo's Hut, with two locations given on the document - the first was placed in the south-east by the Lift Hut, and the second by the train station in the north-east. The south-east spot would win out, with the second location occupied by a Jinjo underneath a boulder.
- Speaking of boulders - players would have found a large boulder near the Lift Hut, where its destruction would lead to the Ordnance Shootout (or "Shooting Section?" on the document). In the final game, the Ordnance Shootout is found near the Fuel Depot at the world entrance, and the boulder has since been replaced with a BillyBob enemy.
- The Waterfall Cavern, or "Big Cavern" on the document originally featured a tunnel that led to a "Whackamole Room" when designed for Banjo-Kazooie. This room was featured in concept art for Glitter Gulch Mine, dated July 30th, 1997, and would have tasked Banjo and Kazooie with firing eggs at a taunting character holding a Jiggy. Provided that they can fire an egg into each of the holes before the timer runs out, they will have the character reliquish the Jiggy. This game and room was removed when development began on Banjo-Tooie, and the tunnel instead provides a connection to Hailfire Peaks, which is true in the final game.
Banjo-Kazooie Mine Overview: 18-9-98
- This overview of GlitterGulch Mine is a collated version dated September 18th, 1998.
- The Ordnance Storage Shootout was originally planned to exit into the Fuel Depot near the pool of stagnant water. In the final game, successful completion or failure of the Ordnance Shootout will lead back out to the lobby where Beak Bayonet was learned.
- The Grille Switch for the Waterfall Cavern was originally located on top of the pile of gemstones near Wumba's Wigwam. In the final game, the Switch has been placed on the ground in front of the gemstones, with its former spot occupied by a Glowbo.
- Wumba's Wigwam is still shown to have a minecart rail leading up to its entrance. This was removed in the final game.
- The location that used to feature the a boulder blocking the path to the Ordnance Storage in the Banjo-Kazooie document now features a "Transport Molehill". While Banjo would use Mole tunnels on the Isle O' Hags courtesy of JamJars Silos, transportation within worlds would be accomplished by Warp Pads in the final game.
- The last jail cell in the Gloomy Caverns would have featured a connection to 'World 10', speculated to be Cauldron Keep when it was a level instead of an endgame location. In the final game, no such connection to any level can be found in the jail cell.
- "Egg Select" is a standalone learnable move instead of the L/R select menu being taught with the first new egg move. In the final game, there is a Jinjo underneath a boulder in that area instead.
- The Train Station features two possible exits, one leading to "World 3" (WitchyWorld), and the other to "Witch Island", an early name for Isle O' Hags. This suggests that Banjo would be able to use the train tunnels by himself, and that each location had a purposeful exit. In the final game, the tunnels are impassable without Chuffy, and the levels do not purposefully connect - any level can be reached through any Station.
- The Water Storage originally featured an exit in the murky water beneath the bridge. This was coloured over in the document when the designer changed their mind and removed the exit, and is reflected in the final game.
- The Beak Bayonet Molehill is located on the top of a gem pile near the Crushing Shed. In the final game, the Silo has been moved to the lobby of the Ordnance Storage for convenience.
Banjo-Tooie Flooded Caves Overview: 21-9-98
- The Flooded Caves originally featured a pair of Flaming Torch Baddies that would guard the Jiggy at the end of the sequence. While the Flaming Torch Baddy wouldn't appear in GlitterGulch Mine, they are still found in the games code, fully modeled and textured.
GlitterGulch Mine Enemies/Boiler Boss |
|---|
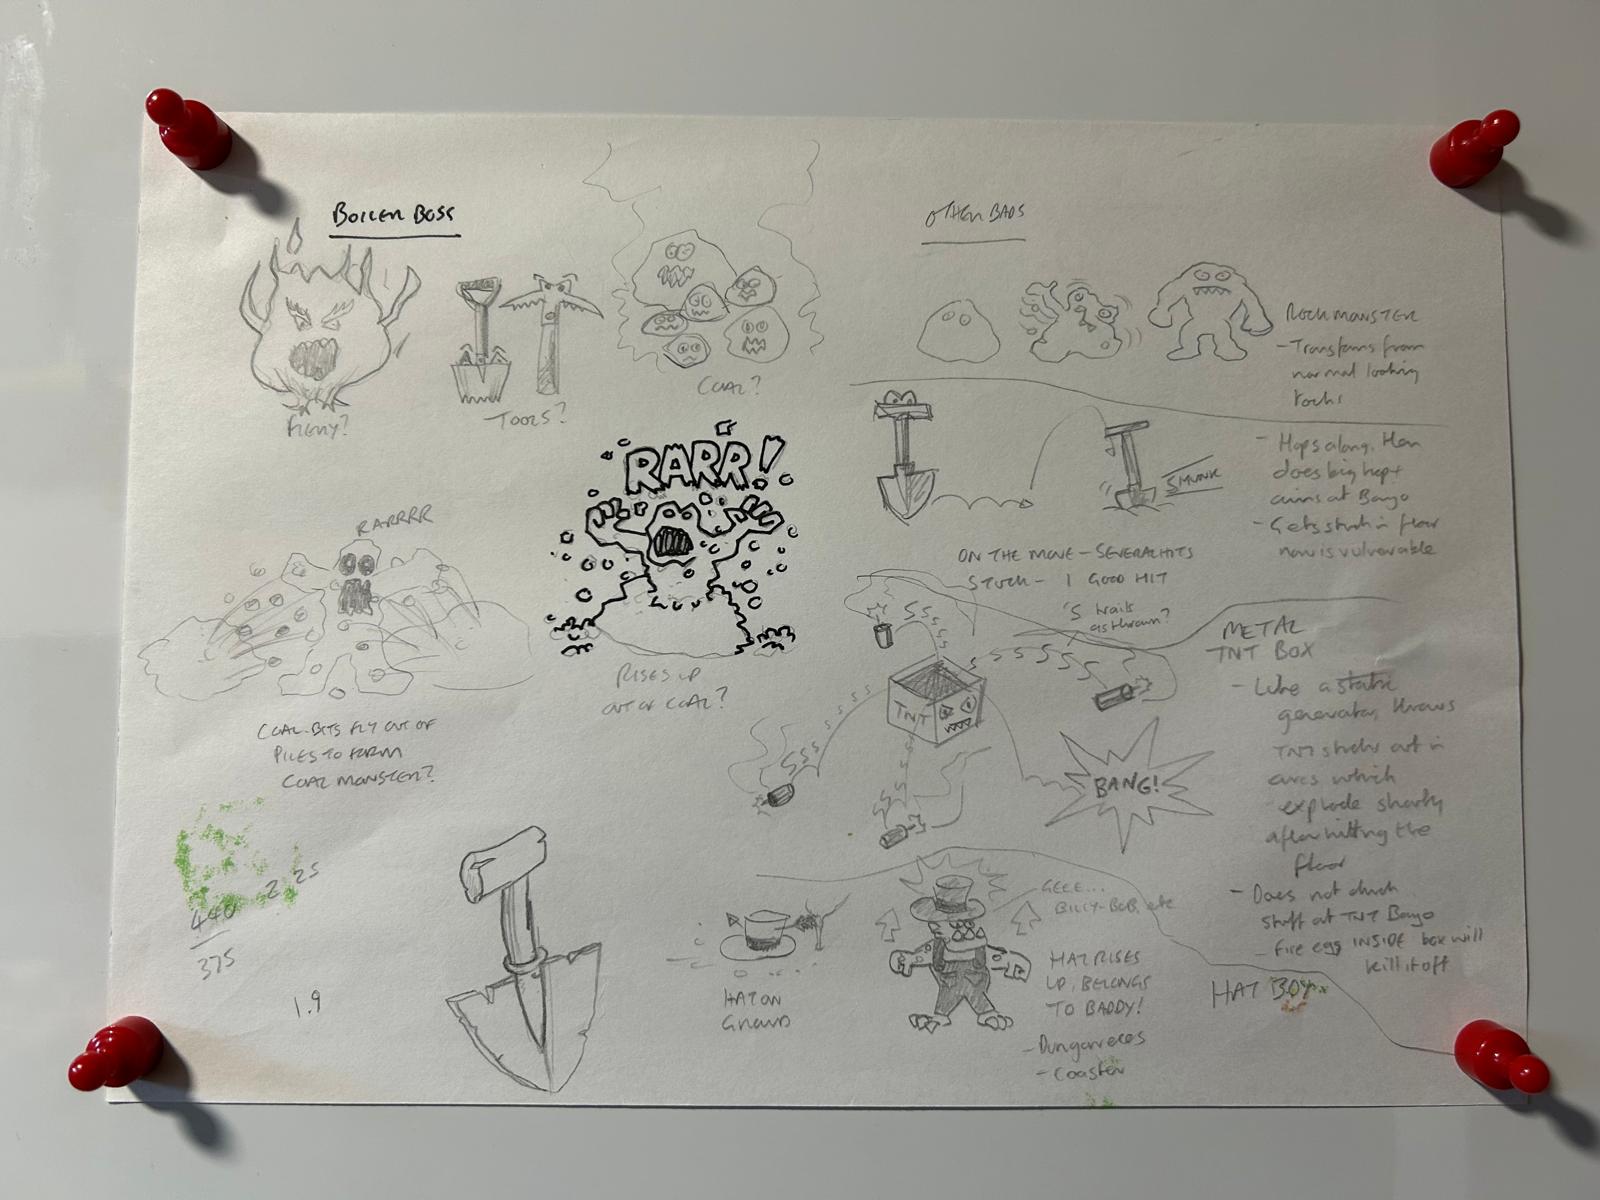 |
GlitterGulch Mine Enemies/Boiler Boss
- A possible reveal for Old King Coal was to have many bits of coal amalgamate to form his body. The second less-hardware-intensive option where he rises up from coal, was selected instead.
- A transforming Rock Monster was considered as an enemy in Glitter Gulch Mine, but went unused.
- A Pickaxe enemy was also depicted alongside Diggit, but would not appear in the final game.
- The Bang Box enemy was described as a metal TNT box, whereas the final is made from wood.
- The Bang Box is also described as not attacking Detonator Banjo - this is untrue.
- The document specifies that Fire Eggs targeting the inside of the box will defeat it, but it can be fired anywhere on the Bang Box, and other variants of eggs can be utilized for a defeat.
WitchyWorld#
Fair #1 Overview: 16-10-98 |
Fair #2 Entrance/Area 51: 16-10-98 |
Fair #5 Mr. Patch: 17-10-98 |
|---|---|---|
 |
 |
 |
Fair #14 Crazy Castle Stockade: 20-10-98 |
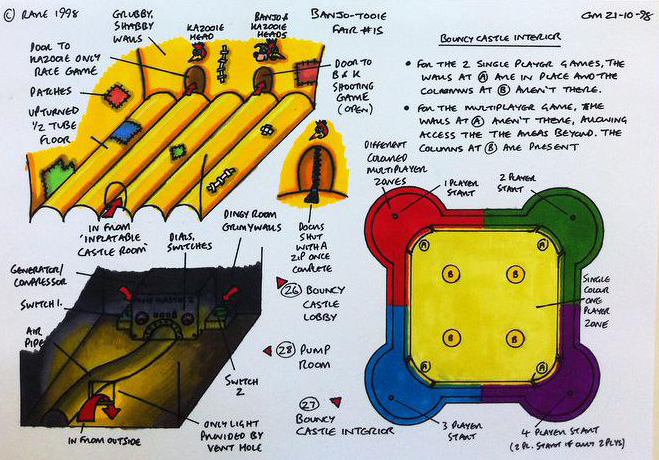
Fair #15 Castle Interior/Pump Room: 21-10-98 |
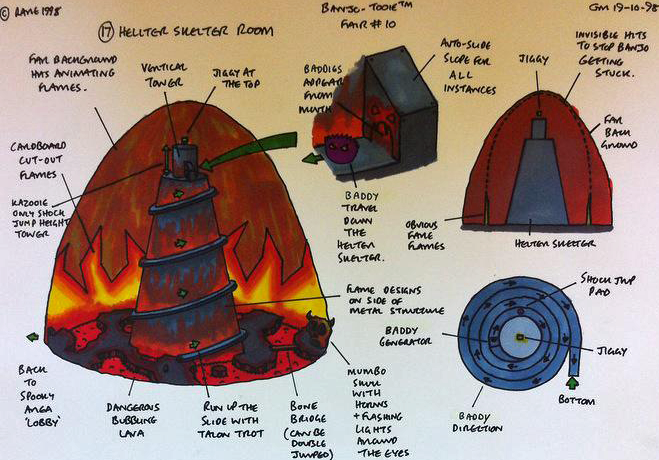
Fair #10 The Inferno: 19-10-98 |
|---|---|---|
 |
 |
 |
Fair #1 Overview: 16-10-98
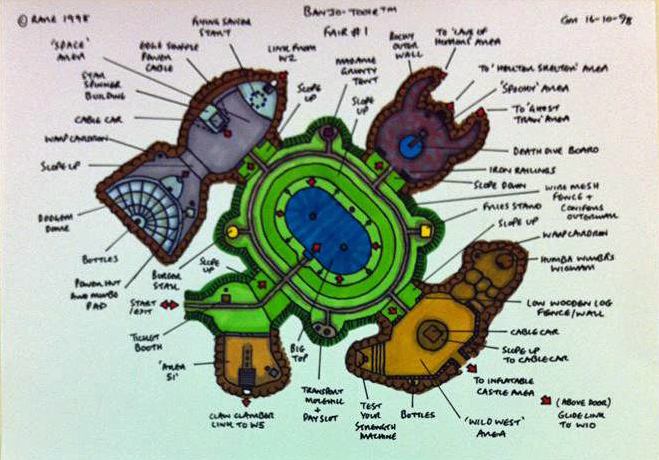
- The four corners just outside of WitchyWorld's Big Top are occupied in the final game by Madame Grunty, Big Al's Burgers, Salty Joe's Fries and a Beehive. In the document, the Beehive's location was originally home to a Transport Molehill, which Banjo could utilize after he had 'paid' by slipping into the Strongbox as his Coin transformation. This transaction is detailed further on the "Fair #2" document.
- Travel by Cable Car and Molehill would have been further supplemented by transportation via Warp Cauldron. Returning from Banjo-Kazooie to dash the duo across the park, players would have encountered the first Warp Cauldron next to Wumba's Wigwam in the Wild West Zone, and the second near the Dodgem Dome in the Space Zone. The Warp Cauldrons would find themselves redundant in the final game as the Warp Pads were able to supersede their function, going as far to provide multiple exits within a world from a single location. The Warp Cauldrons location in the Wild West Zone was replaced with a door for Van Banjo, whereas its counterpart in the Space Zone had its spot commandeered by Jamjar's Silo for Airborne Egg Aiming.
- Bottles would have originally been encountered following the Grip Grab sequence in the Wild West Zone, and atop the Dodgem Dome Arena in the Space Zone. In the final game, Jamjars Silos are instead found behind the Big Top and at the base of the Dodgem Dome Arena respectively. The areas that Bottles used to occupy were eventually replaced with Jinjos.
- An unused exit exists in the Wild West Zone that would have linked up to World 10, presumably Cauldron Keep or "Castle". As the exit is located over the door to the Crazy Castle Stockade, and the document specifies that it's a "Glide link to W10", it's not a stretch to suggest that Kazooie would have needed to use the Glide ability from the Cable Car platform to make a connection. This glide alcove was removed entirely in the final game, leaving plenty of room above the Crazy Castle signage.
Fair #2 Entrance/Area 51: 16-10-98
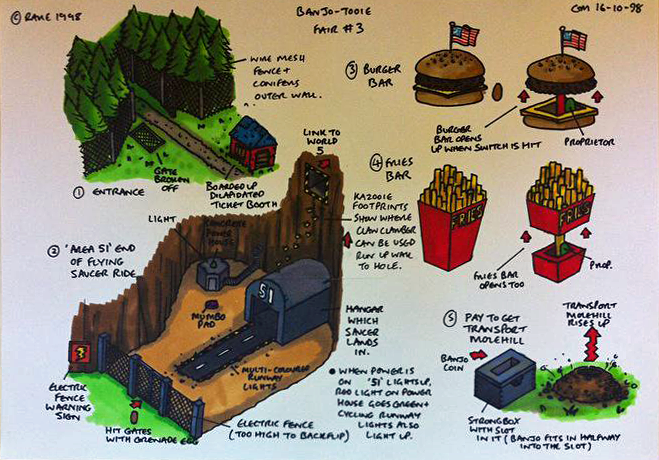
- To emphasize the dire state of the fairgrounds, the entrance to WitchyWorld would have featured a pair of gates, with the rightmost on the ground having fallen off its hinges. In the final game, the gates to the park are outside of this perimeter, found in the Isle O' Hags.
- The runway lights leading into the Area 51 Hangar were originally multi-colored, in the final game the lights are white.
- Big Al's Burgers originally featured an American Flag on its rooftop, which might have been a step too far for, ahem... western audiences. In the final game, the American Flag has been removed entirely.
- Just like the final game, Premium Attractions around WitchyWorld would require Banjo to pay up. Unlike the final game and its Van transformation however, Banjo would turn into a Coin and slip into the Strongbox Slot himself. Evidently, this was used to purchase a Transport Molehill; a feature that didn't carry over into release.
Fair #5 Mr. Patch: 17-10-98
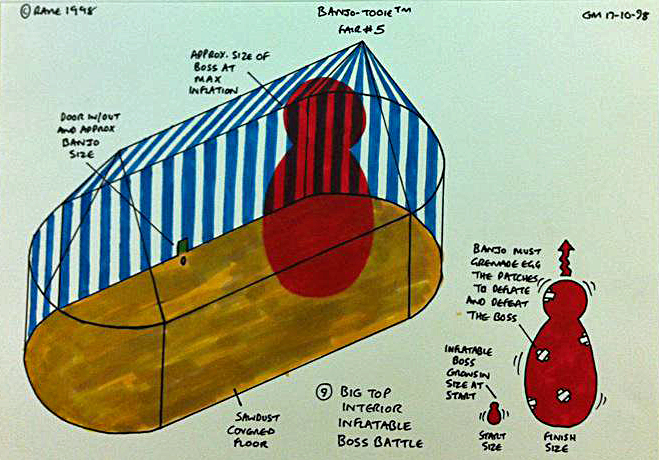
- The floor in the Big Top arena was originally intended to be covered in sawdust. This detail was left out of the final game, where grass is seen instead.
Fair #14 Crazy Castle Stockade: 20-10-98
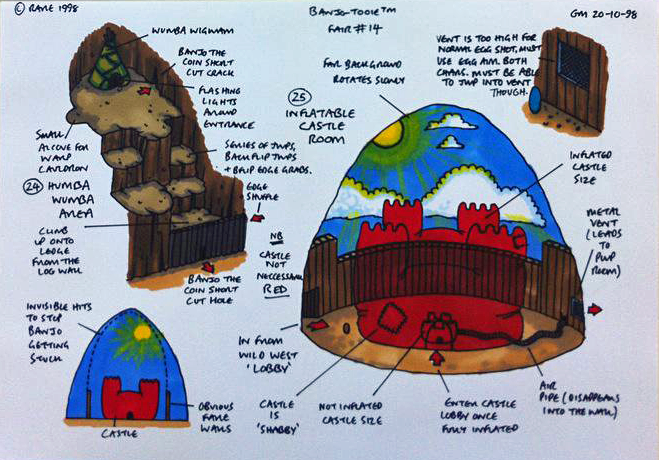
- Wumba's Wigwam was meant to feature flashing lights around its entrance to tie in with the fairground. In the final game the entrance is bare.
- Coin Banjo would have been able to roll through thin cracks in the walls of WitchyWorld to discover shortcuts. In the final game, Van Banjo is able to drive through Van Doors around the world to find similar time-saving routes. One such door would replace the Warp Cauldron beside Wumba's Wigwam, seen in the document.
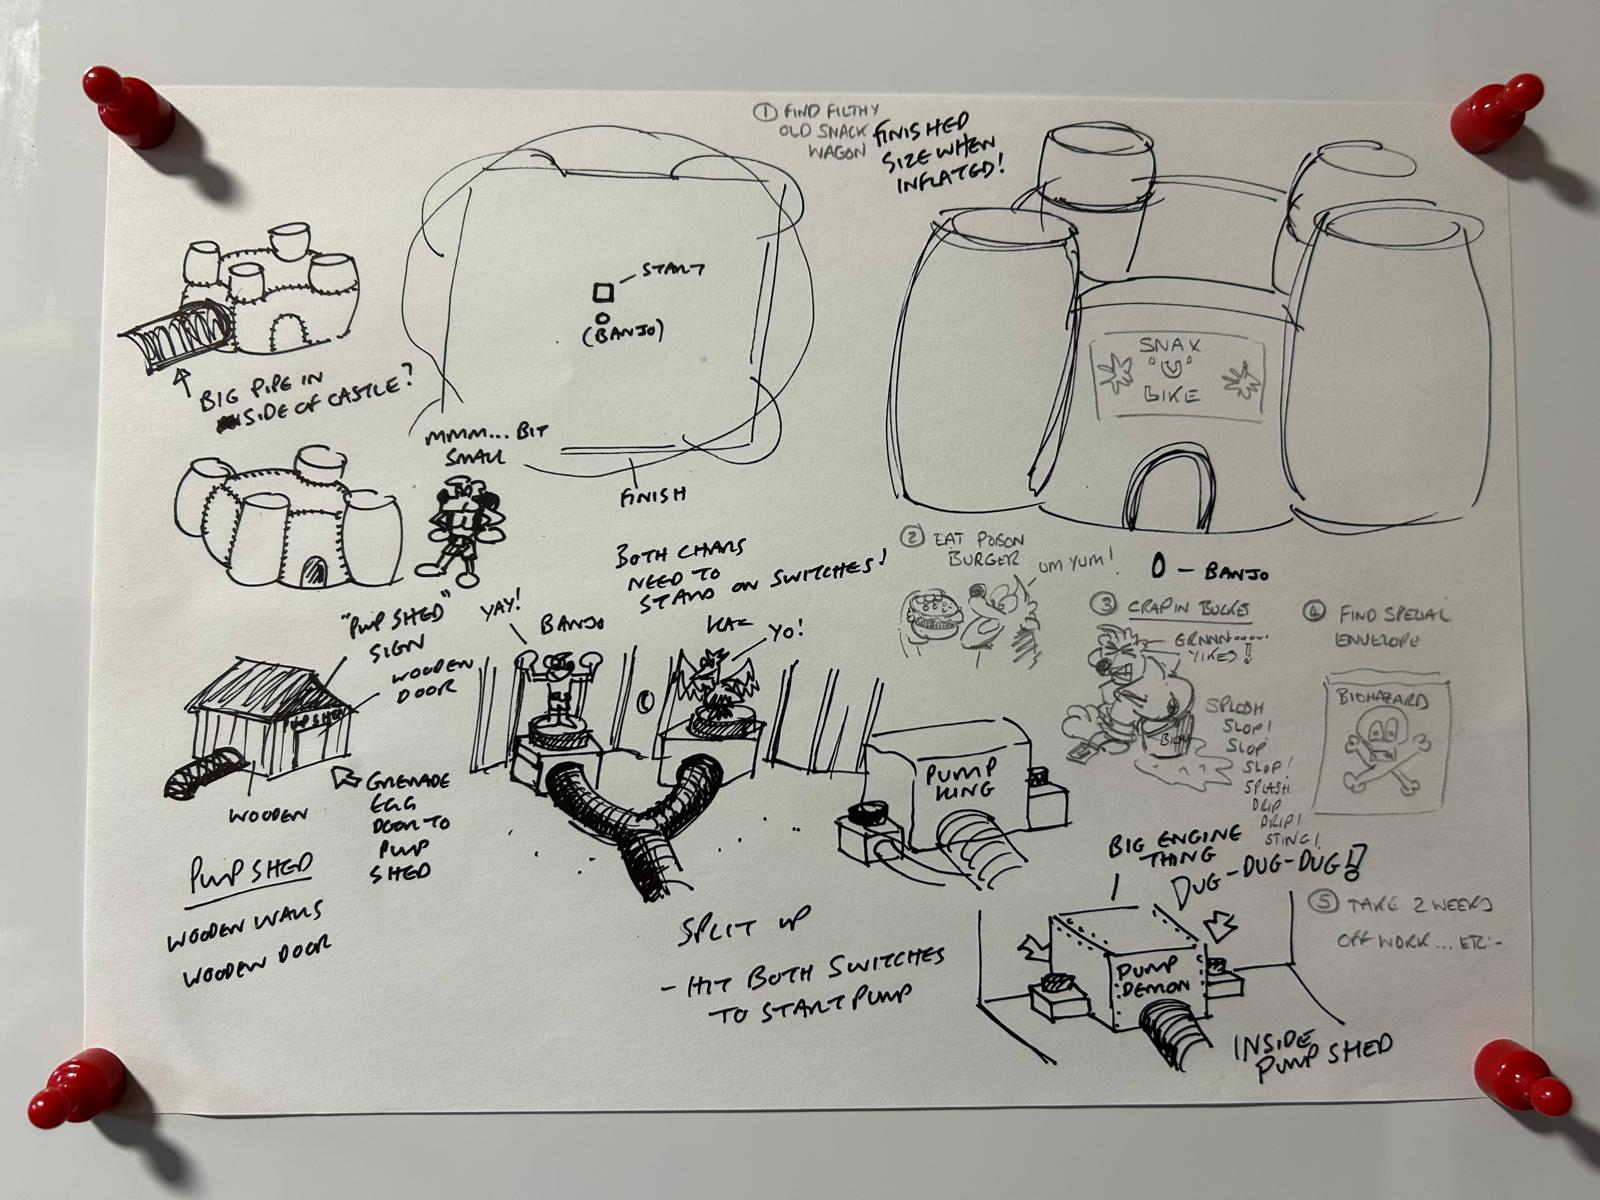
- The Crazy Castle in the Stockade was originally meant to inflate like Mr. Patch; miniaturized but fully formed, only to grow larger. In the final game, the Crazy Castle is large-scale, but visibly deflated without any points of entry. It's possible this change was done to prevent confusion, as the castle might have appeared to suit Coin Banjo if it were small but intact.
Fair #15 Castle Interior/Pump Room: 21-10-98
- The interior of the Crazy Castle would have featured the three-dimensional heads of Banjo/Kazooie and Kazooie above the doors of their respective challenges, looking similar to game trophies. In the final game, the heads of Banjo/Kazooie and Kazooie are placed on the doors themselves, as flat images.
- The document also specifies that the doors to each challenge will be sealed with a zipper when completed. This detail was unnecessary in the final game, as players are invited to retry the mini-games in Banjo-Tooie at their leisure in order to best their scores for each challenge. Sealing up the doors would run counter to this logic.
- While the single-player Crazy Castle would retain the same dimensions in the Hoop Hurry and Balloon Burst challenges, its size and scope was intended to transform when played in multiplayer. As the perimeter of the castle expanded beyond the walls of the single-player adventure, 2 to 4 players would start off in one of four multi-colored towers in a new, wider playing field. The interior of the castle would also see four pillars erected that would add challenge and strategy to the proceedings. Unfortunately, this expanded role wasn't to last, as the final games' multiplayer features the same dimensions for Hoop Hurry and Balloon Burst that had been experienced in the single-player adventure. That's deflating...
- While the document specifies that the Pump Room is only illuminated by the light from the exterior vent hole, the final game features a pair of red safety beacons on either side of the room.
Fair #10 The Inferno: 19-10-98
- The background flame decal of the Inferno area was envisioned as being constructed from cardboard to sell the cheapness of the park. In the final game, the flame decal is constructed from the same riveted steel as the Inferno tower.
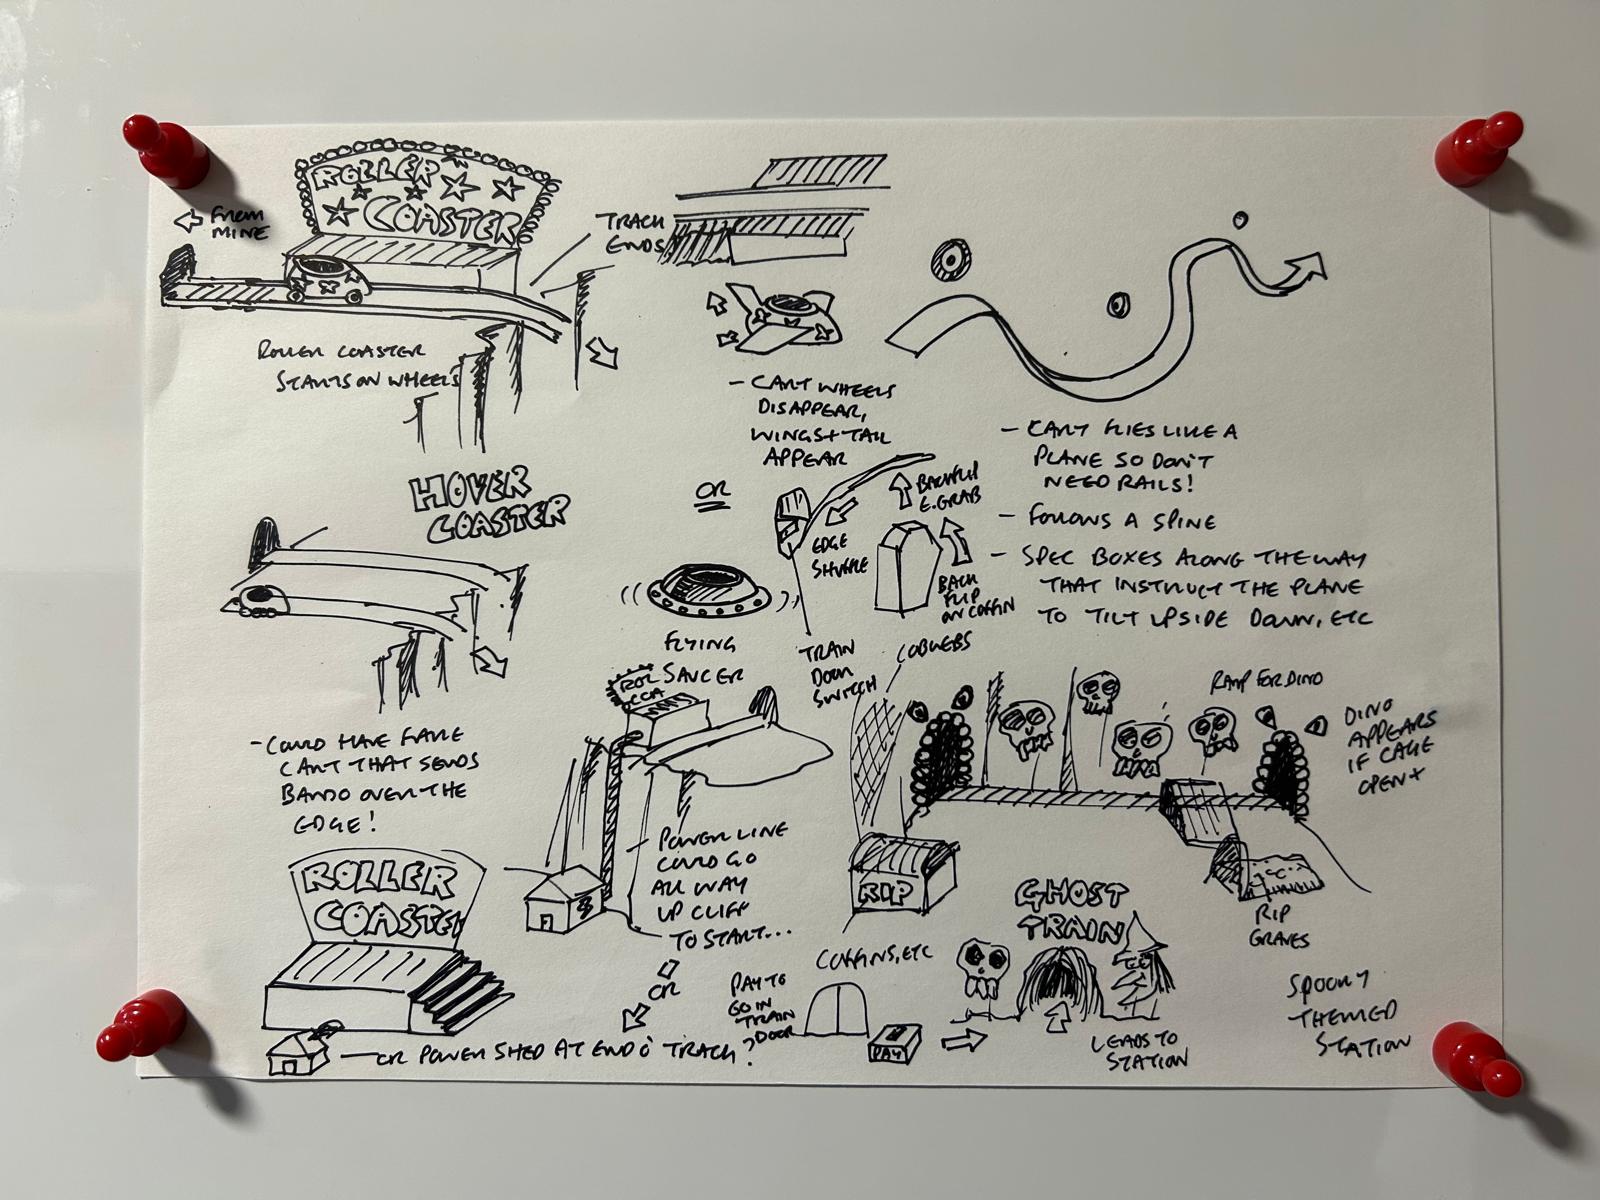
Ticket Acquisition/Mr. Patch |
Unused Shooting Gallery/Cave of Horrors |
Saucer of Peril/Train Station |
Crazy Castle Stockade/Pump Room |
|---|---|---|---|
 |
 |
 |
 |
Ticket Acquisition/Mr. Patch
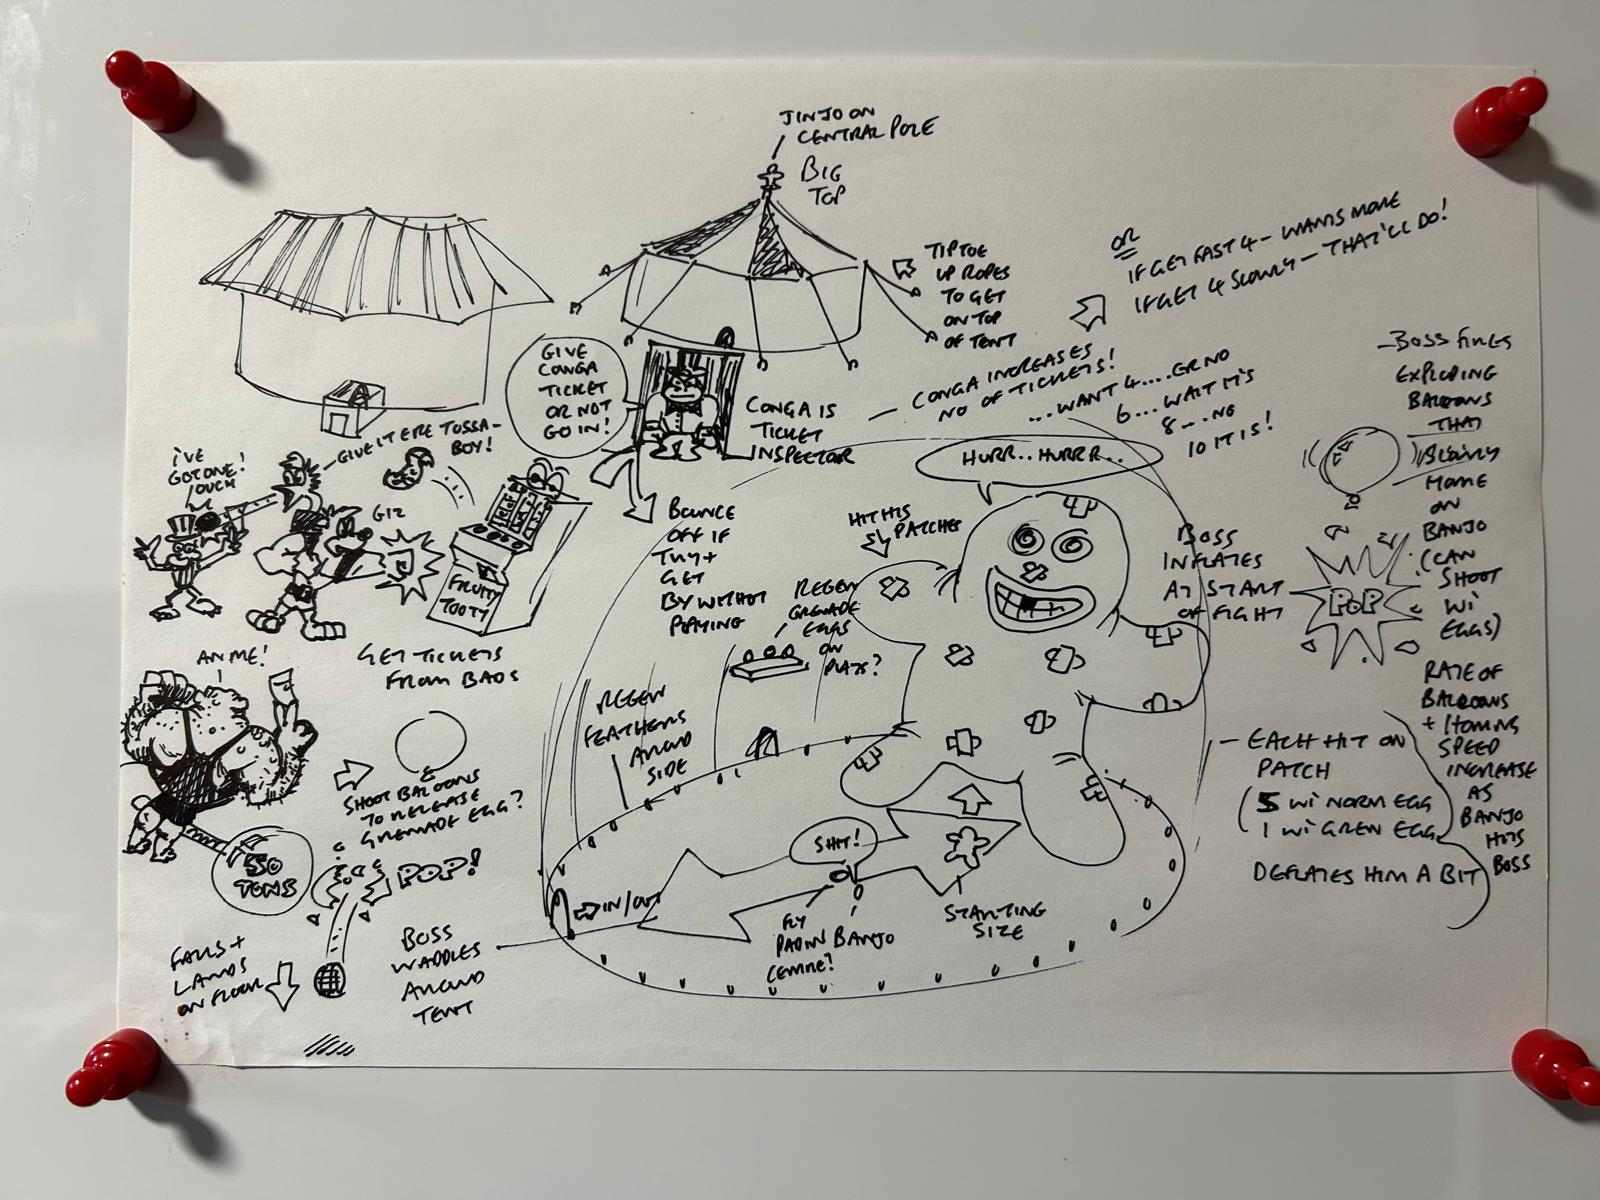
- Collecting tickets for the Big Top Attraction originally had Banjo taking on a number of fairground minions including a Carnival Barker and a Strongman. In the final game, Big Top Tickets can only be acquired by destroying the Fruity machines around the tent.
- Gaining entry to the Big Top was originally much harder, as Conga was planned to demand a higher ticket count after each interaction, capping off at 10. Alternatively, Conga would judge the pace of the ticket collecting to merit entry - if four were collected too quickly, he would increase the price of admission, rewarding slower players at only four tickets. In the final game, Conga will only demand four tickets, regardless of the pace collected.
- Banjo originally entered the Big Top from the far end, facing Mr. Patch directly. In the final game, Banjo enters from the middle. This detail seems to have been considered on the document, as the middle entrance was drawn, but was summarily scribbled out and redrawn on the far end.
- A single Flight Pad was originally planned to be placed in the middle of the Big Top for the duration of the battle. In the final game, the Big Top features four Flight Pads arranged in the four cardinal directions.
- Keeping your supply of Eggs and Feathers during the battle had several ideas tossed around. The first was to have the perimeter of the Big Top interior surrounded by Red Feathers, with an endless munition of Grenade Eggs kept on an elevated platform. The second idea was to have Mr. Patch fire homing balloons at the player, which when popped would drop a supply of Grenade Eggs below. In the final game, regenerating Eggs and Feathers are kept around the Flight Pads, and Mr. Patch fires exploding Beach Balls at the player that do not provide any additional Grenade Eggs.
Unused Shooting Gallery/Cave of Horrors
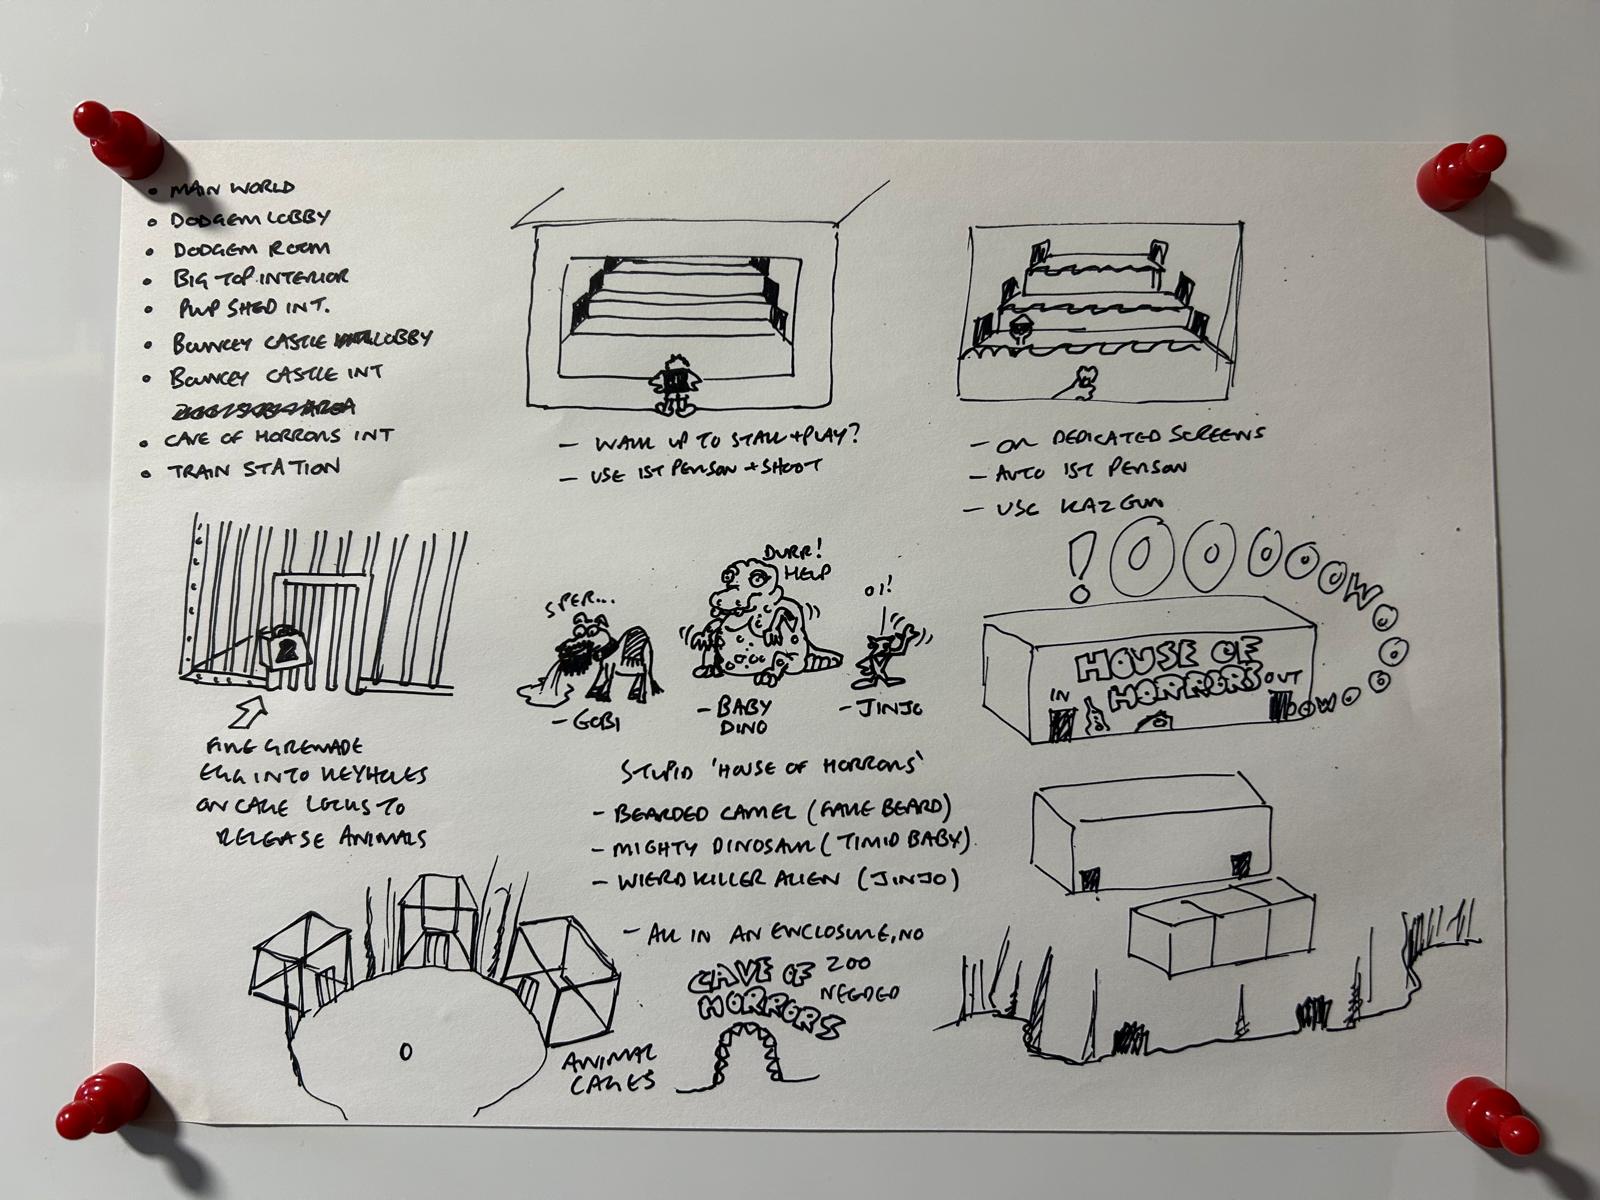
- Originally, WitchyWorld had been planned to run its own dedicated Breegul Blaster segment, where Banjo could approach the stalls in the fairground and enter into a Shooting Gallery mini-game. Unfortunately, this feature was absent from the final game.
- Only the Jinjo kept its moniker from the document as the "Weird Killer Alien", with 'Mighty Dinosaur' being appended as 'Mighty Evil Dinosaur' and 'Bearded Camel' becoming 'Ancient Bearded Camel' in the final game. Gobi even grew his own ancient beard, which was planned to be revealed as a fake in the original design.
Saucer of Peril/Train Station
- The Saucer of Peril was originally conceptualized as a Roller Coaster Cart that transforms into a plane when the track underneath it disappears. In the final game, the Saucer of Peril is, of course, a Flying Saucer.
- A beginners trap was considered for WitchyWorld, where players could clamber into an unmanned 'Hover Coaster' cart whose only purpose was to hurdle off the edge of a short track. Thankfully, this deathtrap was left out of the final game.
!Crazy Castle Stockade/Pump Room
- The Pump Room was originally intended to be located inside a shed connected to the Crazy Castle, where a Grenade Egg against the wooden door would allow passage. In the final game, the Pump Room is built into the wall of the Stockade protected by a vent screen, which is dispatched with a Grenade Egg.
Jolly Roger's Lagoon#
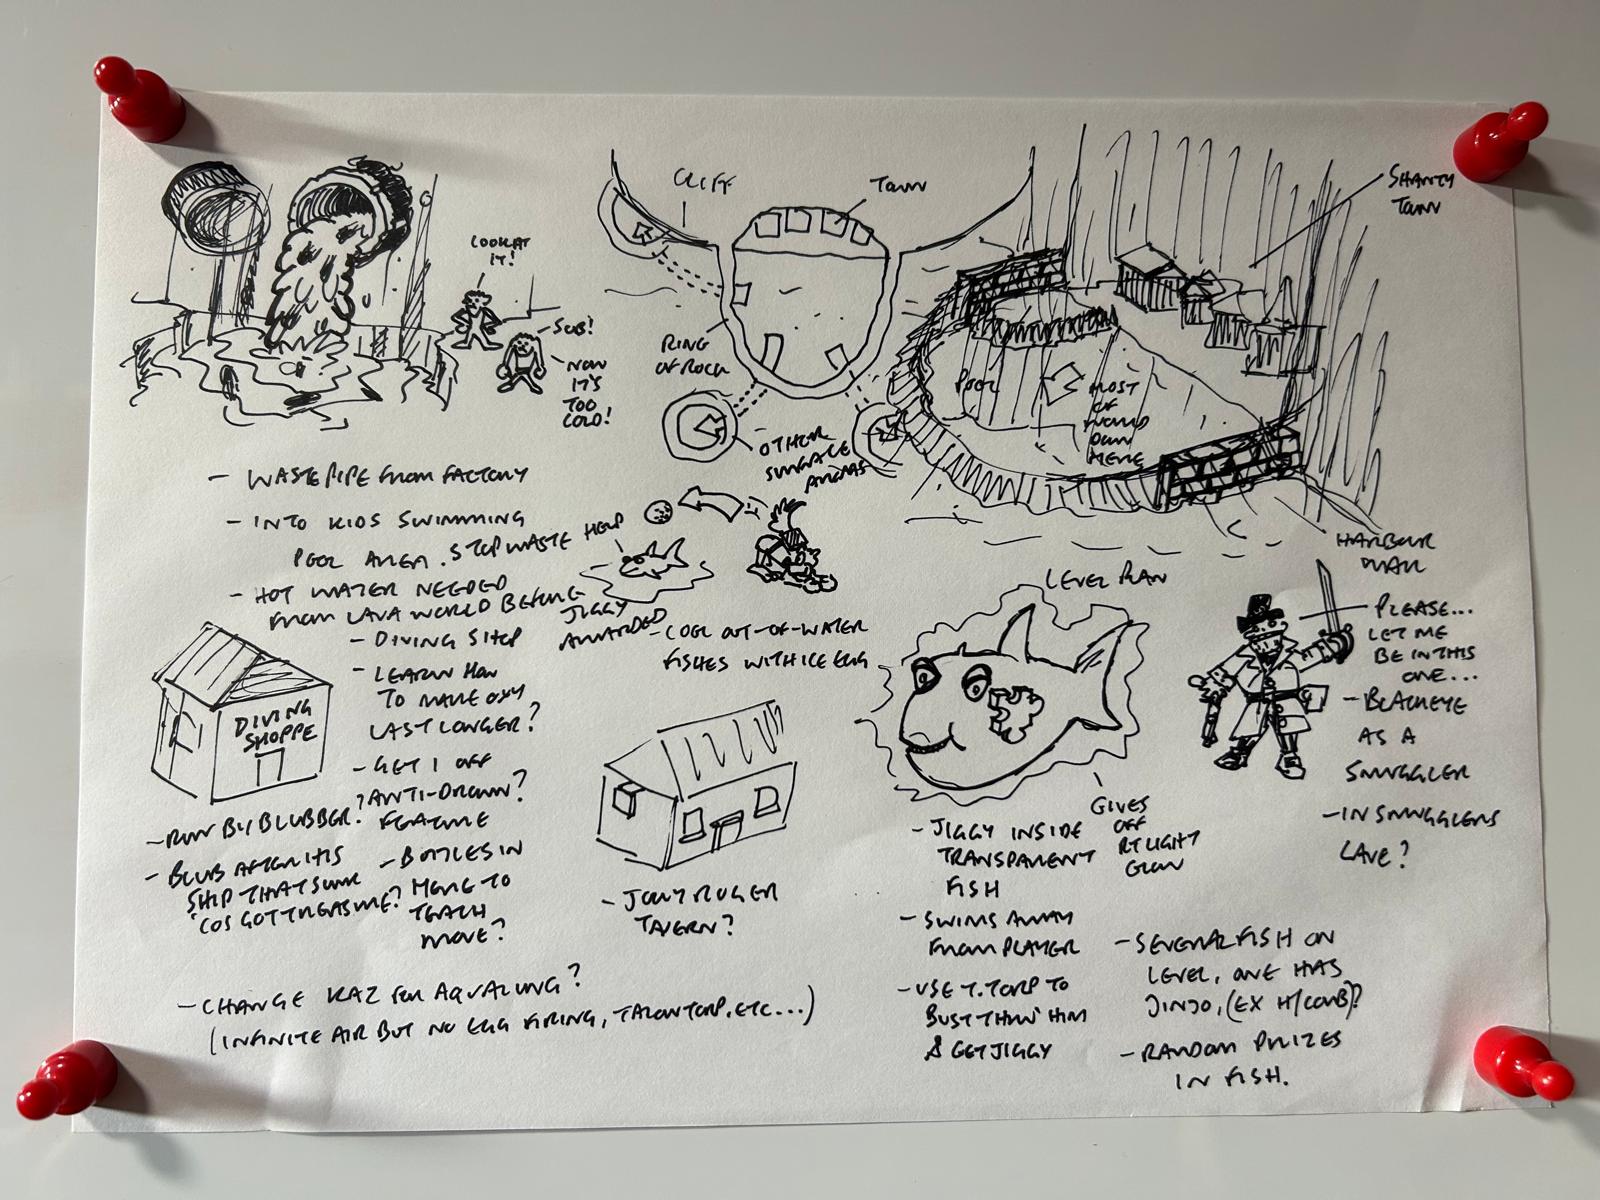
Jolly Roger's Lagoon Town Planning |
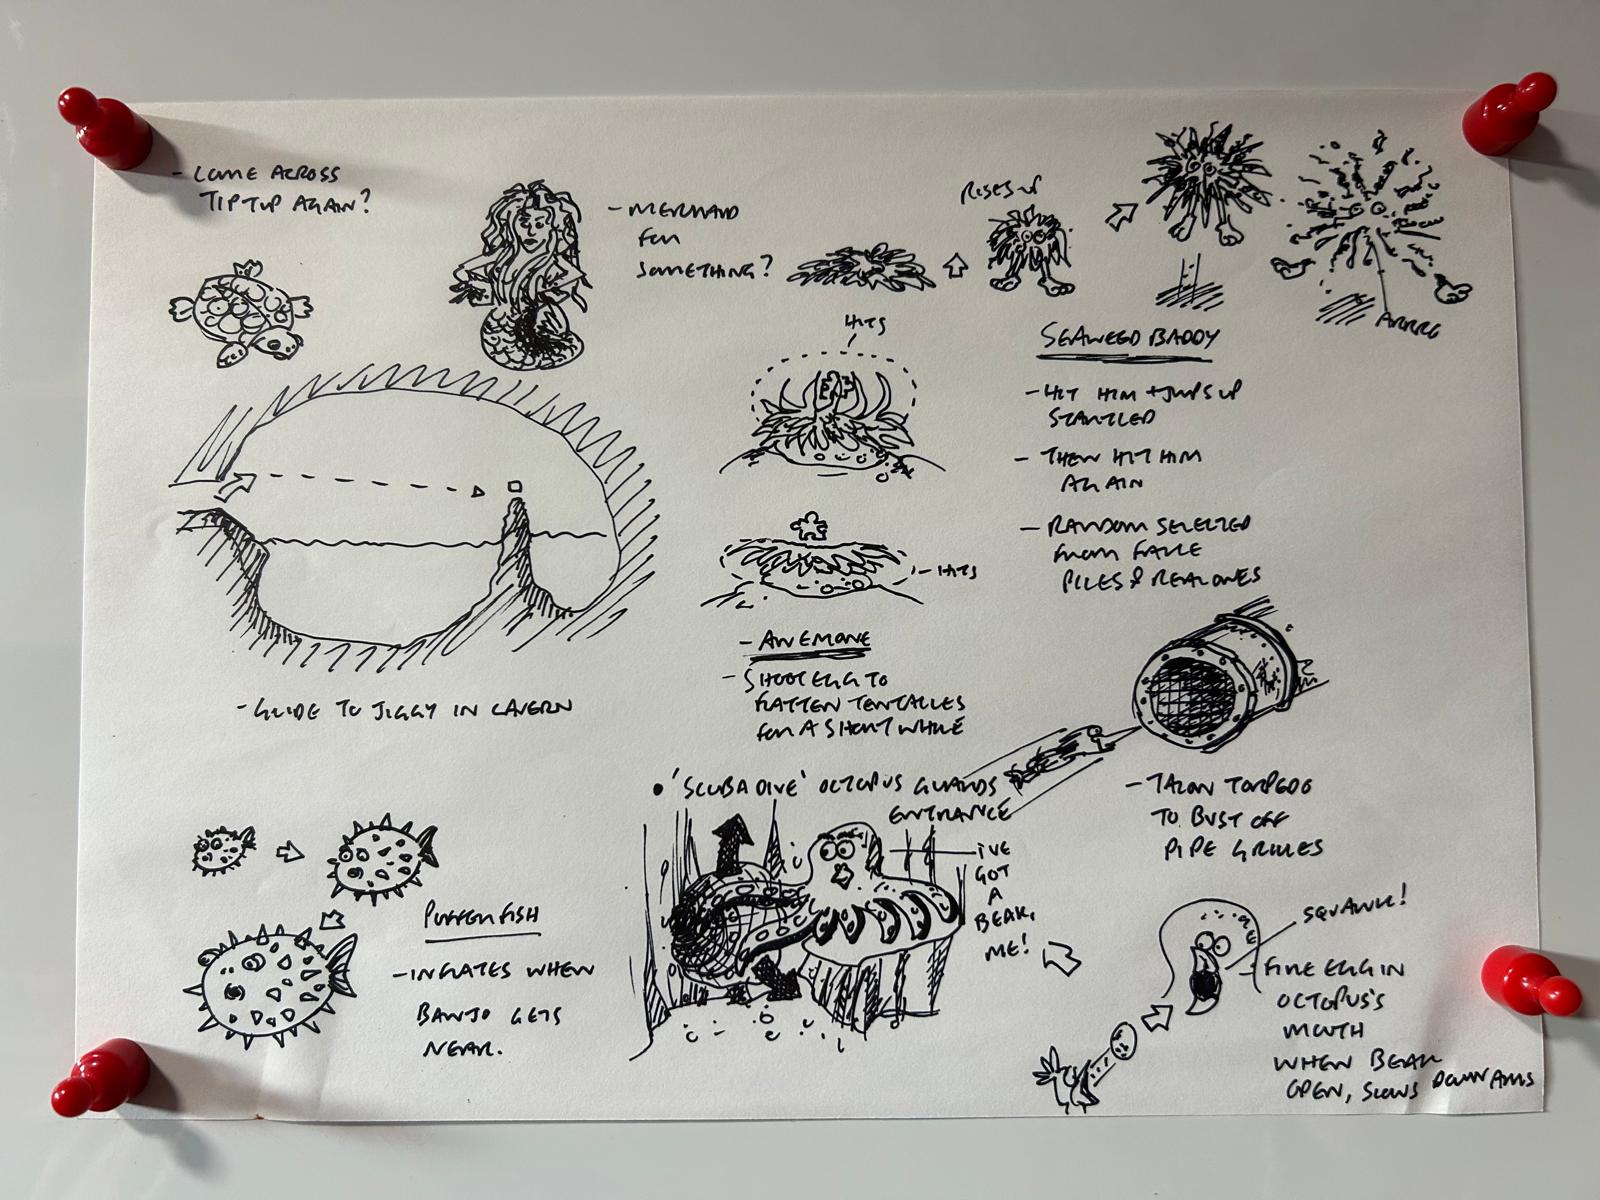
Smuggler's Cavern/Atlantis Enemies |
Atlantis Planning |
Sea Bottom Planning |
|---|---|---|---|
 |
 |
 |
 |
Jolly Roger's Lagoon Town Planning
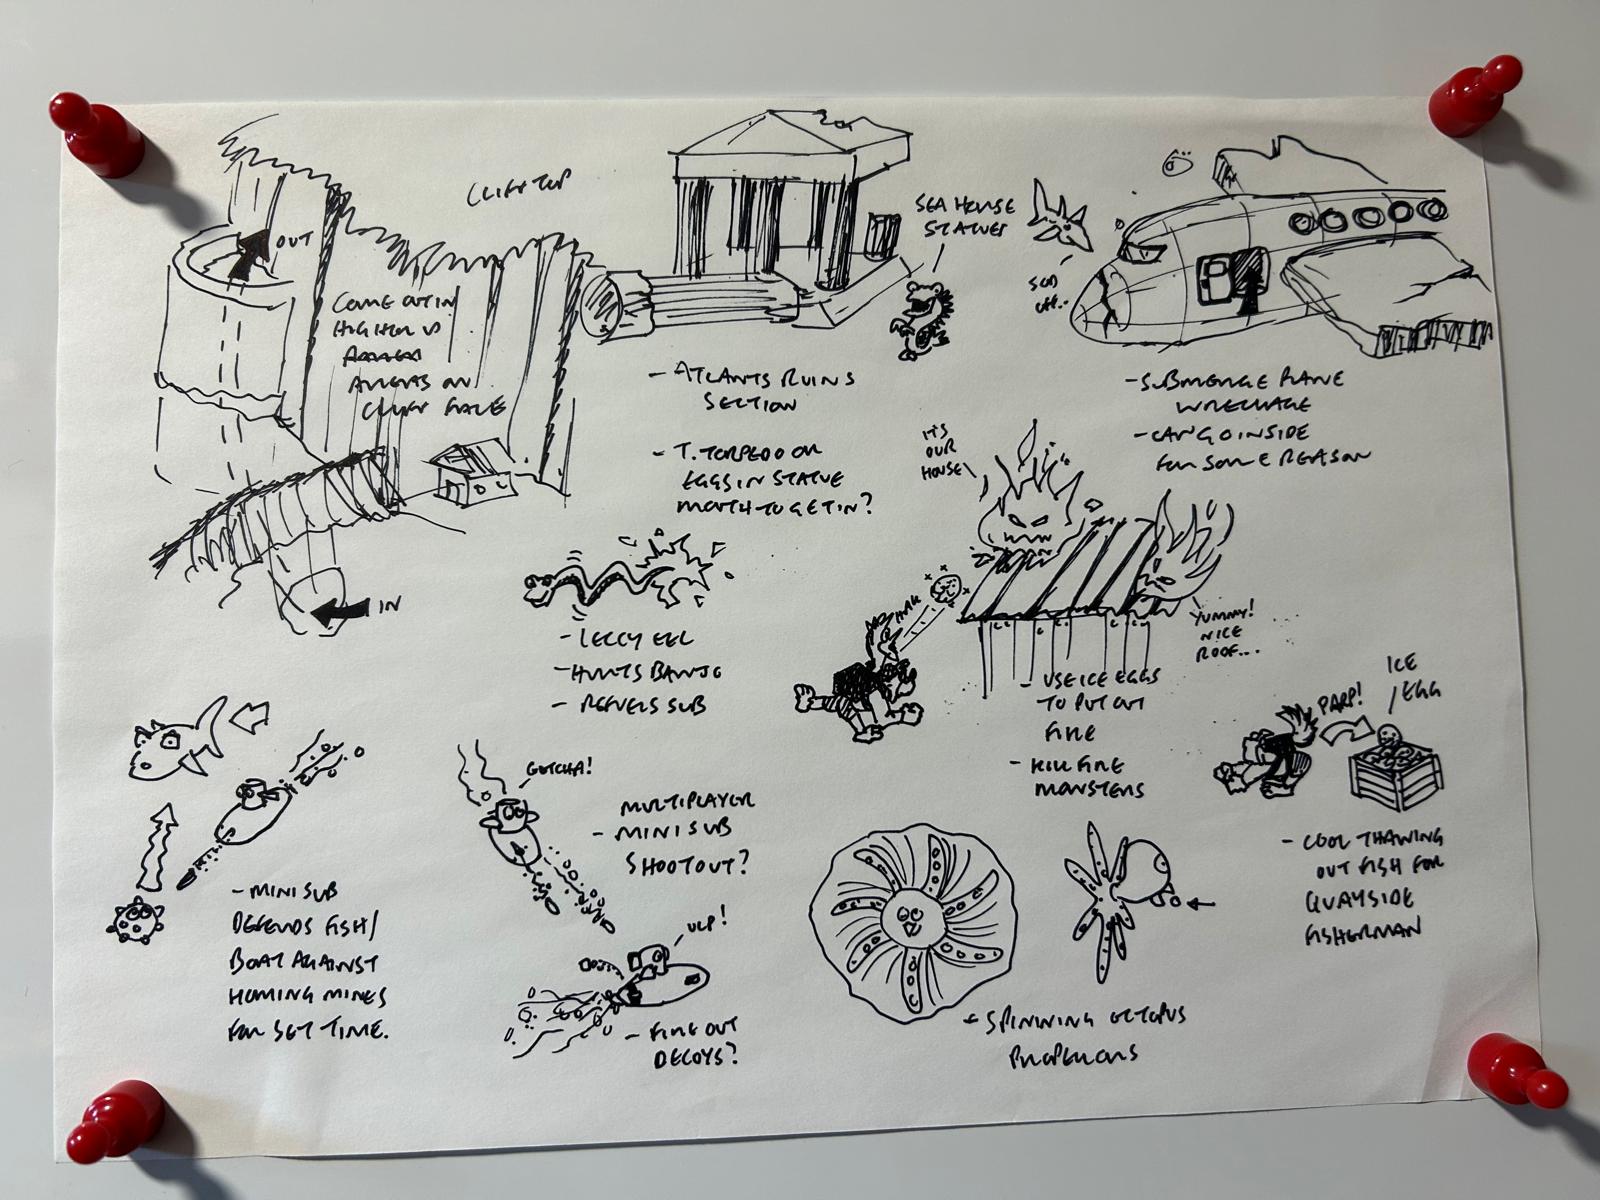
- Several ideas were conceptualized to allow for players to swim in Jolly Roger's Lagoon untethered from an Oxygen meter. This included learning an underwater breathing technique from Bottles, and swapping out Kazooie with an Aqualung, at the expense of being unable to utilize her abilities while diving. In the final game, Mumbo uses his magic to cause the sunlight to pierce the lagoon, oxygenating the water.
- Captain Blubber was considered to run a "Diving Shoppe" in the town square, intent on reaching his ship that has inexplicably sunken in the Lagoon. In the final game, Captain Blubber runs the Waveracer Hire without mention of his old ship, the Salty Hippo.
- The item-harbouring transparent fish, Seemee, was originally planned to actively swim away from the player, adding frustration to acquiring their items via Talon Torpedo. In the final game, the Seemee do not attempt to avoid the player.
- Captain Blackeye was originally envisioned as running a bootlegging operation in Smuggler's Cave. In the final game, Captain Blackeye can be found in the backroom of Jolly's Tavern, battling a touch of seasickness.
Smuggler's Cavern/Atlantis Enemies
- The Inky Octopus was intended to guard a single exit by waving one of its limbs in front of the passage. In the final game, the Octopus is placed in the tunnel between two areas, waving all of its limbs wildly to prevent passage to either side.
- The Inky Octopus was originally dispatched by firing an egg into its open beak, which would cause its arm to slow and allow passage. In the final game, firing an Ice Egg into its beak will freeze the Octopus entirely.
Atlantis Planning
- Jolly Roger's Lagoon once featured an unused area called the Cliff Top (not to be confused with the Isle O' Hags location). By diving into the Lagoon, and swimming up through a long flue, players would emerge at a much higher elevation overlooking the town from the Cliff Top. In the final game, the town in Jolly Roger's Lagoon is the highest point of the world, and the underwater flue leading to the Cliff Top has been removed entirely.
- The Ruins around Atlantis were planned to be surrounded by underwater Seahorse statues - having Kazooie fire an egg into their mouth, or diving with a Talon Torpedo would allow passage. In the final game, the Seahorses have been replaced with Mermaid statues holding coded jars. Firing eggs into the jars in sequence would allow passage into the ruins.
- The underwater wreckage of a downed airplane was originally planned to be found within Atlantis. In the final game, the wreckage of the submerged plane was replaced with the submerged wreckage of a sunken pirate ship.
- Ice Eggs are shown to be useful against putting out a fire on a shanty rooftop, and preserving a Quayside Fishermans catch of the day. In the final game, neither freezing challenge materialized in Jolly Roger's Lagoon.
Sea Bottom Planning
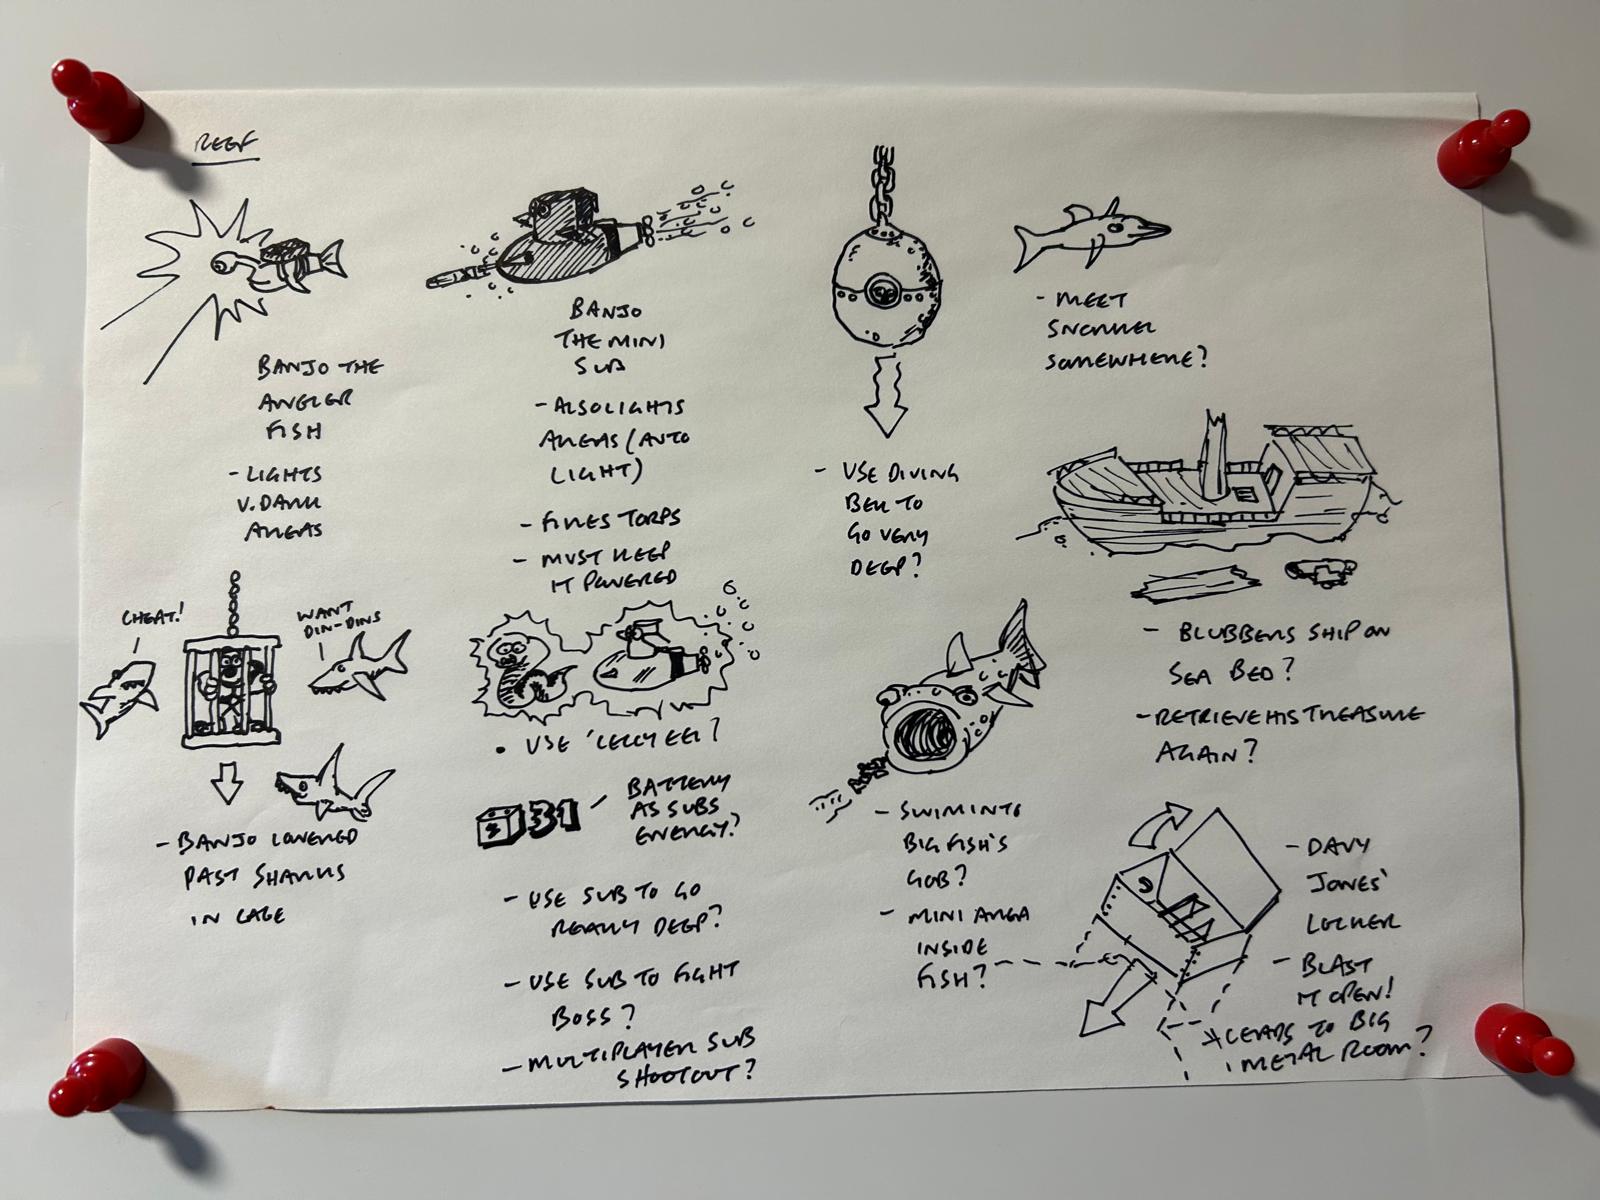
- The darkness of the sea bottom prompted many illuminating ideas into reaching unfathomable depths, including being lowered in a shark cage or a diving bell, and being transformed into an Angler Fish or Submarine. In the final game, players would be able to explore the Sea Bottom by transforming into the Submarine. No pressure.
- The Submarine was originally powered by depleting electricity serving as something of a countdown sequence. Players would need to fuel their Submarine, even going as far to befriend some Frazzles for their eel-ectric power. Thankfully, this mandatory mission was left out of the final game, as the Submarine is free to dive without seeking alternative fuels.
- Captain Blubber's ship, the Salty Hippo, was considered for a cameo appearance on the Sea Bottom, where retrieval of his treasure a second time would have presumably resulted in another golden reward. In the final game, Captain Blubber's ship isn't found on the Sea Bottom, or anywhere in Jolly Roger's Lagoon, for that matter.
Terrydactyland#
Dino #1 Overview: 13-1-99 |
Dino #7 Overview: 13-1-99 |
|---|---|
 |
 |
Dino #15 Interior Lake Cave: 15-1-99 |
Dino #16 Lake Cavern/River Passage: 15-1-99 |
|---|---|
 |
 |
Dino #1 Overview: 13-1-99
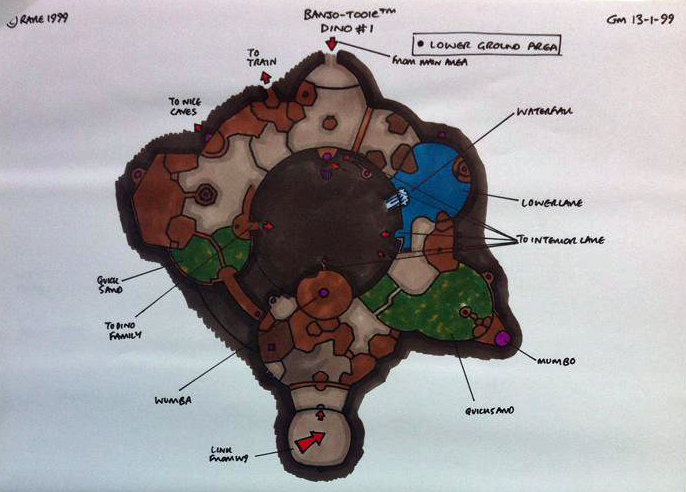
- Drippy's Pool might have served as a one-way connection to Cloud Cuckooland, as the text "link from world 9" indicates. At one point you might have been able to follow the rainwater down to Terrydactyland. In the final game, the pool in Cloud Cuckooland prevents the player from passing through with a set of bars over the drainage spout, severing any connection.
Dino #7 Overview: 13-1-99
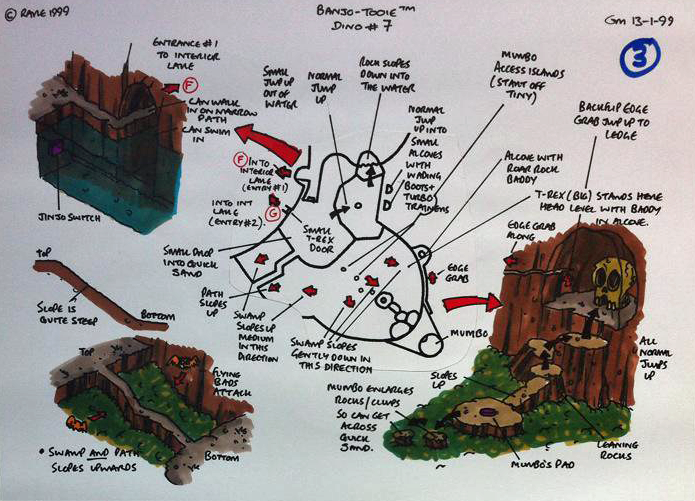
- The Grib Grab alcove near Mumbo's Skull was meant to house a Roar Rock Baddy, detailed in the Dino #19 document. In the final game, the alcove features a boulder containing a Cheato Page, with the Unga Bunga Guard (The Roar Rock Baddy replacement) being moved to block the entry of Oogle Boogle Cave.
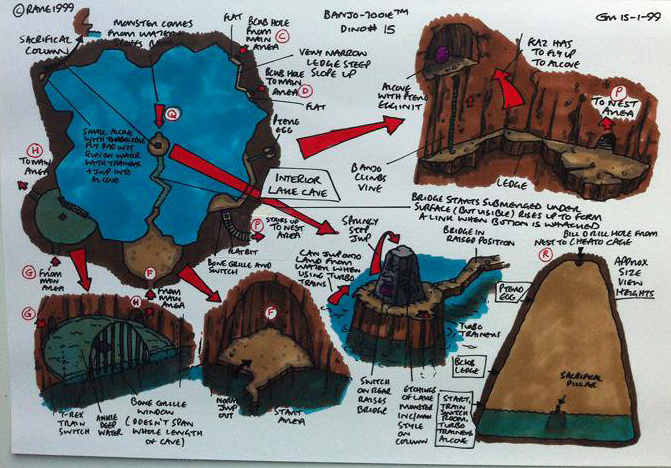
Dino #15 Interior Lake Cave: 15-1-99
- The entrance to Inside the Mountain was originally designed to keep the water contained within the chamber. In the final game, the platform is split to allow the water to flow into Terrydactyland, and also feature a pair of Split-Up Pads on the opposite shore.
- The Small T-Rex passage was originally meant to lead to the Terrydactyland Train Station Switch. In the final game, the passage instead leads to a Cheato Page, with the Train Station Switch being relocated outside, just in front of Drippy's Pool near Wumba's Wigwam.
- Reaching the alcove containing the Flight Pad originally required the use of Turbo Trainers. Players would need to grab the Trainers and then hydroplane across the water to achieve enough vertical height and jump into the raised alcove, in a similar manner used to rescue the Jinjo across the water in Jolly Roger's Lagoon. In the final game, the Flight Pad alcove has been lowered so that it may be reached by jumping out of the water, and the Turbo Trainers have been removed entirely.
- The central island originally featured a Shock Spring Pad that would allow vertical access to the "Sacrificial Column". In the final game, the Shock Spring Pad has been replaced by a pair of Springy Step Shoes.
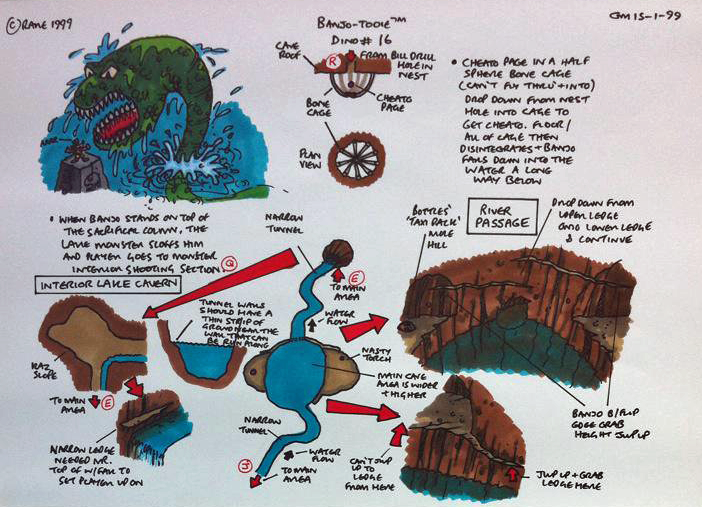
Dino #16 Lake Cavern/River Passage: 15-1-99
- The small cage accessed from the center of Terry's Nest was originally constructed from bone and meant to disintegrate when Banjo stepped inside, causing him to fall down into the Lake. In the final game, the cage does not disintegrate, and also features a Shock Spring Pad to return to Terry's Nest.
- The small cage originally contained a Cheato Page. In the final game, it contains a Jiggy.
- The River Passage originally featured a Flaming Torch Baddy from Glitter Gulch Mine on the shoreline. In the final game, this encounter does not occur, as the Flaming Torch Baddies were axed prior to release.
Dino #19 Bonfires Cavern/Enemies: 19-1-99 |
|---|
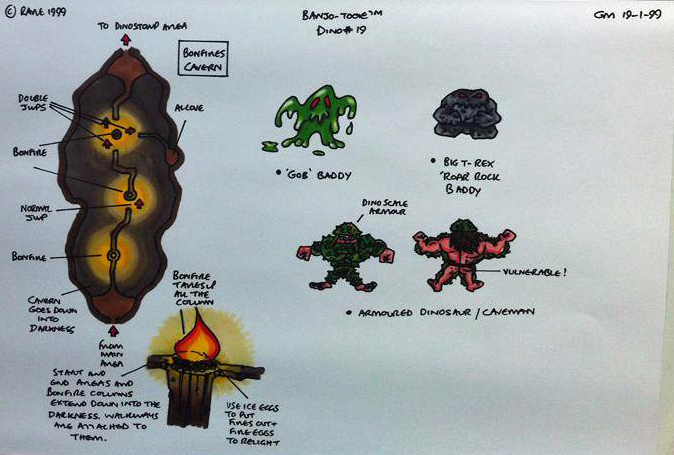 |
Dino #19 Bonfires Cavern/Enemies: 19-1-99
- The Bonfire Cavern originally featured three bonfires on the way to the Stomping Plains. In the final game, there are only two bonfires.
- The final bonfire originally allowed access to an split path where players would discover an alcove along the cave wall. In the final game, there no split path or alcove - the Caverns simply act as a straight shot from Terrydactyland to the Stomping Plains.
- The design for the platforming section in the Caverns was originally much more challenging. It's tamed down considerably in the final version.
- While the Bonfires may be put out by Ice Eggs, the document specifies that they may be relit with Fire Eggs, likely to aid in navigation back to Terrydactyland. In the final game, the bonfires will automatically relight over time, negating the use of Fire Eggs while adding to the challenge.
- Terrydactyland originally featured a squat granite enemy called a "Big T-Rex 'Roar' Rock Baddy". Evidently, Banjo would need to approach these enemies with the Big T-Rex and roar, causing them to shatter into pieces. In the final game, the Rock Baddy has been removed entirely, with their function supplanted with the Unga Bunga Guard, where roaring loudly at the caveman will cause him flee from the entrance of Oogle Boogle Cave - after soiling his loincloth, of course.
- The design of the Mucoids were originally meant to be more bipedal. In the final game, the Mucoids lack any limbs and get around by hopping.
Dino #21 Pterodactyl Boss Battle: 20-1-99 |
|---|
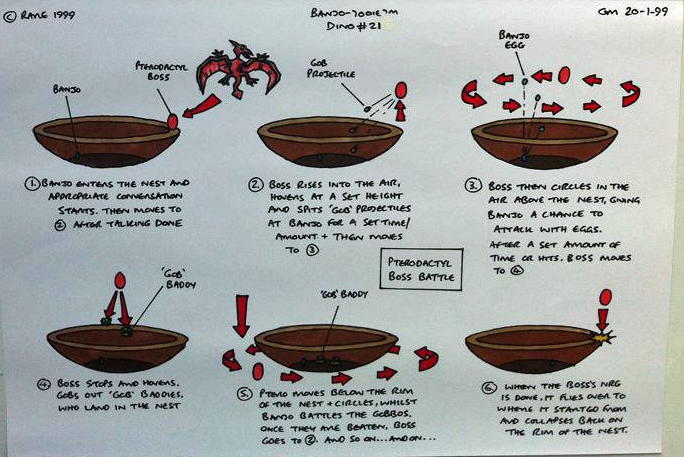 |
Dino #21 Pterodactyl Boss Battle: 20-1-99
- During the battle with Terry's Mucoids during the Boss fight, Terry was originally meant to fly below the rim of nest during the phase, circling until Banjo defeated his 'snotty buddies'. In the final game, Terry chooses to fly beneath the cloud cover until the Mucoids are defeated.
Grunty Industries#
Factory #19 Outside: 16-3-99 |
|---|
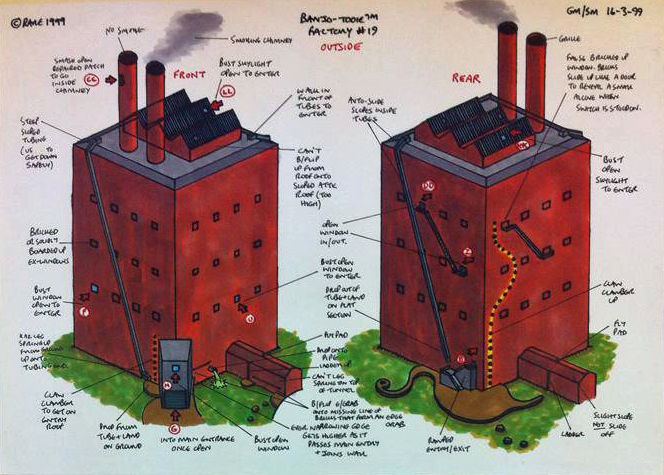 |
Factory #19 Outside: 16-3-99
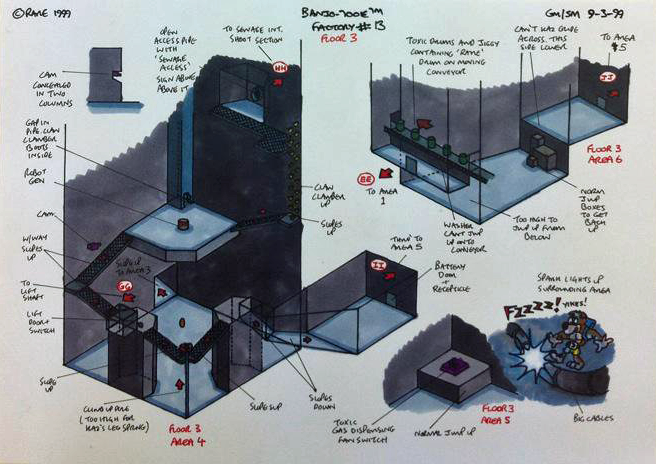
- Grunty Industries would have originally featured a pair of twin tubes on the front and rear of the building, running the length of factory from the rooftop to the base. Banjo would approach the mouth of either of these tubes while on the roof to slide down safely to the bottom. In the final game, both tubes have been removed entirely, as Banjo can simply use the available Warp Pad on the rooftop to reach the ground floor if desired.
- Originally, the 'false bricked up window' on the fourth floor that slides up to reveal a Jinjo was connected via walkway to the third window on the third floor. In the final game, the walkway instead connects to the fourth window. It's likely that the walkway would have been too steep, otherwise.
- The walkway that connects Floor 4 to Floor 3 was originally intended to be a single staircase. In the final game, the walkway is segmented into three pieces, with the second facing the opposite direction.
Factory #3 Ground Floor: 17-2-99 |
Factory #16 Basement A: 11-3-99 |
|---|---|
 |
 |
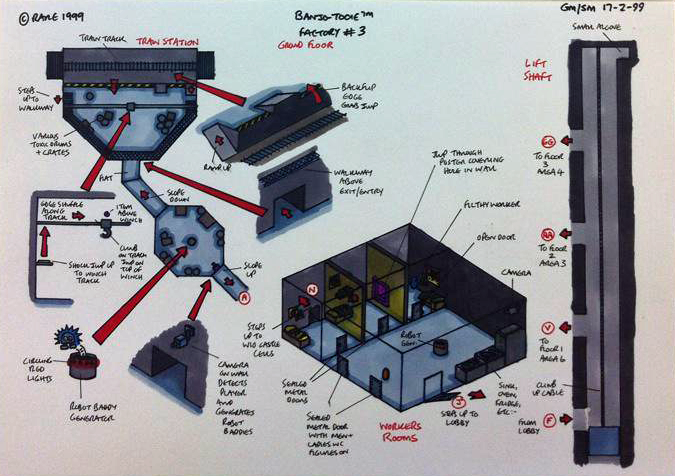
Factory #3 Ground Floor: 17-2-99
- The third room in the Worker's Quarters originally connected to the Castle Cells in World 10. In the final game, the third room has no such connection.
- Both bathroom doors in the Worker's Quarters were intended to be sealed shut. In the final game, Banjo can enter the men's bathroom for a reunion with Loggo and unblock him for a Cheato Page.
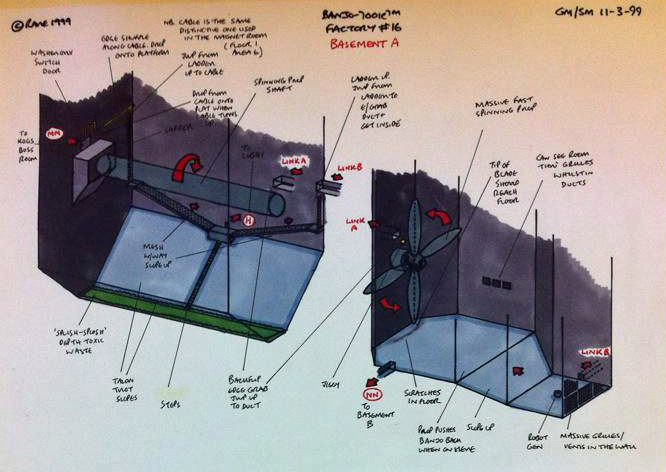
Factory #16 Basement A: 11-3-99
- The Air Conditioning Plant's large fan was originally meant to be protected by a Tintop Generator. In the final game, Banjo will instead encounter a Washup, Boltoid and Nutta in this area.
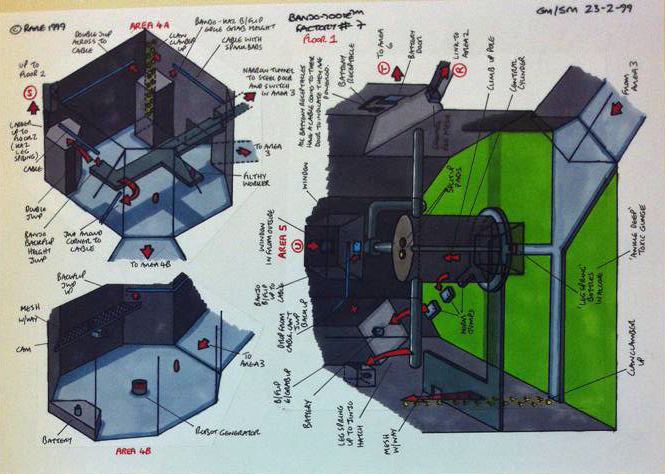
Factory #7 Floor 1: 23-2-99 |
|---|
 |
Factory #13 Floor 3: 9-3-99 |
|---|
 |
Factory #20 Floor Plan: 19-3-99 |
|---|
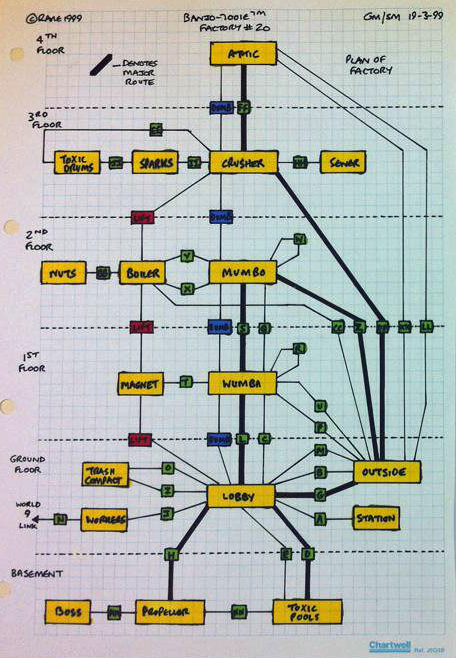 |
Due to the complex design and inter-connected nature of Grunty Industries, a Floor Plan was drafted on March 19th, 1999 by designers Gregg Mayles and Steven J. Mayles for simplicity.
Yellow Squares denote the function or major attraction within a room on a given floor.
Green Squares denote entrances and exits listed on the separate concept documents. For instance, the Floor Plan connects the "Workers" and "Lobby" with the letter "J", with a "World 9 Link" from "Workers" as "N". Viewing the Worker's Rooms illustrated on the "Banjo-Tooie Factory #3" document provides an exit to each, with the 'steps up to lobby' from this area marked "J", and the 'steps up to W10 Castle Cells" marked "N".
Red Squares labelled "LIFT" denote the accessible floors from the elevator.
Blue Squares labelled "DUMB" denote the floors accessible from the dumbwaiter, which only Washing Machine Banjo may use.
The Floor Plan remains unchanged from its final appearance in Banjo-Tooie, with the exception of the link to Cauldron Keep's "Castle Cells" found in the Worker's Quarters, as the final level has no connections to any of the former levels.
Cloud Cuckooland#
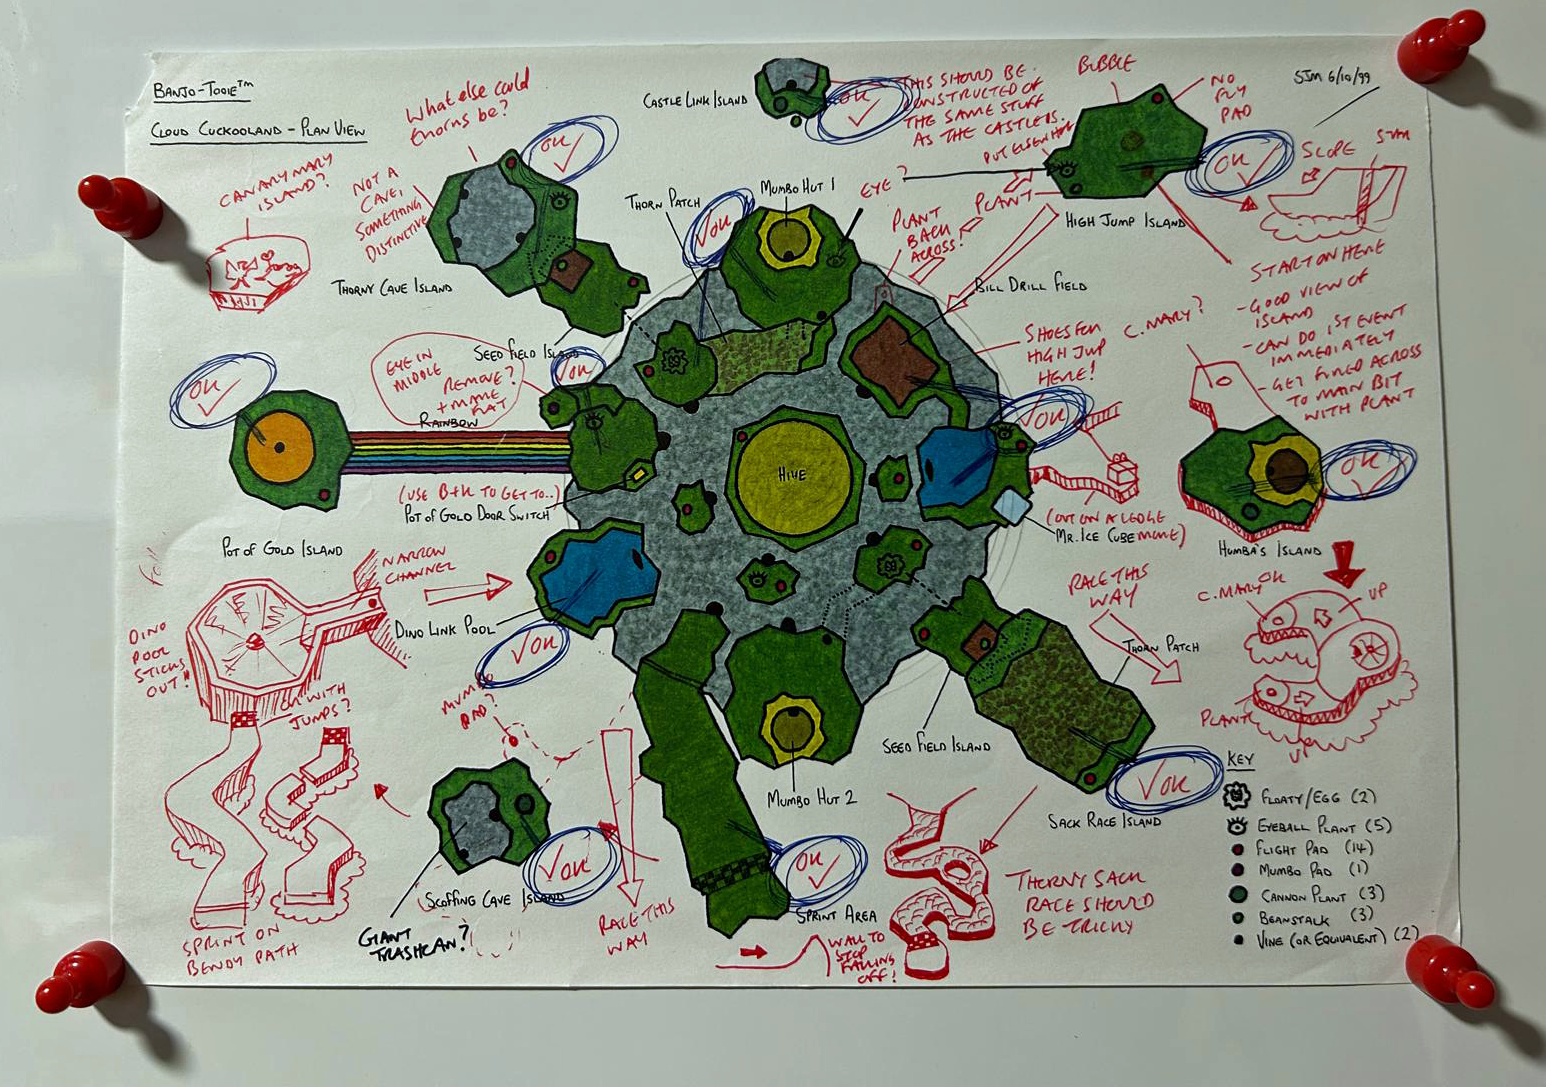
Cloud Cuckooland Overview: 6-10-99 |
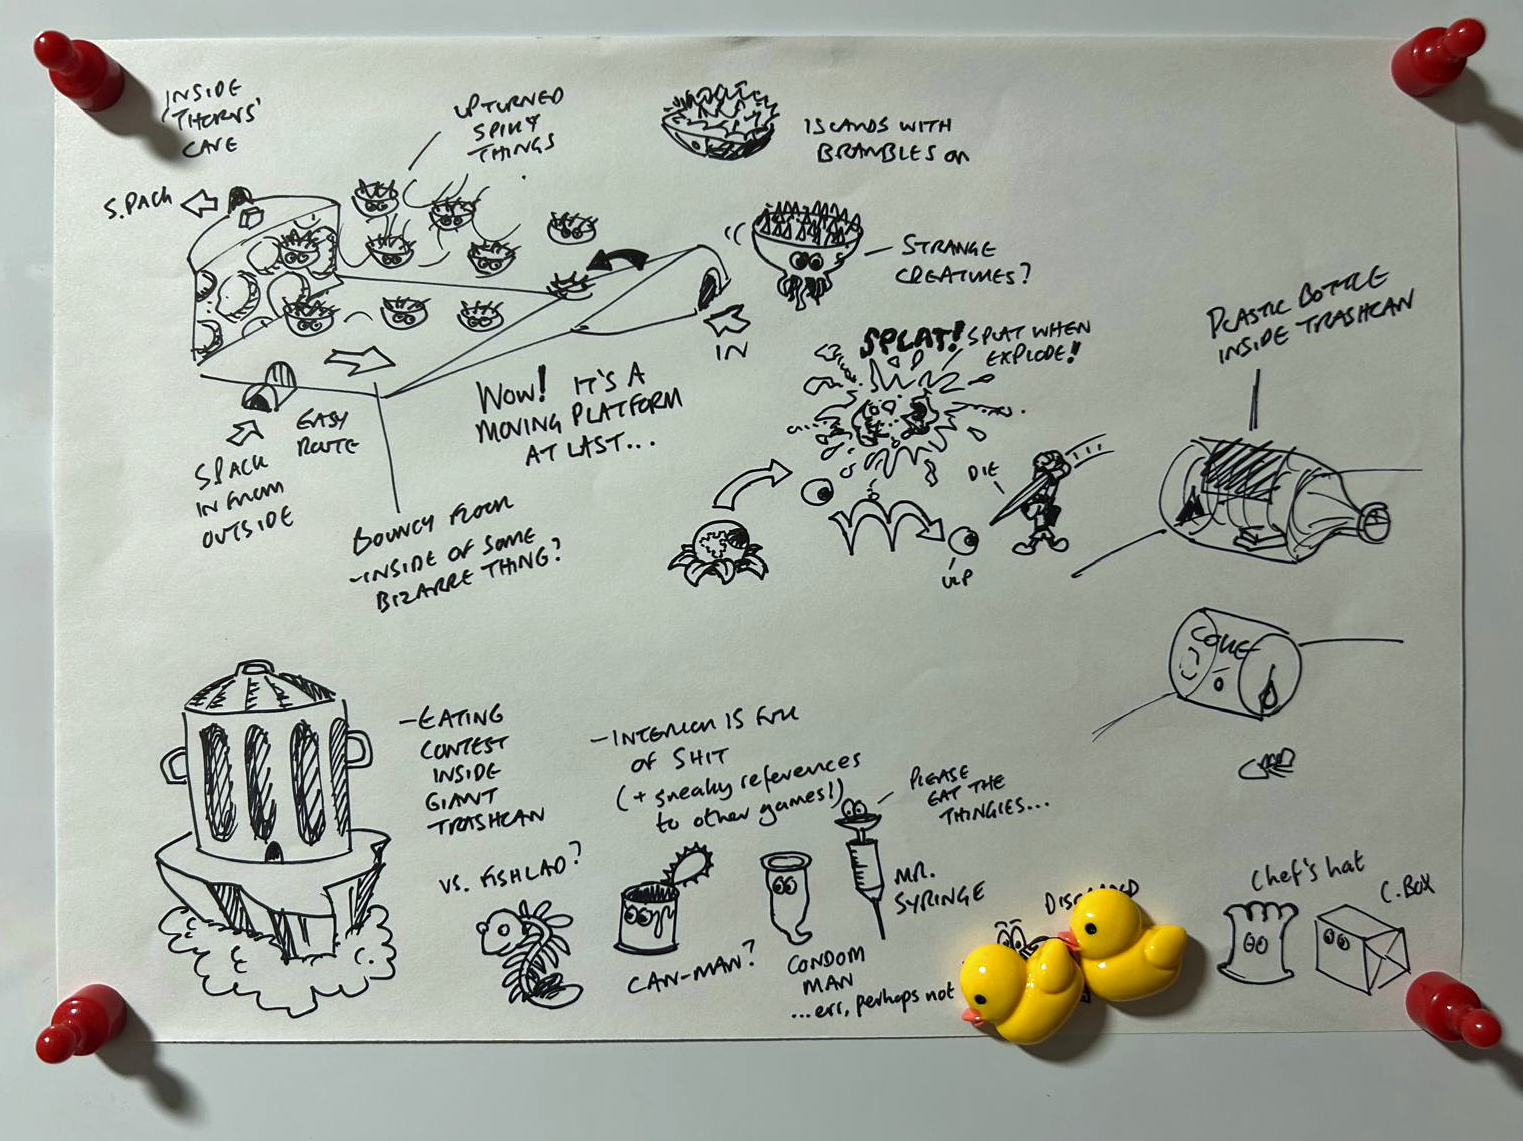
Inside the Trash Can/Cheese Wedge |
|---|---|
 |
 |
Cloud Cuckooland Overview: 6-10-99:
- The Cheese Wedge was originally intended to be a "Thorny Cave". The red revision notes urges a replacement for the location, reading "Not a cave, something distinctive". In the final game, the cave was changed to a Cheese Wedge, with an added hazard that caused the stench inside to slowly deplete the oxygen bar.
- Originally, players could find an Eyeball Plant next to the Cheese Wedge, with a Flight Pad below on the "Seed Field Island". These are switched in the final game.
- The Jelly Castle's original purpose was meant to connect to Cauldron Keep, far below. Within Cauldron Keep, players would be able to plant a seed in the 'Soil Turret', where a long stalk would sprout up into the clouds, creating a link as it reached Cloud Cuckooland. The red revision note makes a point that the counterpart 'Castle' in Cloud Cuckooland should resemble the architecture in Cauldron Keep to connect the two visually. ("This should be constructed of the same stuff as the Castle is." In the final game, the link to Cauldron Keep has been removed, along with the resemblance, as its been substituted for Jelly. While this naturally fits in with Cloud Cuckooland's surreal aesthetic, the original function is the reason it's a castle at all.
- The High-Jump Island originally featured a Flight Pad. This was removed in the final game.
- Canary Mary was originally meant to have her own dedicated island in Cloud Cuckooland, with a possible location seen behind the Cheese Wedge. In the design document, the red pen revision has added a branching path onto Humba Wumba's Island marked "C. Mary?". Following up on this idea, another illustration of Humba Wumba's Island has been drawn below giving us the finalized branching path that can be seen in the final game.
- The pool near the Bill Drill Field originally featured a Flight Pad on its shore. This Flight Pad was moved to be placed under George Ice Cube, giving a function to his demise when pushed off. Additionally, the red pen revision urged the platform that George sits on to be more precarious ("Out on a ledge more"), which is the case in the final game.
- The Sack Race island was originally a straight shot through a thorn patch. The red pen revision has drawn a more complicated route underneath ("Thorny Sack Race should be tricky"). While the final Thorny Sack Race Route isn't as winding as the planned route suggests, it does feature a similar clever shortcut if one takes the thinner (and thereby more dangerous) inside track, as designed.
- The "Sprint Area" was originally designed to be be closer to Mumbo's Hut, with the note suggesting its relocation, along with a slope at the end of the finish line ("Wall to stop falling off!) to prevent players being finished off. The Sprint area was moved in the final game, but no retaining slope was added.
- Two further paths for the "Sprint Area" were drawn, including a "Sprint on Bendy Path" and one featuring pitfalls, but the final game features a straight platform with peaks and valleys instead.
- The Giant Trashcan was originally envisioned as a "Scoffing Cave" where an eating contest would have been held. While the cave had been modified to a Giant Trashcan in the final game, the eating contest continued to serve as its function during development. Thankfully for Kazooie, the objective would be changed to have her defeating the germs infesting the trash, rather than eating mounds of it.
- A Flight Pad has been added in front of the Giant Trashcan.
- The Dino Link Pool was originally closer to the central island and much rounder in shape. The red pen revision has redrawn the pool to feature a narrow channel to become more beaker-like so that the "Dino Pool sticks out" more convincingly over Terrydactyland.
- The Pot of Gold Door Switch area originally featured an elevated area with an Eyeball Plant nearby. The red pen revision suggests removing the Eyeball Plant and making the area flat - which is how it appears in the final game.
- The Pot of Gold Island originally featured a Flight Pad. This is removed in the final game.
Inside the Trash Can/Cheese Wedge:
- The Inside of the Cheese Wedge would have originally featured its Jiggy prize behind a barrier on the first floor. In the final game, the Shack Pack entrances are found next to each other, on the second floor.
- The "Bouncy Floor - inside of some bizarre thing?" text alludes to a point in development when the Cheese Wedge hadn't been decided on. Previously a "thorny cave" in the 6-10-99 document, a desire to make a more distinctive location with a bouncy floor led to the Cheese Wedge being considered and approved for the final game.
- Similarly, the platforms inside the Cheese Wedge also had a shifting development, starting as small islands covered in brambles before given the Banjo treatment of adding googly eyes to everything to become "Strange Creatures". In the final game, the platforms are devoid of eyes, looking closer to onions with their hanging roots.
- The Inside of the Trashcan was originally meant to house an off-putting eating contest for its Jiggy. In the final game, Kazooie defeats an army of germs that have taken up residence in the trashcan, instead.
Candidates for the earlier eating contest include the bony "Fishlad" and "Can-Man", along with more humorous suggestions of Condom Man and Mr. Syringe, and what looks to be a Discarded "Magazine" with sticky pages. Luckily for the games rating, the final "Trash Can Germs" mini-game is hosted by Guffo, a sentient can of baked beans.
- The Superstash Clockwork Switch was originally meant to be featured in a "Coke Can", before it was replaced with an upturned Plastic Bottle so its contents could be viewed while inside the Trash Can. The plastic bottle was then replaced with an upright glass "Dud" bottle of beer, before the label was substituted for "Jolly's Juice" in the final game.
- The Inside of the Trash Can was originally meant to feature "sneaky references to other games". This idea was abandoned in the final game, likely to avoid disparaging rival studios. The idea was embraced in Banjo-Kazooie: Nuts & Bolts, however, as Guffo's Trash Can reappears in BanjoLand and has been filled with copies of "Grabbed by the Ghoulies", an Xbox title from the Banjo team that was infamous for it's lacklustre sales.
Glowbo Cave/Mingy Jongo Boss: 29-7-97 |
|---|
 |
Glowbo Cave/Mingy Jongo Boss 29-7-97:
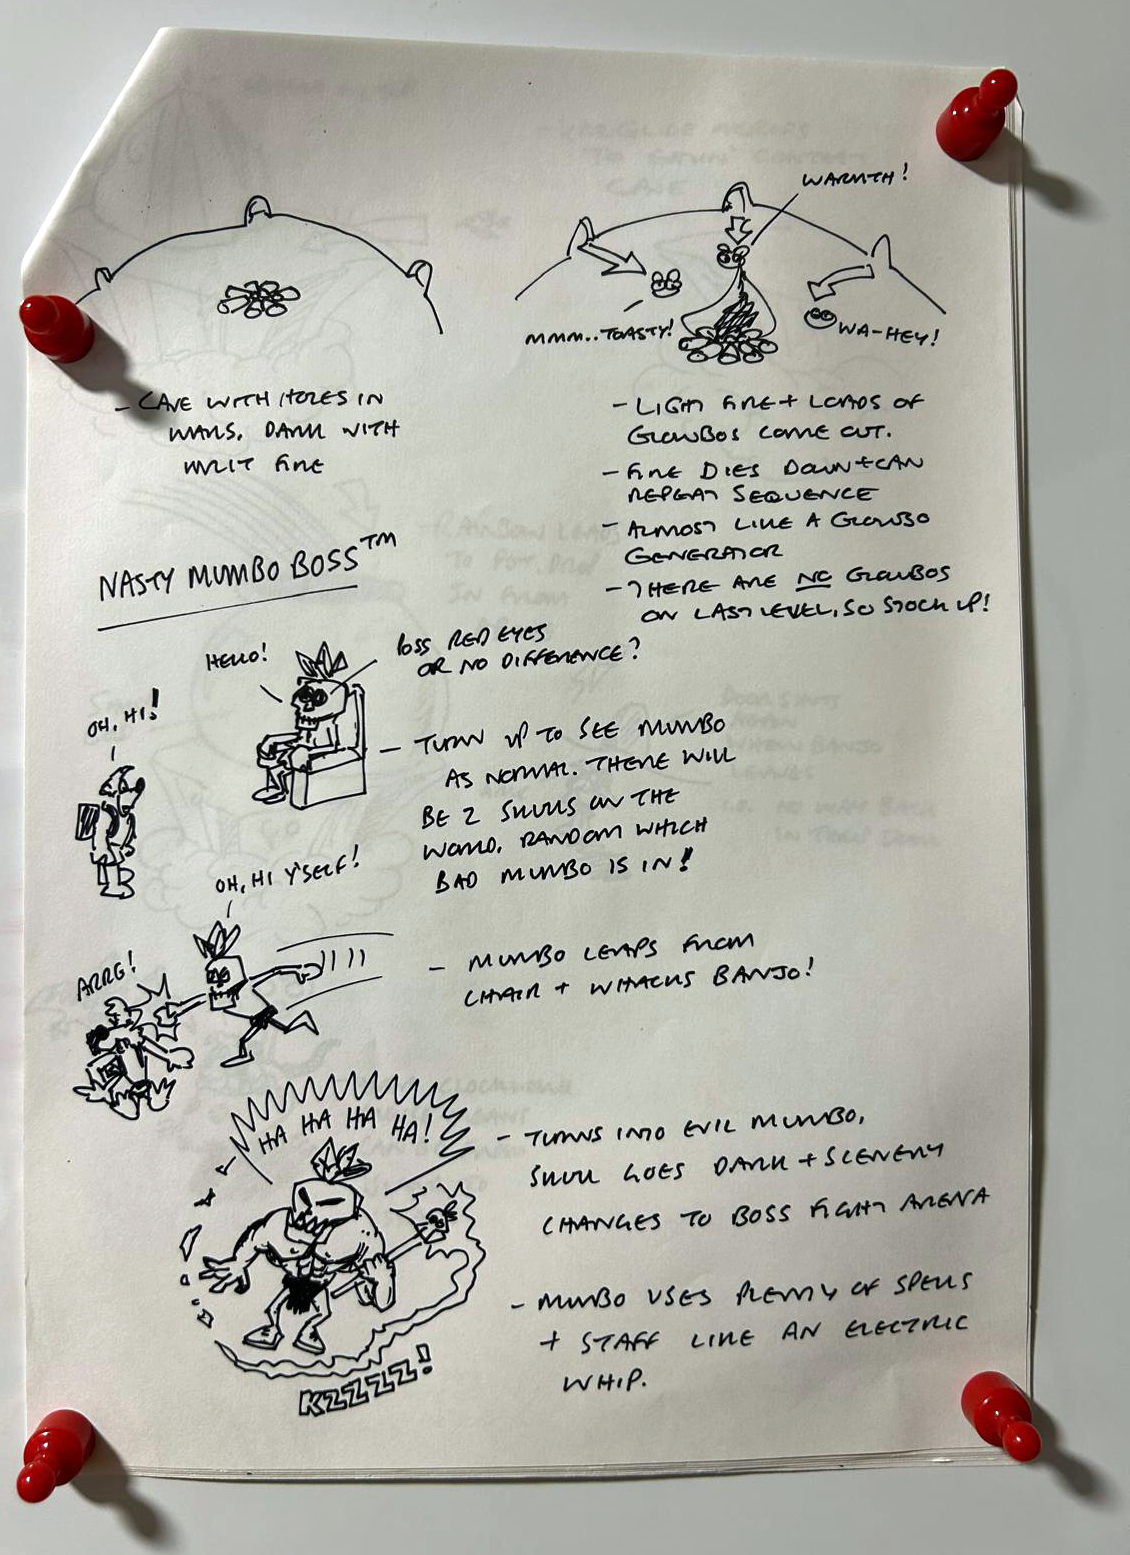
- An unused location that had confused Banjo fans for decades, "Glowbo Cave" was discovered by name only in the code of Banjo-Tooie, under the index entries for Cloud Cuckooland. In the design document, Banjo and Kazooie would enter a cave in Cloud Cuckooland, discovering an unlit fire in the center of the room. Lighting the pyre with Fire Eggs would cause Glowbo's to race out from surrounding crevices in the walls for warmth, where they could then be collected by players, en masse.
- The design specifies that no Glowbo's were planned for Cauldron Keep, so players should use this area as a "Glowbo Generator" and "stock up" - this infers that the Glowbo's in Banjo-Tooie might have functioned on a per-use system at one point in development, with each re-visit to Mumbo or Humba requiring the use of a Glowbo. In the final game, there are two Glowbo's in each world intended for use by Humba and Mumbo - once a Glowbo is used, any re-visit is free of charge.
- As there is no need to stock up on Glowbos in this capacity, Glowbo Cave got as far as receiving an index entry, but the location was ultimately removed in the final game.
- Mingy Jongo was originally planned to have red eyes while in "disguise" to allude to its evil nature. This idea was not used, as it was more effective to keep it a surprise and have Evil Mumbo's attack as the big reveal.
- Mingy Jongo was originally meant to have magic from his staff extend into an electric whip, which would be swung as a melee attack. In the final game, the staff is used only to fire magic spells as projectiles.
Cauldron Keep#
Castle #1 Exterior: 9-11-99 |
Castle #18 Rooftops: 21-9-98 |
Castle # 11 Glide Tower/Treasure Chamber: 4-11-99 |
|---|---|---|
 |
 |
 |
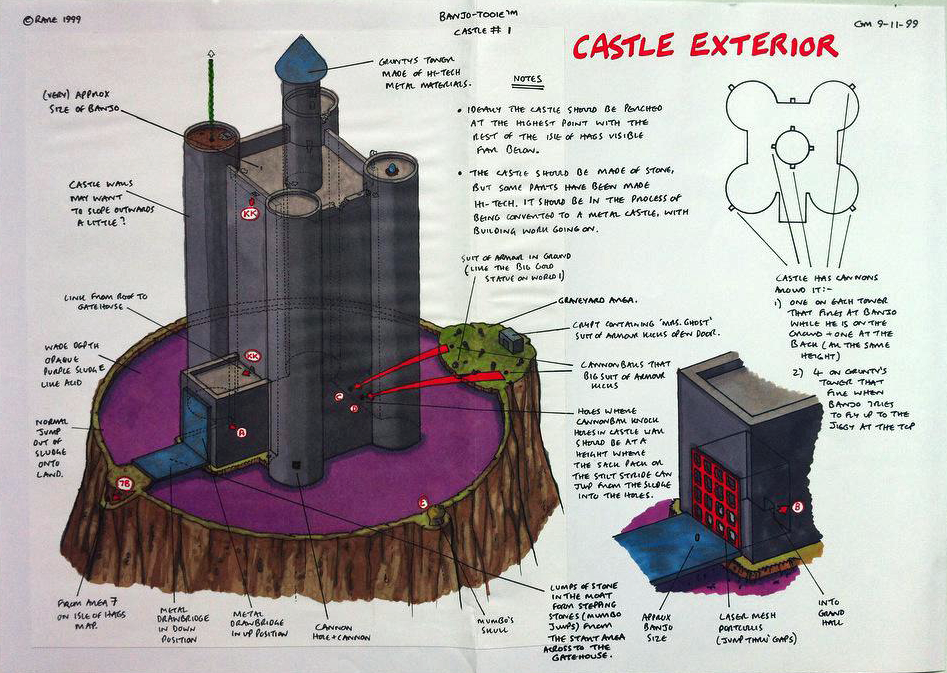
While Cauldron Keep does appear in Banjo-Tooie to host the Tower of Tragedy Quiz, and the final showdown against Gruntilda, it was originally planned to serve as the games final level, with 10 further Jiggies to collect. As development continued and it was evident that there wouldn't be time to include Cauldron Keep as an entire level, it was downsized to its role in the final game. If the level were included, players would be able to collect 100 Jiggies within Banjo-Tooie, just like its predecessor - as it stands currently, a 100% file in Banjo-Tooie will have a total of 90 Jiggies.
Castle #1 Exterior: 9-11-99
- Cauldron Keep's original design was envisioned as a traditional castle, with four turrets and a central tower. In the final game, Cauldron Keep is one large central tower.
- The fortress would have been fortified with cannons on each of the towers, facing outward, that would fire at Banjo when he was near. A single cannon was placed on the back of Cauldron Keep, with four further cannons on Grunty's central tower, meant to fire at Banjo when attempting to fly up to the Jiggy on the top.
- Mumbo's Skull was originally placed on the outer rim, with lumps of stone in the moat that he could use to jump across to enter the Gatehouse. In the final game, Mumbo's Skull is not present on the outer rim, as he has no magic tasks to accomplish in Cauldron Keep.
- The rear of Cauldron Keep originally featured a Graveyard, along with a suit of armor that Mumbo could enchant like the Golden Goliath in Mayahem Temple. Thanks to designer Gregg Mayles, we have learned that the suit of armor would have been dubbed 'Biggerax'. This enchanted suit of armor would have been able to kick down the door of the Crypt to free 'Mrs. Ghost', a character whom Banjo would need to reunite with a 'Mr. Ghost'. In the final game, the Ghost couple, the Crypt, Graveyard and Biggerax were removed from Cauldron Keep.
- Biggerax was meant to kick the cannonballs into the rear of the castle to create makeshift entrances for Banjo and Kazooie. In the final game, the only means to enter Cauldron Keep is through the front entrance.
- As in the final game, Cauldron Keep featured a laser grid portcullis that could be leapt through. Unlike the final game, however, there doesn't appear to be a means to turn off the grid via switch.
- The Split-Up Pads would have originally been much found deeper in the level, in the final game players can discover Split-Up Pads in front of the drawbridge as they approach Cauldron Keep.
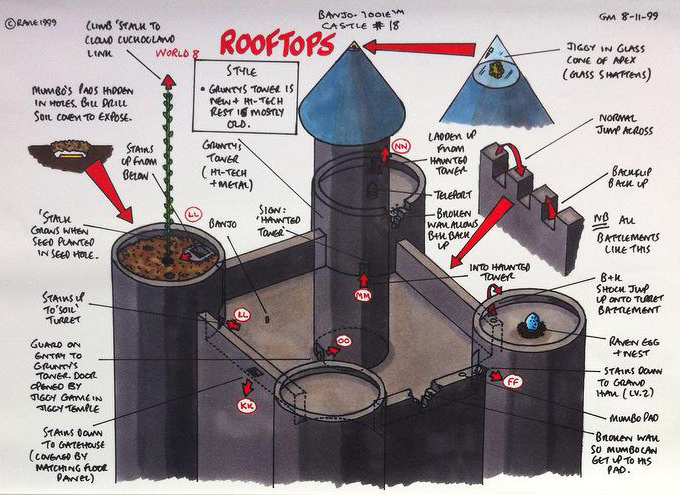
Castle #18 Rooftops: 21-9-98
- One of the turrets, designated as the 'Soil Turret' would have allowed Banjo to plant a seed that would grow a long stalk upwards. Climbing said stalk would have connected to the previous level, Cloud Cuckooland. In the final game, there is no connection between Cauldron Keep and Cloud Cuckooland, but it serves as the reason for including a Jelly "Castle" in the final game, as it would have linked the two.
- It's inferred that the "Haunted Tower" would have been where Banjo and Kazooie would encounter "Mr. Ghost", who would teach the duo how to be scary if they could reunite him with his deceased wife. Luckily, this could be accomplished by having Biggerax knock down the Crypt door in the Graveyard to free her.
- Banjo and Kazooie would have originally fought Gruntilda's sisters - Mingella and Blobbelda - inside Grunty's Tower, one at a time before leading up to Gruntilda at the top. In the final game, Mingella and Blobbelda are defeated during the Tower of Tragedy Quiz, leading to a fight with Gruntilda at the top of Cauldron Keep.
- Grunty's Tower originally featured a Jiggy at the apex in glass cone, which would shatter to allow for its collection. This was removed in the final game.
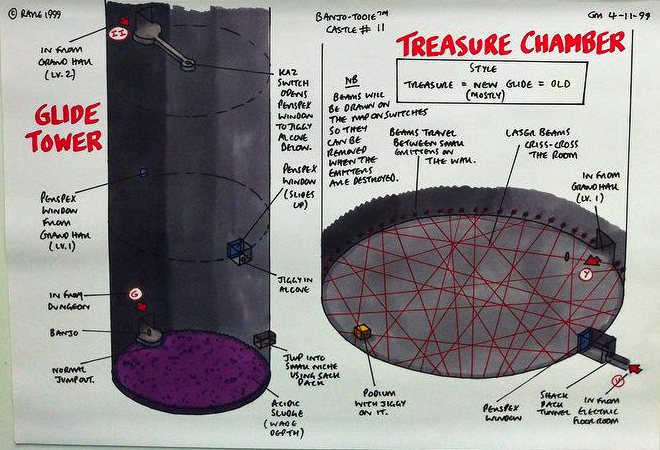
Castle # 11 Glide Tower/Treasure Chamber: 4-11-99
- The Glide Tower and the Treasure Chamber are locations wholly removed from Banjo-Tooie. In the final game, the only locations that exist inside Cauldron Keep are the Gatehouse, the Tower of Tragedy Quiz, and the Gun Chamber.
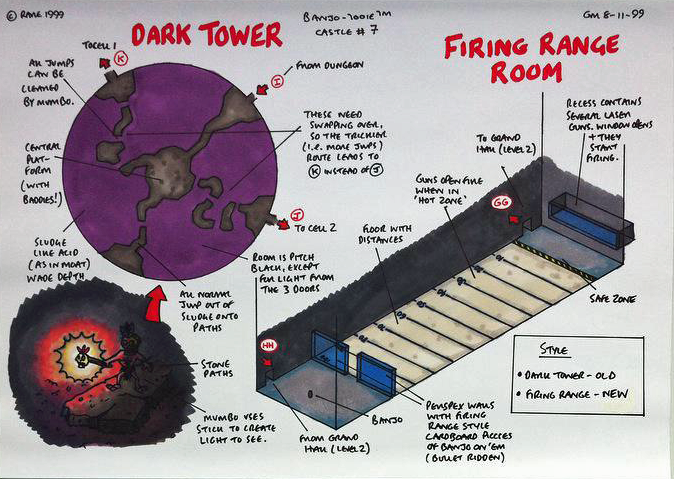
Castle #7 Dark Tower/Firing Range: 8-11-99 |
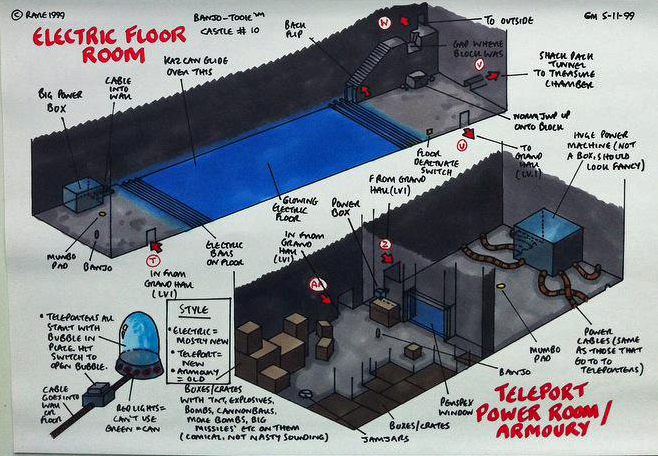
Castle #10 Electric Floor/Armoury: 5-11-99 |
|---|---|
 |
 |
Castle #7 Dark Tower/Firing Range: 8-11-99
- The "Dark Tower" was closest in proximity to the 'Cell 1', 'Cell 2' and 'Dungeon', providing a connection to the Cells found in Glitter Gulch Mine, and the Worker's Quarters in Grunty Industries, respectively. When Cauldron Keep was removed, the cells followed and so did any link to Glitter Gulch Mine and Grunty Industries.
- Both the Dark Tower, and the Firing Range were removed in the final release of Banjo-Tooie.
Castle #10 Electric Floor/Armoury: 5-11-99
- This document lists the earliest known appearance of Jamjar's Silo, as previous documentation listed Bottles.
- Prior to the inclusion of Warp Pads, Cauldron Keep would have originally featured teleporters around the castle. It's unknown whether these teleporters would have remained after the inclusion of the Warp Pads, if the level made it into the final game.
- Both the Electric Floor Room, and the Teleport Power Room/Armoury were removed in the final release of Banjo-Tooie.
Chuffy#
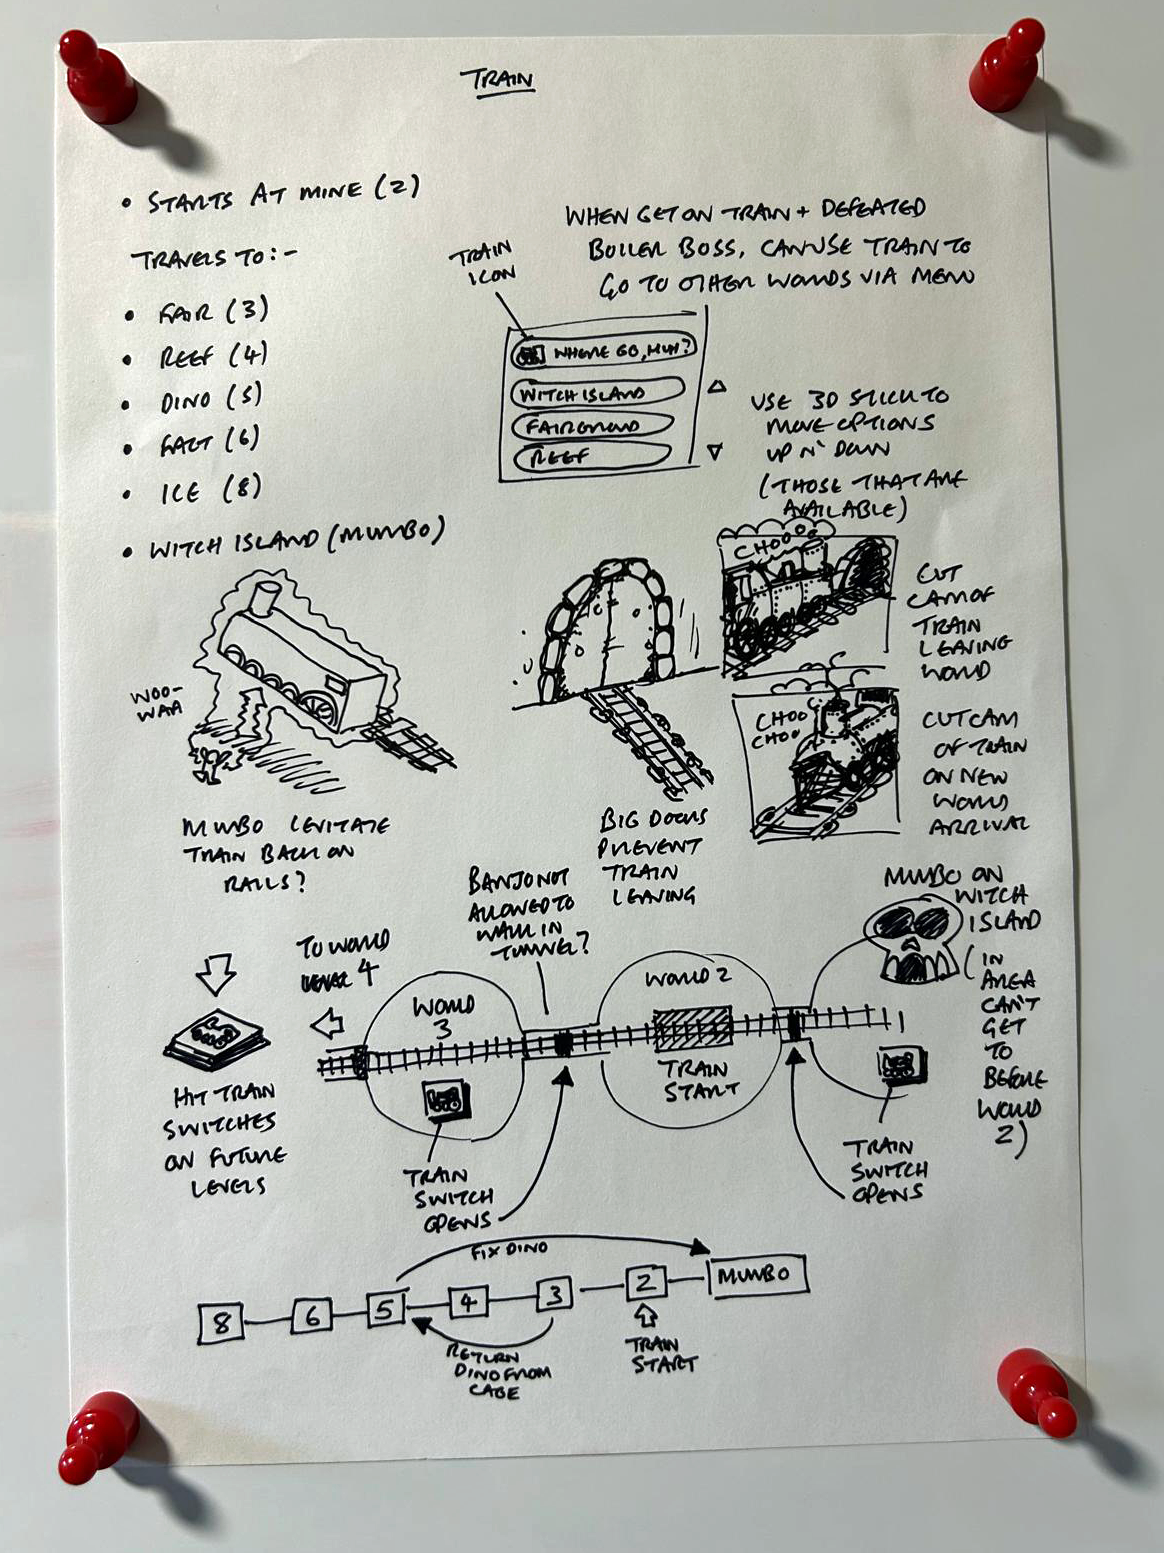 |
- This document plots out Chuffy's role within Banjo-Tooie, starting from levitating the Train back onto the tracks with Mumbo in Glitter Gulch Mine, train switches, travel between the worlds and early chronological planning for transporting the Styracosaurus family.
- Transportation to "Reef (4)" confirms that you were once able to use the train to travel to Jolly Roger's Lagoon. In the final game, it is impossible to reach Jolly Roger's Lagoon (along with Mayahem Temple and Cloud Cuckoooland) by train.
Press Screenshots/Footage#

|
This needs some investigation. |
Various media released during development.
Witchyworld#
Warp Pad#
|
Early |
Final |
|---|---|

|
|
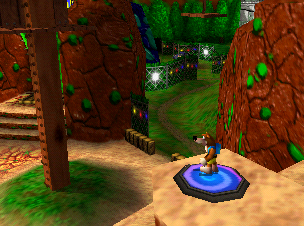
The warp pads originally had B-T on them. In the final game, they were changed to a blue swirl. Otherwise, everything else in this shot is final.
Dive of Death#

A screenshot of Kazooie on top of the Dive of Death. The level appearance is virtually the same as the final; however, Kazooie shouldn't be able to get up here alone since she can't climb ladders and there are no flight pads in the main area of the level. This may have been done using debug tools to show off both solo Kazooie and a bird's eye view of the level at the same time.
Terrydactyland#
|
Early |
Final |
|---|---|

|

|
- Terrydactyland received extensive retexturing as development continued.
Grunty Industries#
|
Early |
Final |
|---|---|

|
|
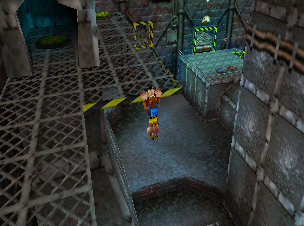
- In the first room of Grunty Industries, there was originally a worker enemy on one of the metal walkways. In the final game, there are no enemies up there.
- The vertex color lighting around the elevator shaft area is yellow and seems to radiate out from the shaft. A light was added to the wall above the shaft door in the final game, and the area's vertex colors were adjusted to a bright blue that spreads out wider.
- The elevator door and platform are also slightly narrower in the final game, and a floor gauge was added above the door.
|
Early |
Final |
|---|---|

|
|
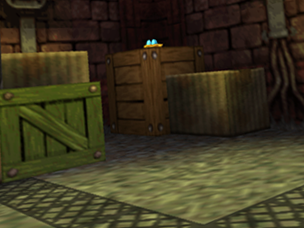
- The screenshot depicts Mumbo using his staff against a Tintop enemy amidst the crates on the third floor. This isn't possible in the final game, as the only foes in this area are the Nutta, Boltoid and Washup enemies.
- Players could originally find a Star Wars reference with a box marked "TK-421" on the third floor of Grunty Industries. In the final game, this box can only be found in the Train Station.
- Retexturing work on the crate and floor is notable, with the nondescript metal crate being replaced with a more traditional wooden variant.
Cloud Cuckooland#
|
Early |
Final |
|---|---|

|

|
- The brown bottle inside of the trashcan was originally called "Dud", with a logo design, seemingly intended as a parody of the "Bud" neck wrapper design on Budweiser beer bottles. In the final game, it was changed to "Jolly's Juice". This was probably done to comply with Nintendo's standards regarding references to alcohol and/or the similarity to the "Bud" logo.
- Interestingly, the screenshot with the original texture is used for one of the framed pictures in Banjoland in Nuts & Bolts.
Humba#
|
Early |
Final |
|---|---|

|

|
- Humba originally wore a red dress. In the final game, she wears a yellow dress. A portrait of her in her original red dress is seen in the Worker's Quarters in Grunty Industries in the final cut of the game. She also has simpler facial features, with no eyelids, very small eyelashes, and either no lipstick or no mouth texture altogether.
- In her dialogue icon, she appears to be wearing a mask over the lower part of her face.
- The Mumbo token icon from Banjo-Kazooie is present in the item counter in the lower right, rather than a Glowbo icon. This was likely a placeholder until the Glowbos were implemented.
- Humba's book of spells is not visible next to her.
SpaceWorld 2000#
Watch on YouTubeA Japanese demo that was playable at SpaceWorld 2000 which doesn't appear to be much different from the final game; many of the differences involve the demo mode and localization specifications. Banjo-Tooie footage starts at 43:34 in the video.
Opening and Title Screen#
Dolby Digital#
- The copyright text for Dolby Digital is in Japanese. The font is much larger and uses what may be the same font as the copyright text below. The final version uses English text (and font, size, etc) identical to the original English version.
Logo#
|
Early |
Final |
|---|---|
|
|
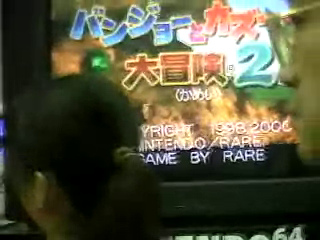
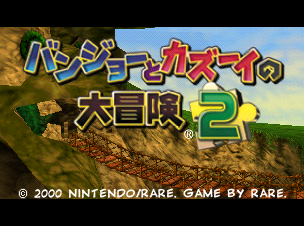
- "大冒険", "の", and "と" are bright red with a gradient in the demo. In the final, these letters are dark red with no gradient.
- The 2 is a different font with no Jiggy behind it. The final font is more angular to match the rest of the logo.
- The trademark ® is placed right in the middle between 険 and 2, rather than being by the bottom of the two symbols.
- The text (かめい)(kamei) is underneath the logo. This is likely meant to be read as 仮名 "temporary name".
- The copyright text is much larger and in a different font; the final game uses the same font and wording as the English version.
- "Copyright" is spelled out instead of using ©, and the years are 1998-2000 rather than just 2000 in the final.
- There are no periods used in the copyright text.
Menu#
The demo menu is a simple dialogue-head menu and uses a screenshot of Kazooie flying over Grunty Industries as a background. These menus correspond to unused text left in the final game (but in Japanese.)
Top Menu#
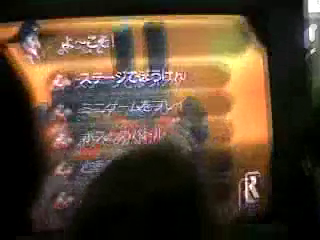
The top menu lets players select various game modes.
Original |
Translation |
|---|---|
よ〜こそ! みなさん。 |
Welcome, everyone! |
ステージでぼうけん |
Explore worlds |
ミニゲームをプレイ |
Play minigames |
ボスとのバトル |
Boss battles |
とま(obscured)ん! |
(Likely "multiplayer madness!") |
(obscured) |
(Likely "story and game info") |
Level Select#
The first option lists levels:
Original |
Translation |
|---|---|
ステ〜ジをえらぶがよい。 |
Select a stage. |
マヤヤンしんでん |
Mayahem Temple |
ウイッチわーるど |
Witchyworld |
ジョリーのリゾート |
Jolly Roger's Lagoon |
グラ(obscured) likely グランティさんぎょう |
Grunty Industries |
- All level names are the same as the final.
Gameplay#
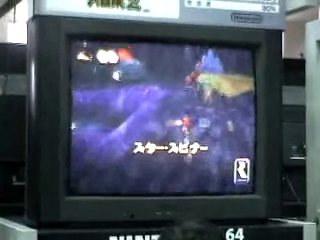
As often is the case with Rare's game demos, a rotating Rare logo is always shown at the bottom right during gameplay. Minigame counters layer on top of the logo so as not to impede gameplay.
To Be Incorporated#
|
|
To do: |
- By exploiting a glitch, you can reach the ledge in Jinjo Village that leads to the Wooded Hollow that you normally can't without the Grip Grab. If you do so before you talk to King Jingaling, he will stop you from entering and tell you to talk to him.
- A similar glitch can be used to reach the ledge to the Plateau in the Wooded Hollow, but an invisible wall will prevent you from going further.
References#
- https://web.archive.org/web/20000817193445/http://www.rareware.com/affairs/tepid/banjteam.html↩︎
- https://web.archive.org/web/20000817152636/http://ign64.ign.com/news/5451.html↩︎
- https://web.archive.org/web/20000817193445/http://www.rareware.com/affairs/tepid/banjteam.html↩︎
- https://web.archive.org/web/20000817152618/http://ign64.ign.com/news/8398.html↩︎
- https://web.archive.org/web/20000817152555/http://ign64.ign.com/news/17334.html↩︎
- https://web.archive.org/web/20000817152547/http://ign64.ign.com/news/21211.html↩︎
- https://web.archive.org/web/20000817152530/http://ign64.ign.com/news/21923.html↩︎
- https://web.archive.org/web/20000815063032/http://ign64.ign.com/releases.html↩︎
- https://web.archive.org/web/20001018195255/http://ign64.ign.com/news/24413.html↩︎
- Comment text: As the other designer of Banjo-Tooie, I salute anyone that persevered to finish it. It was always intended to be more of an adventure game than a platform game (hence everything being interconnected), thanks in part to Ocarina of Time, which influenced us a lot. Grunty Industries was the first level I ever designed and it was an exercise in proving myself (though it was refined and approved by Gregg). What made sense on paper in the literal form of a map was much more difficult to navigate in-game and in-head. I'd like to say 20+ years of hindsight have highlighted how over-complicated and user-unfriendly Banjo-Tooie is at time but the truth is we knew almost immediately, before the game launched, but by then it was too late to do much about it, which leads me to: FUN FACT: the warp pads were added right at the end to aid navigation after all the other paths and connections were designed. Thanks to GMTK for this great analysis and to everyone else for playing.↩︎