This is a sub-page of Dance Dance Revolution Hottest Party.
All IDs which are not properly listed here are identical to the final game.
IDs 01-16#
ID 01 (1, 2 Step)#
Different charts: Difficult, Expert
Difficult
Chart Data
|
Early |
Final |
|---|---|
|
|
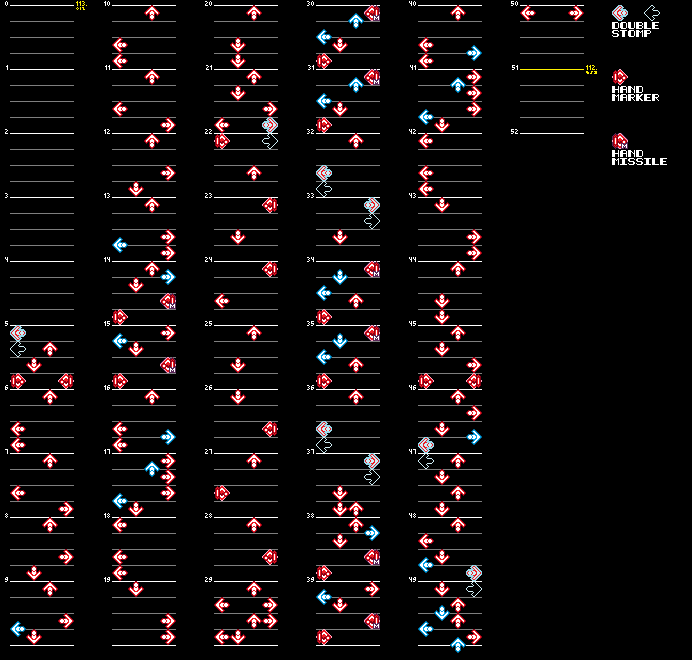
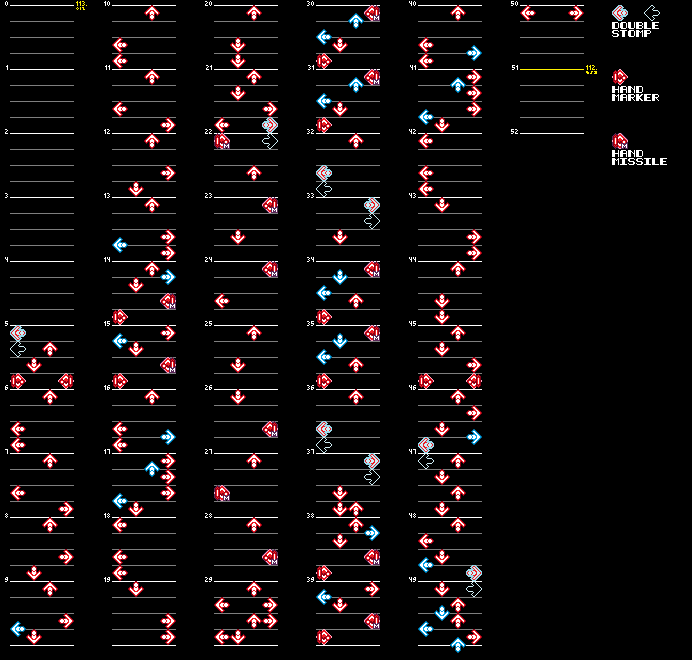
- All Hand Missiles from measures 22 to 28 were originally Hand Markers.
Expert
Chart Data
|
Early |
Final |
|---|---|
|
|
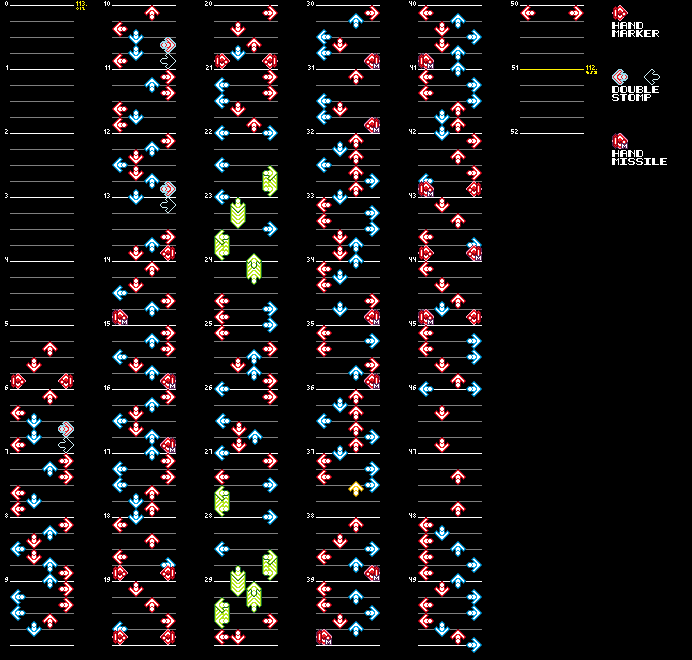
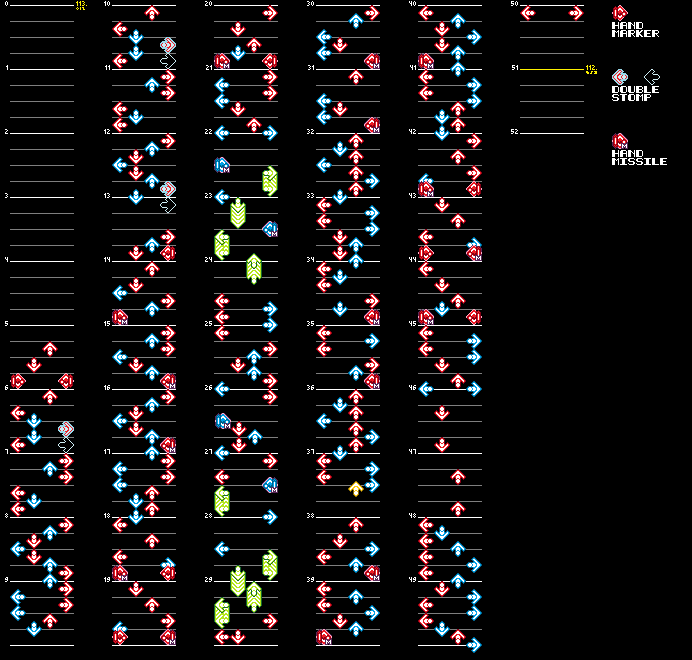
- There were originally no Hand Missiles between measures 18 and 28. In their place were Hand Markers and regular notes.
ID 04 (Finally)#
Different charts: Basic, Difficult, Beginner
Basic
Chart Data
|
Early |
Final |
|---|---|
|
|
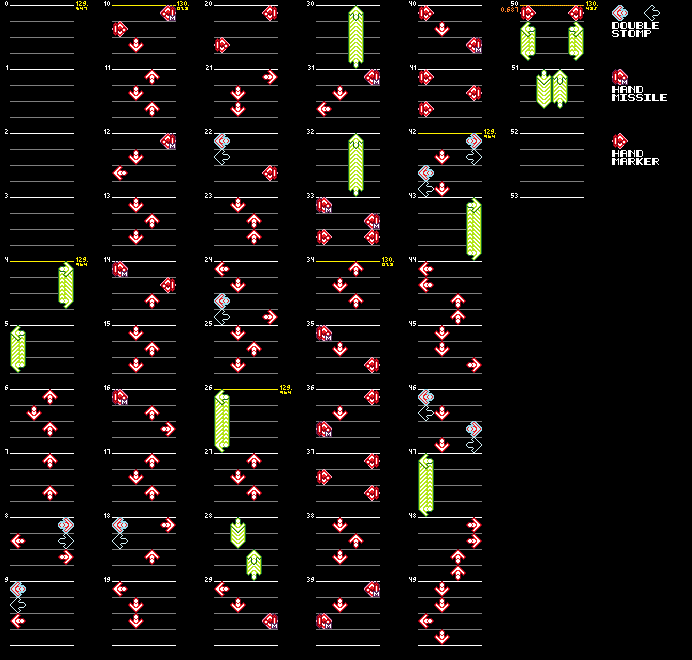
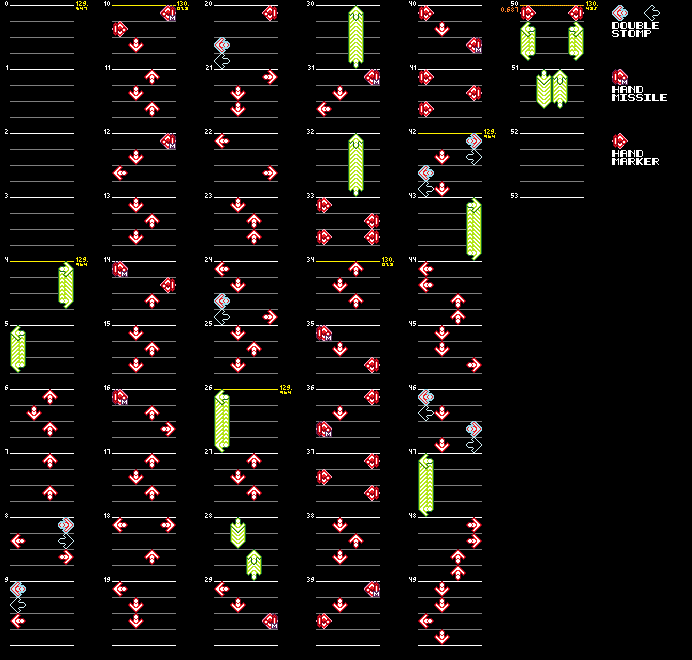
- There is a more extensive use of gimmicks:
- The left arrow in measure 18 is a Double Stomp rather than being gimmickless.
- The left arrow in measure 20 is a Hand Marker rather than a Double Stomp.
- Measure 22's left and right arrows were originally a Double Stomp and a Hand Marker, rather than being gimmickless.
- The first left and right arrows in measure 33, as well as the left arrow in measure 39 were Hand Missiles rather than Hand Markers.
Difficult
Chart Data
|
Early |
Final |
|---|---|
|
|
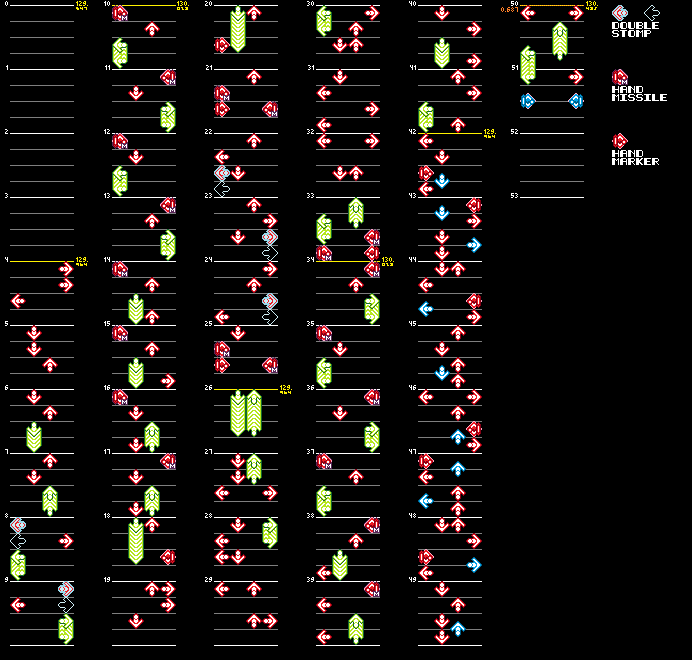
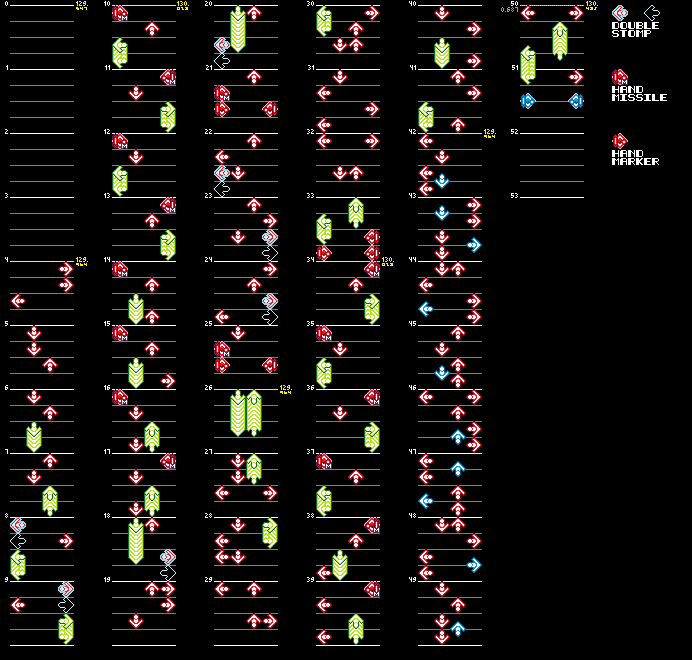
- There is a greater use of Hand Markers and Hand Missiles in the early chart.
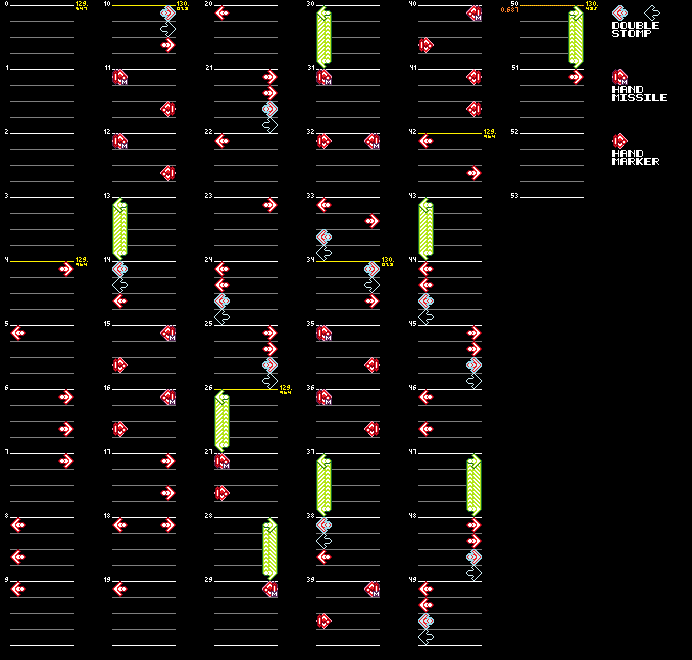
Beginner
Chart Data
|
Early |
Final |
|---|---|
|

|
- There were originally Double Stomps in measures 34 and 38.
ID 06 (Hot Stuff)#
Different charts: Basic, Difficult, Expert
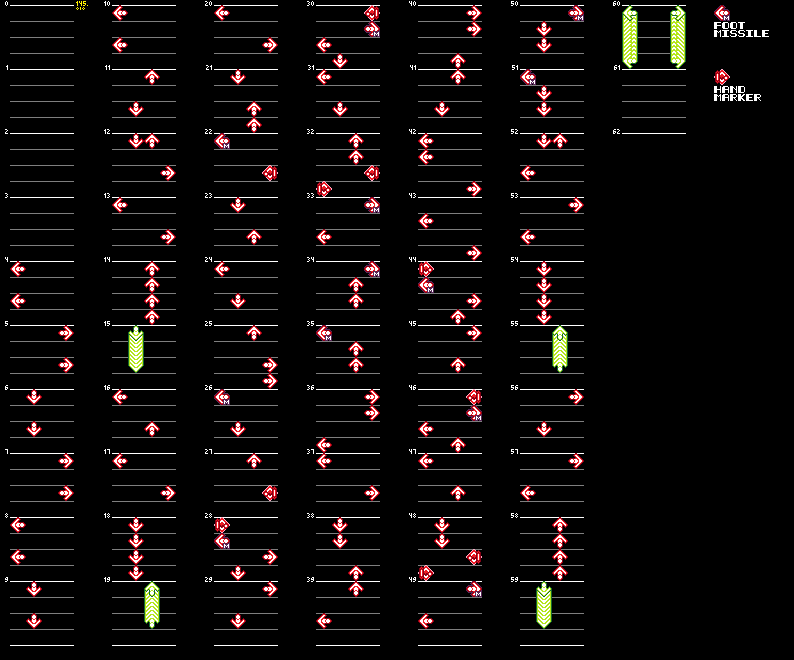
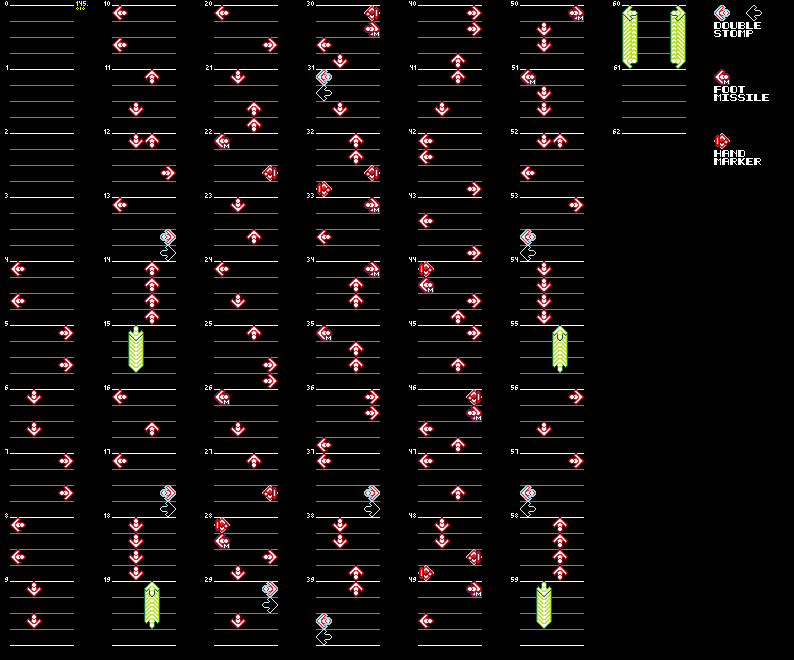
Common Difference
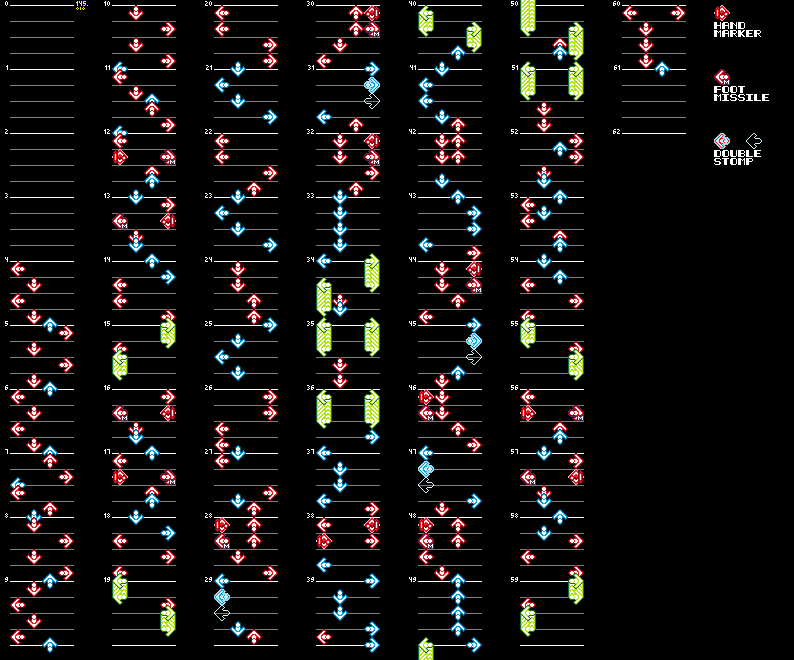
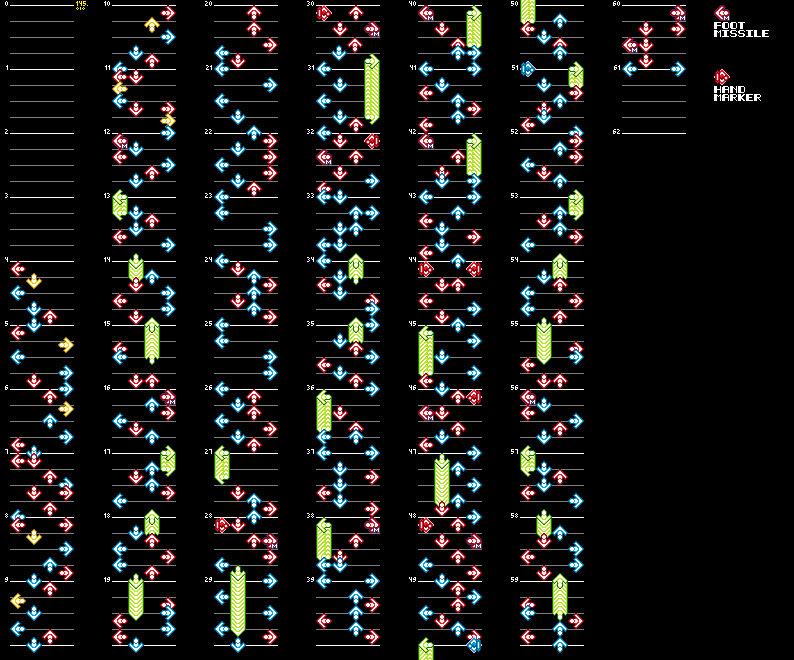
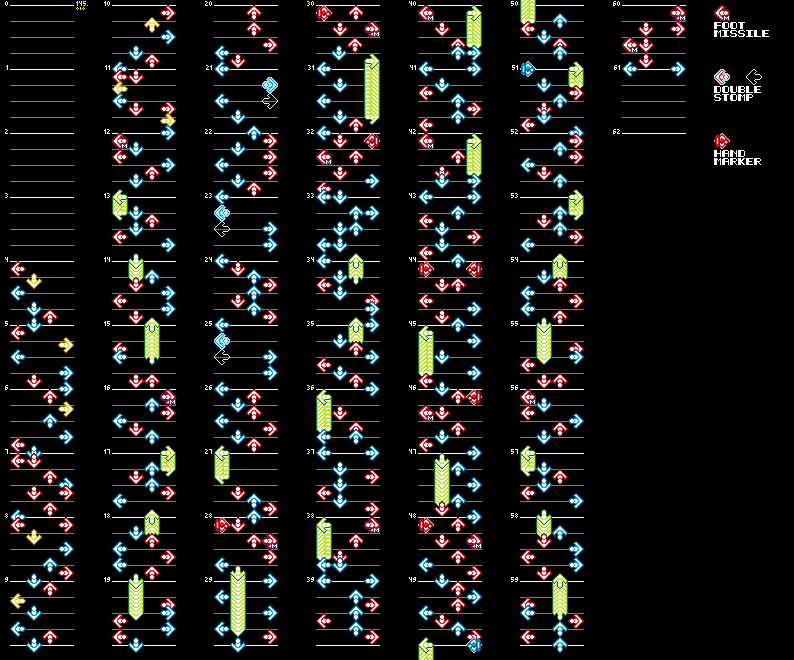
None of these early charts have Double Stomps. In all cases, there are regular notes where they would be.
Basic
Chart Data
|
Early |
Final |
|---|---|
|
|
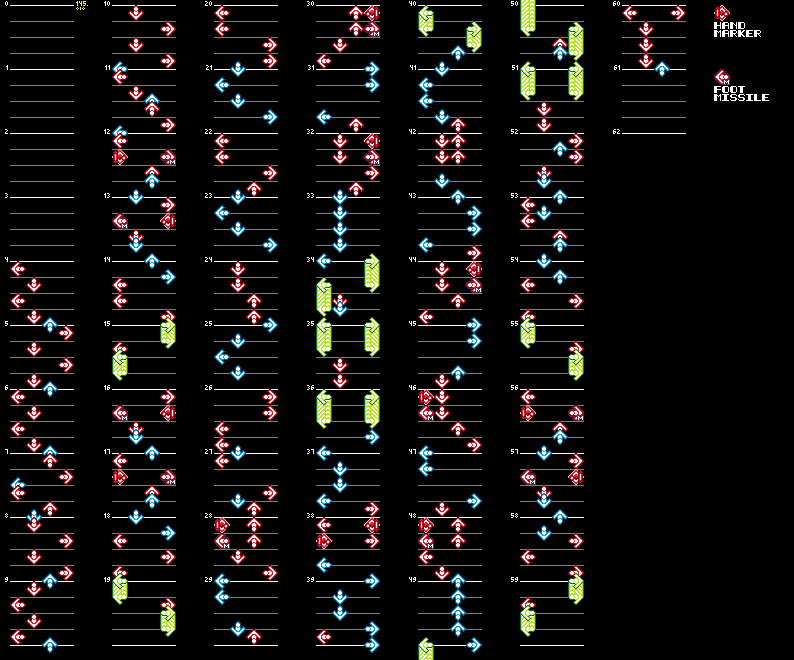
Difficult
Chart Data
|
Early |
Final |
|---|---|
|
|
Expert
Chart Data
|
Early |
Final |
|---|---|
|
|
ID 08 (Nothing But You)#
Different charts: Expert
Expert
Chart Data
|
Early |
Final |
|---|---|
|
|
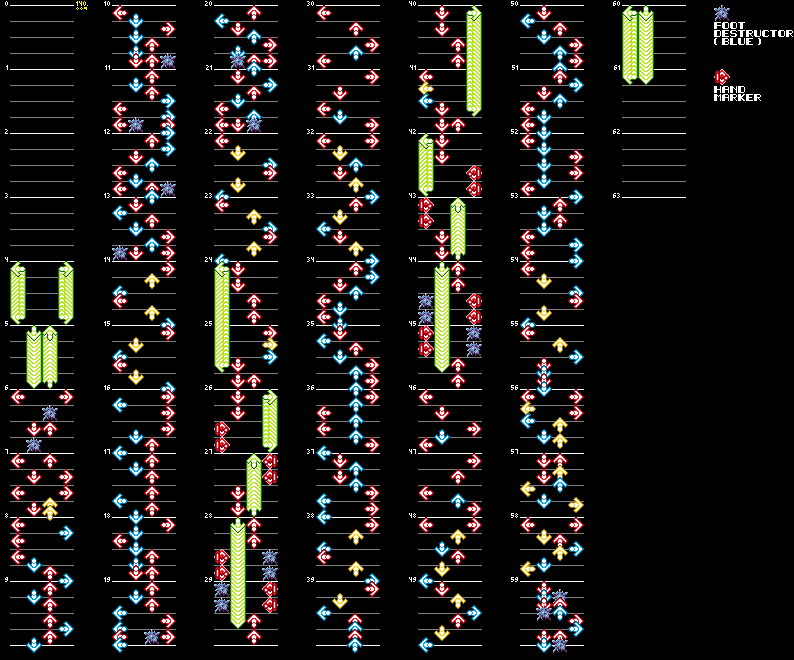
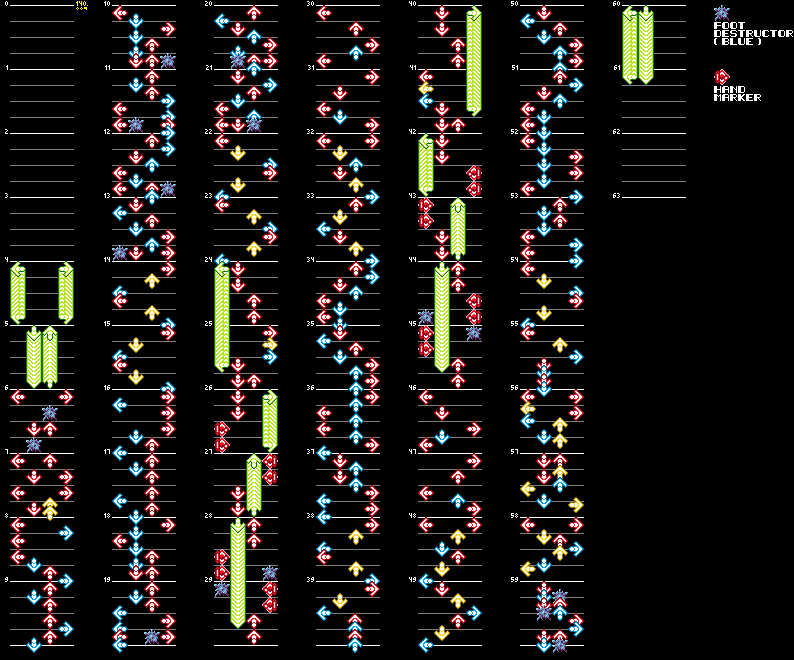
- There are slightly more Foot Destructors in measures 28, 29, 44 and 45.
ID 10 (Summertime)#
Different charts: Basic, Difficult, Expert, Beginner
Common Difference
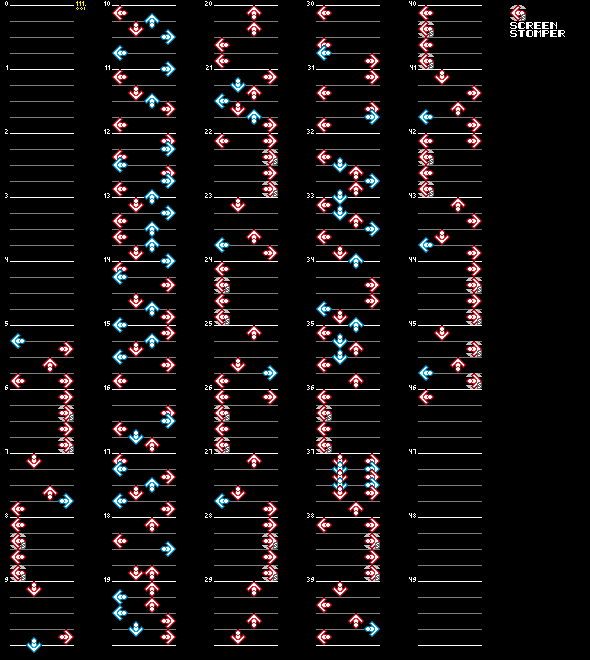
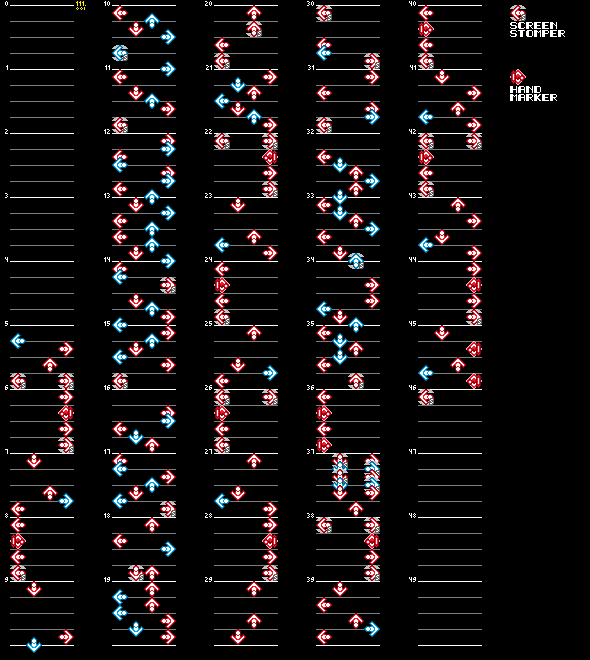
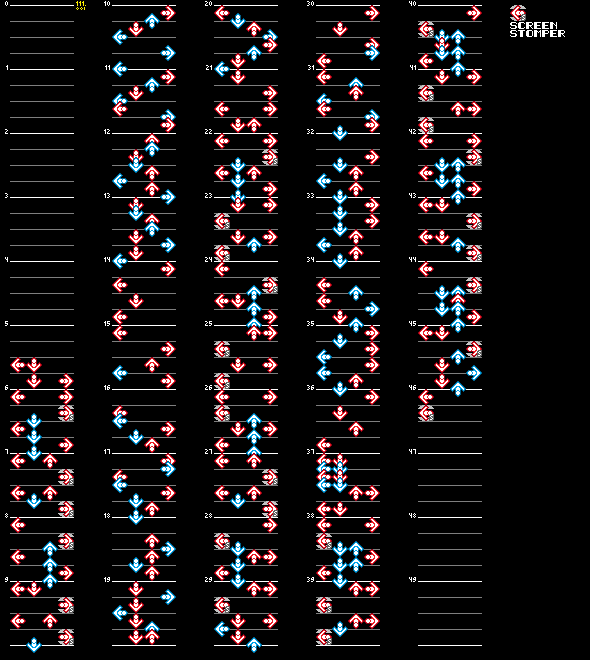
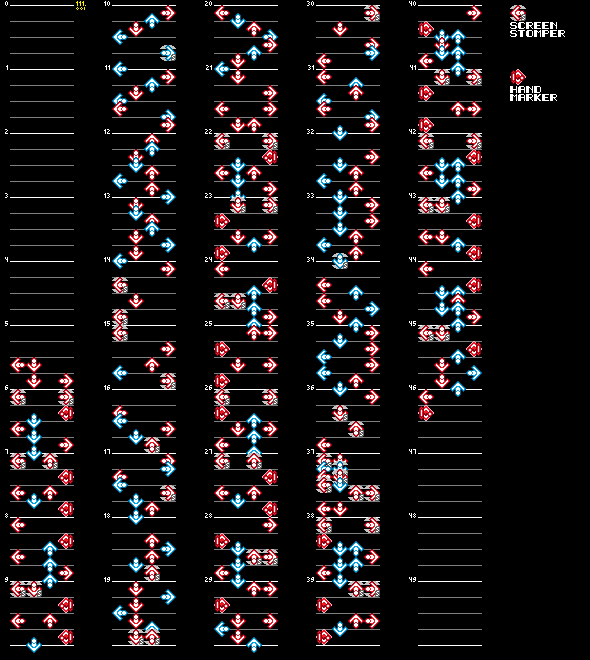
None of the early charts have Hand Markers. As a result of this, the gimmick arrangement is different in all charts.
Basic
Chart Data
|
Early |
Final |
|---|---|

|

|
Difficult
Chart Data
|
Early |
Final |
|---|---|
|
|
Expert
Chart Data
|
Early |
Final |
|---|---|
|
|
Beginner
Chart Data
|
Early |
Final |
|---|---|

|

|
ID 12 (You Spin Me 'Round (Like a Record))#
Different charts: Basic, Difficult, Expert, Beginner
Common Difference
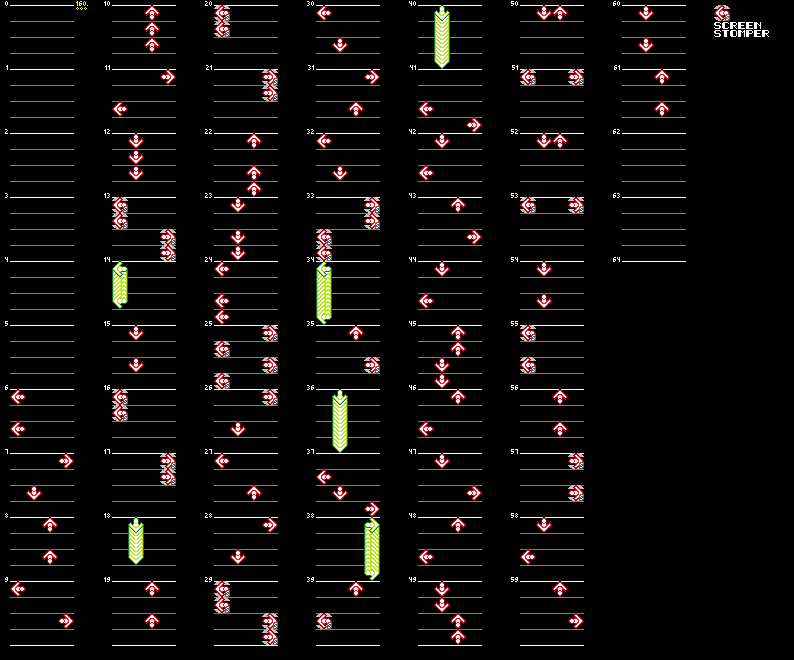
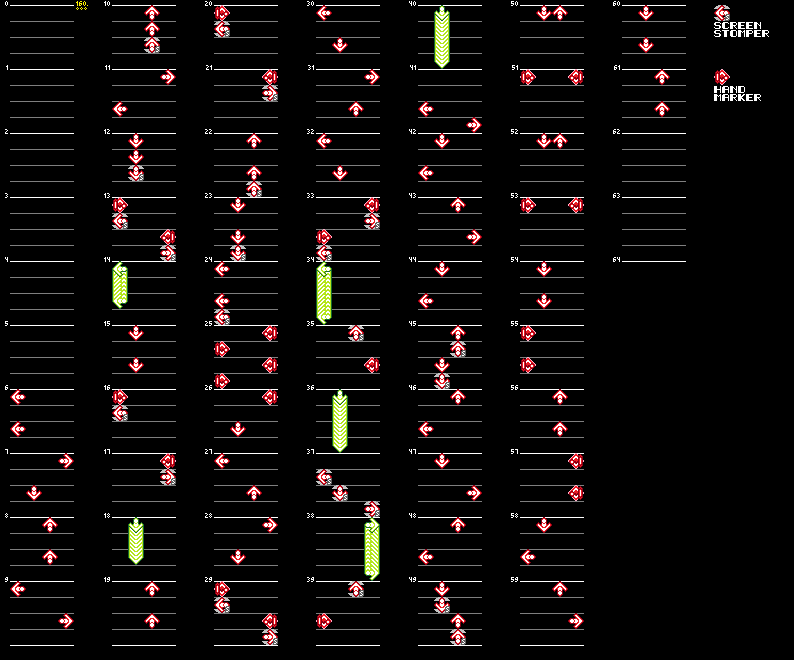
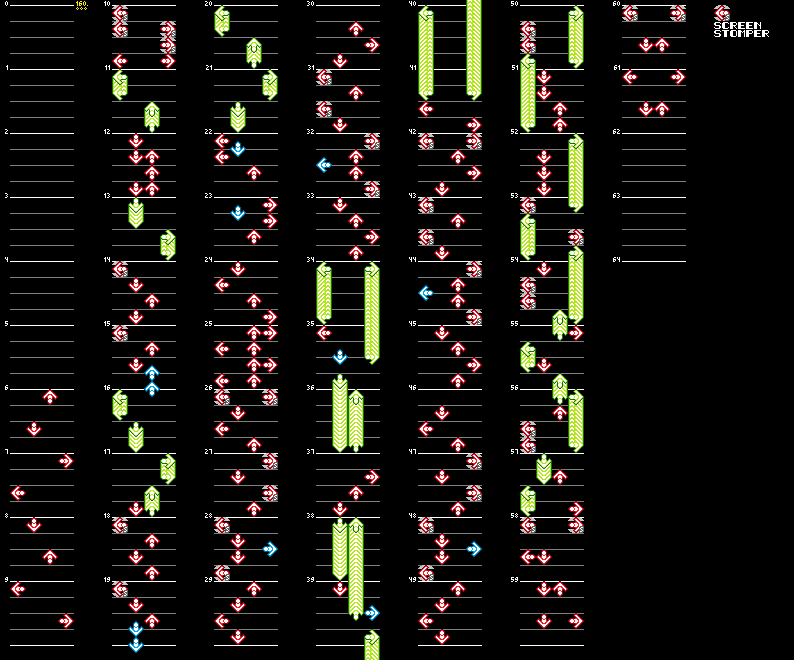
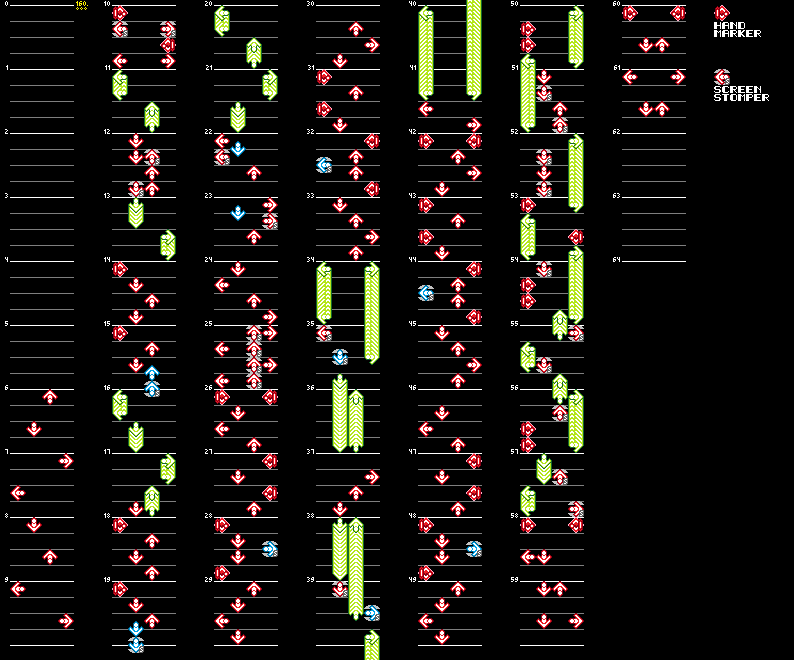
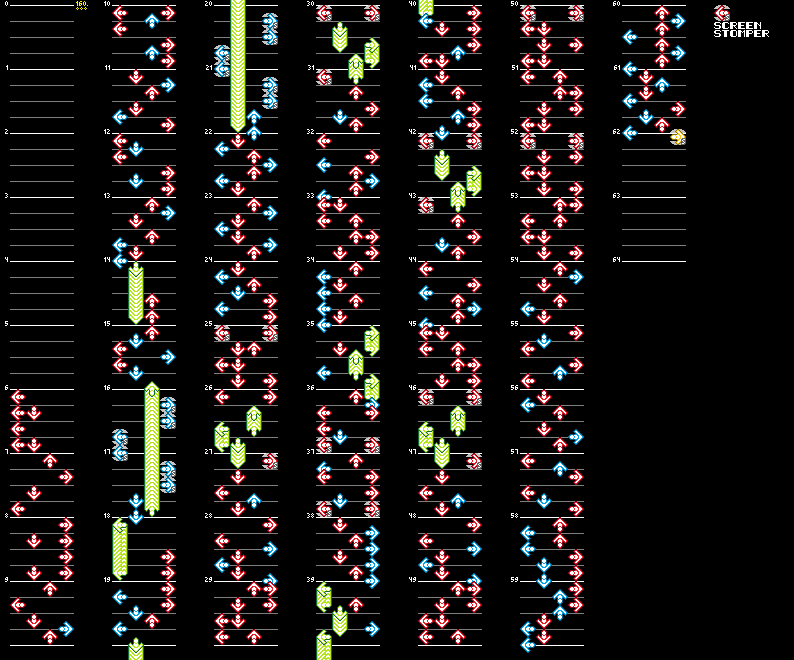
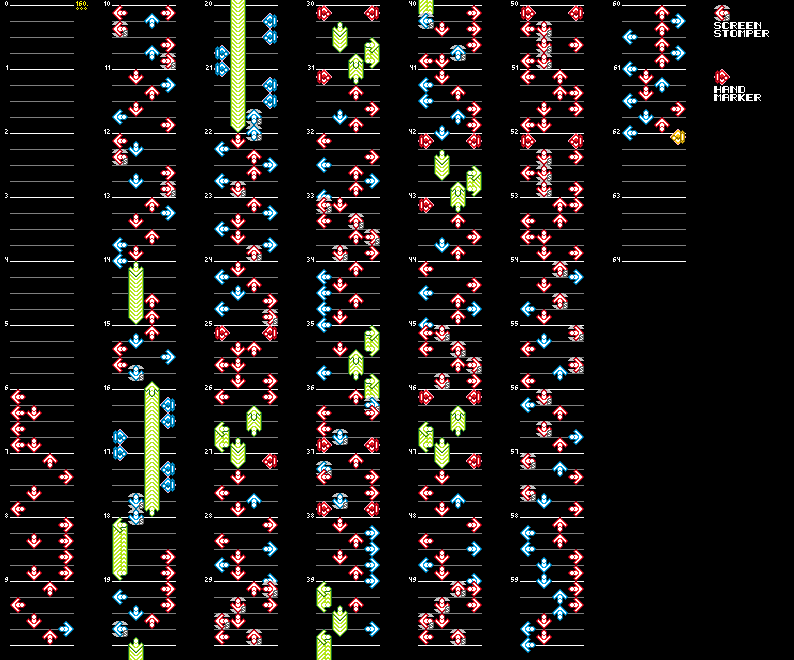
None of the early charts have Hand Markers. As a result of this, the gimmick arrangement is different in all charts.
Basic
Chart Data
|
Early |
Final |
|---|---|
|
|
Difficult
Chart Data
|
Early |
Final |
|---|---|
|
|
Expert
Chart Data
|
Early |
Final |
|---|---|
|
|
Beginner
Chart Data
|
Early |
Final |
|---|---|

|

|
ID 13 (Far Away)#
Different charts: Expert
Expert
Chart Data
|
Early |
Final |
|---|---|
|
|
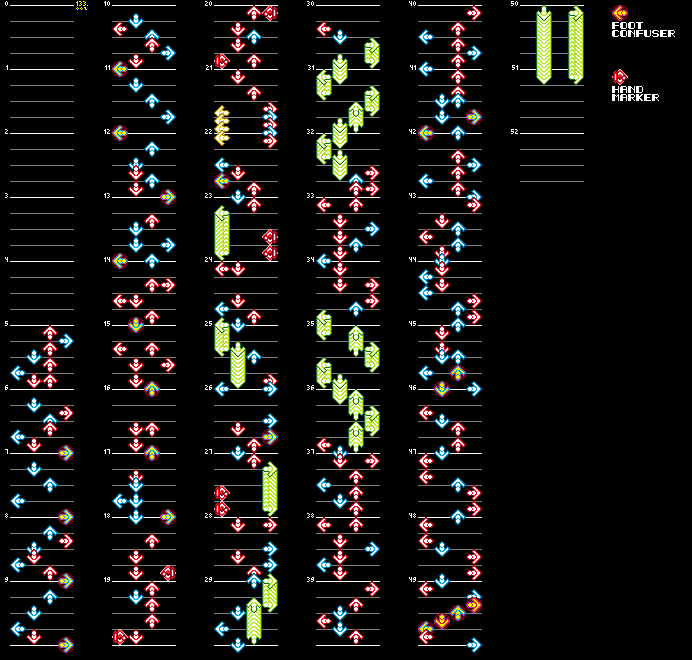
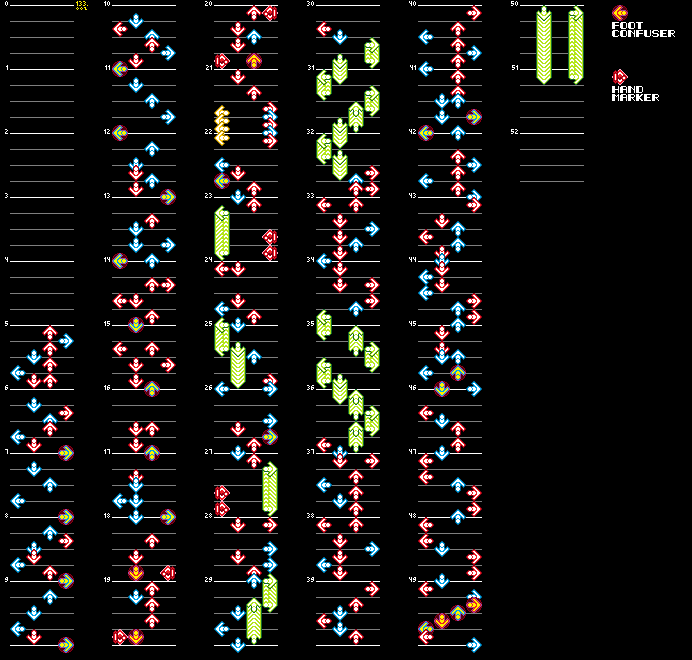
- There were originally no Foot Confusers between measures 18 to 21.
ID 14 (Lips of an Angel)#
Different charts: Basic, Difficult, Beginner
Common Difference
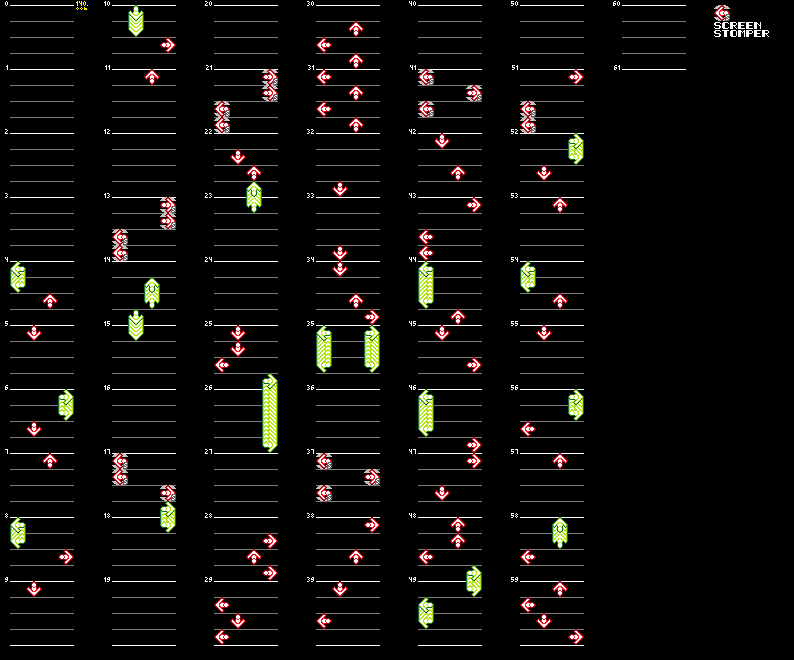
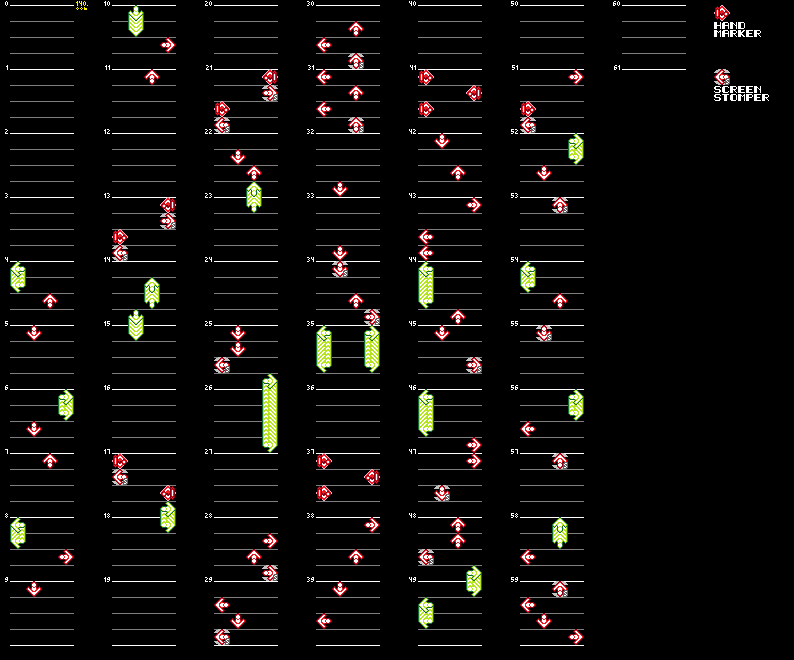
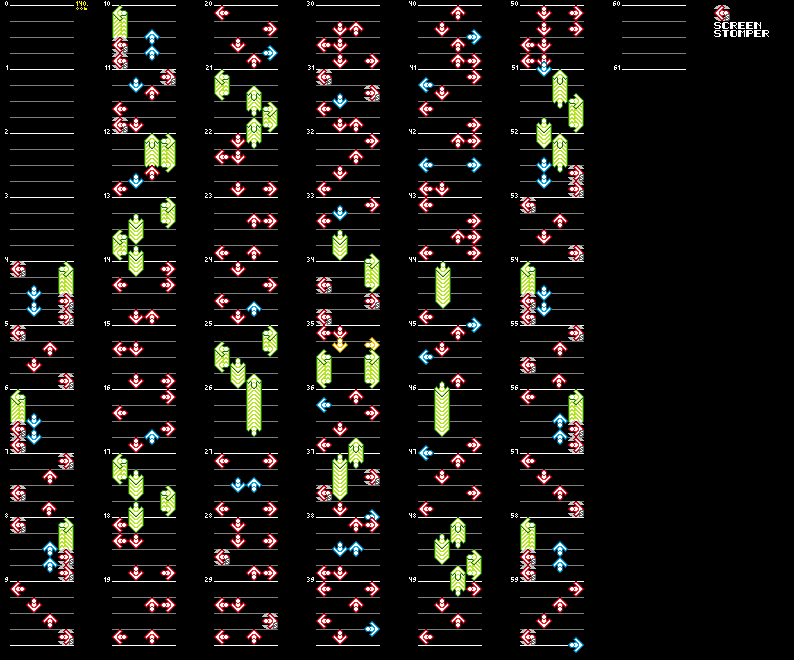
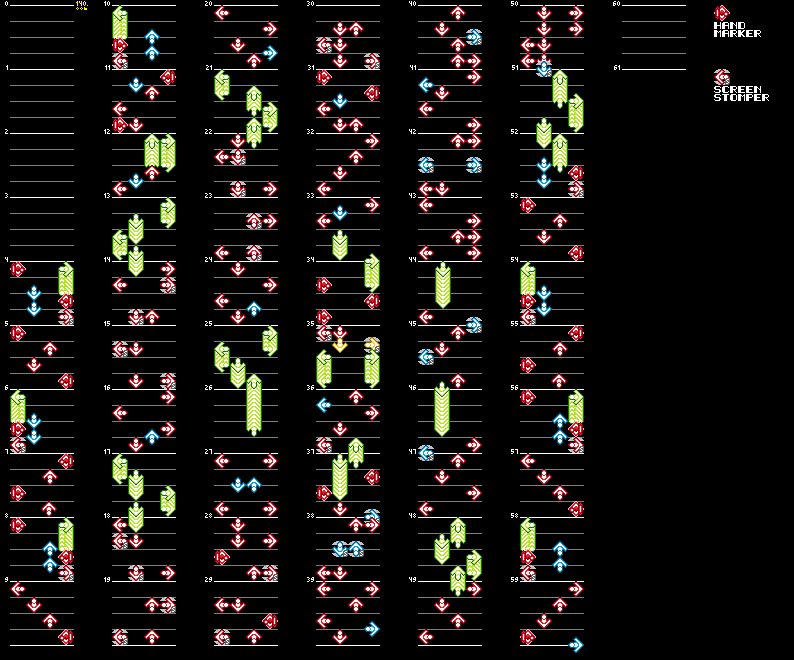
The early charts listed above don't have Hand Markers. As such, the gimmick arrangement is different.
Basic
Chart Data
|
Early |
Final |
|---|---|
|
|
Difficult
Chart Data
|
Early |
Final |
|---|---|
|
|
Beginner
Chart Data
|
Early |
Final |
|---|---|

|

|
- The Beginner chart originally had slightly more notes.
ID 15 (Call on Me)#
Different charts: Basic, Difficult, Expert
Basic
Chart Data
|
Early |
Final |
|---|---|
|
|
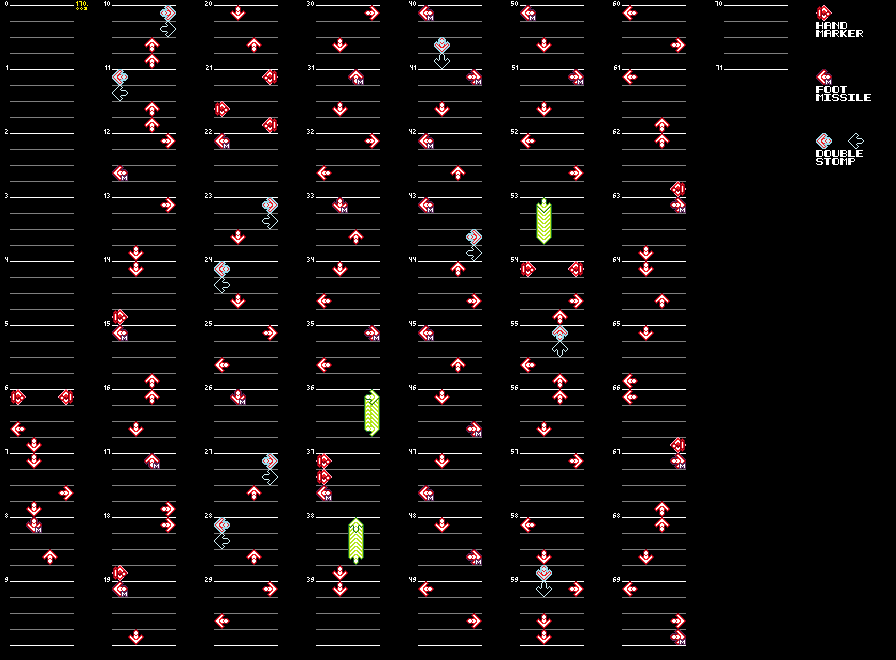
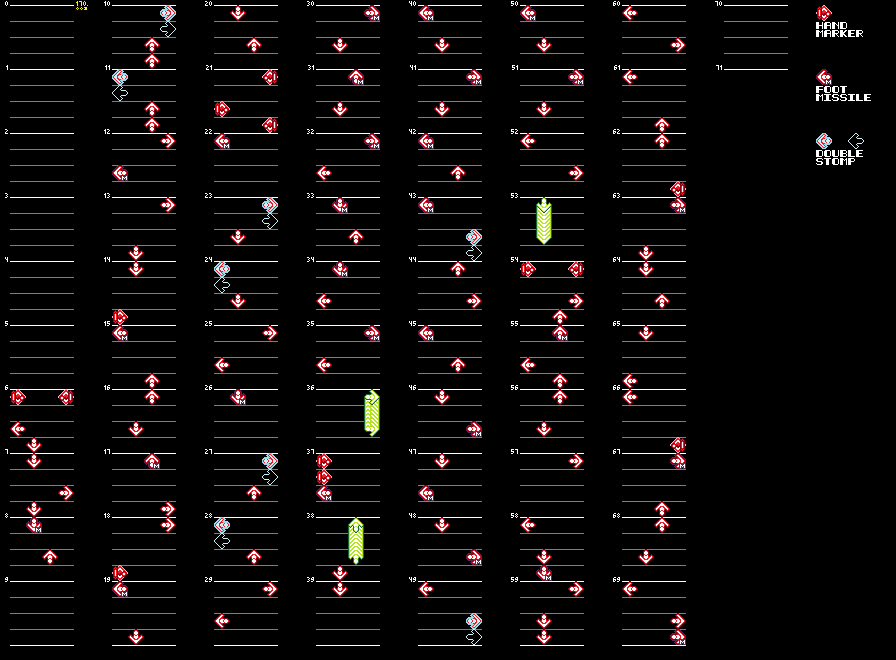
- There are less Foot Missiles between measures 30 and 36.
- The down arrow in measure 40 was originally a Double Stomp. Likewise, the right arrow in measure 49 was originally just a regular arrow.
- The Foot Missiles in measures 55 and 58 were originally Double Stomps.
Difficult
Chart Data
|
Early |
Final |
|---|---|
|
|
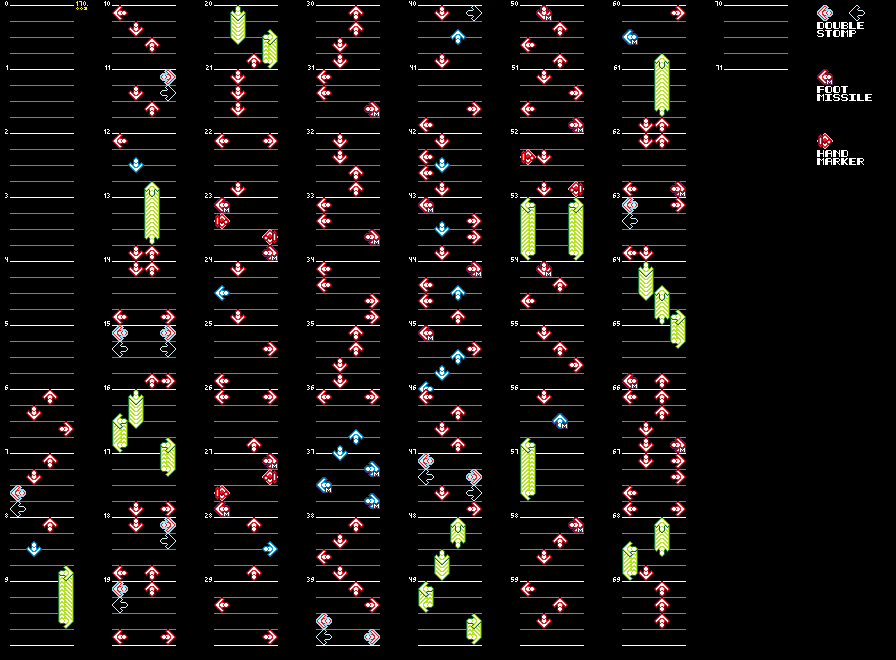
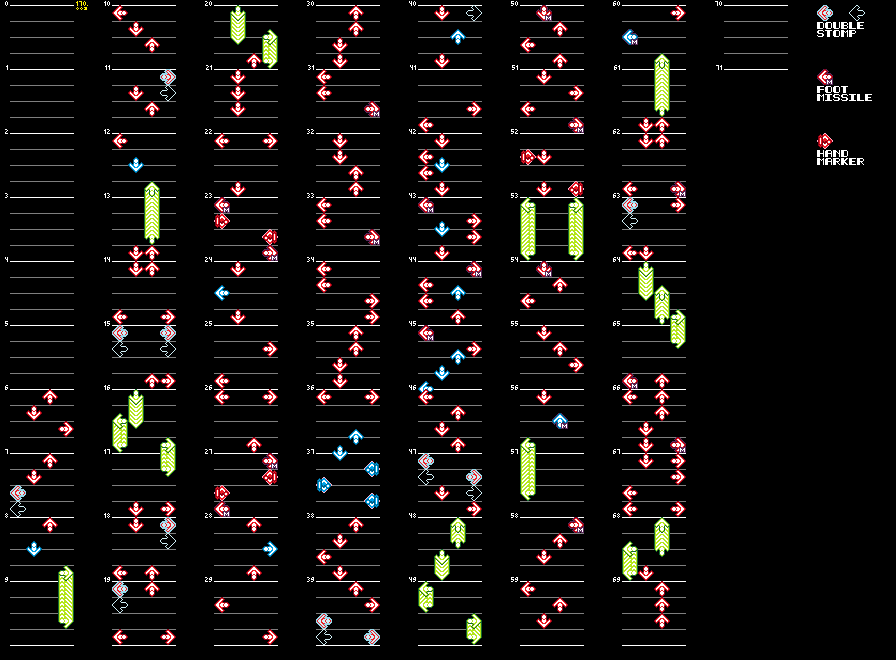
- The Hand Markers in measure 37 were all originally Foot Missiles. This was likely changed due to how fast they would move across the screen.
Expert
Chart Data
|
Early |
Final |
|---|---|
|
|
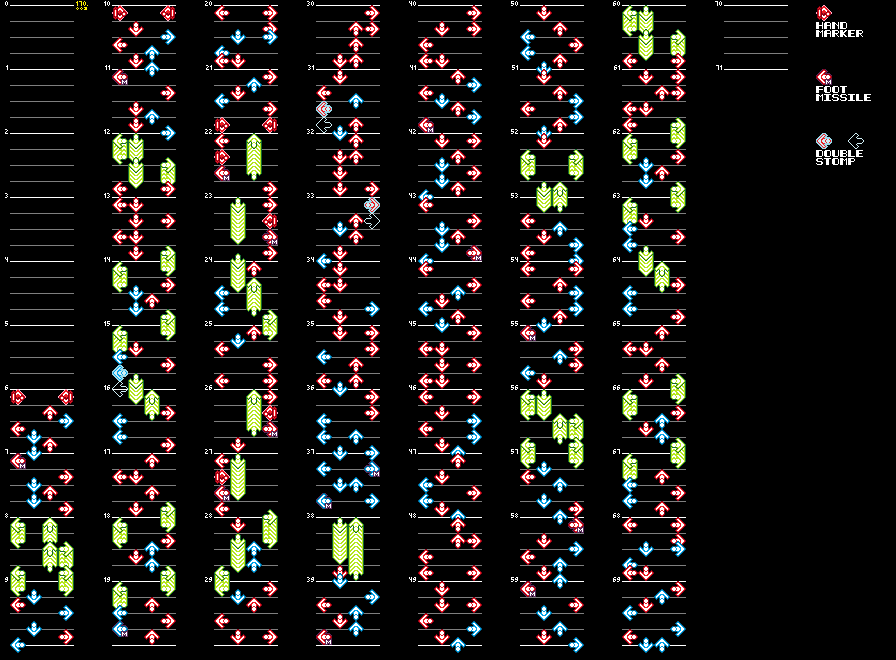
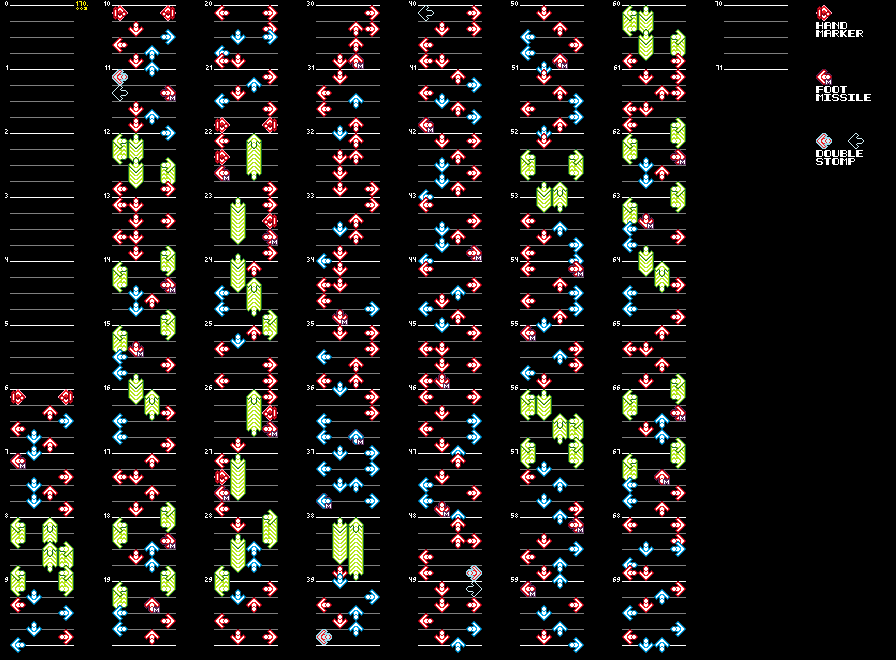
- The gimmick arrangement greatly differs from the final game. Notably, there are much fewer Foot Missiles.
ID 16 (Buried a Lie)#
Different charts: Beginner
Beginner
Chart Data
|
Early |
Final |
|---|---|

|

|
- There are much fewer Hand Missiles throughout the early chart. In most cases, they were originally Hand Markers, but some others, particularly those in measures 51, 55 and 57, were originally regular arrows.
IDs 17-26#
ID 17 (Disco Inferno)#
Different charts: Expert
Expert
Chart Data
|
Early |
Final |
|---|---|
|
|
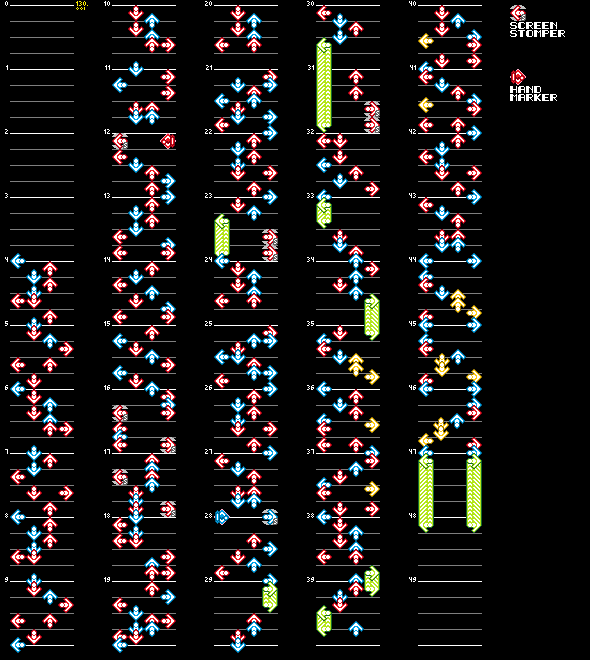
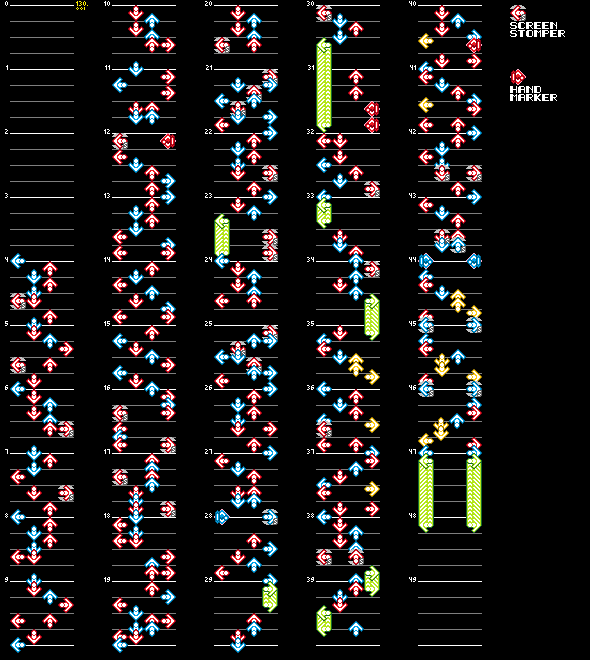
- There are much less Screen Stompers in the early chart.
ID 18 (Always (Microbots Trance Dance Mix))#
Different charts: Expert
Expert
Chart Data
|
Early |
Final |
|---|---|
|
|
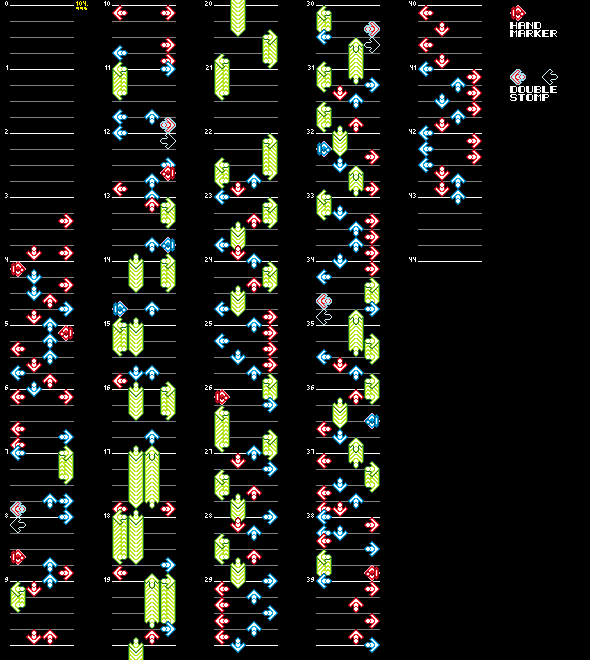
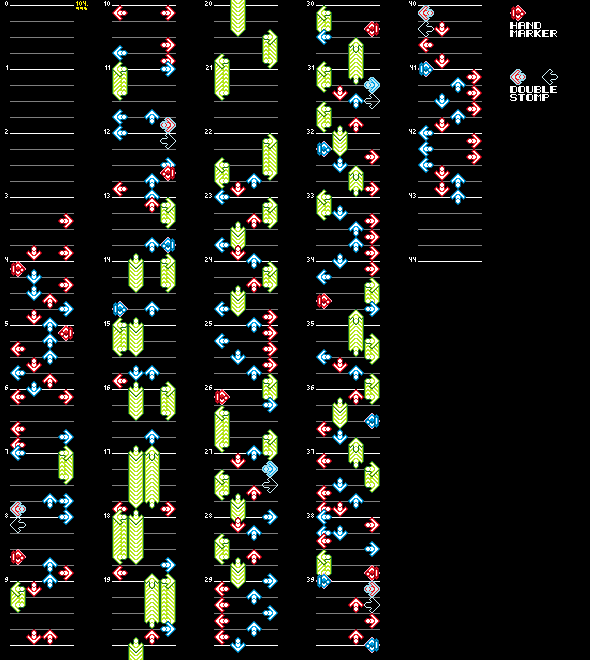
- The gimmick usage is much more limited in the early chart, specially near the ending.
ID 19 (Little L)#
Different charts: Basic, Difficult, Expert, Beginner
Common Difference
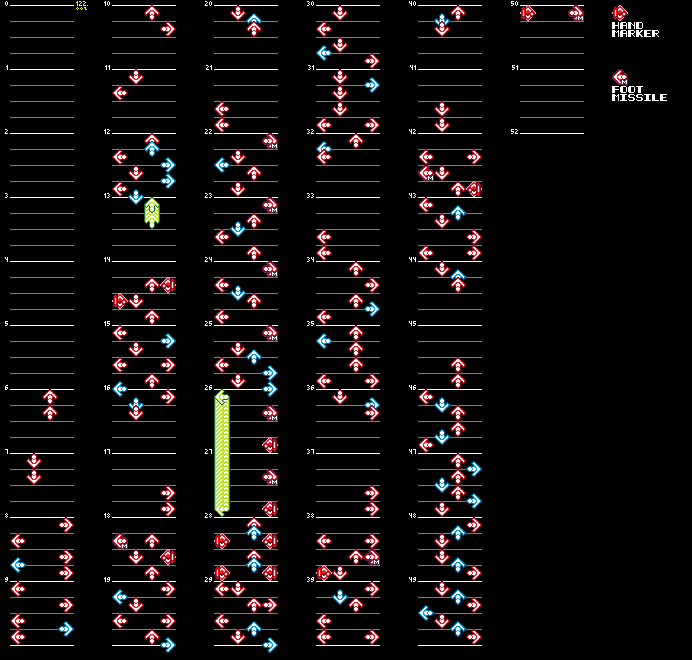
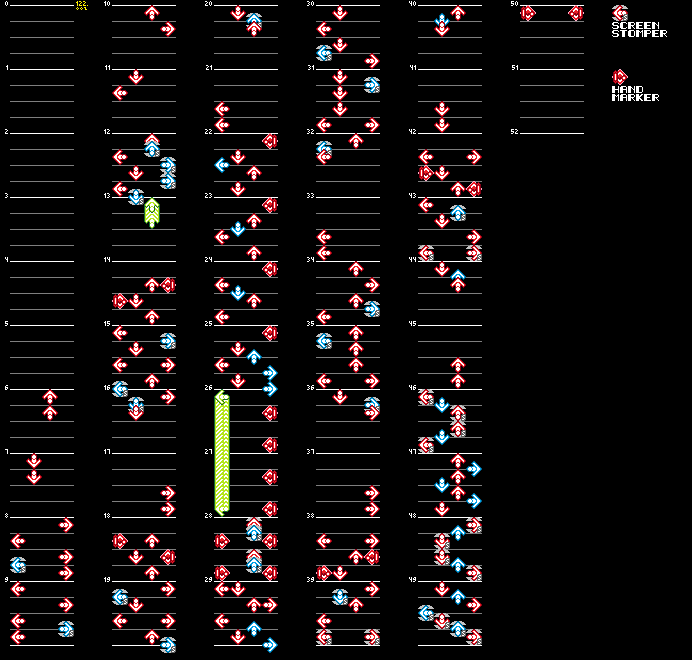
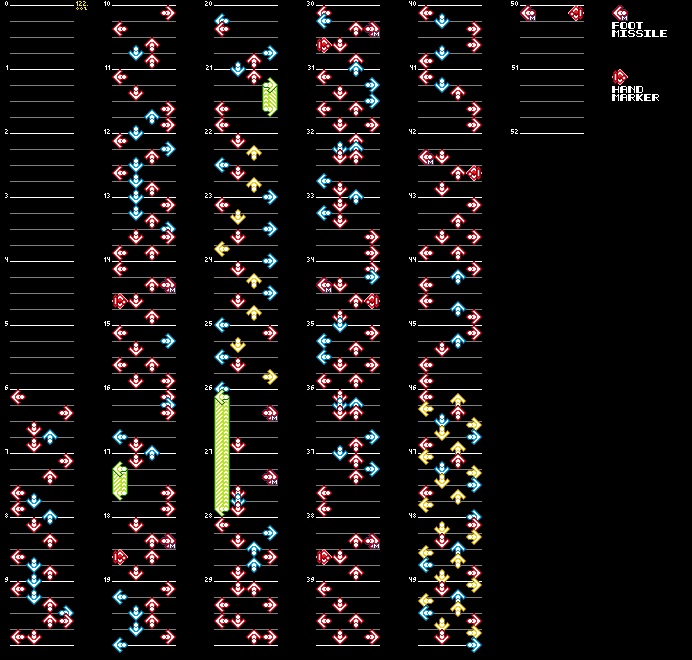
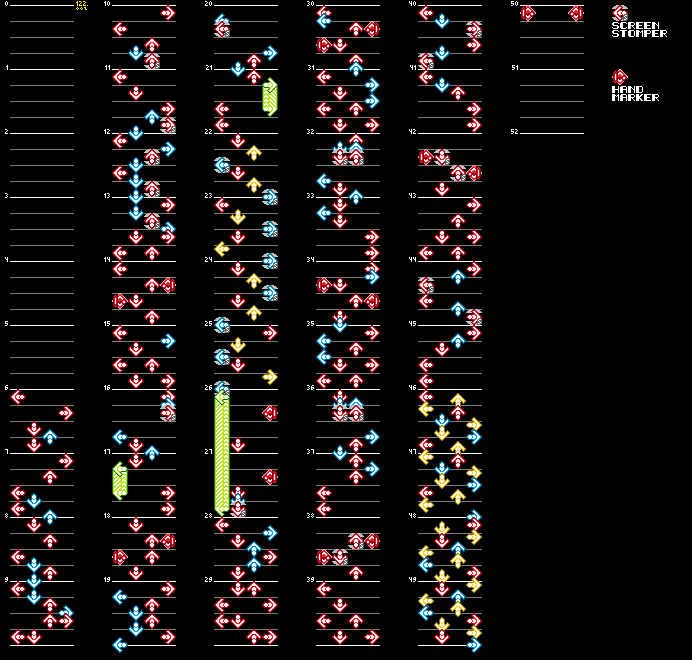
All early charts use the Foot Missile gimmick instead of Screen Stomper. As such, the gimmick arrangement is completely different.
Basic
Chart Data
|
Early |
Final |
|---|---|

|

|
Difficult
Chart Data
|
Early |
Final |
|---|---|
|
|
Expert
Chart Data
|
Early |
Final |
|---|---|
|
|
Beginner
Chart Data
|
Early |
Final |
|---|---|

|

|
ID 20 (Yo, Excuse Me Miss)#
Different charts: Expert
Expert
Chart Data
|
Early |
Final |
|---|---|
|
|
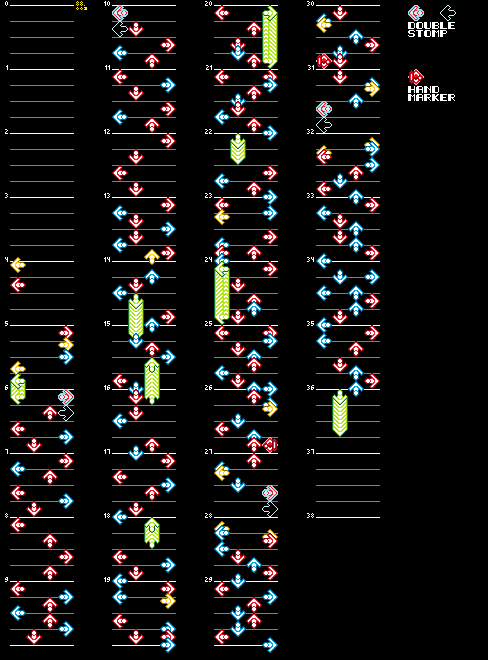
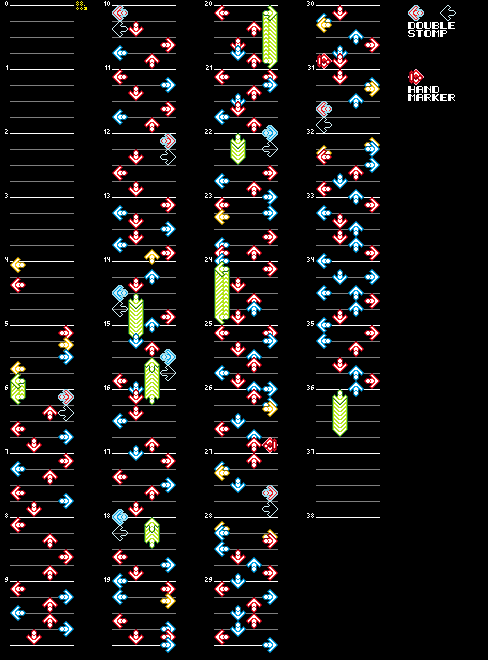
- There were originally no Double Stomp arrows between measures 12 and 22.
ID 21 (Gypsy woman)#
Different charts: Expert, Beginner
Common Difference
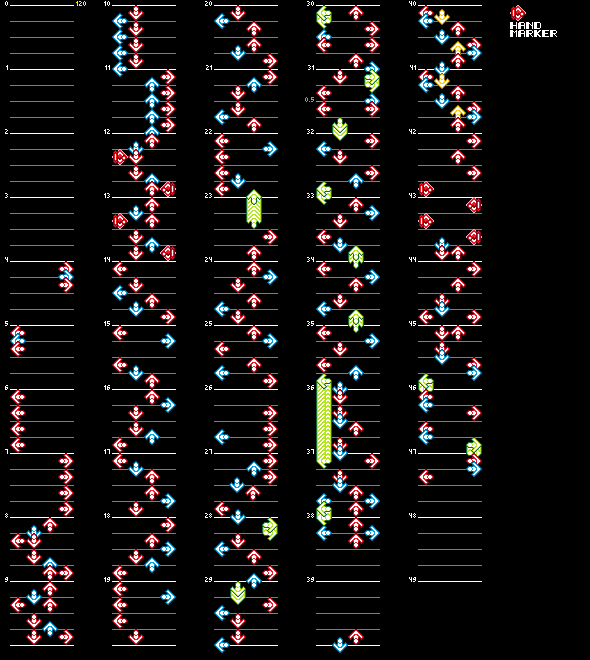
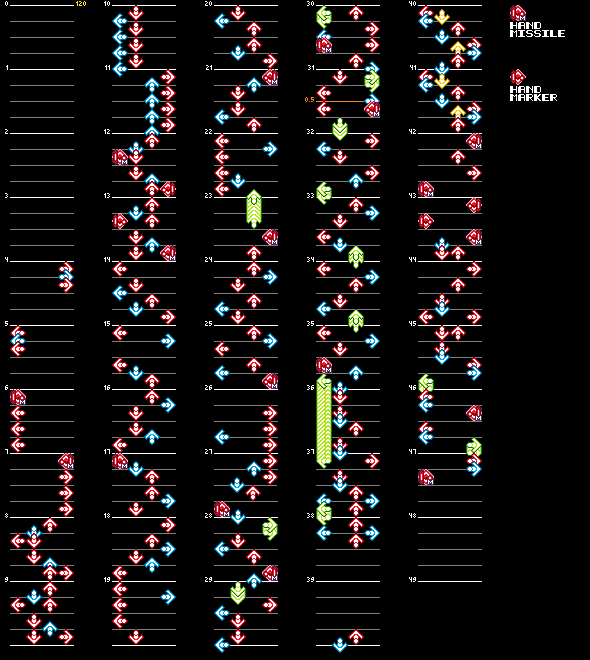
Both of these early charts don't have Hand Missiles. As such, their gimmick arrangement is different.
Expert
Chart Data
|
Early |
Final |
|---|---|
|
|
Beginner
Chart Data
|
Early |
Final |
|---|---|

|

|
ID 22 (Caught Up)#
Different charts: Basic, Expert
Basic
Chart Data
|
Early |
Final |
|---|---|

|

|
- The right arrow in measure 10, the left arrow in measure 11, and the first left arrow in measure 15 were originally Hand Markers rather than Foot Missiles.
- The up arrow in measure 14 was originally gimmickless rather than a Foot Missile. The opposite happens with the second left arrow in measure 15.
Expert
Chart Data
|
Early |
Final |
|---|---|
|
|
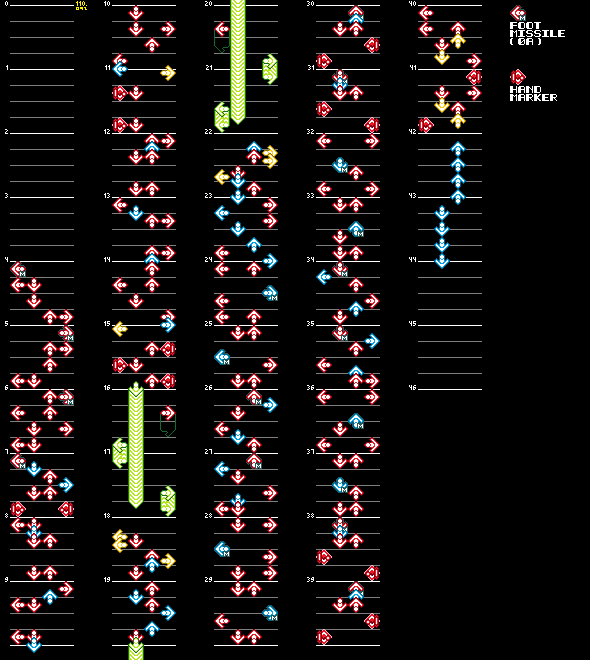
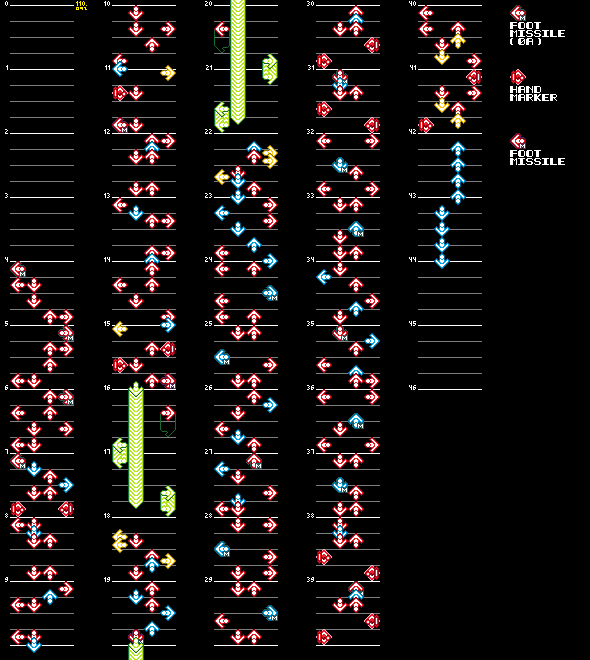
- The early chart lacks the "regular" type of Foot Missile.
- There are much less Foot Missiles in the early chart.
ID 23 (I Don't Feel Like Dancin')#
Different charts: Expert
Expert
Chart Data
|
Early |
Final |
|---|---|
|
|
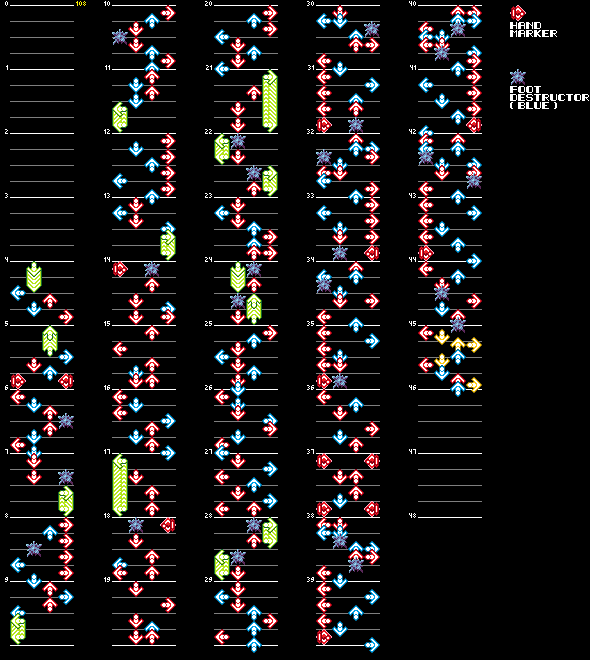
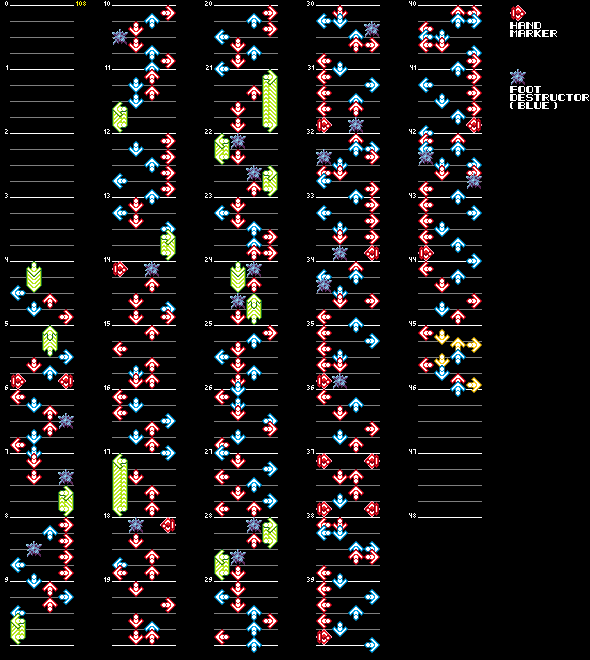
- Originally, there were much more Foot Destructors near the song's ending.
ID 24 (Blue Monday)#
Different charts: Beginner
Beginner
The early chart completely lacks gimmicks.
ID 25 (Too Little, Too Late)#
Different charts: Basic, Difficult, Expert, Beginner
Common Difference
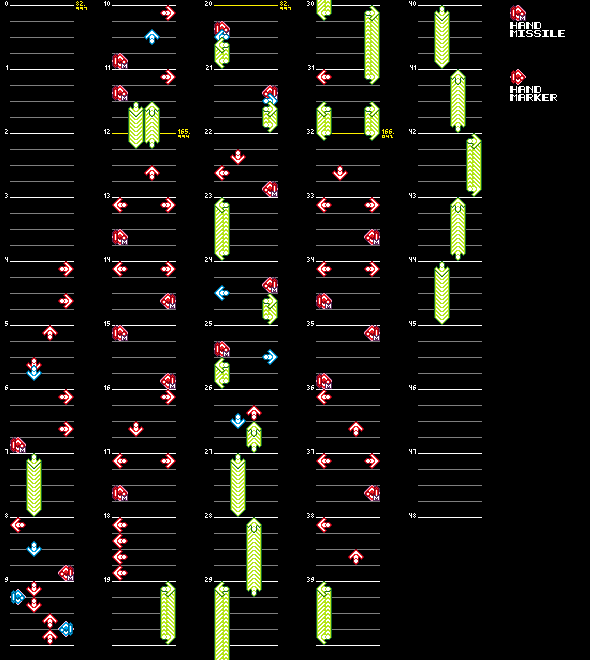
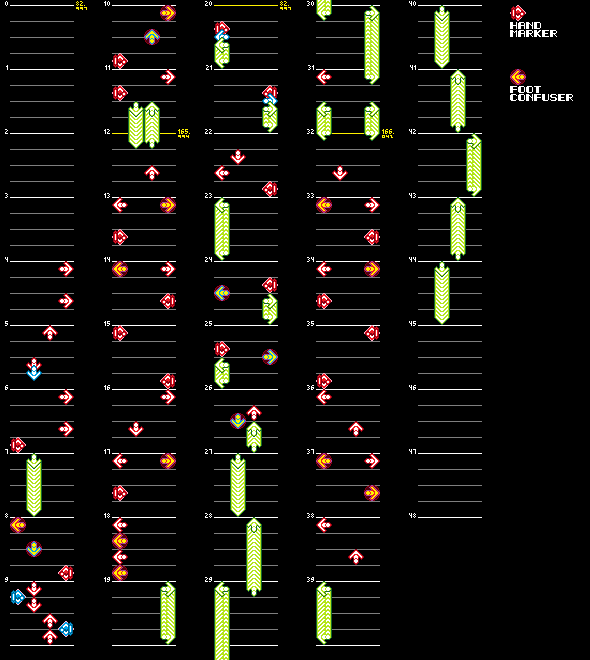
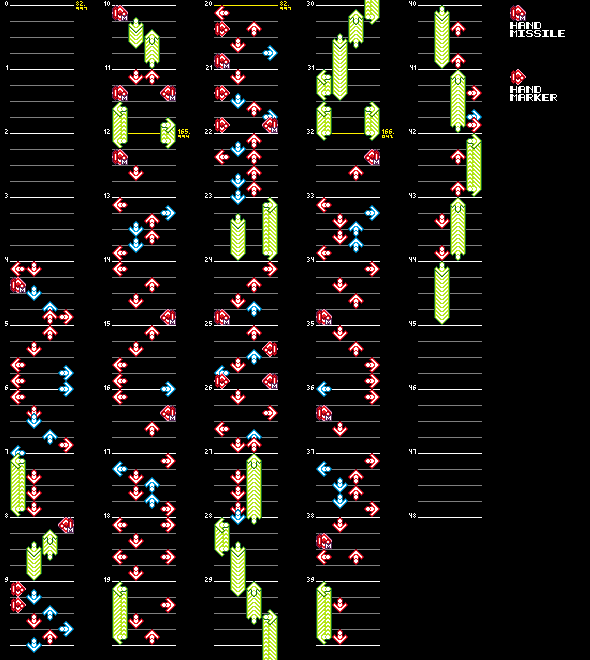
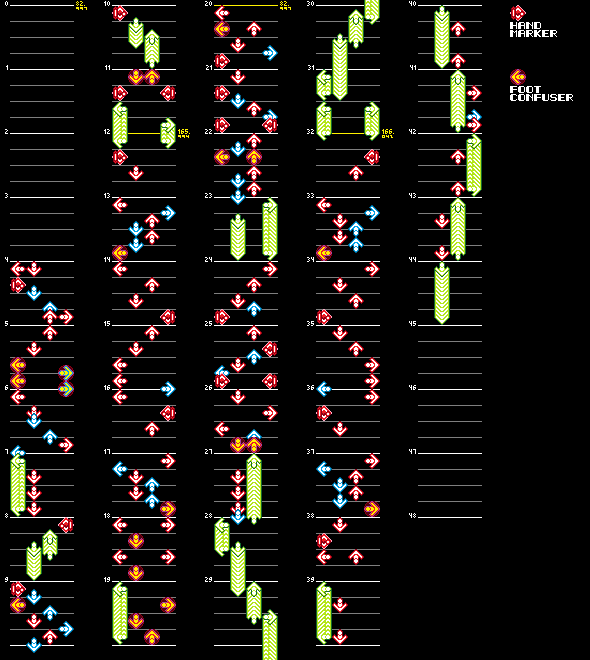
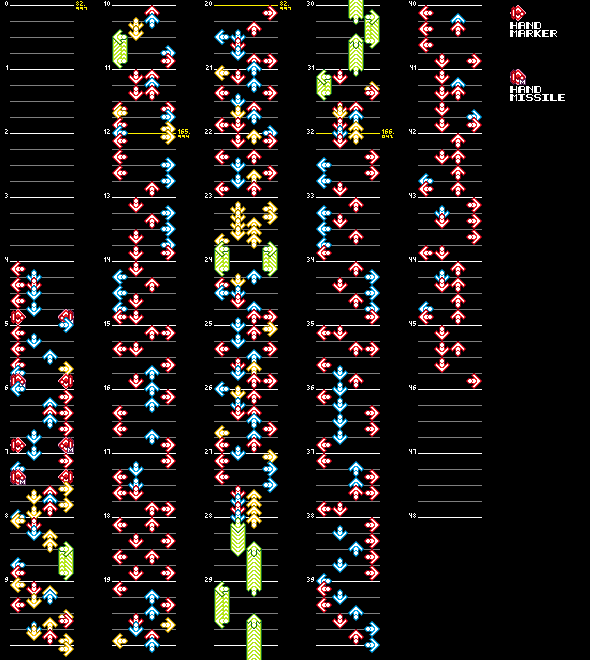
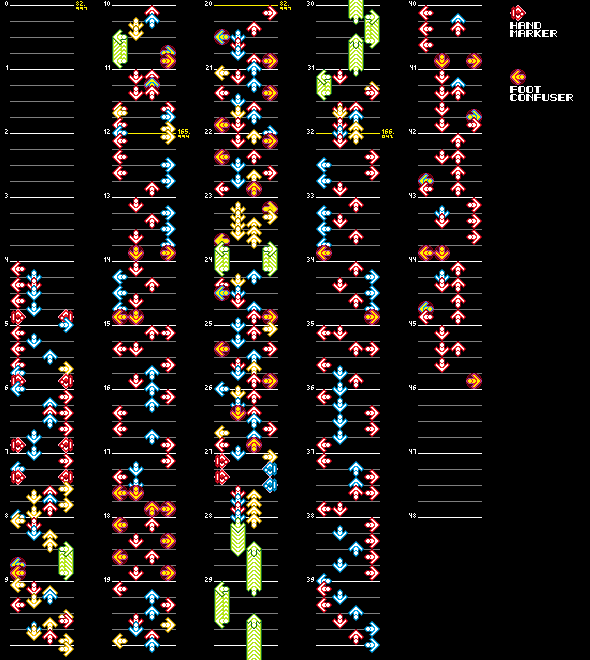
All early charts use the Hand Missile gimmick instead of Foot Confuser. As such, the gimmick placement is different.
Basic
Chart Data
|
Early |
Final |
|---|---|
|
|
Difficult
Chart Data
|
Early |
Final |
|---|---|
|
|
Expert
Chart Data
|
Early |
Final |
|---|---|
|
|
Beginner
Chart Data
|
Early |
Final |
|---|---|

|

|
ID 26 (unappreciated)#
Different charts: Basic, Difficult, Expert, Beginner
Common Difference
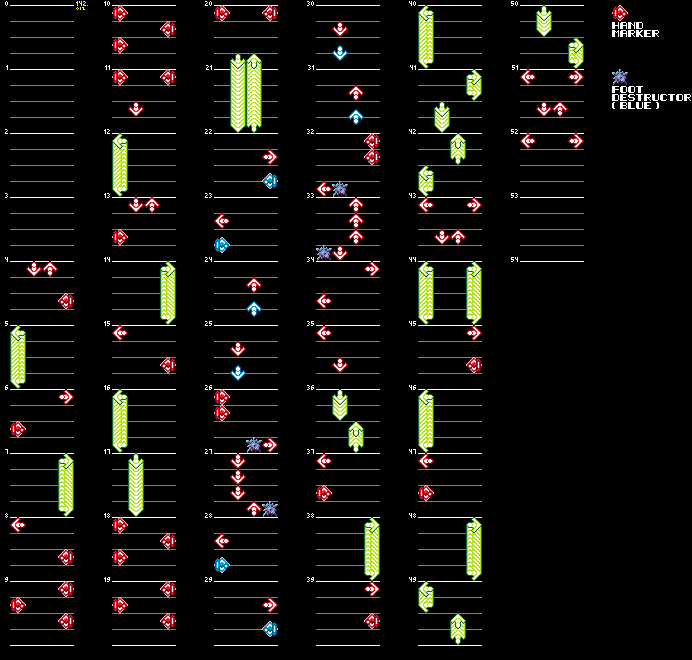
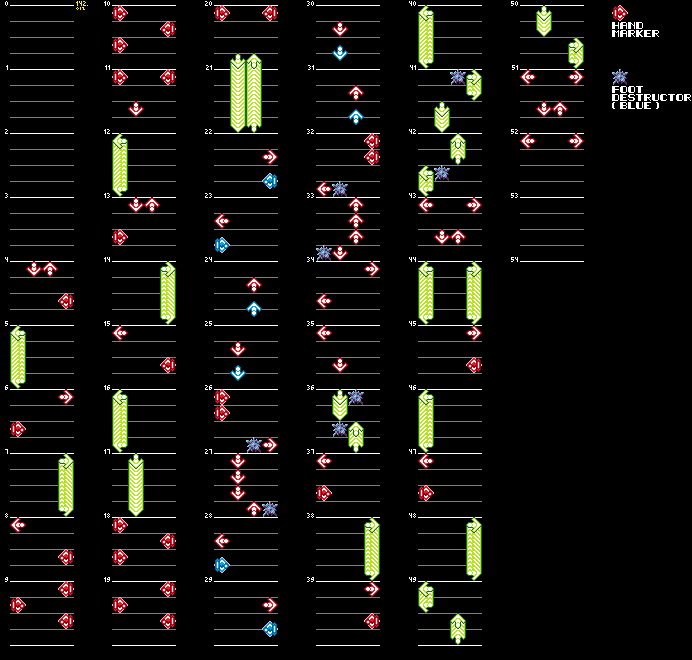
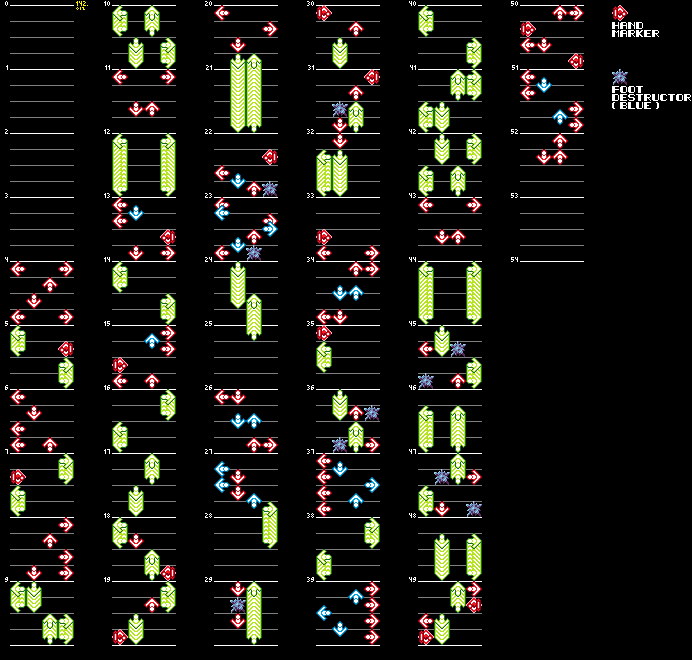
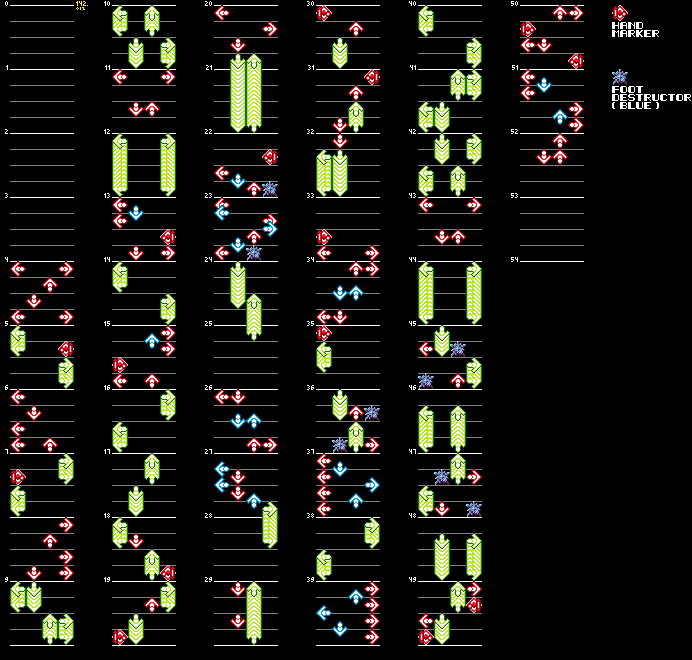
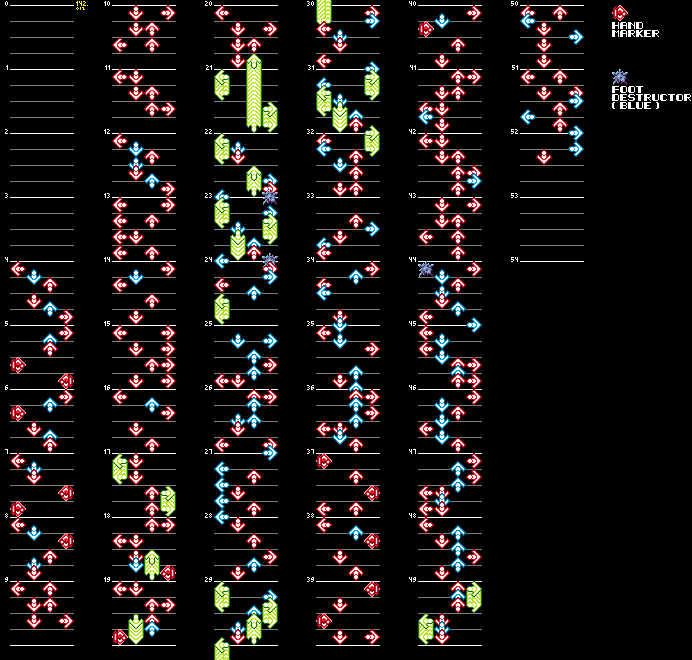
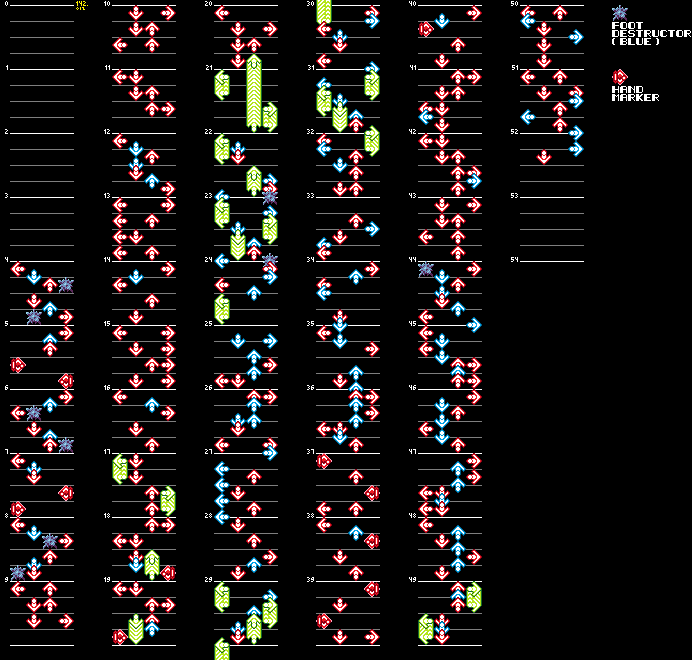
All early charts have less Foot Destructors, though where they were added later differs in each difficulty. In Basic, the changed measures were 36, 41 and 42. In Difficult, they are 29 and 31. In Expert, 4 to 8. In Beginner, 9, 10 and 18.
Basic
Chart Data
|
Early |
Final |
|---|---|
|
|
Difficult
Chart Data
|
Early |
Final |
|---|---|
|
|
Expert
Chart Data
|
Early |
Final |
|---|---|
|
|
- Additionally, the left arrow in measure 6 and the right arrow in measure 8 were originally Hand Markers rather than being gimmickless.
Beginner
Chart Data
|
Early |
Final |
|---|---|

|

|
IDs 27-39#
ID 28 (LOVE SHINE (Body Grooverz 2006 mix))#
Different charts: Basic, Difficult, Expert, Beginner
Common Difference
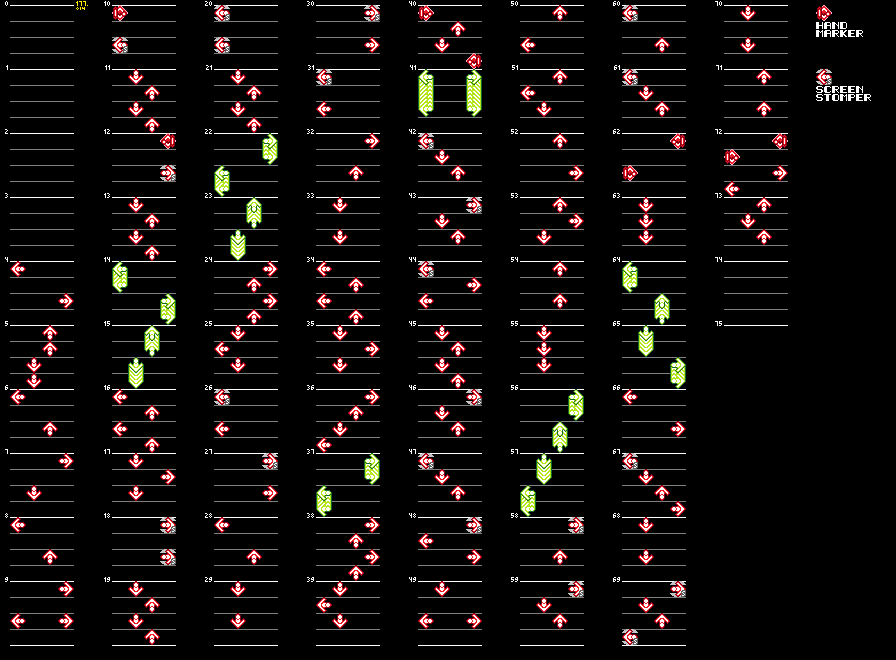
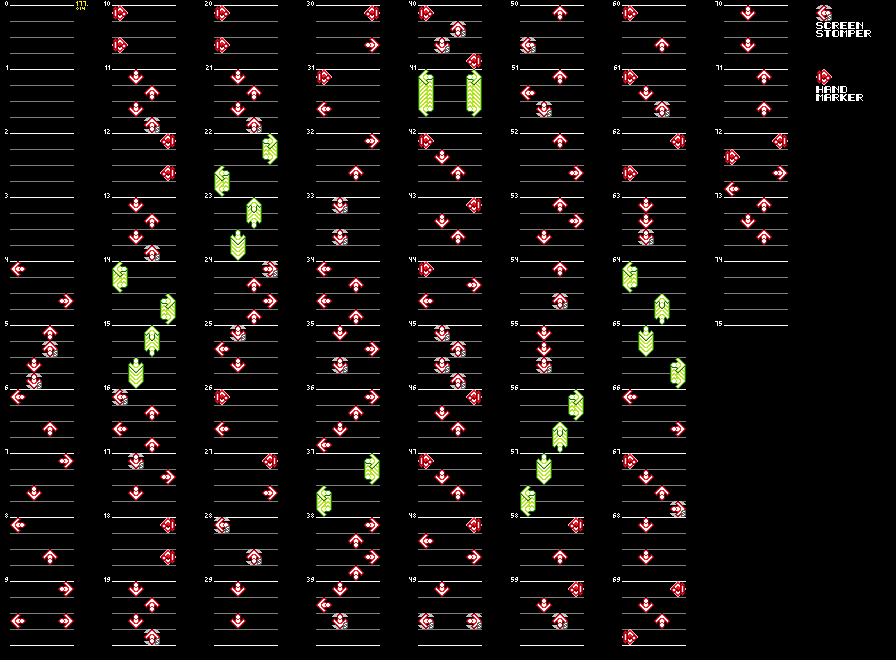
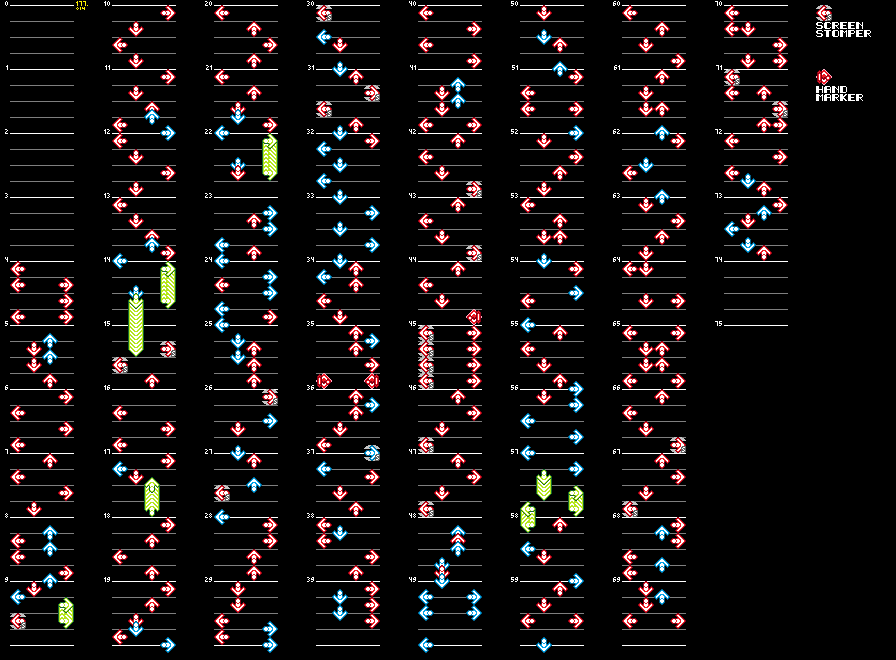
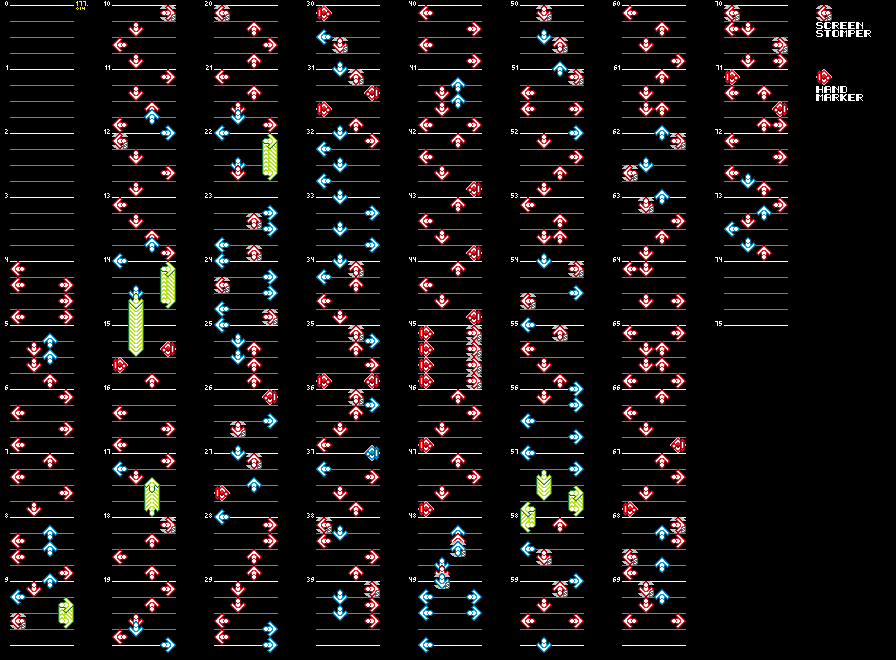
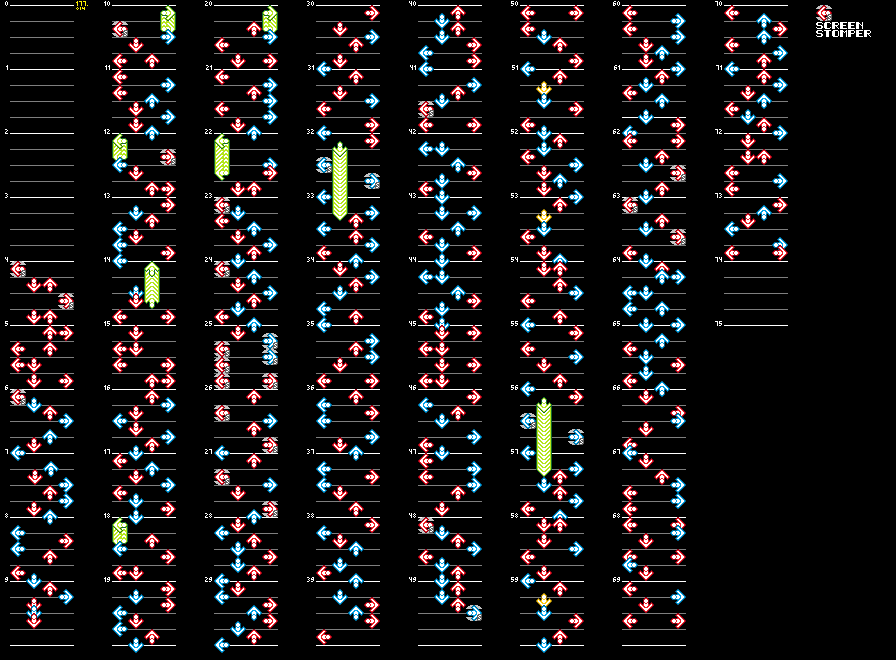
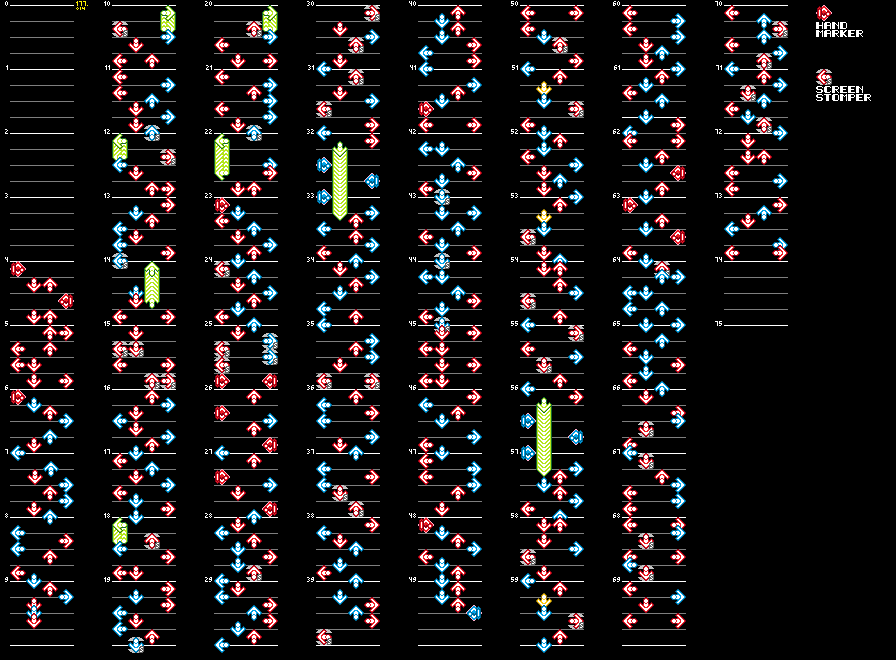
All early charts have nearly completely different gimmick arrangements.
Basic
Chart Data
|
Early |
Final |
|---|---|
|
|
Difficult
Chart Data
|
Early |
Final |
|---|---|
|
|
Expert
Chart Data
|
Early |
Final |
|---|---|
|
|
- Additionally, the early Expert chart completely lacks Hand Markers.
Beginner
Chart Data
|
Early |
Final |
|---|---|

|

|
ID 29 (BREAK DOWN! (World Version))#
Different charts: Basic, Difficult, Expert, Beginner
Common Difference
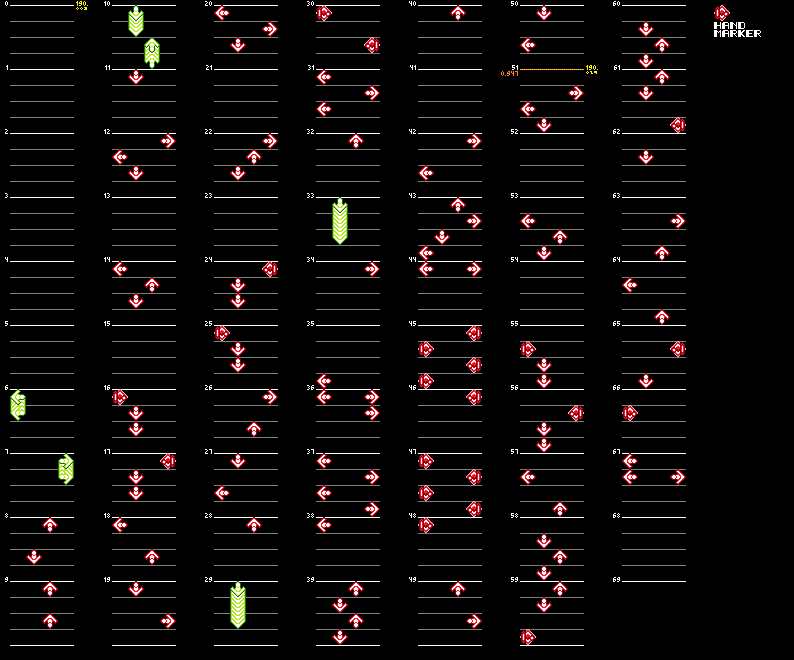
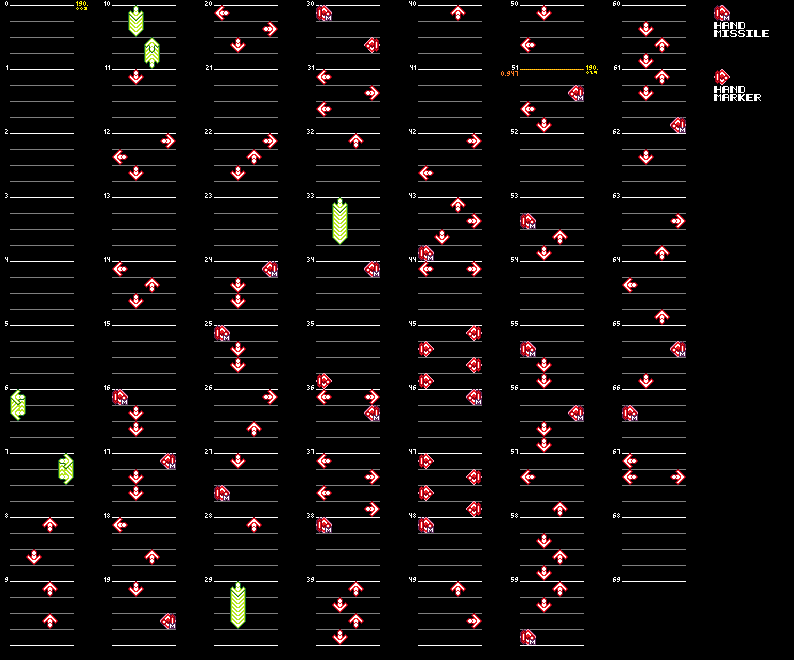
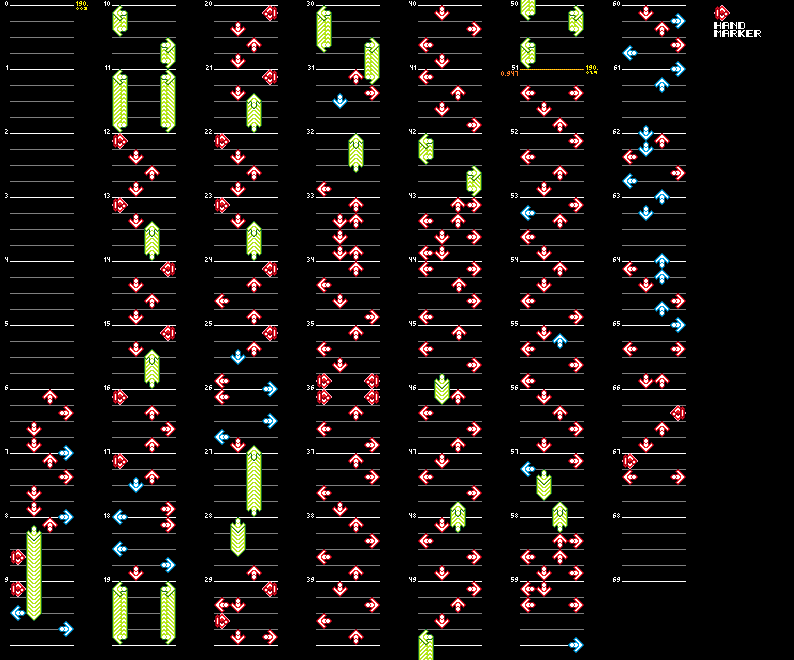
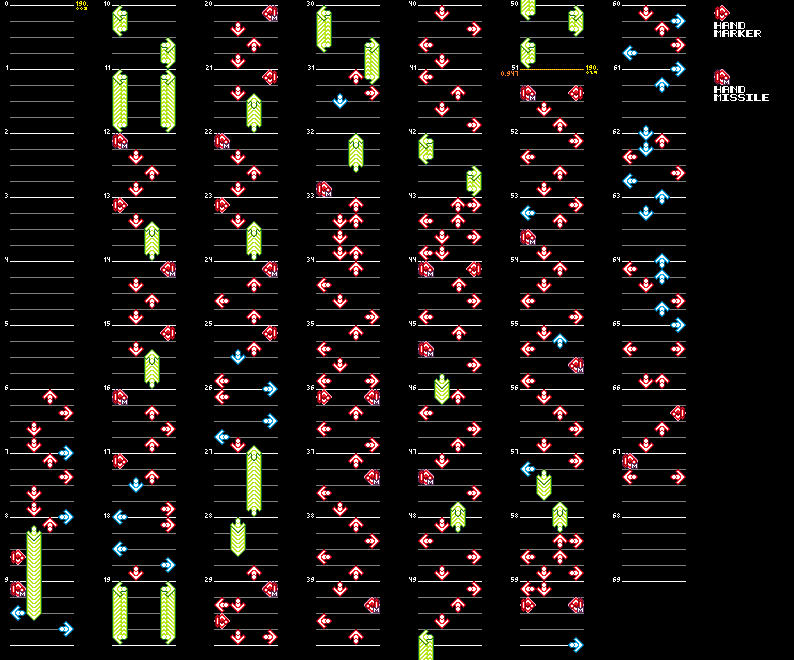
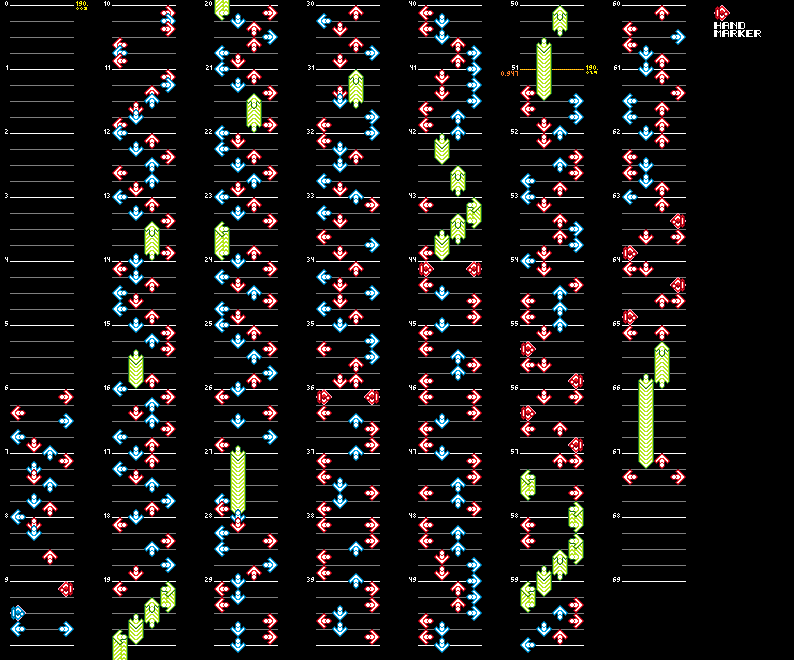
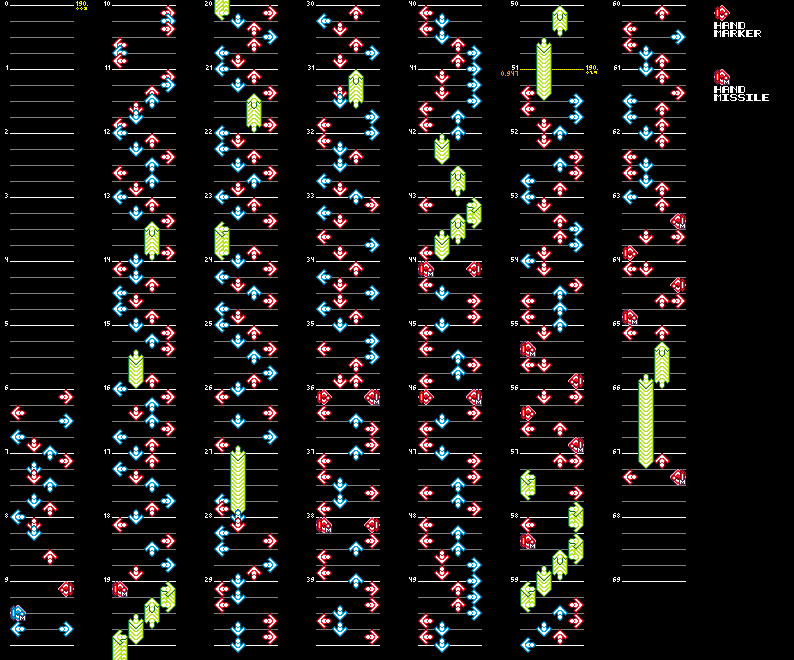
All early charts lack Hand Missiles. As such, their gimmick arrangements are different.
Basic
Chart Data
|
Early |
Final |
|---|---|
|
|
Difficult
Chart Data
|
Early |
Final |
|---|---|
|
|
Expert
Chart Data
|
Early |
Final |
|---|---|
|
|
Beginner
Chart Data
|
Early |
Final |
|---|---|

|

|
ID 30 (1998 (Sparky 2006))#
Different charts: Basic, Difficult, Expert, Beginner
Common Difference
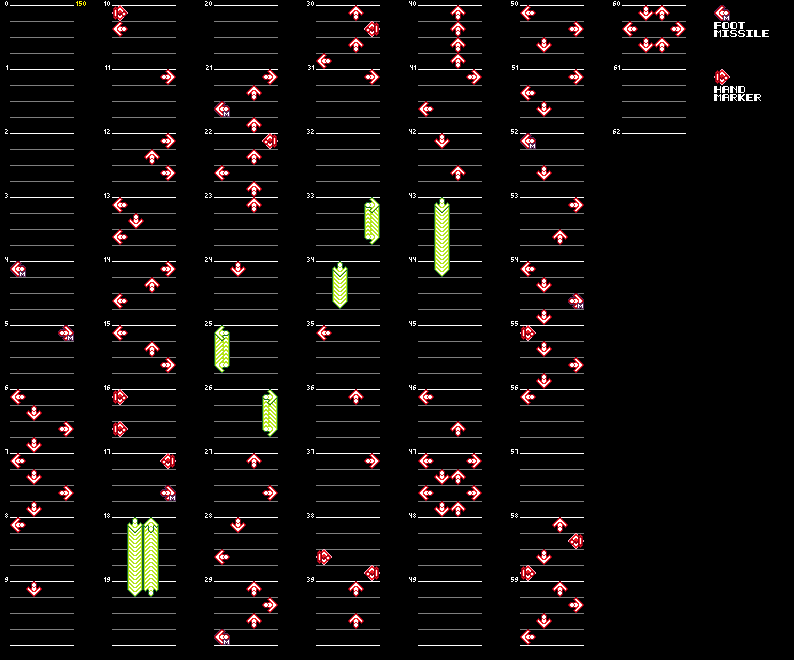
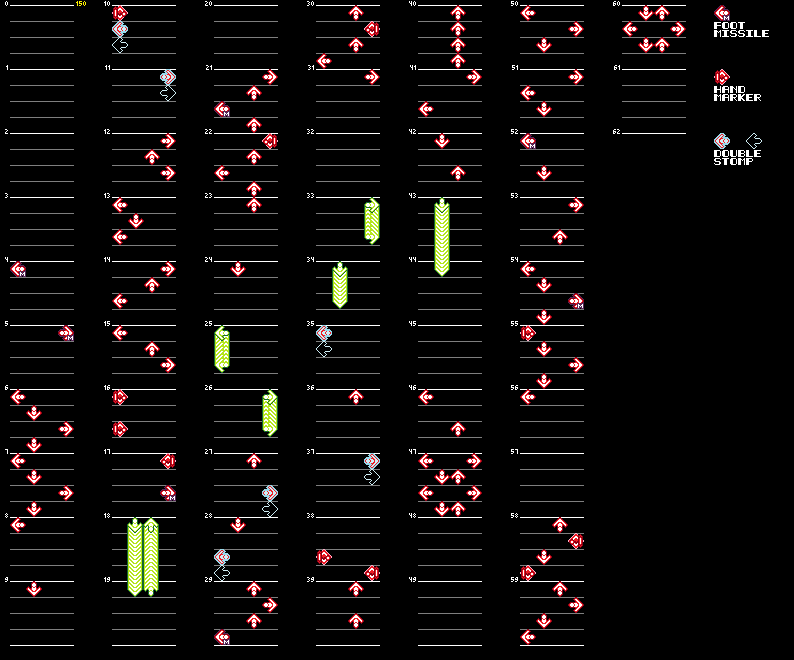
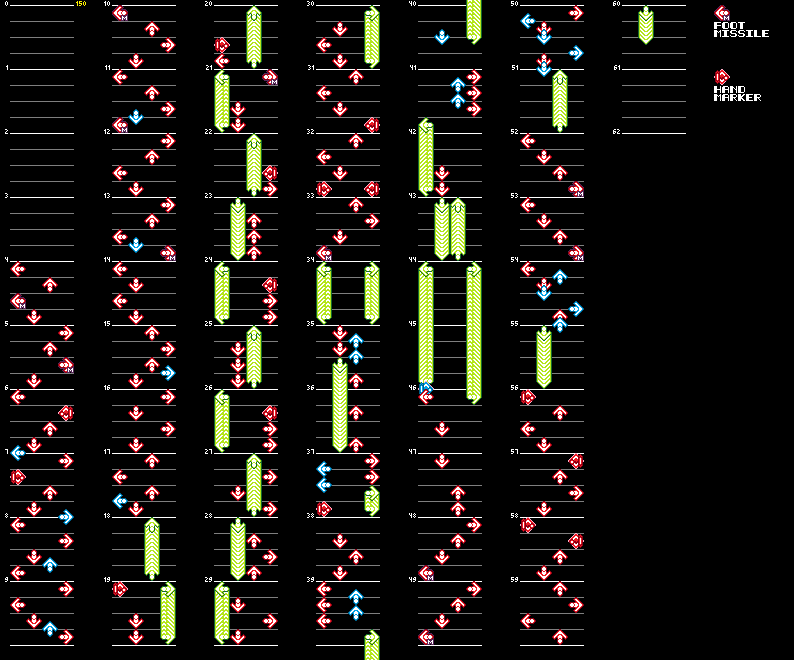
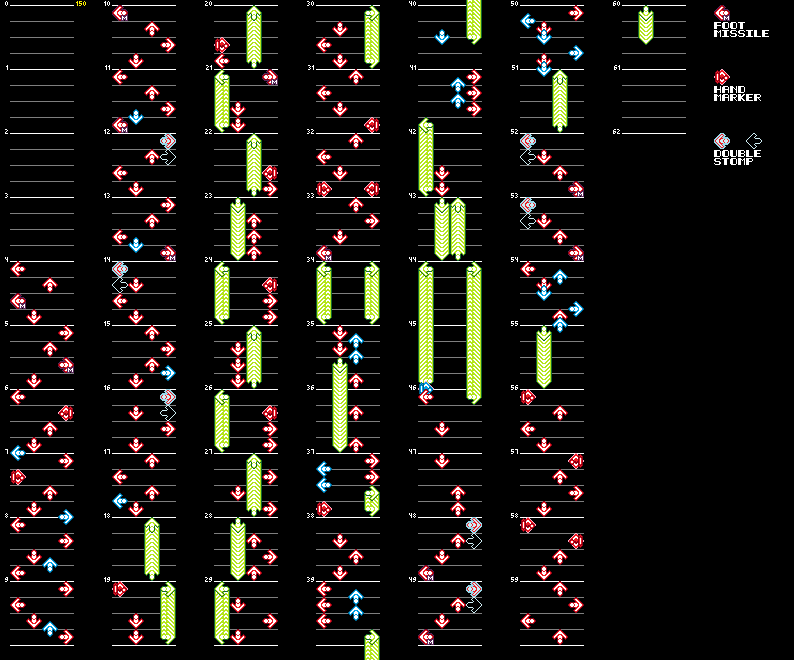
All early charts lack Double Stomps. In all cases, there are regular arrows where these gimmicks should be.
Basic
Chart Data
|
Early |
Final |
|---|---|
|
|
Difficult
Chart Data
|
Early |
Final |
|---|---|
|
|
Expert
Chart Data
|
Early |
Final |
|---|---|
|
|
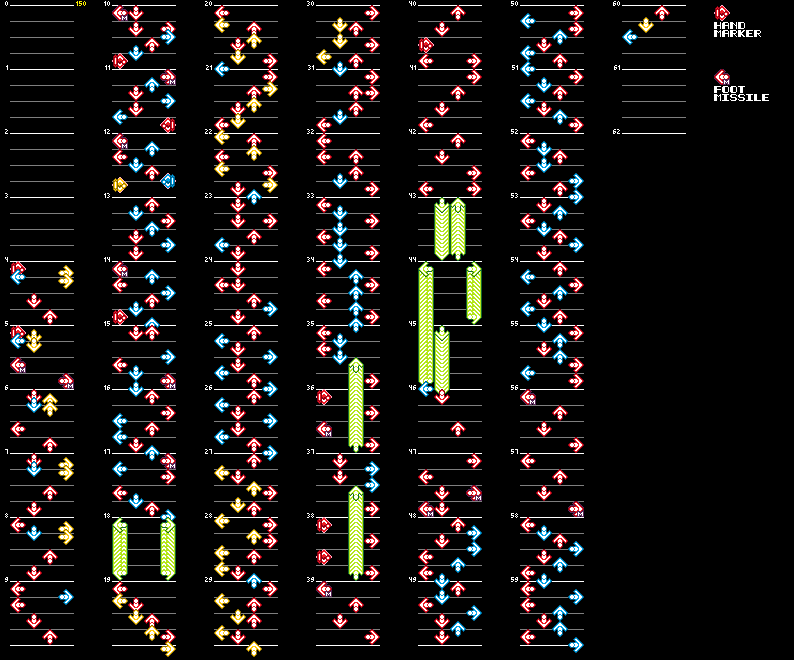
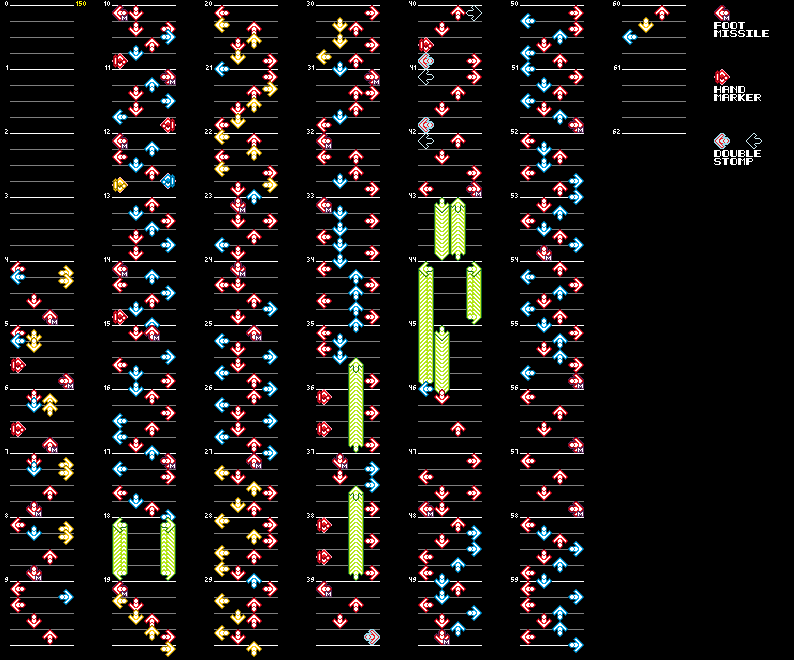
- Overall, the gimmick usage in the earlier chart is much more limited, specially during the chorus sections (measures 19 to 35, and 44 onwards).
Beginner
Chart Data
|
Early |
Final |
|---|---|

|

|
ID 31 (CANDY (UFO mix))#
Different charts: Difficult
Difficult
Chart Data
|
Early |
Final |
|---|---|
|
|
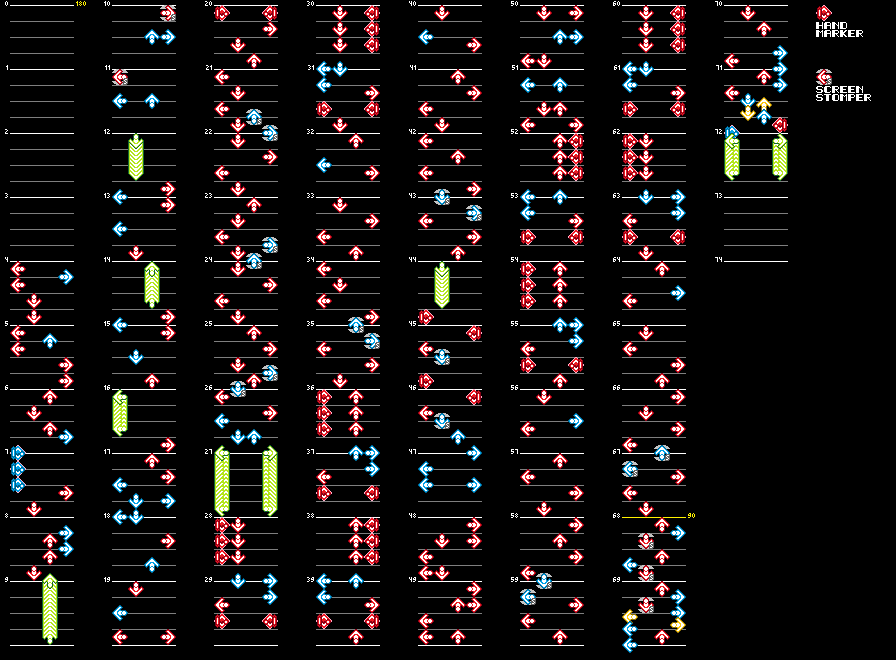
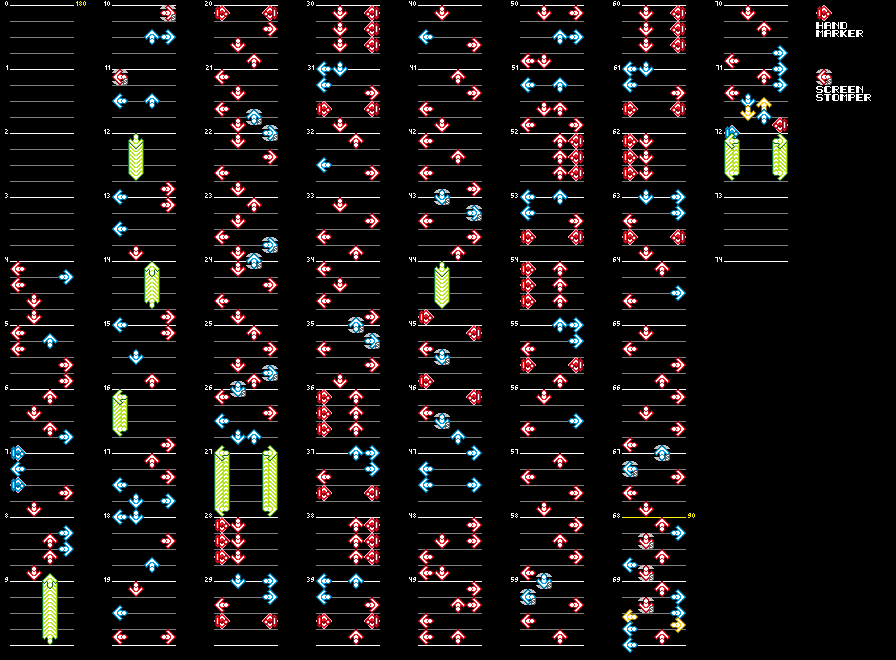
- The first left arrow in measure 7 was originally a Hand Marker.
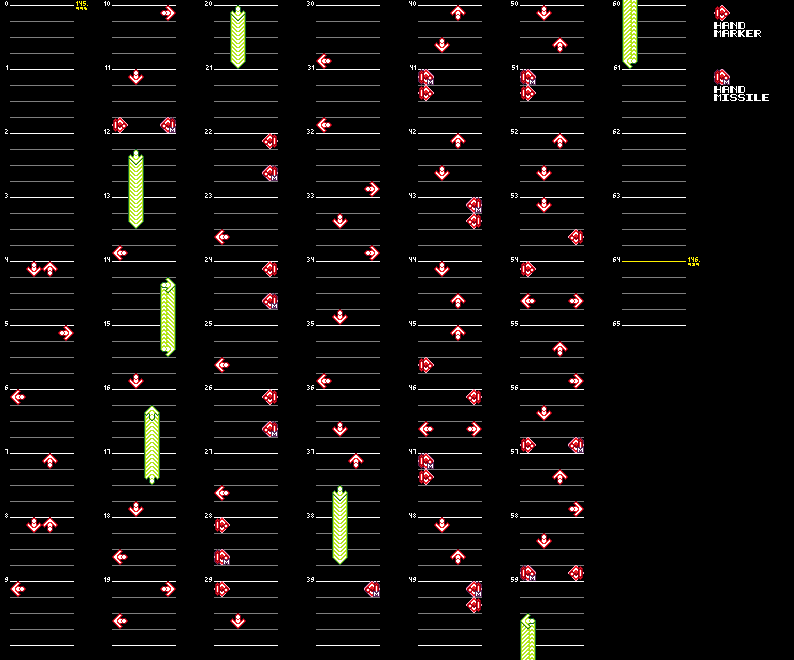
ID 34 (let it out)#
Different charts: Basic, Difficult, Expert, Beginner
Common Difference
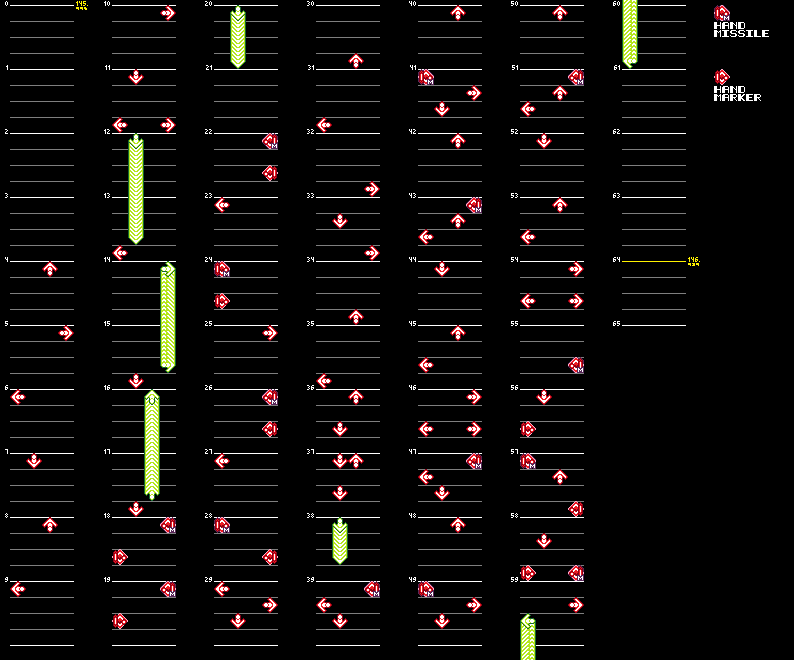
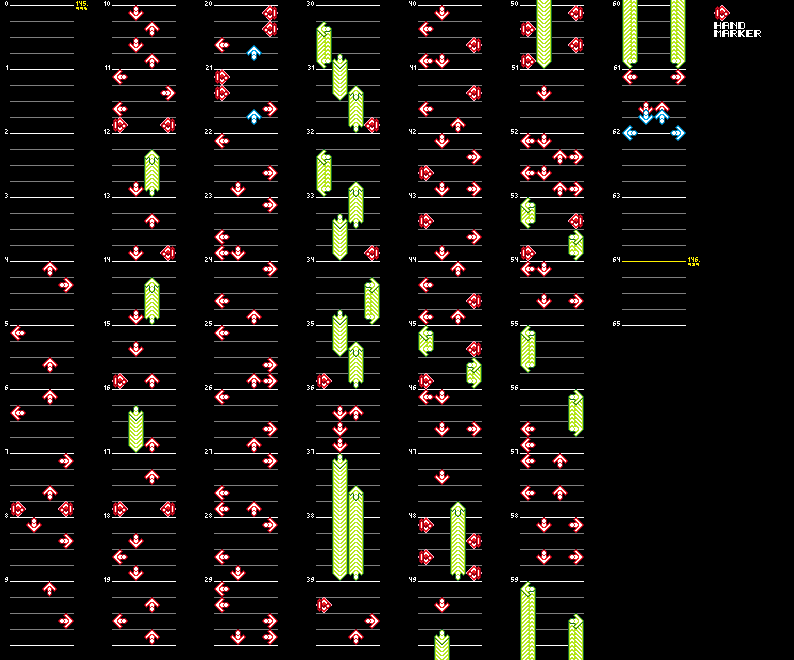
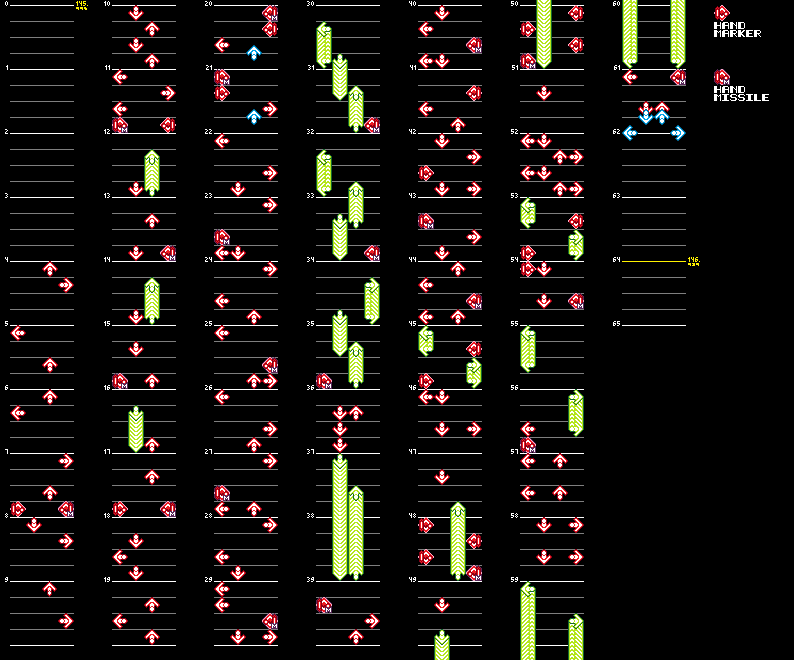
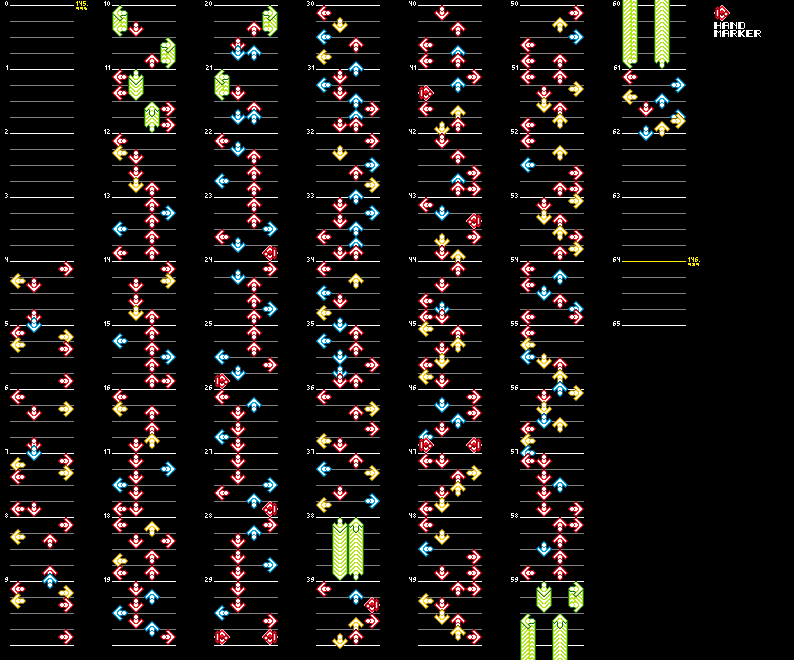
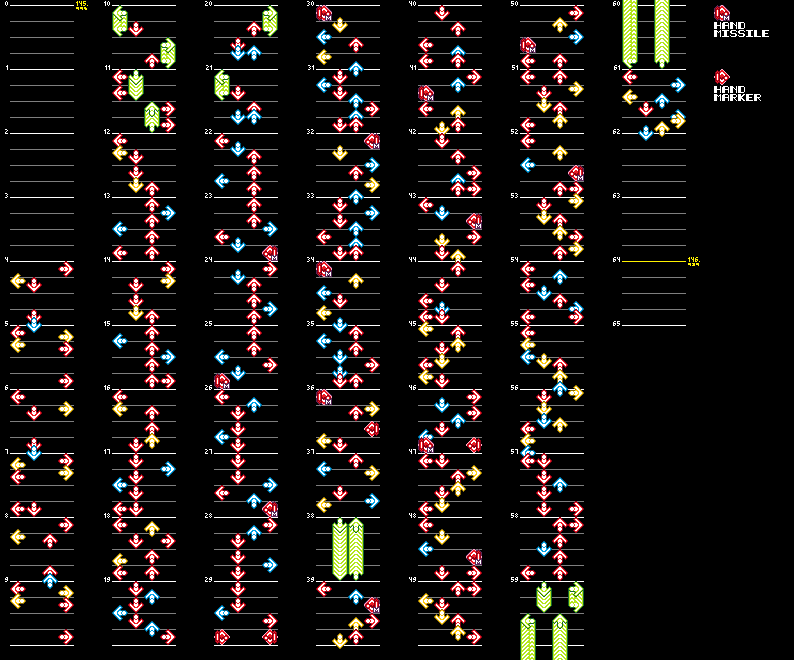
All early charts lack Hand Missiles. In their place are Hand Markers or regular notes in the unused data.
Basic
Chart Data
|
Early |
Final |
|---|---|

|
|
Difficult
Chart Data
|
Early |
Final |
|---|---|
|
|
Expert
Chart Data
|
Early |
Final |
|---|---|
|
|
Beginner
Chart Data
|
Early |
Final |
|---|---|

|
|
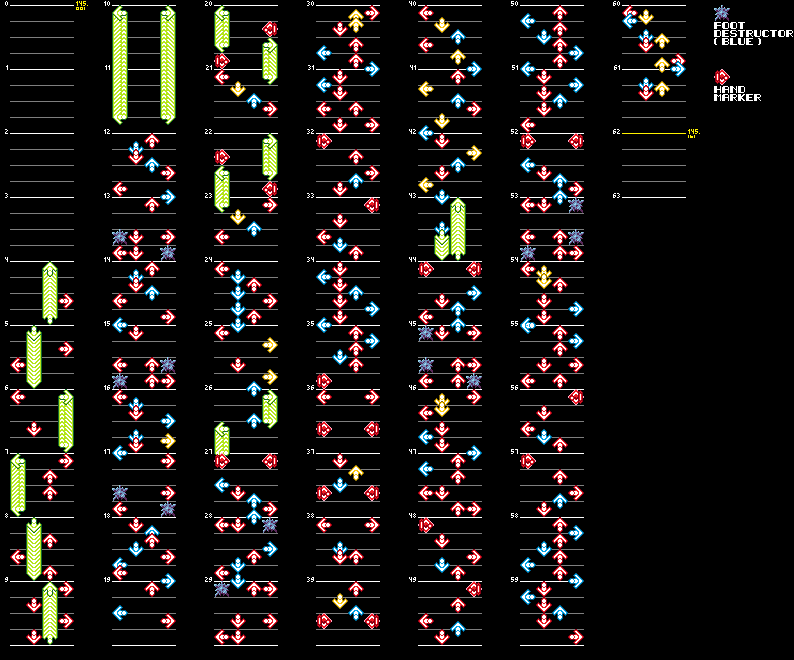
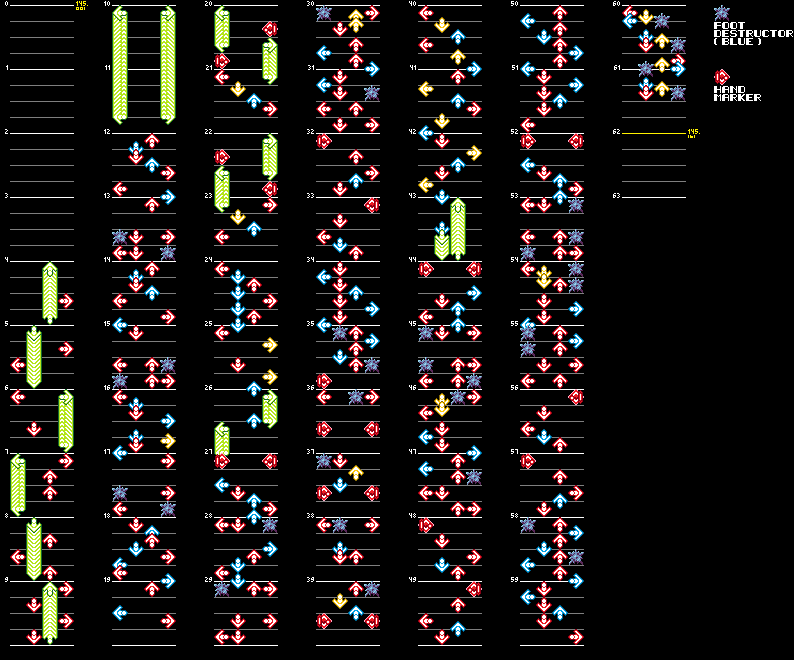
ID 35 (will)#
Different charts: Expert
Expert
Chart Data
|
Early |
Final |
|---|---|
|
|
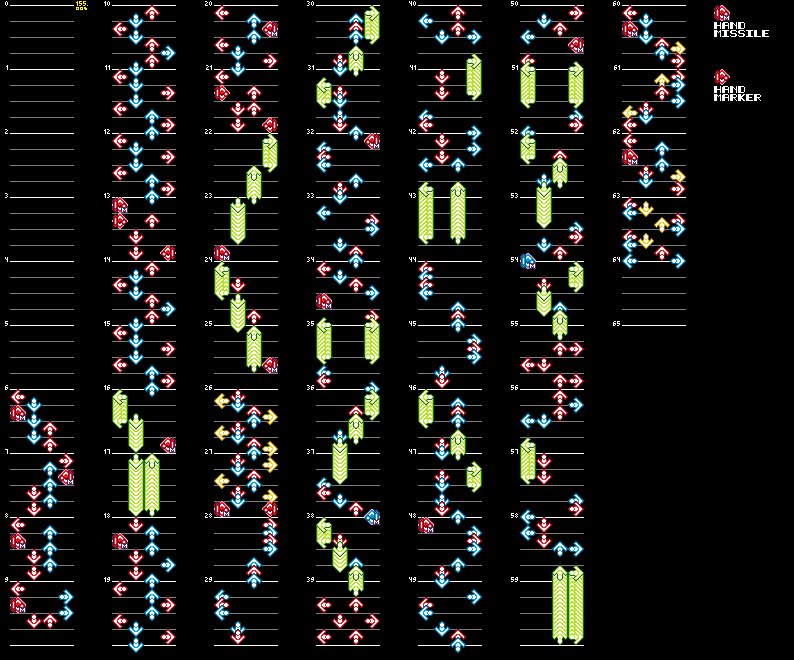
- The early charts have much less Foot Destructors.
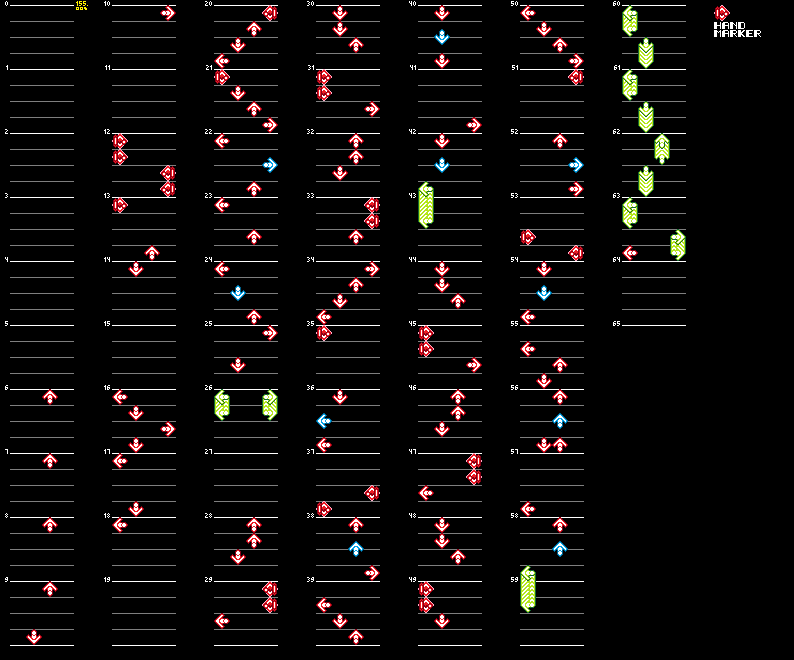
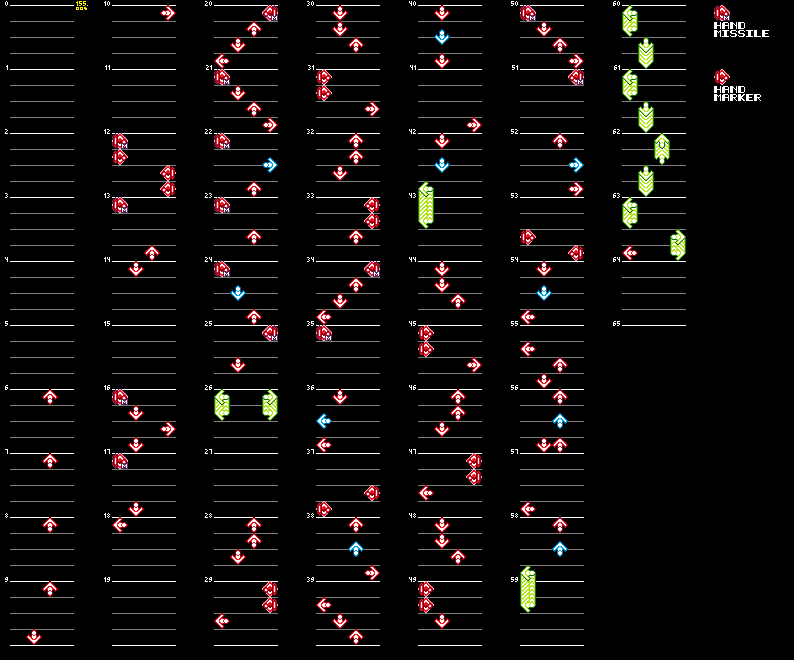
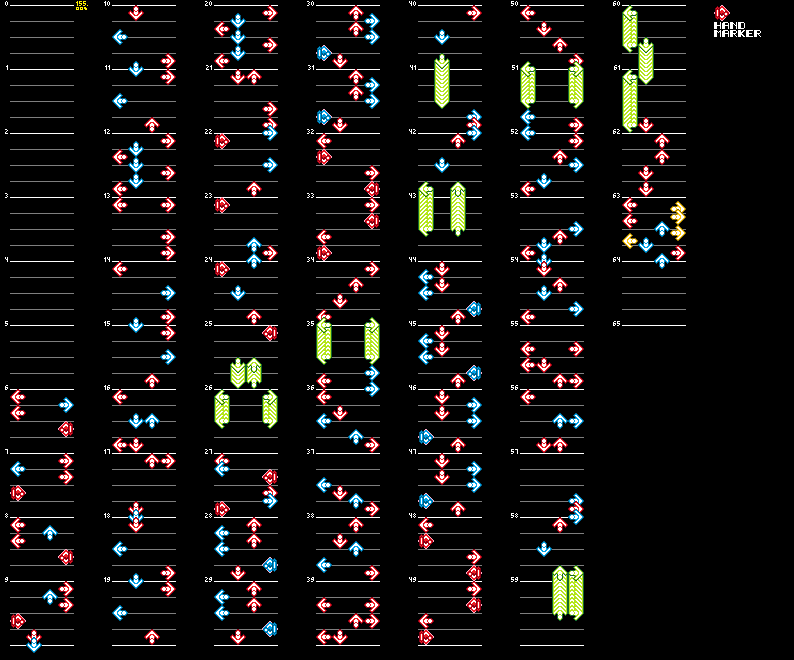
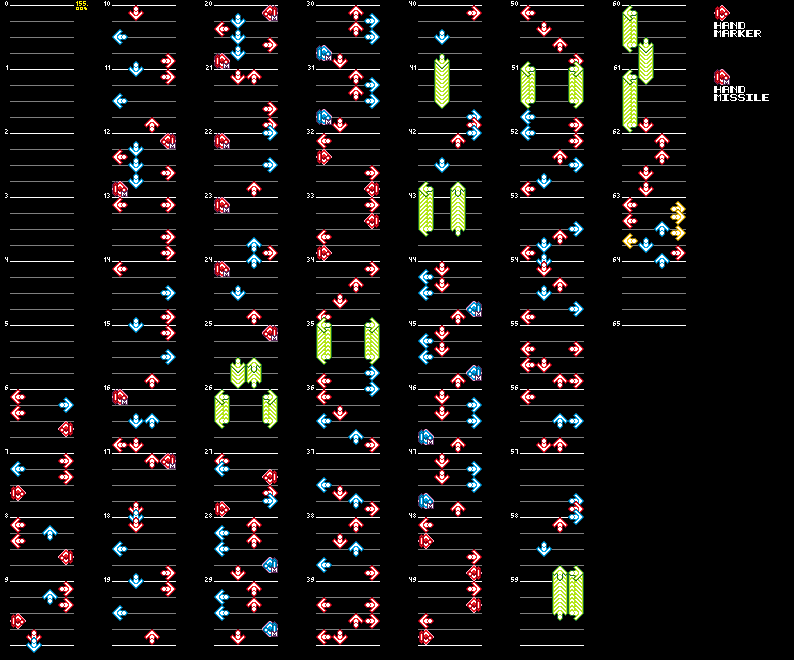
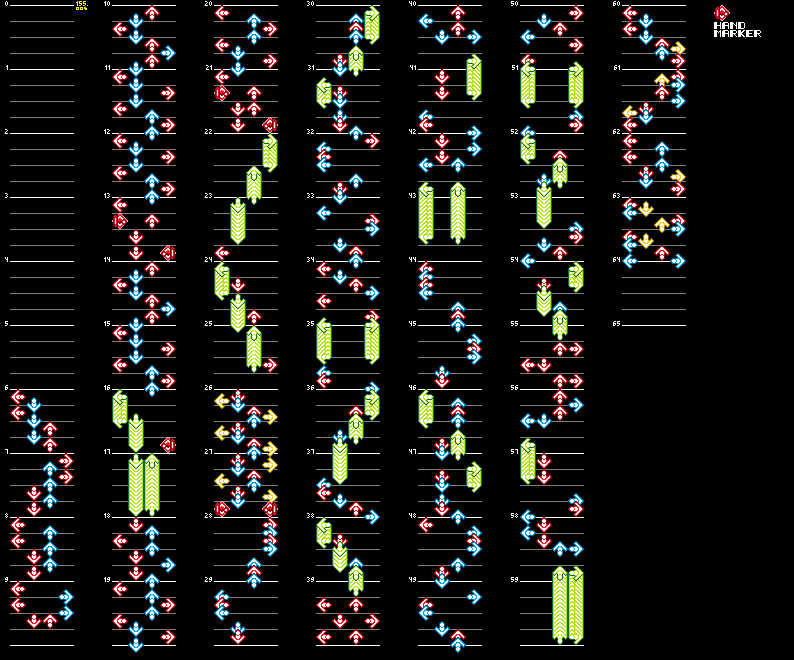
ID 36 (little steps)#
Different charts: Basic, Difficult, Expert, Beginner
Common Difference
All early charts lack Hand Missiles. In their place are Hand Markers or regular notes in the unused data.
Basic
Chart Data
|
Early |
Final |
|---|---|
|
|
Difficult
Chart Data
|
Early |
Final |
|---|---|
|
|
Expert
Chart Data
|
Early |
Final |
|---|---|
|
|
Beginner
Chart Data
|
Early |
Final |
|---|---|

|

|
ID 37 (Touchin')#
Different charts: Basic, Difficult, Expert, Beginner
Common Difference
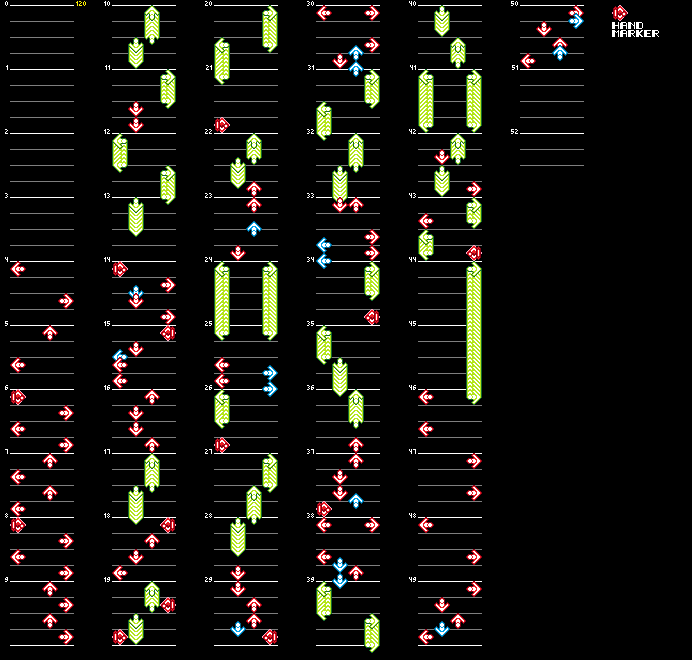
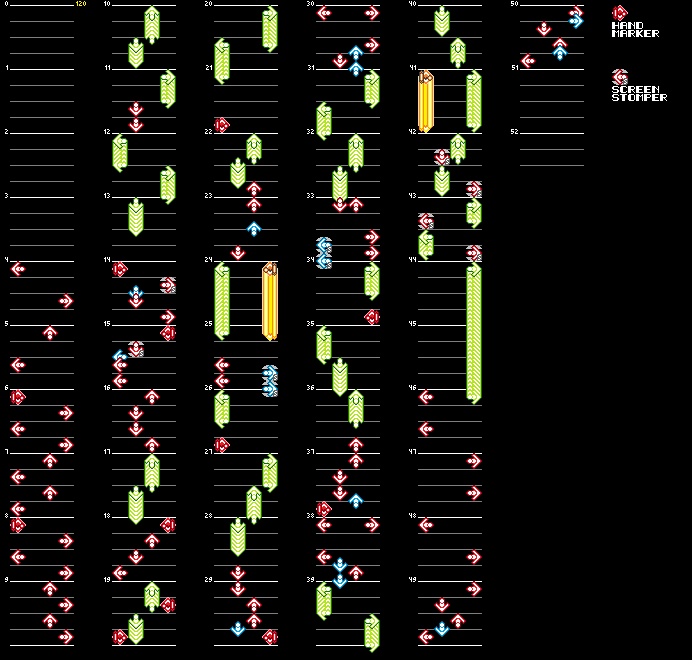
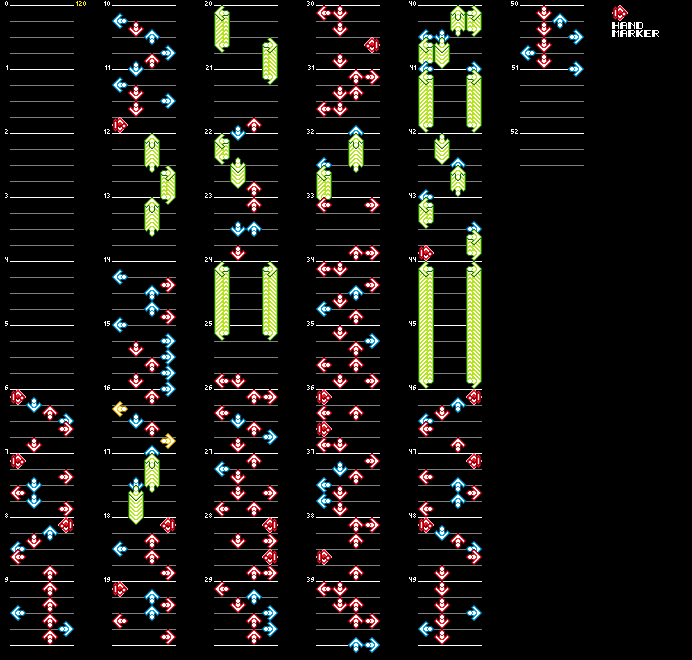
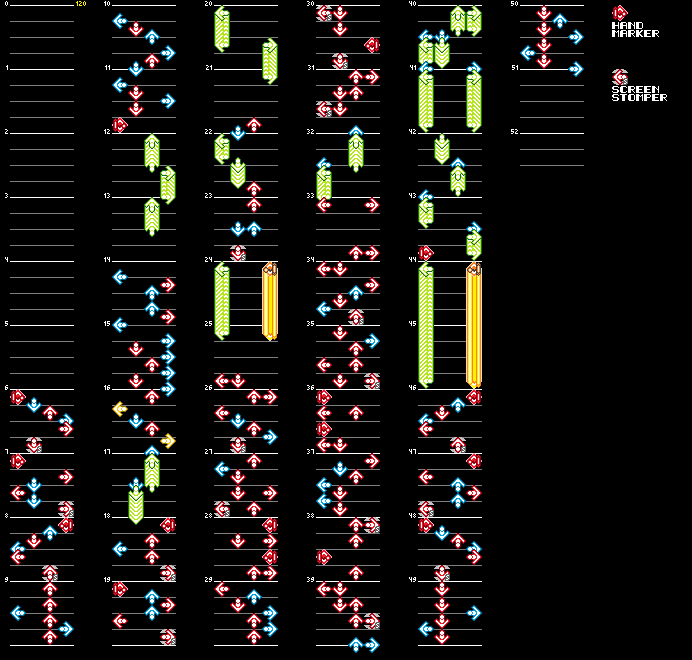
All early charts lack Screen Stompers. In their place were originally regular notes or sometimes Hand Markers. Also, all Hold Markers were originally regular freeze arrows.
Basic
Chart Data
|
Early |
Final |
|---|---|

|

|
Difficult
Chart Data
|
Early |
Final |
|---|---|
|
|
Expert
Chart Data
|
Early |
Final |
|---|---|
|
|
Beginner
Chart Data
|
Early |
Final |
|---|---|

|

|
ID 38 (I'm Flying Away)#
Different charts: Basic, Difficult, Expert, Beginner
Common Difference
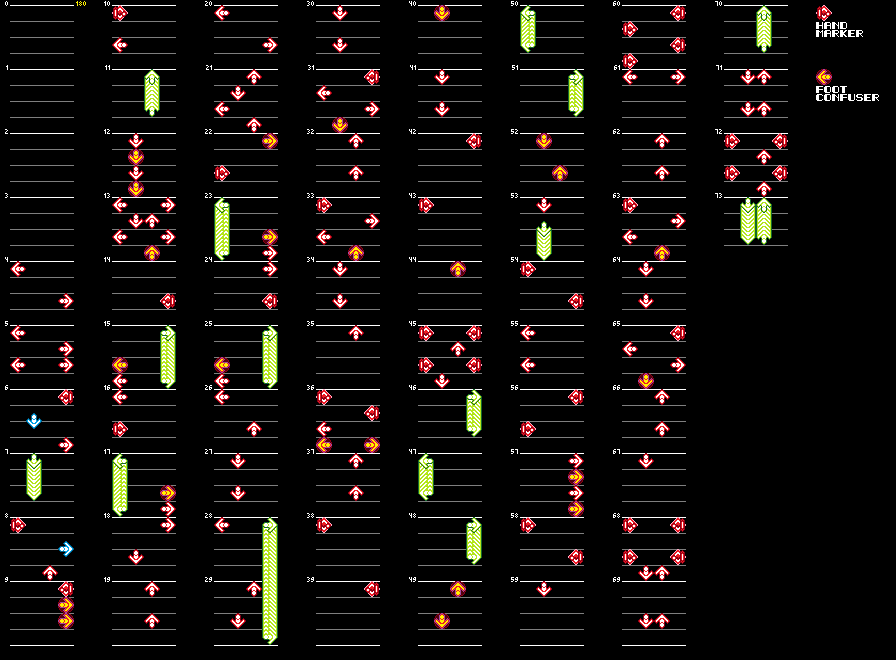
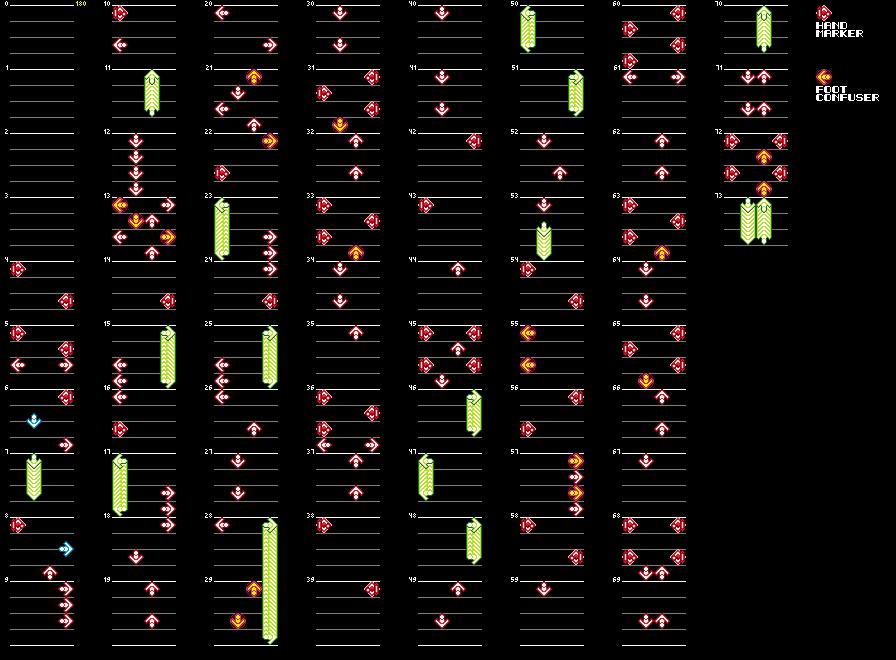
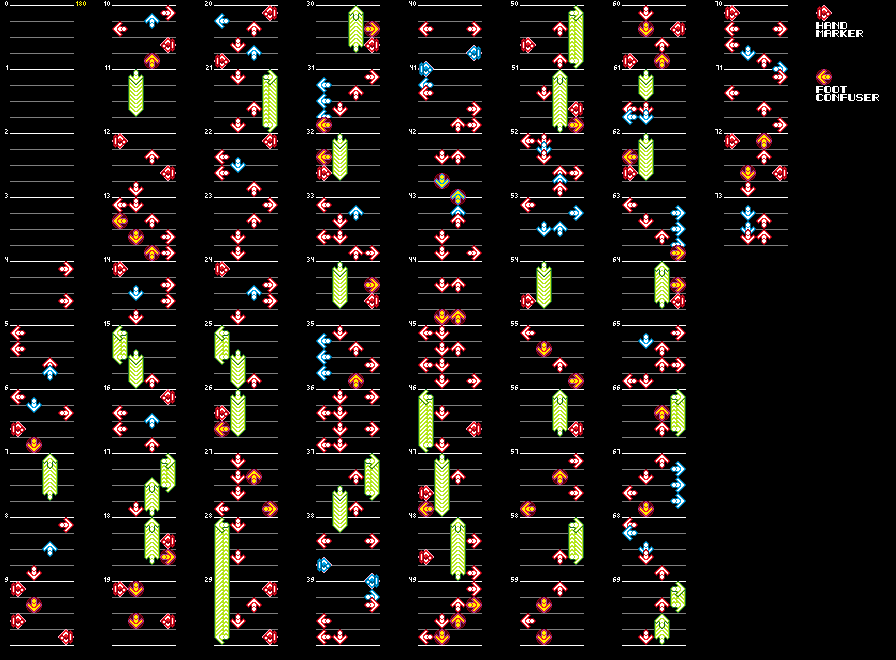
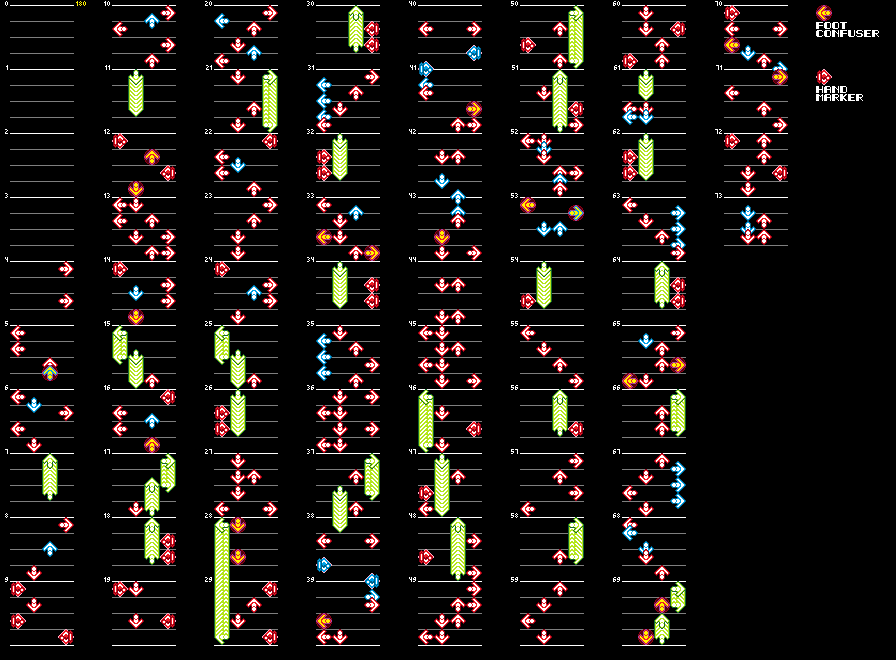
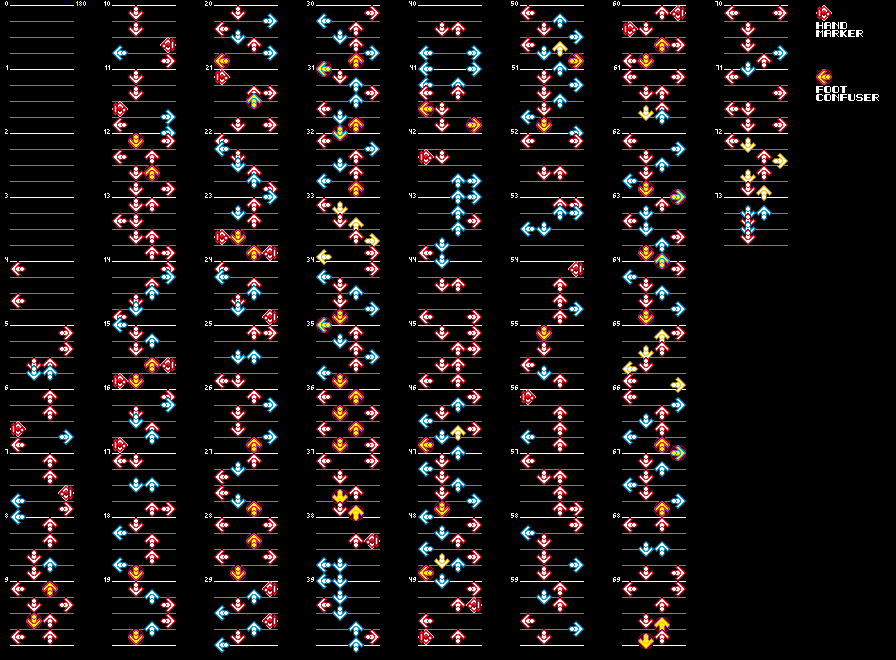
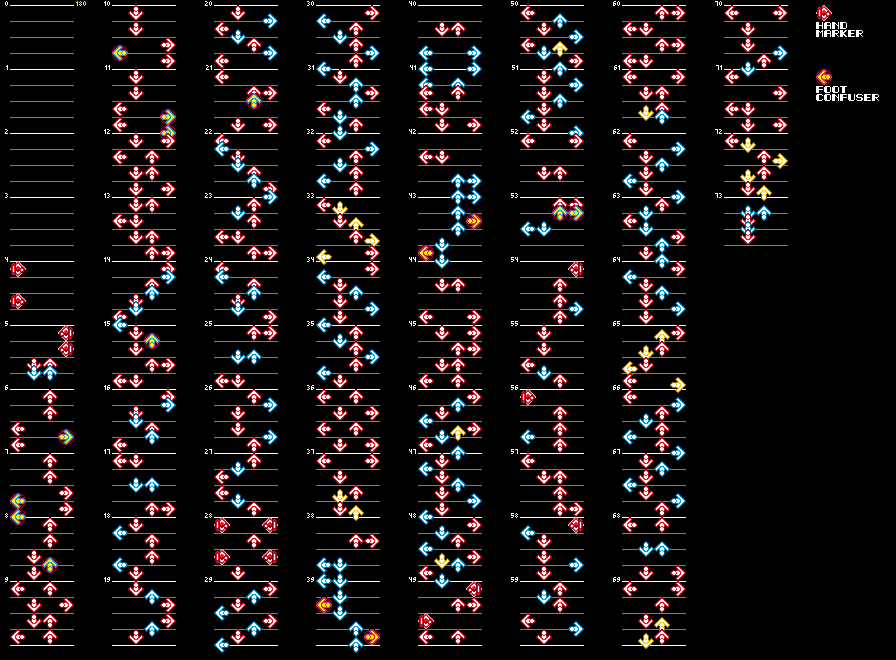
The gimmick arrangement is different in all charts.
Basic
Chart Data
|
Early |
Final |
|---|---|
|
|
Difficult
Chart Data
|
Early |
Final |
|---|---|
|
|
Expert
Chart Data
|
Early |
Final |
|---|---|
|
|
Beginner
Chart Data
|
Early |
Final |
|---|---|

|

|
- There is a missing left arrow in measure 25.
ID 39 (We Will Live Together)#
Different charts: Basic, Difficult, Expert, Beginner
Common Difference
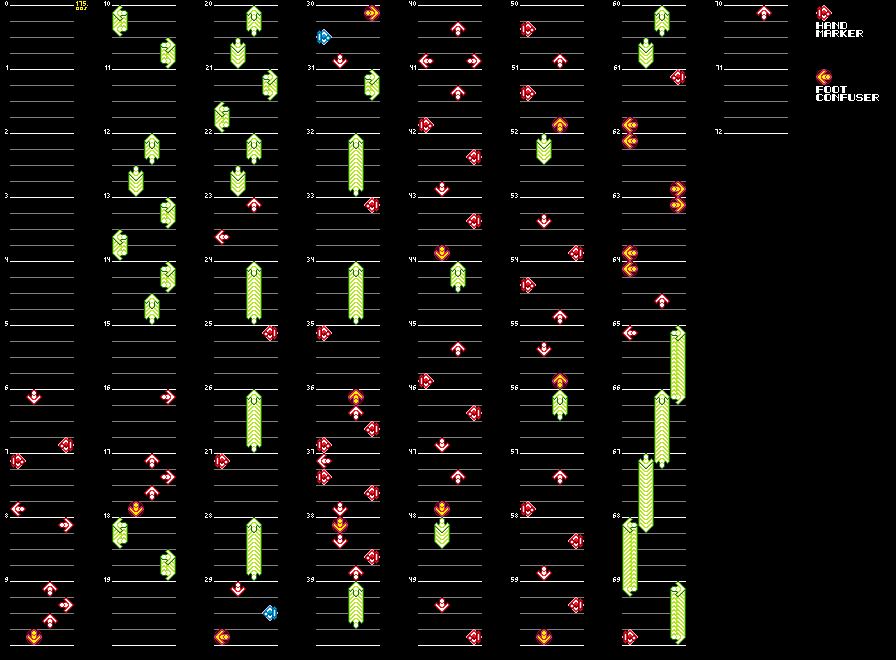
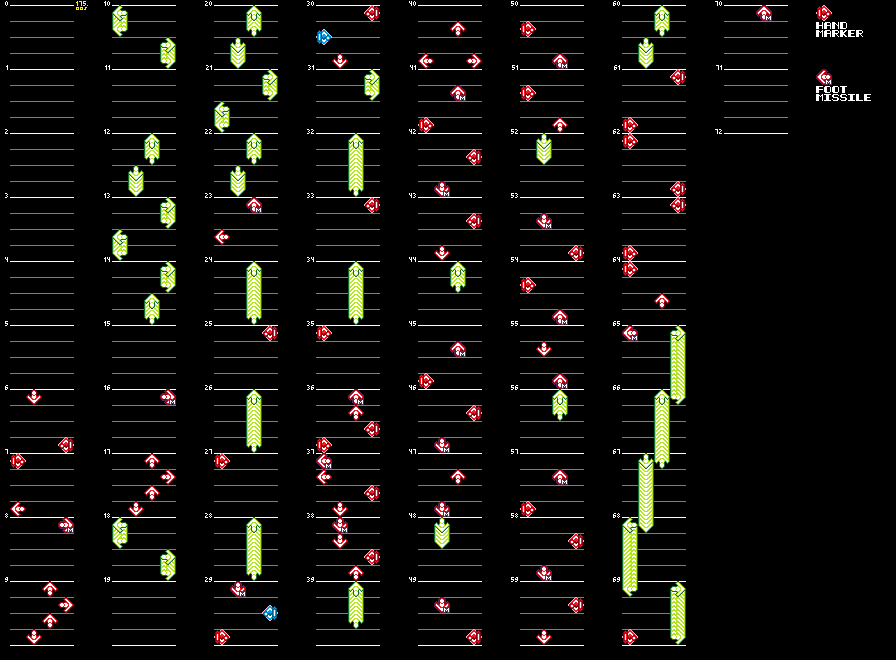
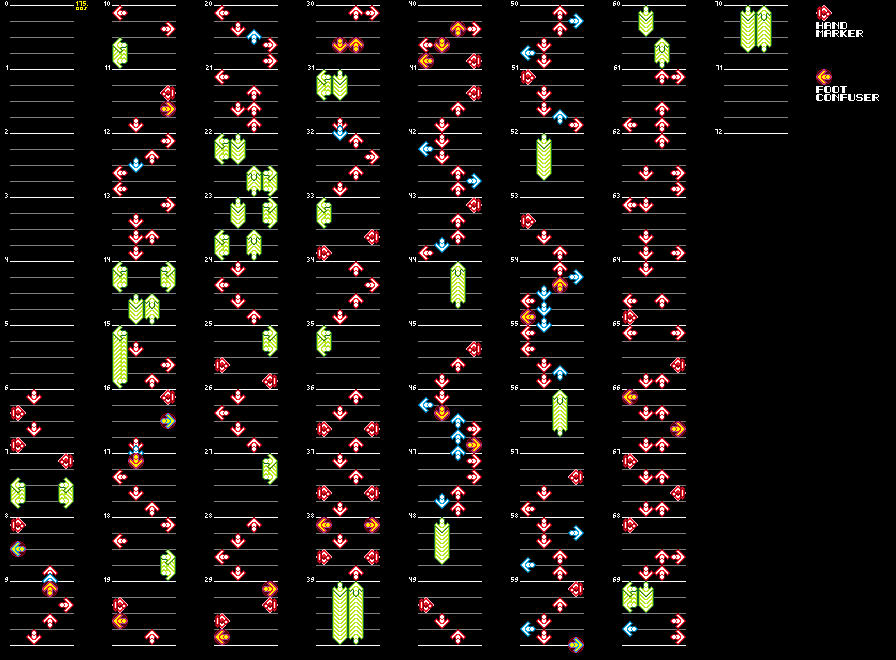
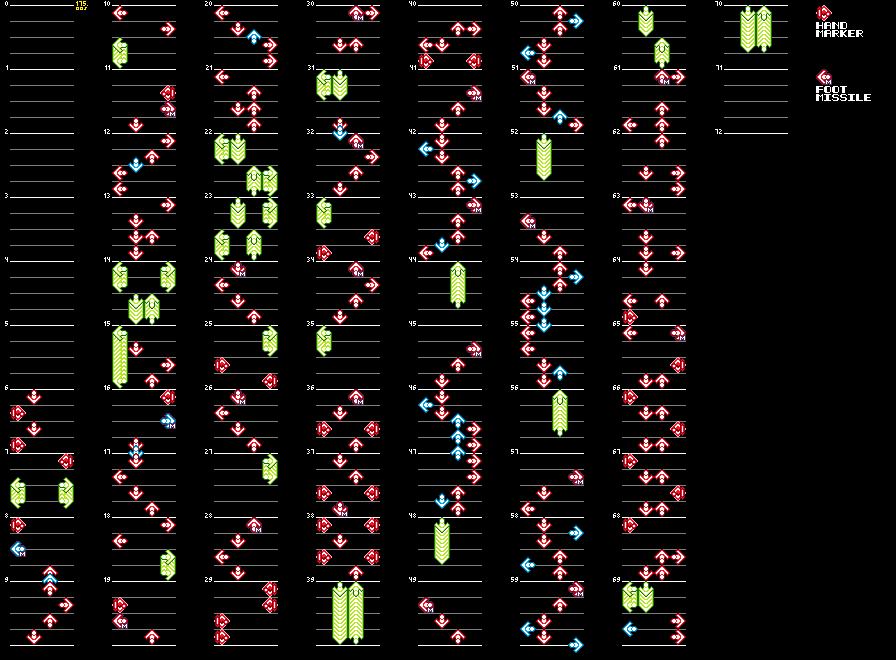
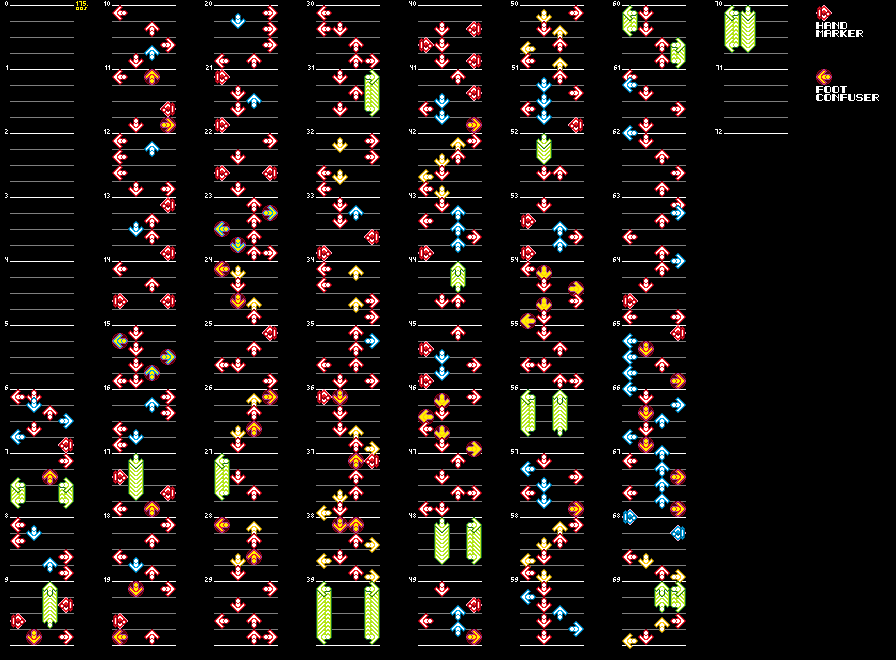
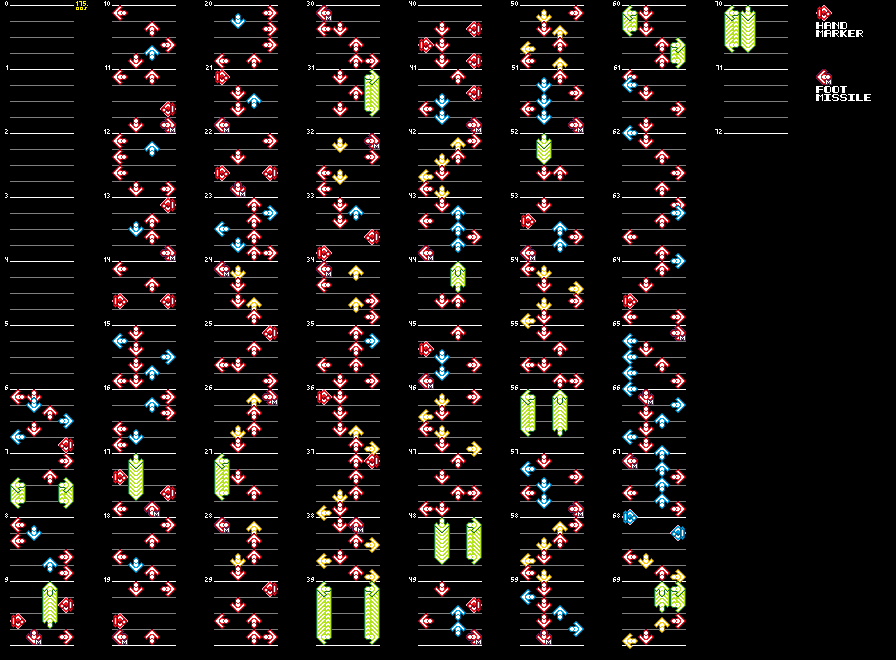
The early charts use the Foot Confuser gimmick instead of Foot Missiles. As such, the gimmick arrangement is different.
Basic
Chart Data
|
Early |
Final |
|---|---|
|
|
Difficult
Chart Data
|
Early |
Final |
|---|---|
|
|
Expert
Chart Data
|
Early |
Final |
|---|---|
|
|
Beginner
Chart Data
|
Early |
Final |
|---|---|

|

|
IDs 40-52#
ID 40 (Heavens and the Earth)#
Different charts: Basic, Difficult, Expert, Beginner
Common Difference
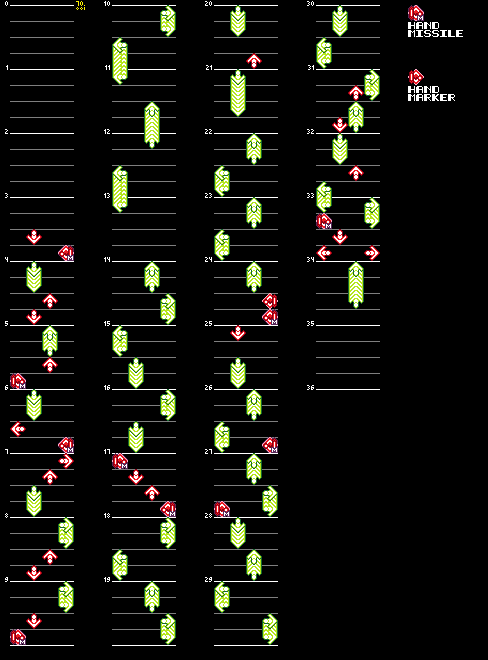
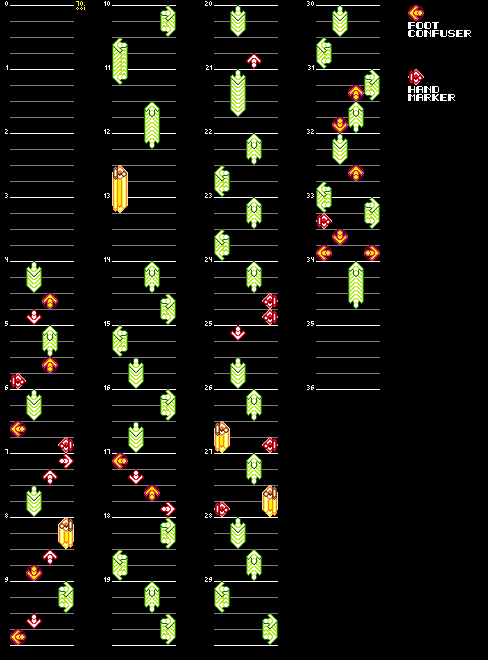
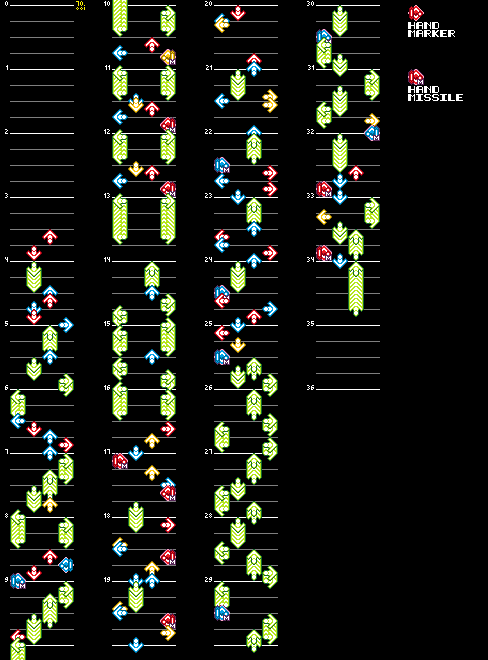
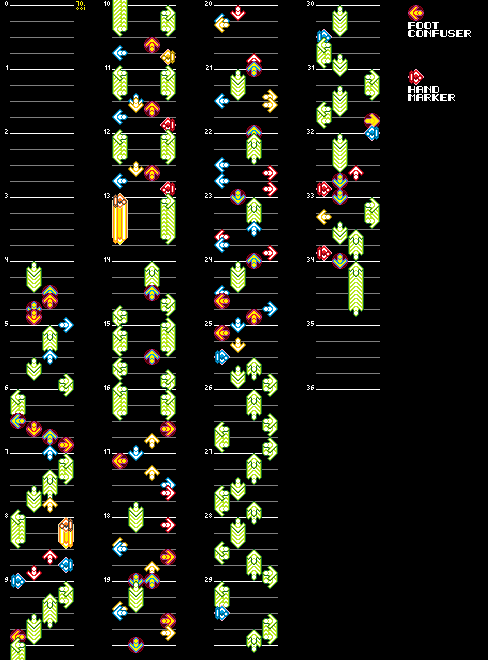
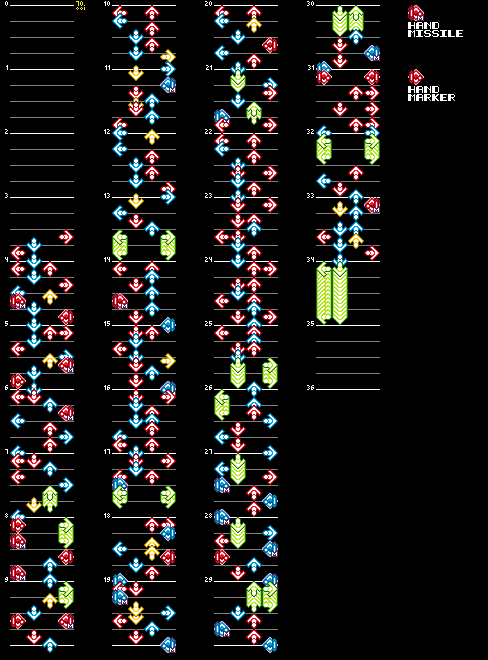
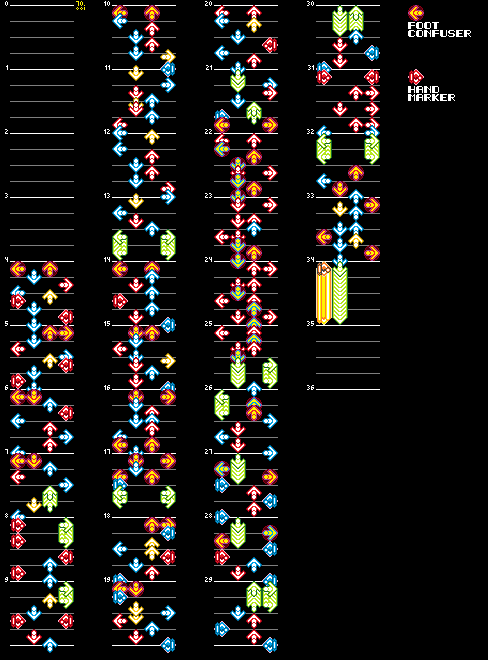
The early charts use the Hand Missile gimmick instead of Foot Confusers, and, as such, have different gimmick arrangements. They also start two beats earlier compared to the used data. All Hold Markers were originally regular freeze arrows, too. Curiously, gimmickless versions of these unused charts would later be used in Dance Dance Revolution S.
Basic
Chart Data
|
Early |
Final |
|---|---|
|
|
Difficult
Chart Data
|
Early |
Final |
|---|---|
|
|
Expert
Chart Data
|
Early |
Final |
|---|---|
|
|
Beginner
Chart Data
|
Early |
Final |
|---|---|

|

|
ID 41 (Moving On)#
Different charts: Difficult, Expert, Beginner
Difficult
Chart Data
|
Early |
Final |
|---|---|
|
|
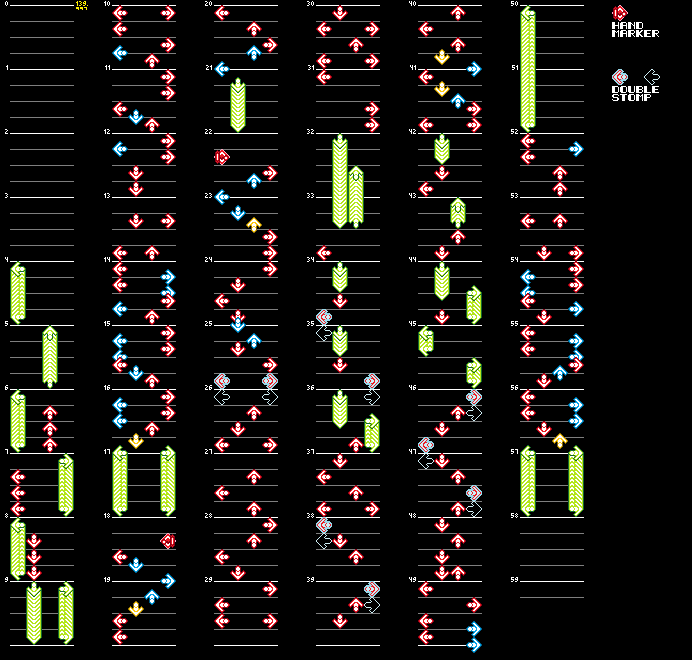
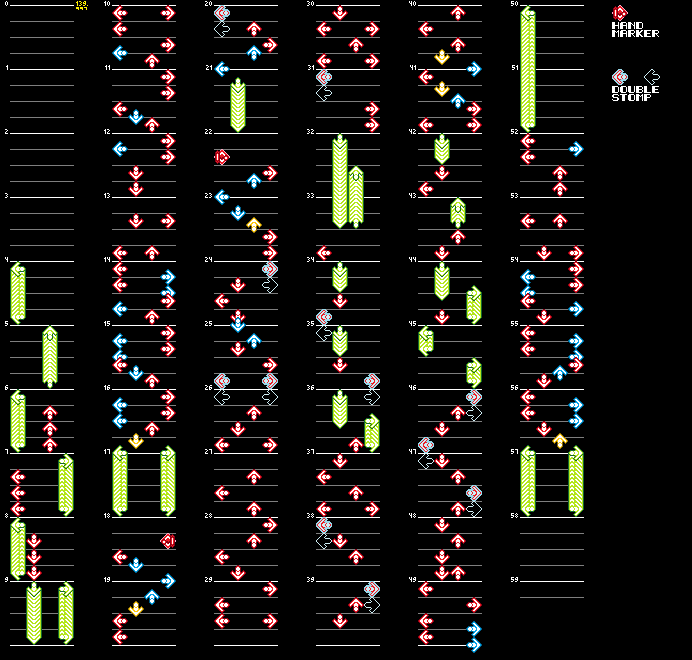
- There were originally no Double Stomps at measures 20, 24 and 31.
Expert
Chart Data
|
Early |
Final |
|---|---|
|
|
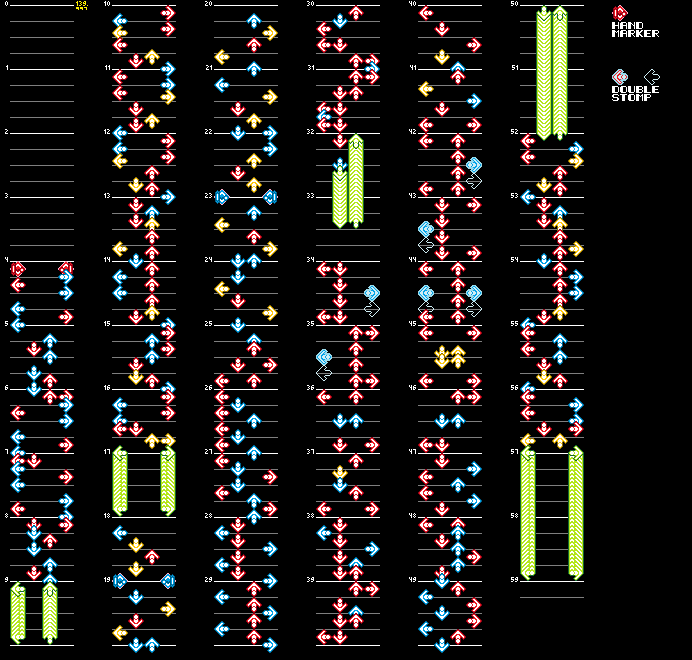
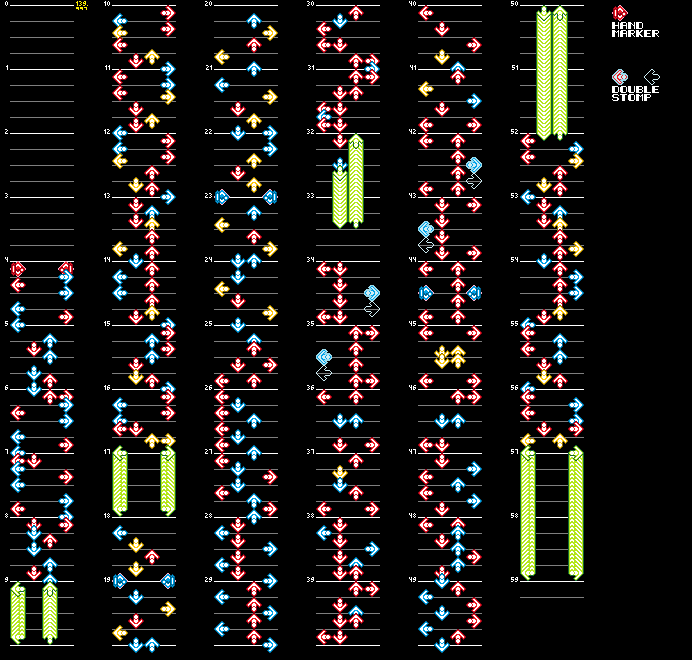
- The Hand Markers at measure 44 were originally Double Stomps.
Beginner
Chart Data
|
Early |
Final |
|---|---|

|

|
- There were originally no Double Stomps at measures 20 and 24.
ID 42 (Here I Go Again)#
Different charts: Beginner
Beginner
Chart Data
|
Early |
Final |
|---|---|

|

|
- The placement of the Double Stomps is slightly different.
ID 43 (the beat)#
Different charts: Basic, Difficult, Expert, Beginner
Common Difference
The early charts use the Screen Stomper gimmick instead of Foot Confusers. Despite this, this slot in each chart's gimmick pool was the only thing that was changed; in all areas in which Foot Confusers would be placed there are Screen Stompers instead.
ID 44 (Beautiful Inside (Cube::Hard Mix)#
Different charts: Basic, Difficult, Expert, Beginner
Basic
Chart Data
|
Early |
Final |
|---|---|

|
|
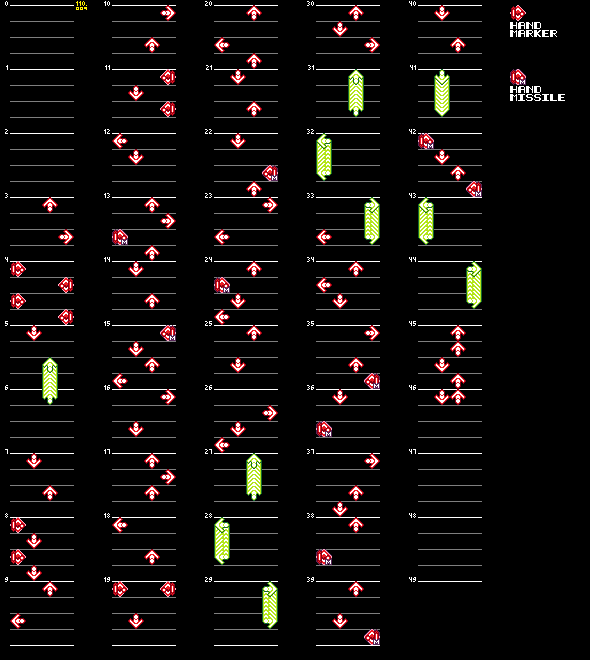
- The early chart does not have Hand Missiles. In all cases except for the left arrow at measure 36, they were originally Hand Markers.
Difficult
Chart Data
|
Early |
Final |
|---|---|
|
|
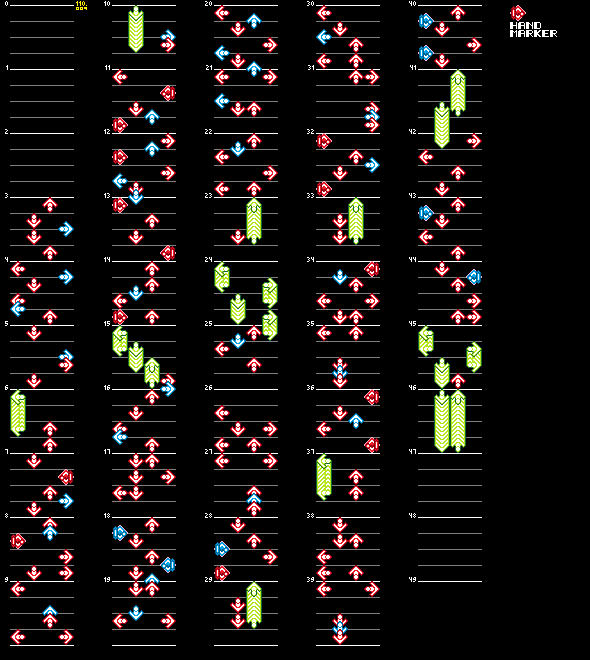
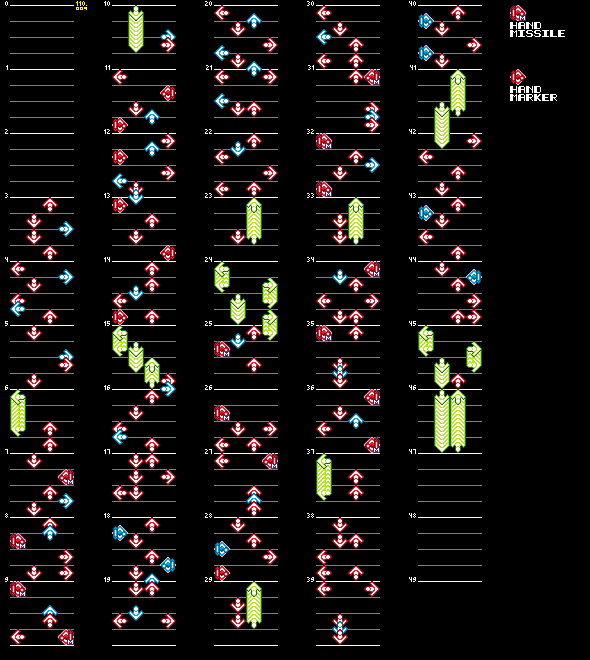
- The early chart does not have Hand Missiles, with Hand Markers and regular arrows being positioned where they should be.
Expert
Chart Data
|
Early |
Final |
|---|---|
|
|
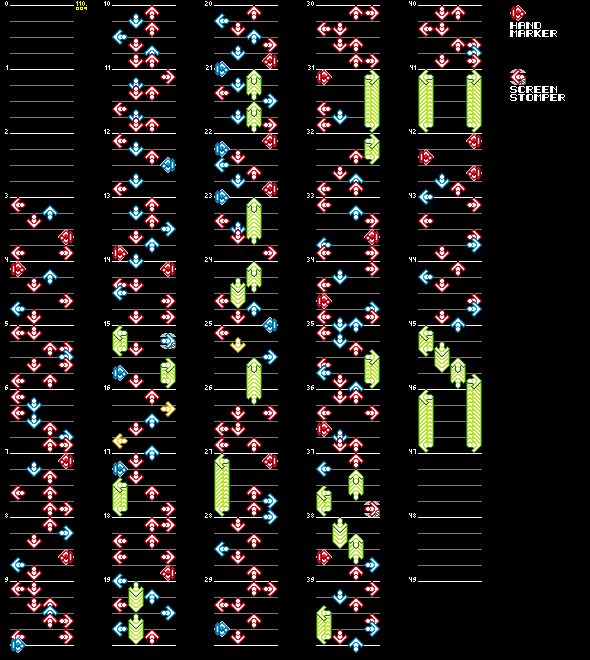
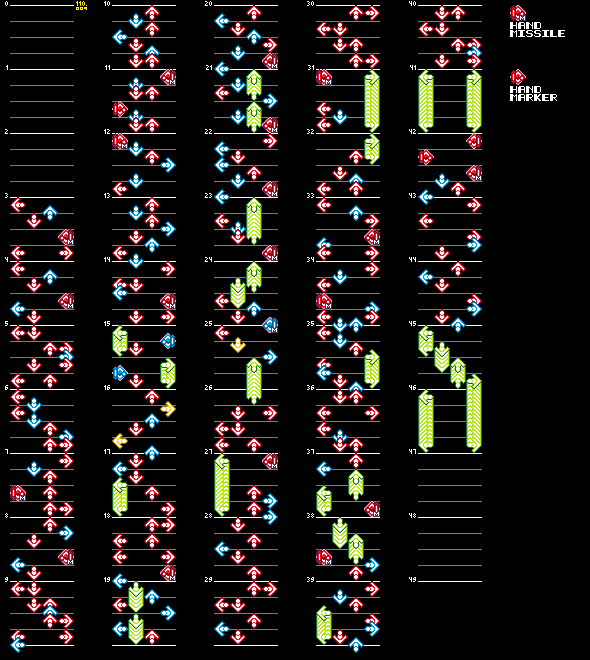
- The early chart uses the Screen Stomper gimmick instead of Hand Missiles. The gimmick arrangement is different too, with many more Hand Markers.
Beginner
Chart Data
|
Early |
Final |
|---|---|

|

|
- The early chart does not have Hand Missiles, with Hand Markers and regular arrows being positioned where they should be.
ID 45 (Mess With My Emotions)#
Different charts: Basic, Difficult, Expert, Beginner
Common Difference
The early charts don't have Foot Destructors. Their absence seems to be the only difference; the placement of all other arrows are identical.
ID 46 (THE REASON)#
Different charts: Basic, Difficult, Expert, Beginner
Common Difference
The early charts don't have Foot Missiles, with regular arrows appearing where these gimmicks should be.
ID 47 (SUPER SAMURAI)#
Different charts: Beginner
Beginner
Chart Data
|
Early |
Final |
|---|---|
|
|
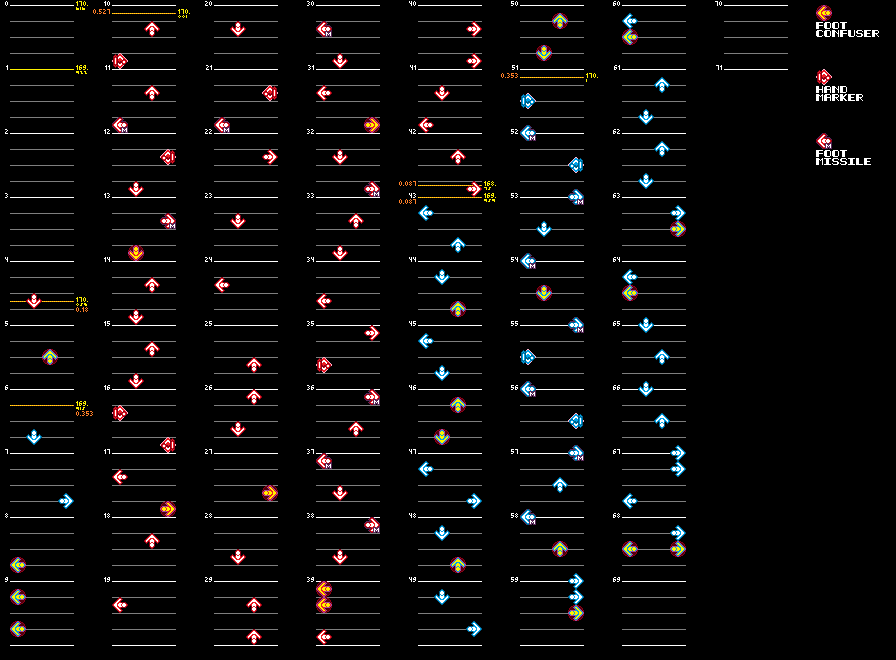
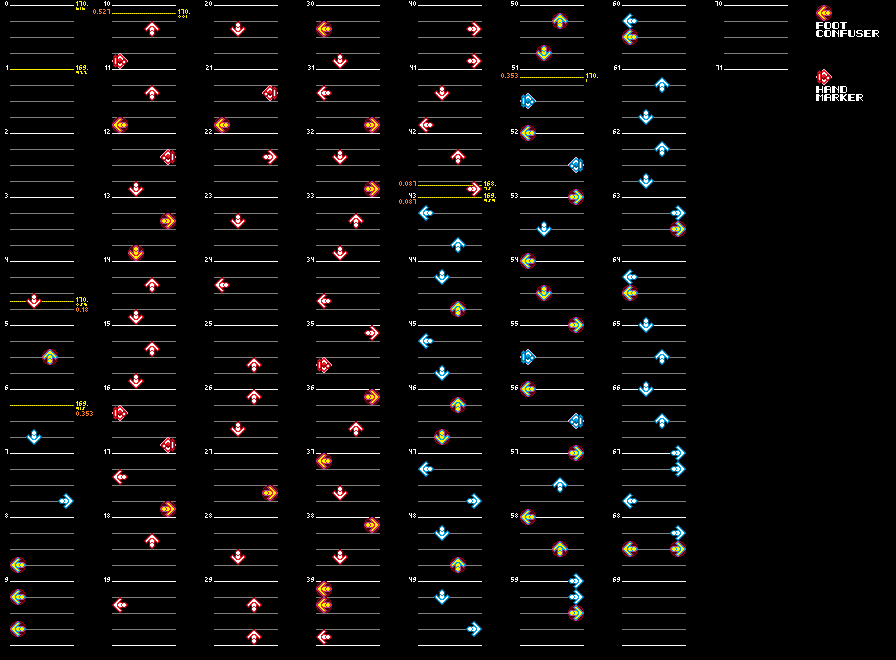
- Contrary to most early charts, the unused Beginner chart makes use of an additional gimmick, that being Foot Missiles. Curiously, none of the song's other charts in both the early and final data make use of this gimmick.
ID 48 (Such A Feeling)#
Different charts: Basic, Difficult, Expert
Common Difference
The early charts don't have Foot Confusers, with regular arrows appearing where these gimmicks should be. All Hold Markers were also regular freeze arrows, too.
ID 49 (Hold Tight)#
Different charts: Basic, Difficult, Expert, Beginner
Common Difference
The early charts don't have Foot Confusers, with regular arrows appearing where these gimmicks should be.
ID 50 (tokyoEVOLVED Ver.A)#
Different charts: Basic, Difficult, Expert, Beginner
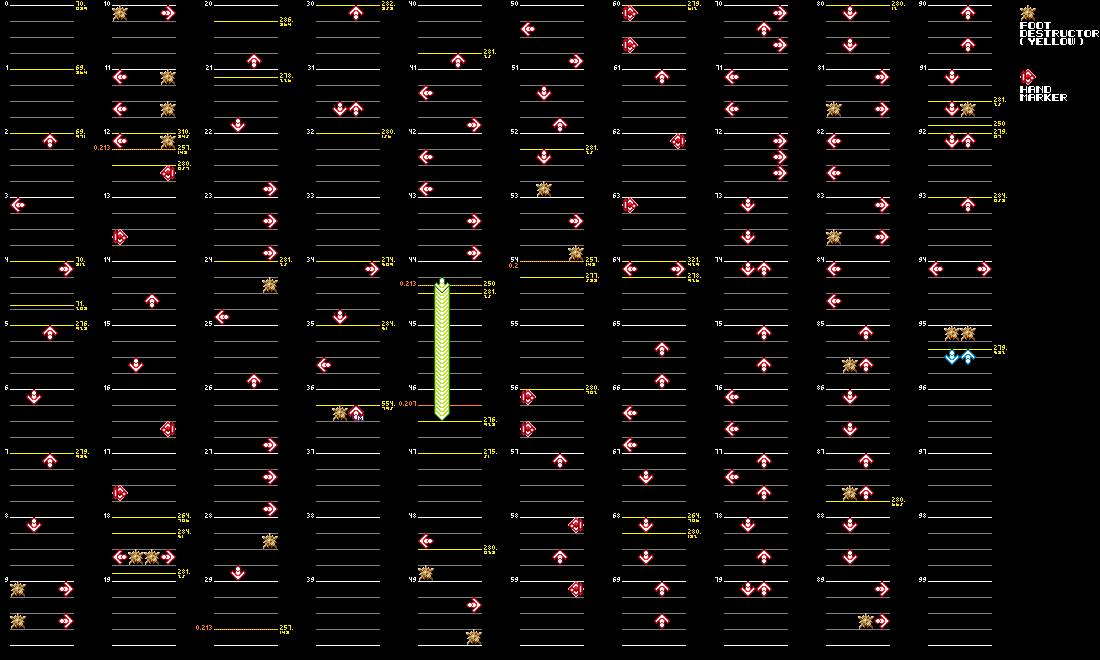
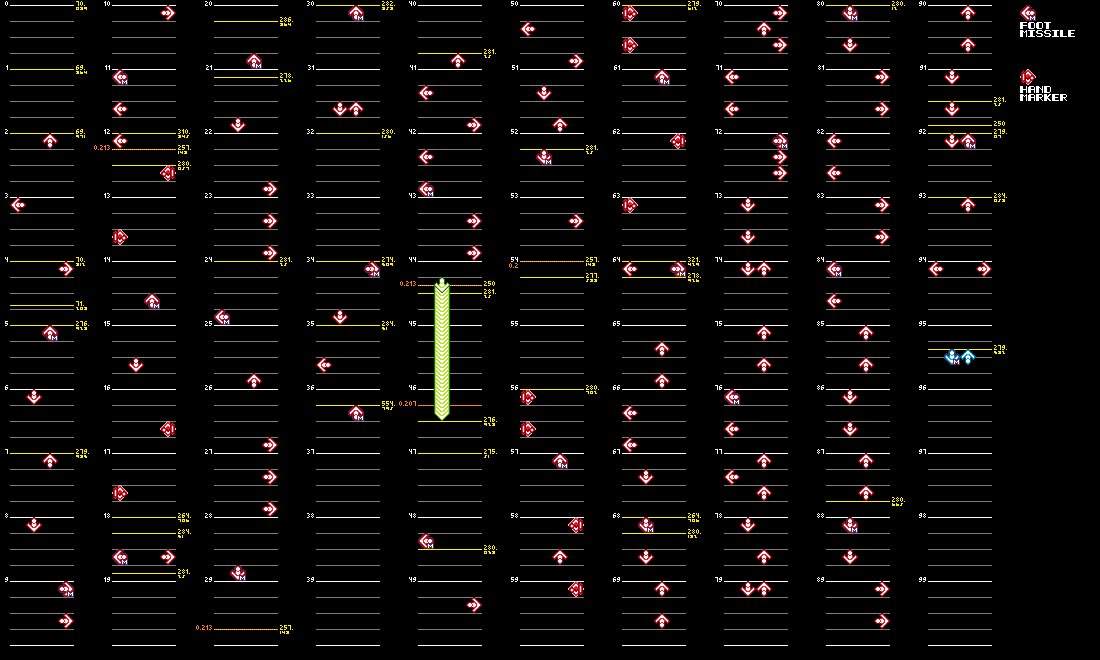
Common Difference
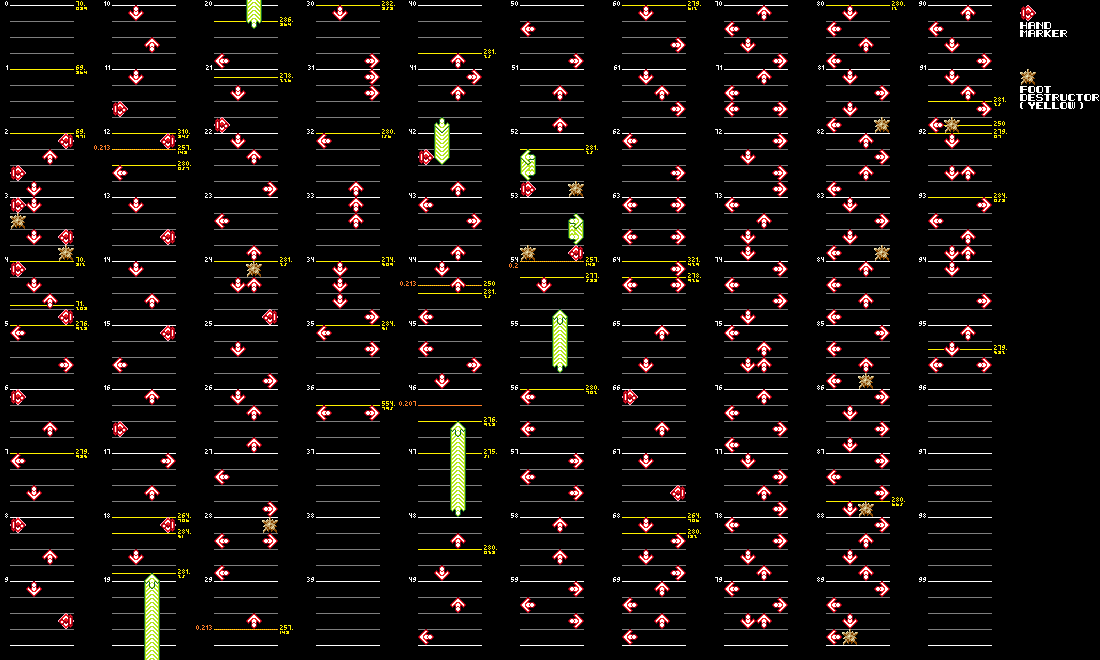
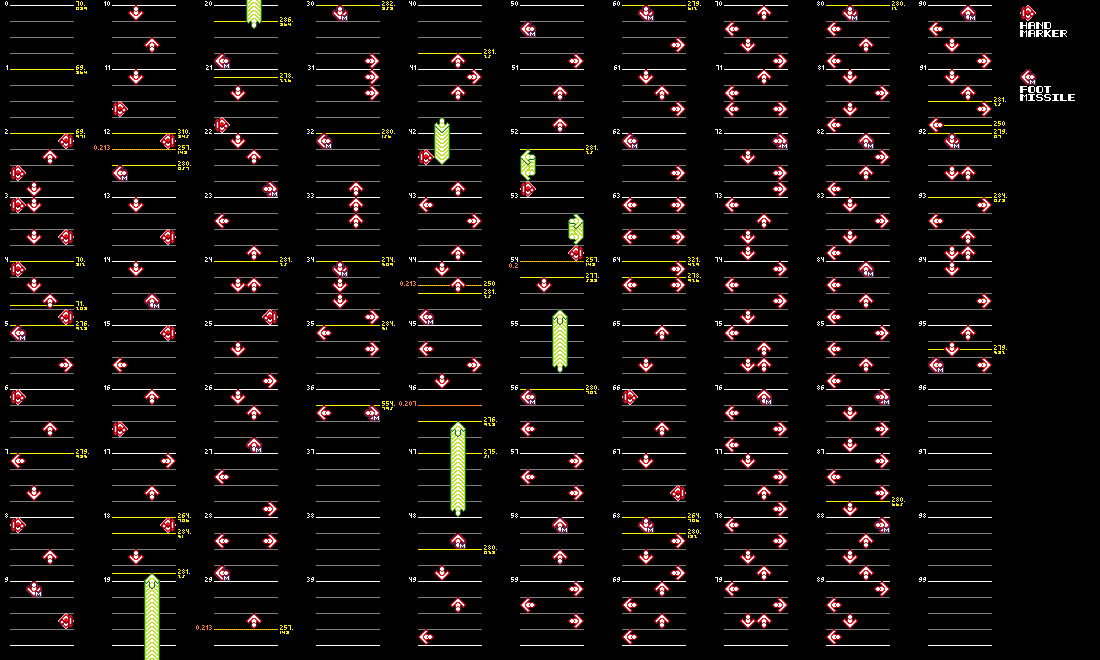
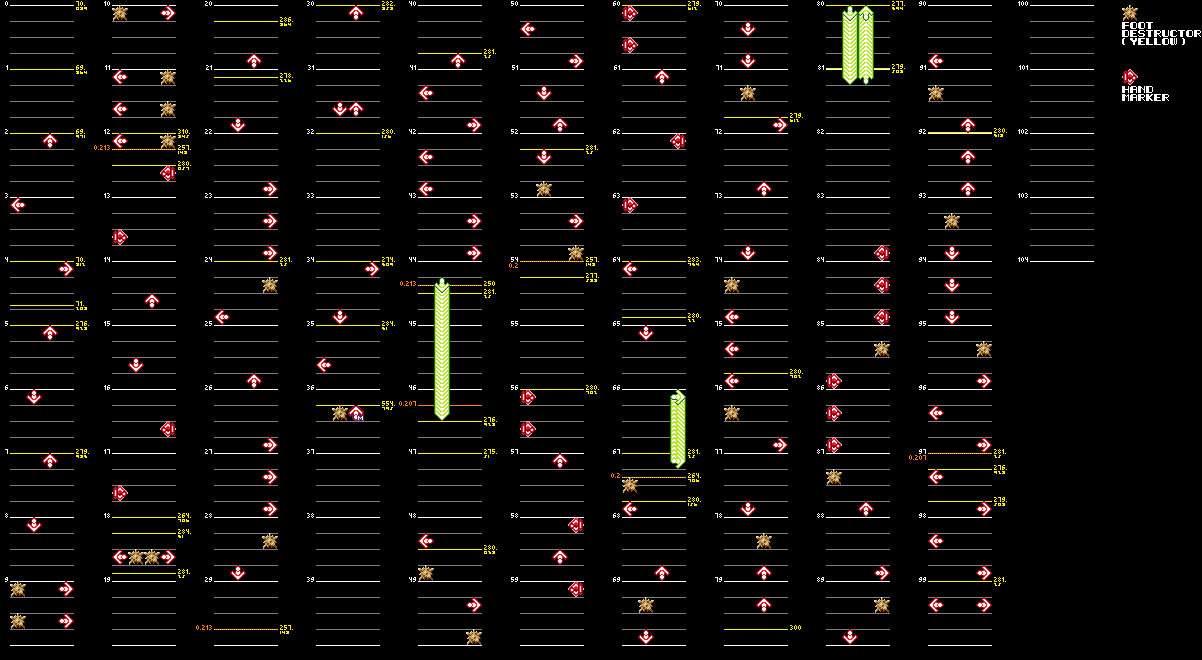
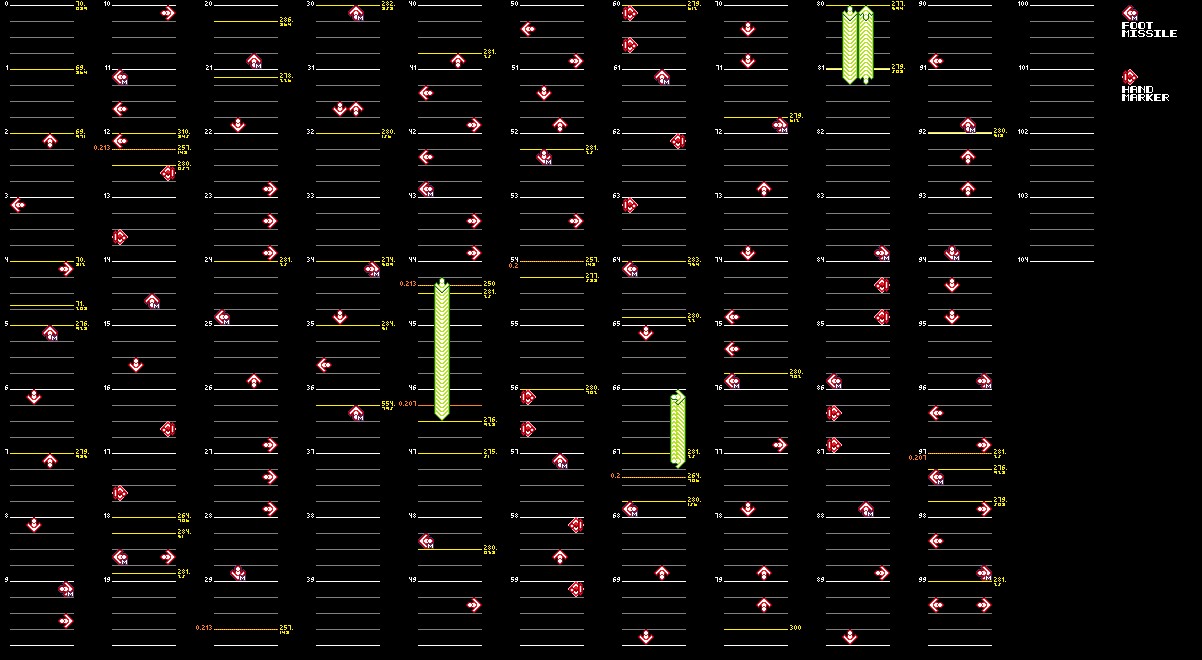
The early charts use the Yellow Foot Destructor gimmick instead of Foot Missiles.
Basic
Chart Data
|
Early |
Final |
|---|---|
|
|
Difficult
Chart Data
|
Early |
Final |
|---|---|
|
|
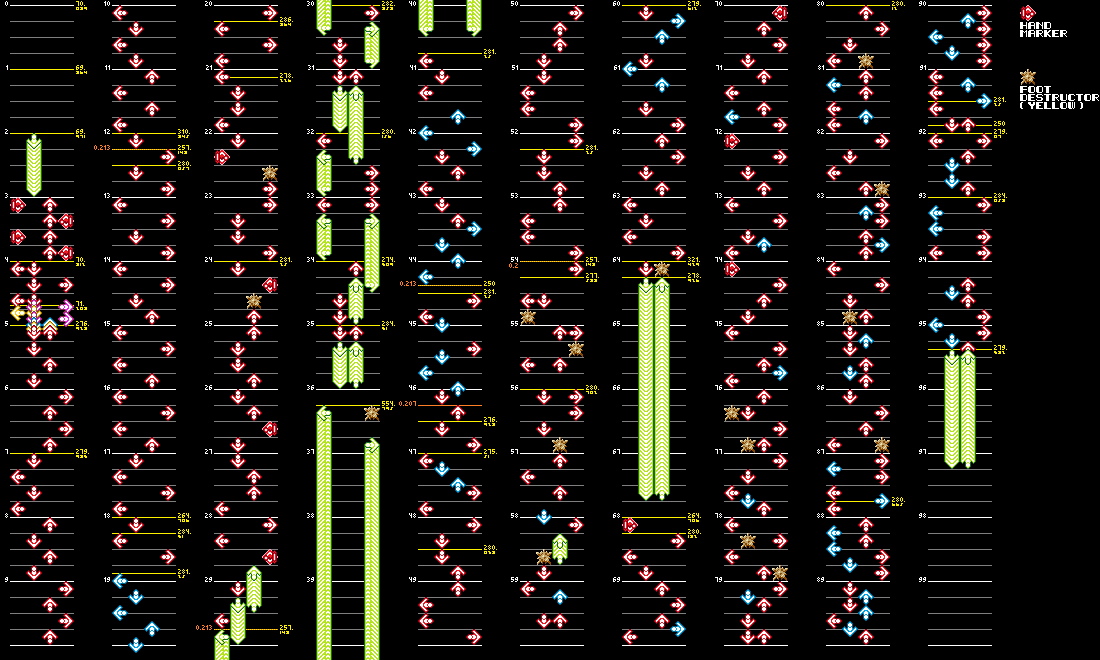
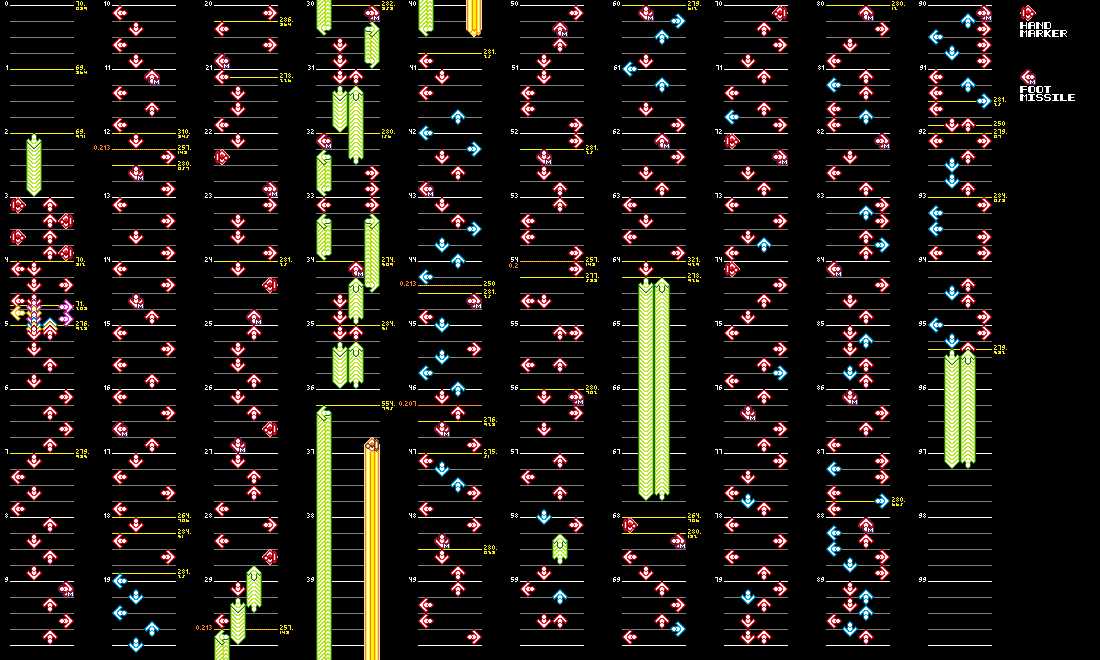
- The Hold Marker starting at measure 36 was originally a regular freeze arrow.
Expert
Chart Data
|
Early |
Final |
|---|---|
|
|
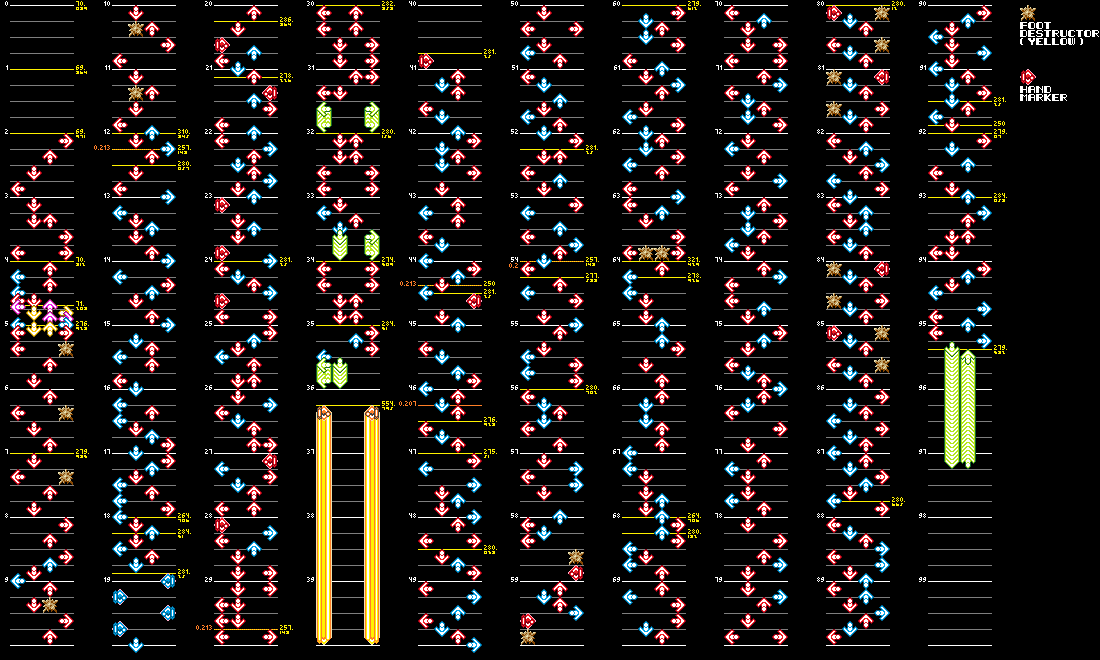
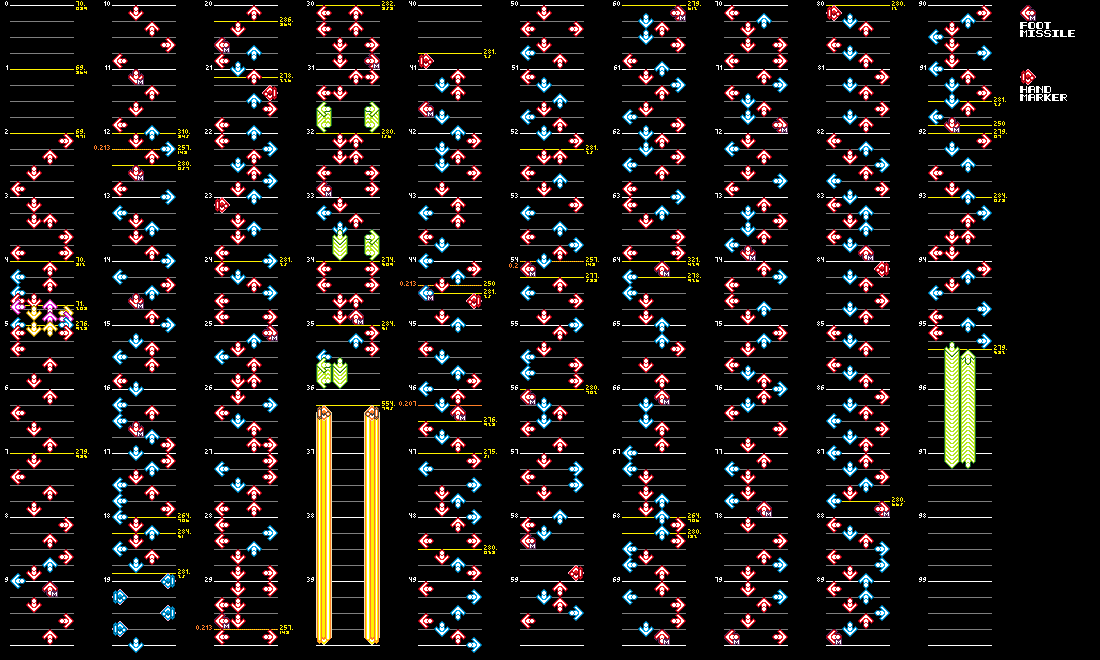
- There are more Hand Markers in the early chart. One interesting thing to note is that the Hand Marker in measure 59 is still there in the song's other two versions.
Beginner
Chart Data
|
Early |
Final |
|---|---|
|
|
ID 51 (tokyoEVOLVED Ver.B)#
Different charts: Basic, Difficult, Expert, Beginner
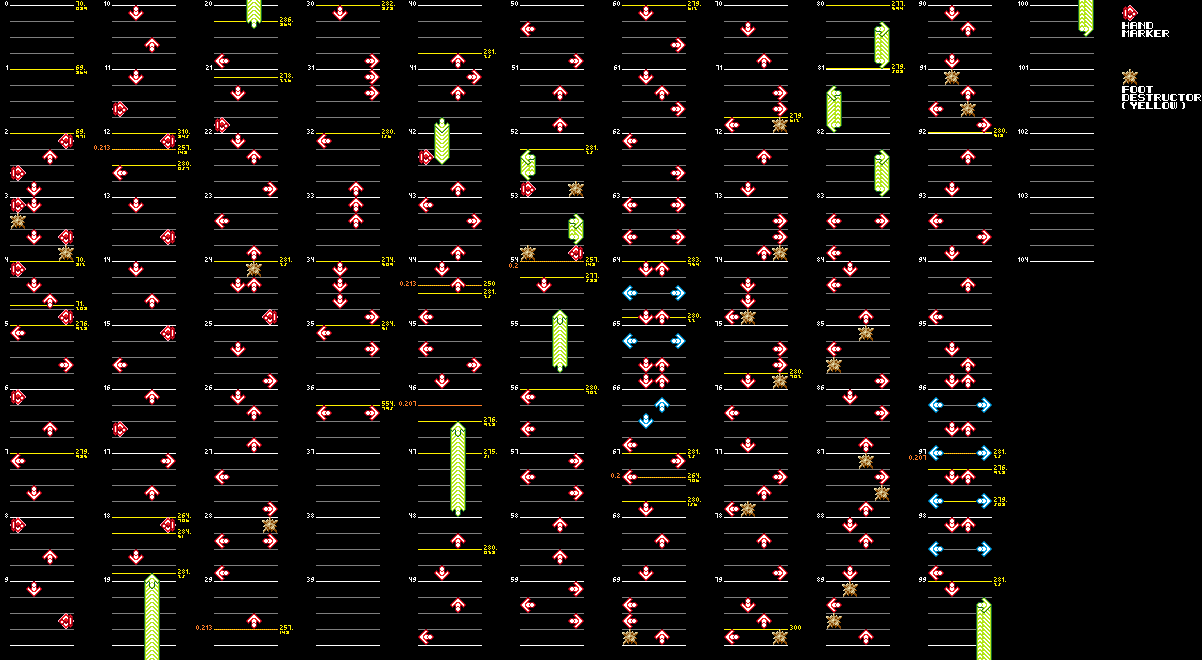
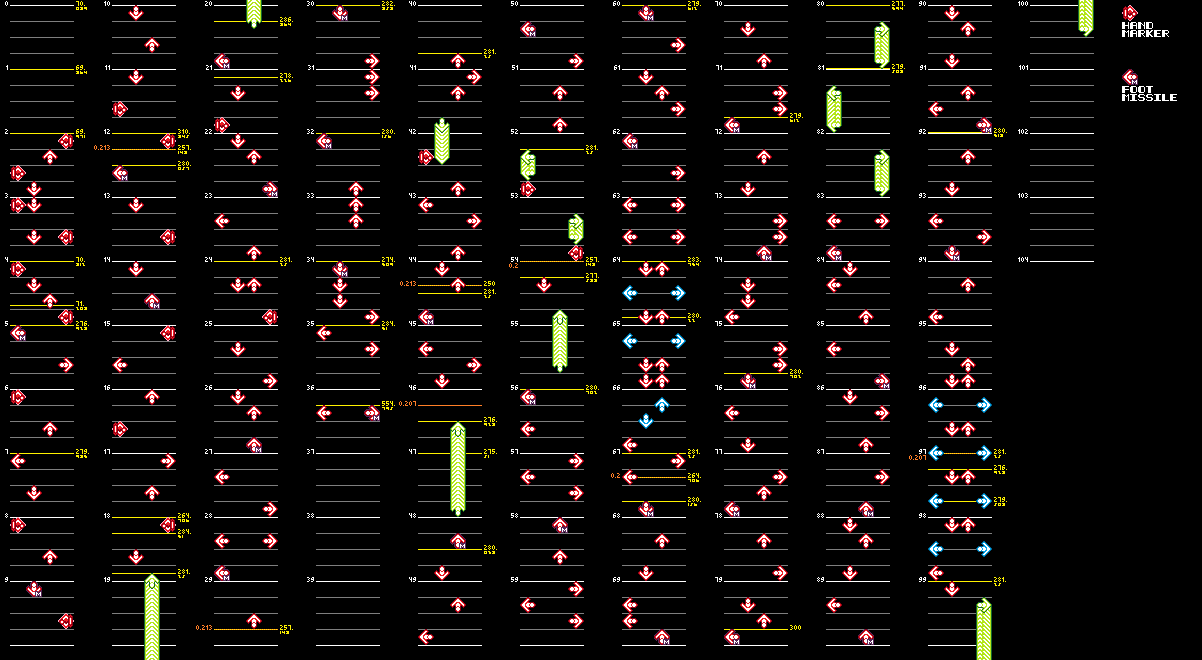
Common Difference
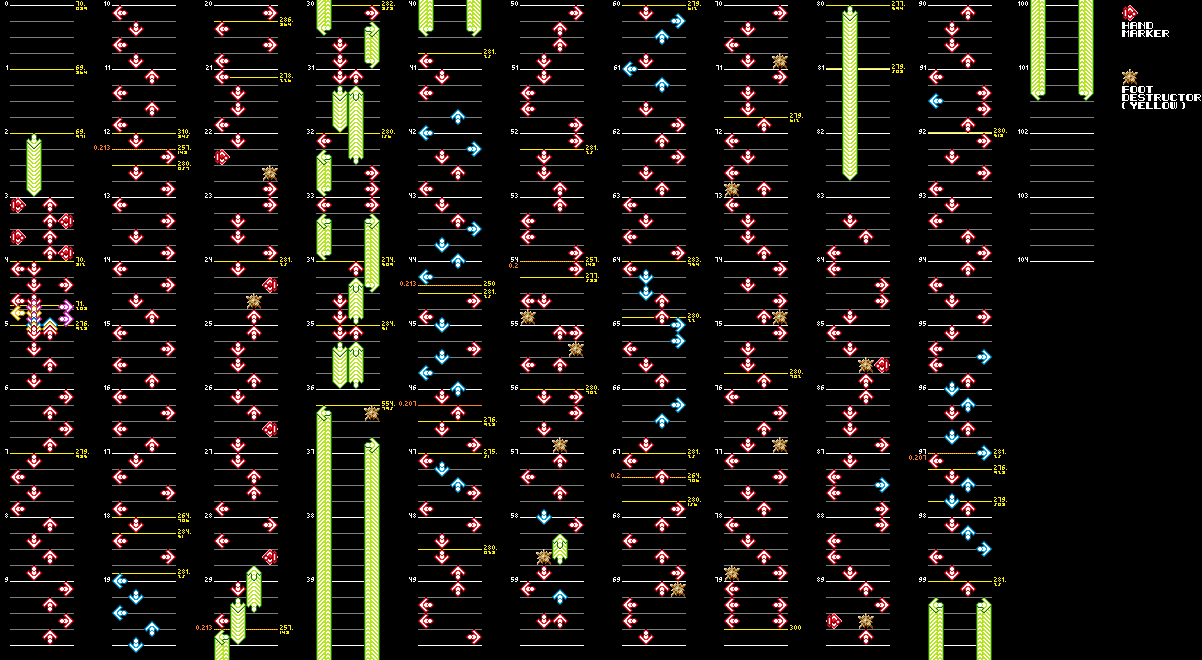
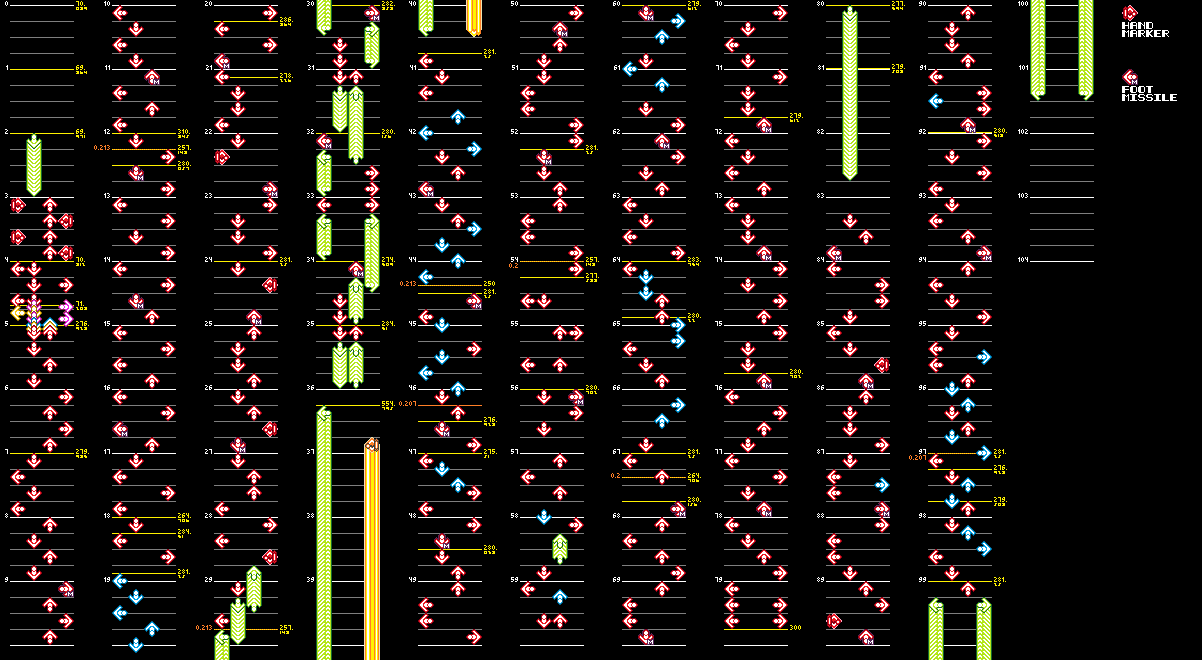
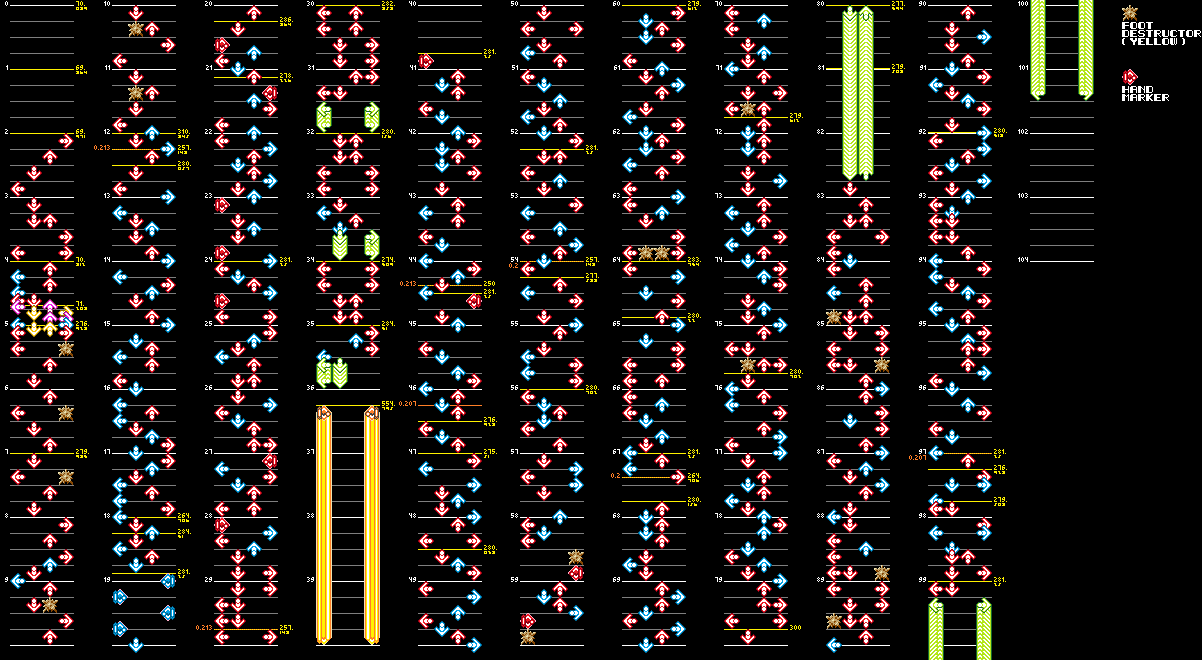
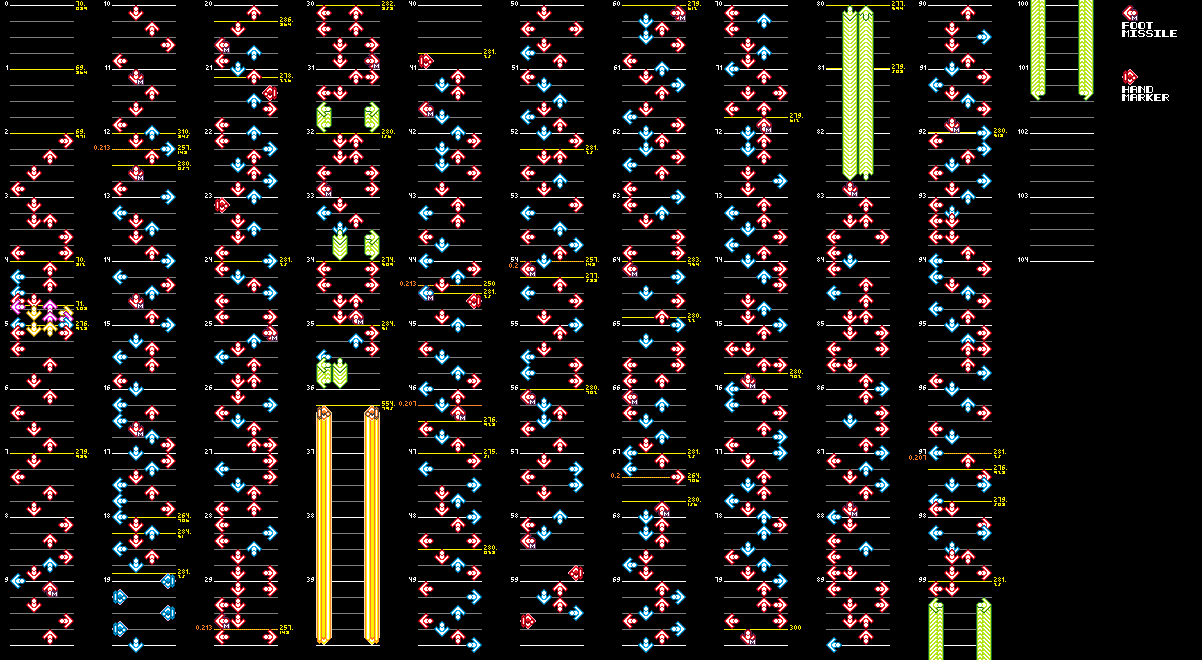
The early charts use the Yellow Foot Destructor gimmick instead of Foot Missiles.
Basic
Chart Data
|
Early |
Final |
|---|---|
|
|
Difficult
Chart Data
|
Early |
Final |
|---|---|
|
|
- The Hold Marker starting at measure 36 was originally a regular freeze arrow.
Expert
Chart Data
|
Early |
Final |
|---|---|
|
|
- There are more Hand Markers in the early chart.
Beginner
Chart Data
|
Early |
Final |
|---|---|
|
|
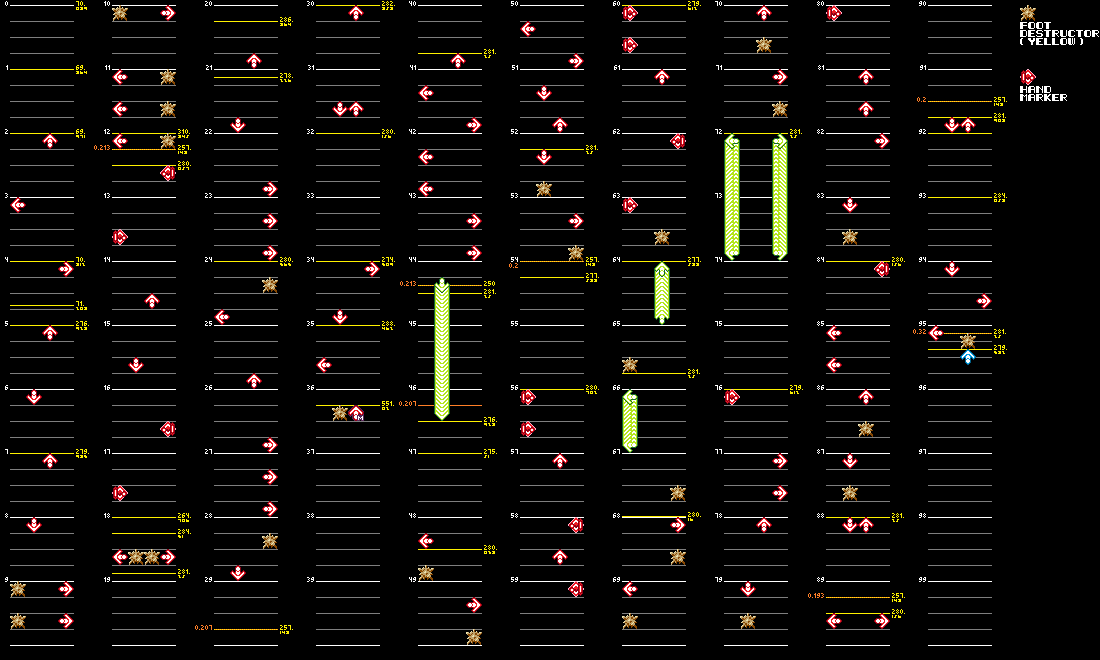
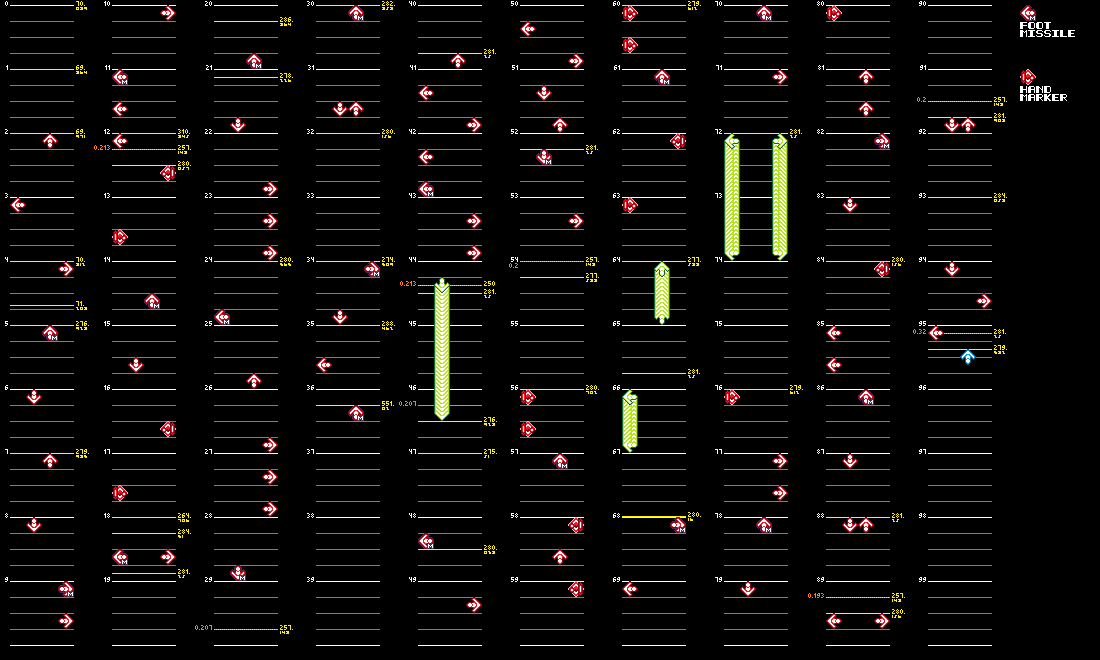
ID 52 (tokyoEVOLVED Ver.C)#
Different charts: Basic, Difficult, Expert, Beginner
Common Difference
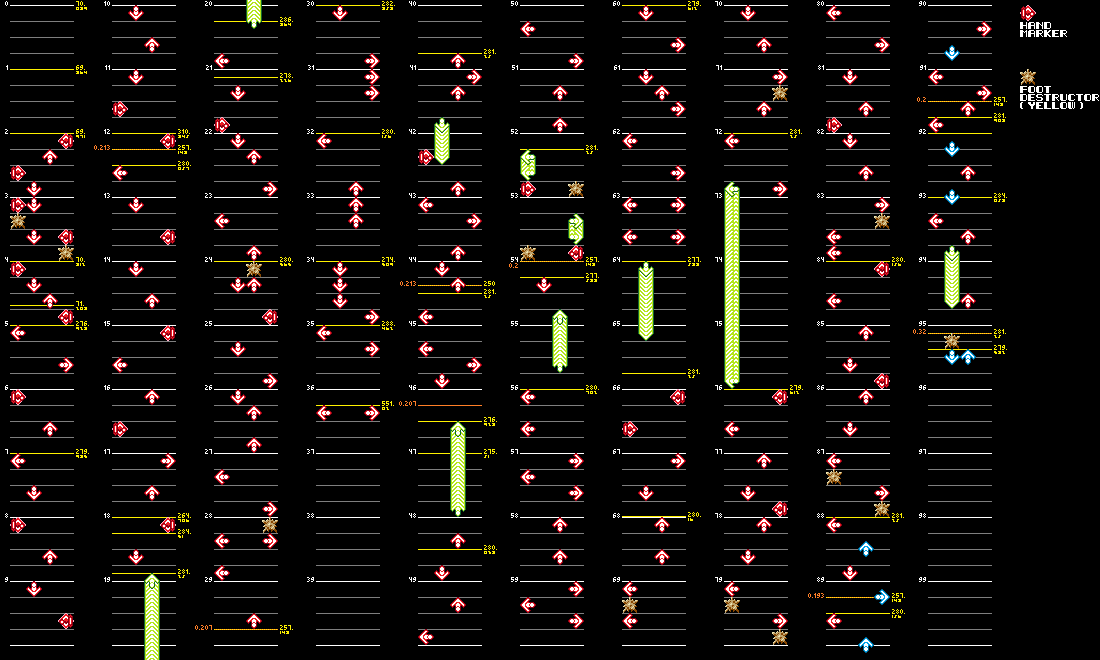
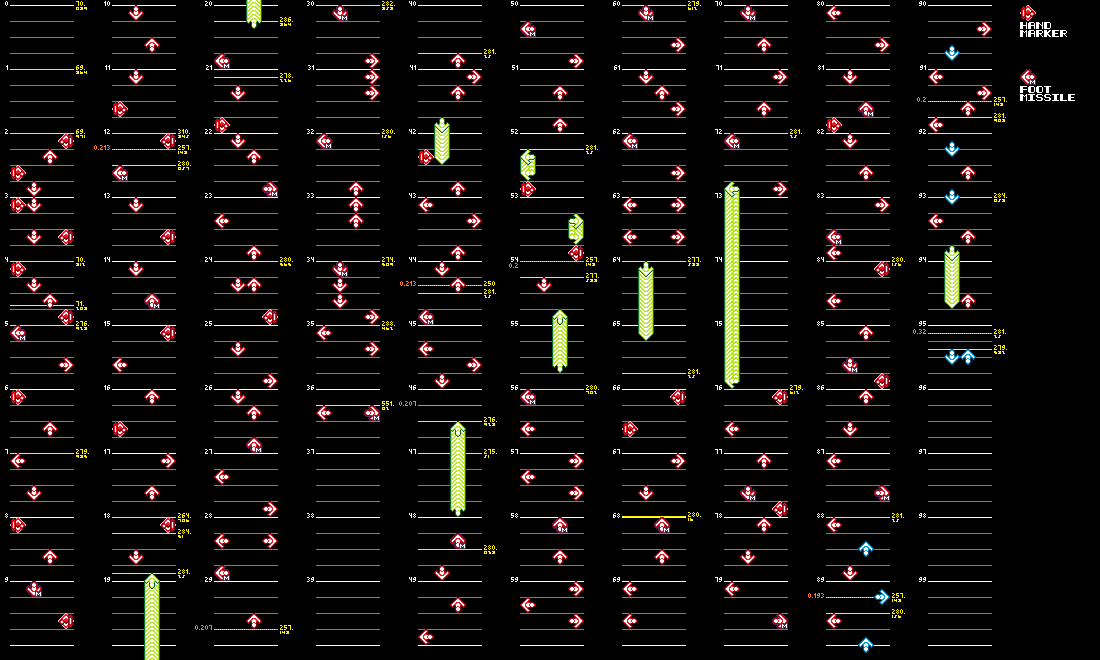
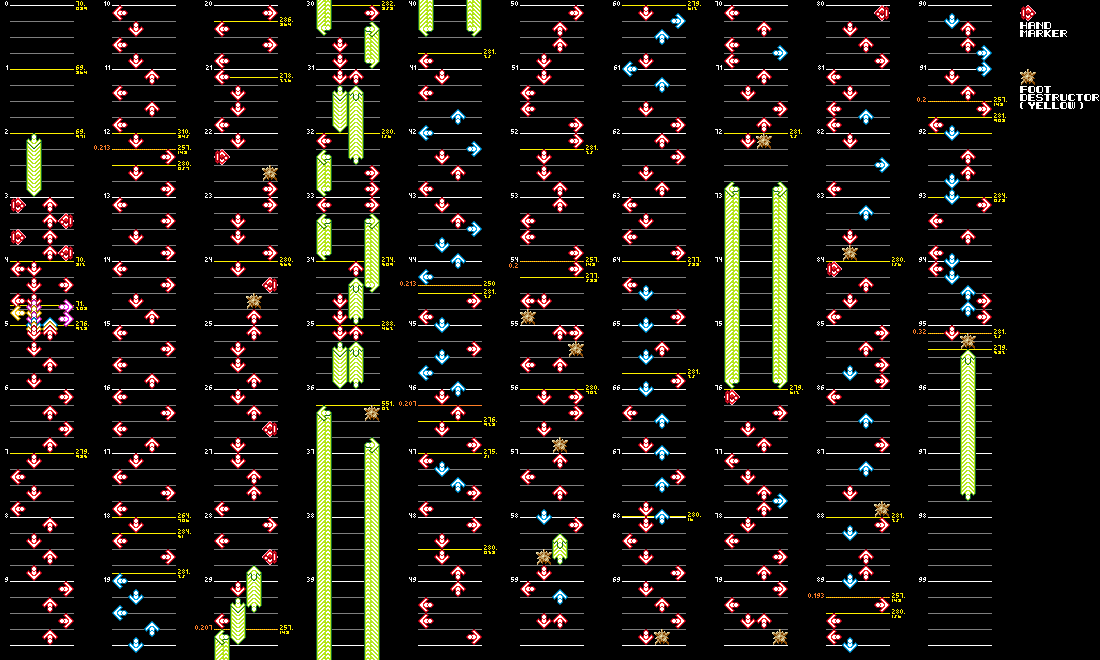
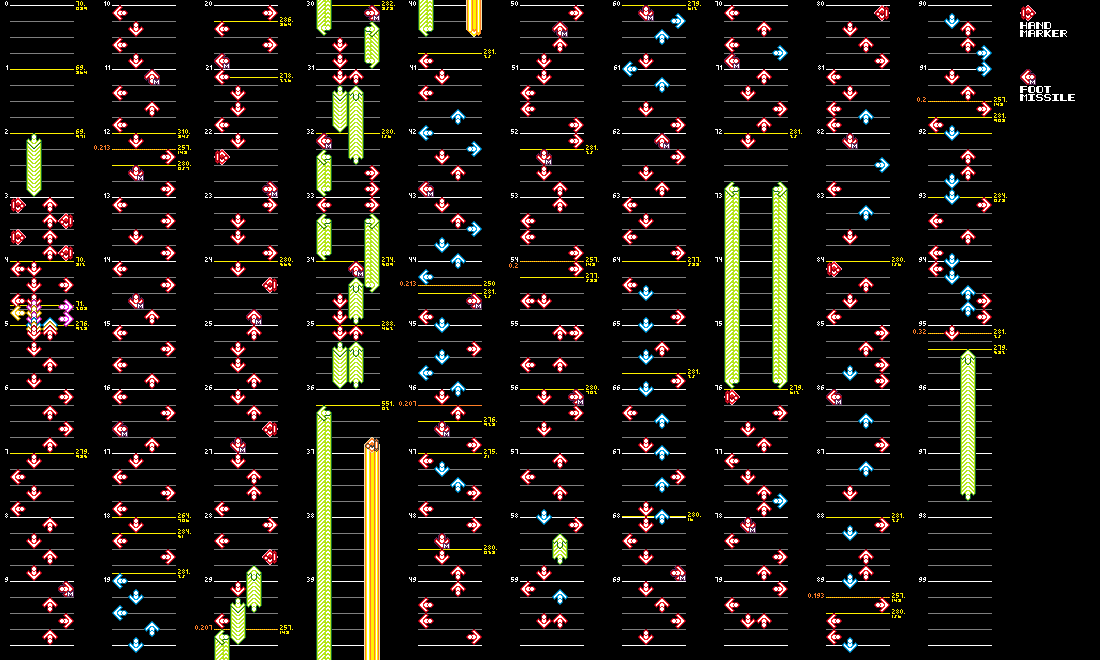
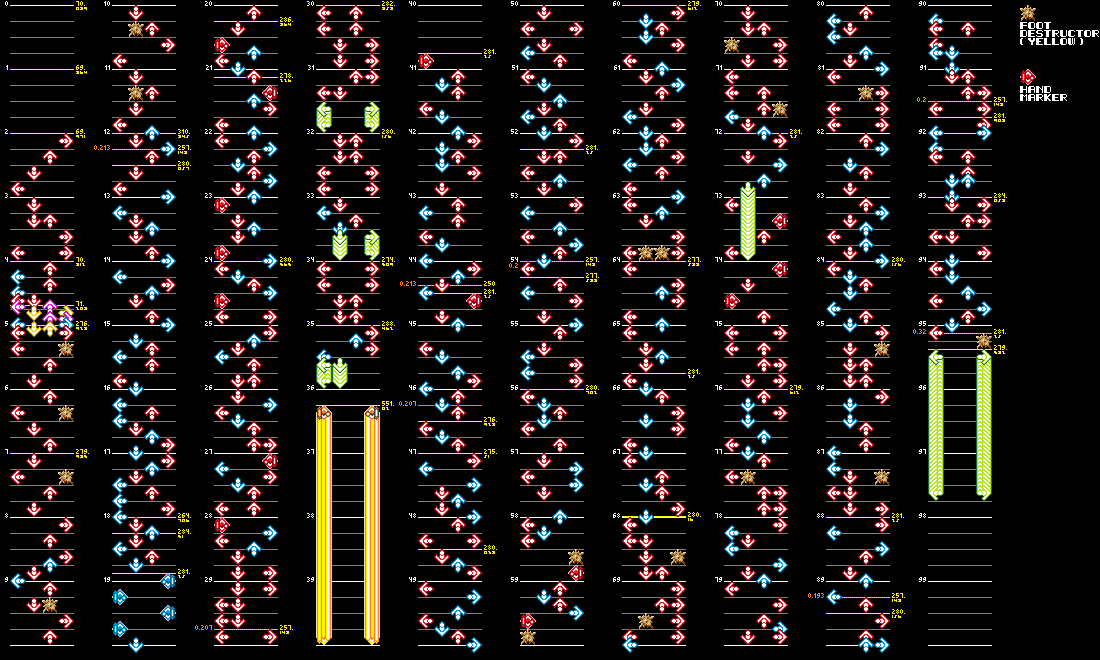
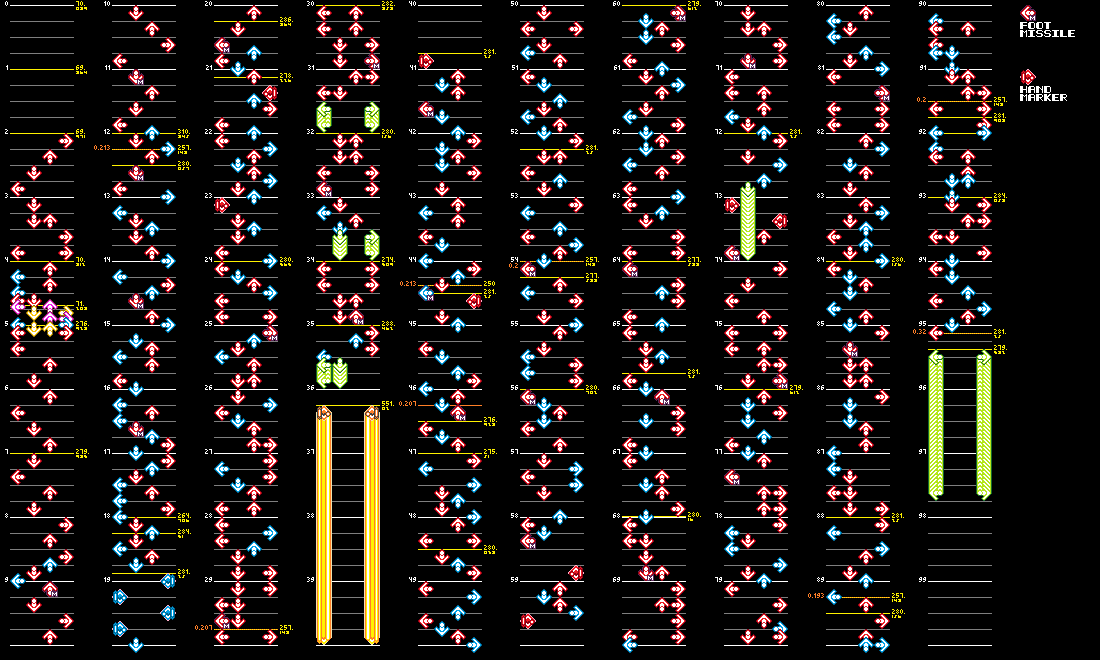
The early charts use the Yellow Foot Destructor gimmick instead of Foot Missiles.
Basic
Chart Data
|
Early |
Final |
|---|---|
|
|
Difficult
Chart Data
|
Early |
Final |
|---|---|
|
|
- The Hold Marker starting at measure 36 was originally a regular freeze arrow.
Expert
Chart Data
|
Early |
Final |
|---|---|
|
|
- There are more Hand Markers in the early chart.
Beginner
Chart Data
|
Early |
Final |
|---|---|
|
|