 This article has a talk page!
This is a sub-page of Proto:Super Mario World 2: Yoshi's Island.

 Graphical DifferencesDifferences even in the smallest details!
 Unused GraphicsLeftovers from previous versions.
 Unused Enemies and ObjectsWell, what does this game hide?
Gameplay Differences#
There's a lot of them.
- The timer works almost like the one from the final game, but instead of using Stars it uses tiny clock-shaped objects and if Yoshi loses some of them they cannot be re-collected. The timer also counts down slower, with one in-game second actually being a second long (this would be restored in Super Mario Advance 3). It also doesn't automatically refill when it goes below 10 and Baby Mario is on Yoshi, and it can go past 30 with objects.
- Yoshi can't make eggs by swallowing enemies. He needs to stomp on them to make an egg that needs to be collected, though not every enemy Yoshi jumps on will turn into eggs (Goombas, Mildes, Georgette Jellies, etc.).
- Yoshi is able to eat the sand that can be found in the levels, something not possible in the final version. He will also automatically use his tongue to eat any sand nearby.
- Yoshi's movement is stiffer, taking longer to build up momentum than in the final. He also moves a little slower.
- After doing a flutter jump, Yoshi must touch the ground before being able to do another one. If the jump button is pressed again after a flutter jump, Yoshi just lifts his feet up.
- Yoshi cannot perform a flutter if he falls off a ledge without jumping first.
- If Baby Mario is separated from Yoshi, he falls on the ground and starts crawling instead of crying and floating in a bubble. He doesn't cry even if he is stolen by an enemy. Baby Mario's ground sprites remain in the final ROM, unused.
- If Baby Mario falls off a ledge, the flying Snifits will slowly come up carrying him, allowing Yoshi to jump over and get him back if he gets the chance to.
- Occasionally, if Baby Mario is separated from Yoshi, a Bandit will appear from the side of the screen and try to kidnap him.
- If Baby Mario falls into lava, he'll be floating in a bubble. If he falls into a void, Yoshi will die instantly.
- Eggs can be reused after they've interacted with enemies and many objects, such as the ? Clouds.
- Spitting enemies while holding Up shoots them straight upwards. In the final version, they are shot in an arc.
- This and the later builds support saving progress to SRAM, but when starting a game from File 1 all the levels are automatically unlocked, a score of 40 is assigned to them (overwrites the already existing scores), the life and coin counters are set to 99, and the Dragon Coin counter is set to 50.
- Before World 2-8, if the player has previously completed World 2-7 in File 2, a mini-cutscene of the appearance of fog will be played (despite its presence before it).
- If you leave the level without passing it, the game will assign it 0 points, but the level will be counted as won. In the same way, it becomes clear that the ending of the game has not yet been implemented.
- The tiles that compose the level select screen can be moved by placing the cursor on one of them, pressing X or Y, then moving the tile to the desired position (must be empty) and pressing X or Y again. This is not saved to SRAM, but it may glitch the level select screen.
- A number of debug tools that are left unused in the final game (freeze frame, instant level clear on File 2 that also works on Files 1 and 3, and a free movement mode) are active by default in this build.
- When 100 coins are collected, the coin counter resets to 0 and a Dragon Coin is awarded instead of a life.
- Poochy will not give Yoshi a ride if Yoshi hops on him.
- Shy-Guys will charge towards Yoshi if he spots him.
- This build has a different score tally board from the final.
- The final score is calculated by adding the remaining Time Points (up to 30), Flower Points (up to 40), and Beat Points (up to 30). A fourth stat, Miss Points (up to -30), is subtracted from the total, but doesn't have a clear purpose and the only known way to get it is taking damage from watermelon seeds (will always set it to -1). While this scoring system is different from the final one, the maximum score that can be obtained is the same (100). The red color in the palette is also a bit brighter.
|
Protos |
Final |
|---|---|

|

|
-
- Below is an example of the Miss Points in use. In this example, Yoshi took damage from watermelon seeds and the Time Points were restored using items:

- In this build, the pause menu removes Yoshi and every object in the current level, writes SELECT (or PAUSE if no item is available in the slots) on-screen using rotating characters, and shows the current amount of Dragon Coins and items on the bottom. The final version uses a black background and shows PAUSE on the top, the current score and the current record for the level in the middle, then on the bottom the current amount of lives, coins, Stars, and the available items. Apart from the whole item selector flashing faster compared to the final version, its left and right sides flash in a different way from the rest. In the final version, it flashes uniformly.
|
Proto |
Final |
|---|---|

|

|
|
Proto |
Final |
|---|---|

|

|
- When aiming an egg to be shot, there are a few differences:
- The cursor can automatically lock on to enemies and is enlarged.
- Pressing R disables auto-aim and uses a smaller cursor, like in the final version.
- The egg can be powered up if the egg-tossing button is held for a couple of seconds. When the egg is powered up, it will be shot like in the final release. Otherwise, the egg will just be tossed towards whatever direction the cursor was in.
- The camera follows the fired egg if it was powered up. In the final version, this only happens under certain conditions.
- In the final release, if the player moves Yoshi in the opposite direction than Yoshi is facing, Yoshi will walk backwards. In this prototype, Yoshi turns around while still aiming the egg.
- The cursor can automatically lock on to enemies and is enlarged.
- When Yoshi is being transformed, a short animation of a sprite waving a wand with an incorrect palette can be seen. This sprite is the blue-capped baby that was replaced by Baby Mario later in development.
- A similar animation exists for Baby Mario too, and can be seen in-game by using Game Genie code EED8-AD67 (EED8-A467 for the later prototype):
-

- After it finishes, Baby Mario stays still like in the image above, but resets every time he lands again on Yoshi's back.
- The world maps have a unique appearance in this build, with more color, detail, and animation, however they share the same base, recoloring it in each world (moreover, enemy infestation is only reflected in world map 1).
- The player's color of Yoshi can only be changed when a level is completed via Goal Ring, instead of being adjacent to a world's level (a purple Yoshi is able to be played outside a 5th level, for example).
- Yoshi can defeat a Piranha Plant by eating it when its head is small.
Audio Differences#
- This build uses placeholder sound effects and music from Super Mario World.
- Upon unlocking World 2-8 on a save file, the Valley of Bowser unlock sting will play and the map music will be temporarily swapped with that of Vanilla Dome. The music will continue to play until entering a level, where the regular map music will resume as normal.
Intro Differences#
|
Proto |
Final |
|---|---|

|

|
A sunbeam was removed from the scene where Yoshi meets Baby Mario for the first time.
Also, a wand drops down on Yoshi's head instead of a map. This is a leftover from earlier in development, where the baby Yoshi encountered was a blue-capped wizard or magician.
|
Proto |
Final |
|---|---|

|

|
When Yoshi is returning to the other Yoshis, Baby Mario's diaper is blue, instead of white like in the final. It could be the blue color was chosen to match Mario's overalls from other Mario games, but was changed to white in the end.
Script#
Proto |
Translation |
Final (JP) |
Final (EN) |
|---|---|---|---|
|
|
|
|
|
|
|
|
|
|
|
|
|
|
|
|
|
|
|
|
|
|
|
|
|
|
|
|
|
|
|
|
|
|
|
The opening story is pretty similar to the final's, though worded completely differently.
Other Differences#
Error Messages#
Apart from having a slightly different font, error messages that the game may display have minor differences from the final version:
|
Proto |
Final |
|---|---|

|

|
Unlike the final game, the controller check is performed every time before loading the world map rather than before the Nintendo logo. This means that it's necessary to have a standard controller plugged into Port 1 and something other than a controller plugged into Port 2 to trigger it.
In this prototype the music stops, but in ys_rom_0_D the map screen music plays at this screen.
Strangely, the text was shifted a bit to the right in the final version.
|
Proto |
Final |
|---|---|

|

|
The region error screen's font was tweaked, "DESIGINED" was corrected to "DESIGNED", "OR SUPER NES" was split into two lines, and a period was added.
Unused Transformations#
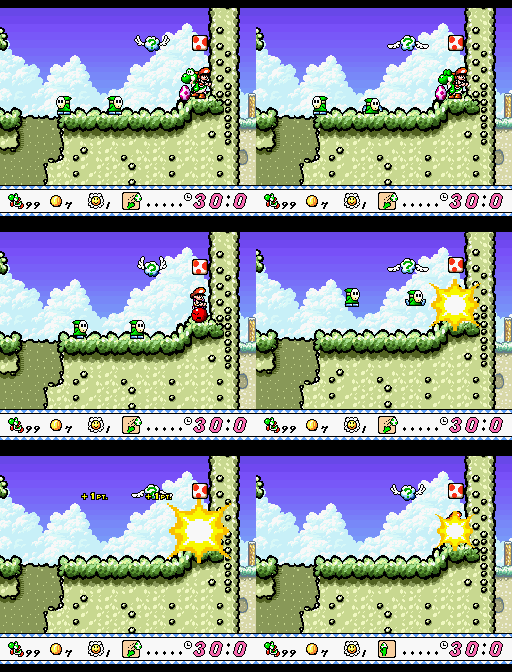
An unused transformation where Yoshi becomes a bomb and explodes, which destroys all enemies on-screen. The graphics for this transformation still exist in the final game, where they go unused. To activate this transformation, use Pro Action Replay (PAR) code 7000B20E.
Controls#
There are three types of controls that can be chosen on the level selection screen.
Type 1#
- Y: Extend tongue / Put enemy in mouth / Spit enemy out (no eggs) - Aim (hold) / Throw egg (release; Aim and Throw only if Yoshi carries at least one egg).
- A: Extend tongue / Put enemy in mouth / Spit enemy out (even if Yoshi carries at least one egg).
- B: Jump.
- L: Lock target reticule when aiming.
- R: Change target reticule when aiming.
Type 2#
The style closest to the final game's.
- Y: Extend tongue / Put enemy in mouth / Spit enemy out (even if Yoshi carries at least one egg).
- A: Aim (hold) / Throw egg (release, Yoshi throws even with no eggs).
- B: Jump.
- L: Lock target reticule when aiming.
- R: Change target reticule when aiming.
Type 3#
- Y: Aim (hold) / Throw egg (release, Yoshi throws even with no eggs).
- A: Extend tongue / Put enemy in mouth / Spit enemy out (even if Yoshi carries at least one egg).
- B: Jump.
- L: Lock target reticule when aiming.
- R: Change target reticule when aiming.
Levels#
 World 1The world of gooey blobs.
 World 2This world's plant has quite a bite!
 World 3That's a lot of turtles...
 World 4Poochy strikes back!
 World 5You've heard of lunar rabbits, now get ready for lunar ravens!
 World 6Look, it's from Baby Bowser!
Related Things#
 Bonus ChallengesYou'll need 5 Dragon Coins to view this sub-page.
 ItemsA very different set of tools for Yoshi to utilize.
 Mini BattlesWe all know why Yoshi had to quit his job as a house demolisher.
 Preview IconsBecause snowmen don't sit when riding cable cars.
Level Names#
All of the levels in Yoshi's Island have a name that briefly appears at the start of the level.
|
|
To do: |
World 1#
Level |
Proto |
Translation |
Final (JP) |
Final (EN) (Official Translation) |
|---|---|---|---|---|
1-1 |
ワンワンちゅうい コース |
Watch out for Chain Chomp Course |
タマゴをつくって なげろ |
Make Eggs, Throw Eggs |
1-2 |
パックンのもり コース |
Piranha Plant Forest Course |
きょだいワンワンちゅうい |
Watch Out Below! |
1-3 |
たけうまジャンプ コース |
Stilt Jumping Course |
プチパックンのどうくつ |
The Cave of Chomp Rock |
1-4 |
ムーチョのとりで コース |
Snifit Fort Course |
ビッグドンブリの とりで |
Burt the Bashful's Fort |
1-5 |
とりアスレチック コース |
Bird Athletics Course |
ちくわゆか アスレチック |
Hop! Hop! Donut Lifts |
1-6 |
トンネルめいろ コース |
Tunnel Maze Course |
たけうまにのったヘイホー |
Shy-Guys On Stilts |
1-7 |
つむじとジュゲム コース |
Gusty & Lakitu Course |
さわるとふるふるワタボー |
Touch Fuzzy Get Dizzy |
1-8 |
スライムボスのしろコース |
Slime Boss' Castle Course |
ビッグスライムの おしろ |
Salvo The Slime's Castle |
World 1-1 Duplicates#
There are 19 level slots that lead to duplicates of World 1-1. Slots 0x44 and higher lead to glitch levels and may crash the game.
Of these 19 duplicates, 16 (0x09, 0x14-0x23, and 0x2D-0x3B) have the "Yoshi's Island - Hollow Grasslands" title card also found in the final game. You can access one of these levels with Game Genie code DBDD-B356 in both prototypes. These title cards use a slightly different font compared to the final version:
|
Proto |
Final |
|---|---|

|

|
The other three (0x0A, 0x0B, and 0x2C, which can be accessed with Game Genie codes DCDD-B356, D8DD-B356, and 4ADD-B356 respectively) feature different and unique title cards:


(Translation: chess!!#5822 (first and last one))
World 2#
Level |
Proto |
Translation |
Final (JP) |
Final (EN) (Official Translation) |
|---|---|---|---|---|
2-1 |
はなちゃんとポチコース |
Flutter and Poochy Course |
ノコノコとパタパタがいた |
Visit Koopa And Para-Koopa |
2-2 |
やきゅうコース |
Baseball Course |
ミットさんとバットくん |
The Baseball Boys |
2-3 |
テトリスブロックコース |
Tetris Block Course |
つむじくんって どんなあじ |
What's Gusty Taste Like? |
2-4 |
ヘリコでGO! |
Ride the Helicopter! |
びっくりテレサの とりで |
Bigger Boo's Fort |
2-5 |
つむじとおたまとキラー |
Gusty & Cloud Drop & Bullet Bill |
ジュゲムに きをつけろ |
Watch Out For Lakitu |
2-6 |
ぐるぐるどうくつコース |
Spinning Cave Course |
なぞときめいろ どうくつ |
The Cave Of The Mystery Maze |
2-7 |
ゆらゆらワタボーコース |
Swaying Fuzzy Course |
かべあなから ジュゲム |
Lakitu's Wall |
2-8 |
ドカンめいろコース |
Pipe Maze Course |
おせおせ! つぼおばけ |
The Potted Ghost's Castle |
World 3#
Level |
Proto |
Translation |
Final (JP) |
Final (EN) (Official Translation) |
|---|---|---|---|---|
3-1 |
ノコノコ コース |
Koopa Troopa Course |
ようこそモンキーワールド |
Welcome To Monkey World! |
3-2 |
かべあなジュゲム コース |
Lakitu Cave Course |
ようきなヤリヤリダンサー |
Jungle Rhythm... |
3-3 |
カウントゆかアスレチック |
Counting Platform Athletics |
ウンババのすむジャングル |
Nep-Enuts' Domain |
3-4 |
きょだいワンワン コース |
Giant Chain Chomp Course |
ゲロゲーロのすむ とりで |
Prince Froggy's Fort |
3-5 |
パタパタごろごろ コース |
Para-Koopa Rolling Course |
ジャングルのアスレチック |
Jammin' Through The Trees |
3-6 |
プクプク コース |
Cheep Cheep Course |
ハリネズミの どうくつ |
The Cave Of Harry Hedgehog |
3-7 |
ジュゲム コース |
Lakitu Course |
おさるのすきな みずうみ |
Monkeys' Favorite Lake |
3-8 |
てっきゅうドスン コース |
Iron Ball Thwomp Course |
ビッグパックンの どかん |
Naval Piranha's Castle |
World 4#
The names of these levels seem to be placeholders that are supposed to briefly describe the level, though they don't really.
Level |
Proto |
Translation |
Final (JP) |
Final (EN) (Official Translation) |
|---|---|---|---|---|
4-1 |
カベバタン |
Wall Smash |
マリオでGO!GO! |
GO! GO! MARIO!! |
4-2 |
たつまき |
Whirlwind |
かべあなジュゲムの ちか |
The Cave Of The Lakitus |
4-3 |
クルクルゆか |
Spinning Platforms |
カウントゆかアスレチック |
Don't Look Back! |
4-4 |
ゴロゴロ |
Rolling |
ビッグプチプチの とりで |
Marching Milde's Fort |
4-5 |
パウスイッチ |
POW Switch |
もってけ ワンワンいわ |
Chomp Rock Zone |
4-6 |
カニワンワン |
Crab Chain Chomp |
プクプクがいる みずべ |
Lake Shore Paradise |
4-7 |
プクプクアビスカニ |
Cheep Cheep Abyss Crab |
せんリフトでアスレチック |
Ride Like The Wind |
4-8 |
キラーキシャワンワン |
Bullet Bills, Trains, Chain Chomps |
ビッグノコノコの おしろ |
Hookbill The Koopa's Castle |
World 5#
World 5-7 does not have a name come up at the beginning of the level in this build.
Level |
Proto |
Translation |
Final (JP) |
Final (EN) (Official Translation) |
|---|---|---|---|---|
5-1 |
とりやまとざんコース |
Bird Mountain Hiking Course |
ゆきの かみなりジュゲム |
BLIZZARD!!! |
5-2 |
アホーどりらっかコース |
Goonie Falling Course |
スキーリフトで GO! |
Ride The Ski Lifts |
5-3 |
せんリフトアスレチック |
Shifting Platform Athletics |
つるつる こおりのせかい |
Danger - Icy Conditions Ahead |
5-4 |
カウントゆかとしろコース |
Counting Floor & Castle Course |
ビッグけめくじの とりで |
Sluggy The Unshaven's Fort |
5-5 |
おそらのくもコース |
Sky Clouds Course |
あほーどりでアスレチック |
Goonie Rides! |
5-6 |
ジュゲンとリフトコース |
Lakitu & Lift Course |
おそらの くものうえで |
Welcome to Cloud World |
5-7 |
せんリフトと おちるゆか |
Shifting Platforms Ahead |
||
5-8 |
とりようさいコース |
Bird Fortress Course |
ビッグキューちゃんのしろ |
Raphael The Raven's Castle |
World 6#
Level |
Proto |
Translation |
Final (JP) |
Final (EN) (Official Translation) |
|---|---|---|---|---|
6-1 |
ちかめいろコース |
Underground Maze Course |
きょうふの ほねあほーどり |
Scary Skeleton Goonies! |
6-2 |
おばけとほのおのコース |
Ghost & Flame Course |
ボロドーだらけの どうくつ |
The Cave Of The Bandits |
6-3 |
おばけとホネコース |
Ghost & Bone Course |
かいてんまるたアスレチック |
Beware The Spinning Logs |
6-4 |
ようがんとどかんコース |
Lava & Pipe Course |
ビッグカチカチの とりで |
Tap-Tap The Red Nose's Fort |
6-5 |
ようがんとどうくつコース |
Lava & Cave Course |
すご~くなが~い どうくつ |
The Very Loooooong Cave |
6-6 |
てっきゅうドスン コース |
Iron Ball Thwomp Course |
こわいこわい ちかのめいろ |
The Deep Underground Maze |
6-7 |
つむじとテトリスブロック |
Gusty & Tetris Block |
すごくハードなアスレチック |
KEEP MOVING!!!! |
6-8 |
てっきゅうドスン コース |
Iron Ball Thwomp Course |
いよいよ クッパじょうだ |
King Bowser's Castle |