 This article has a talk page!
This is a sub-page of Prerelease:Conker's Bad Fur Day.
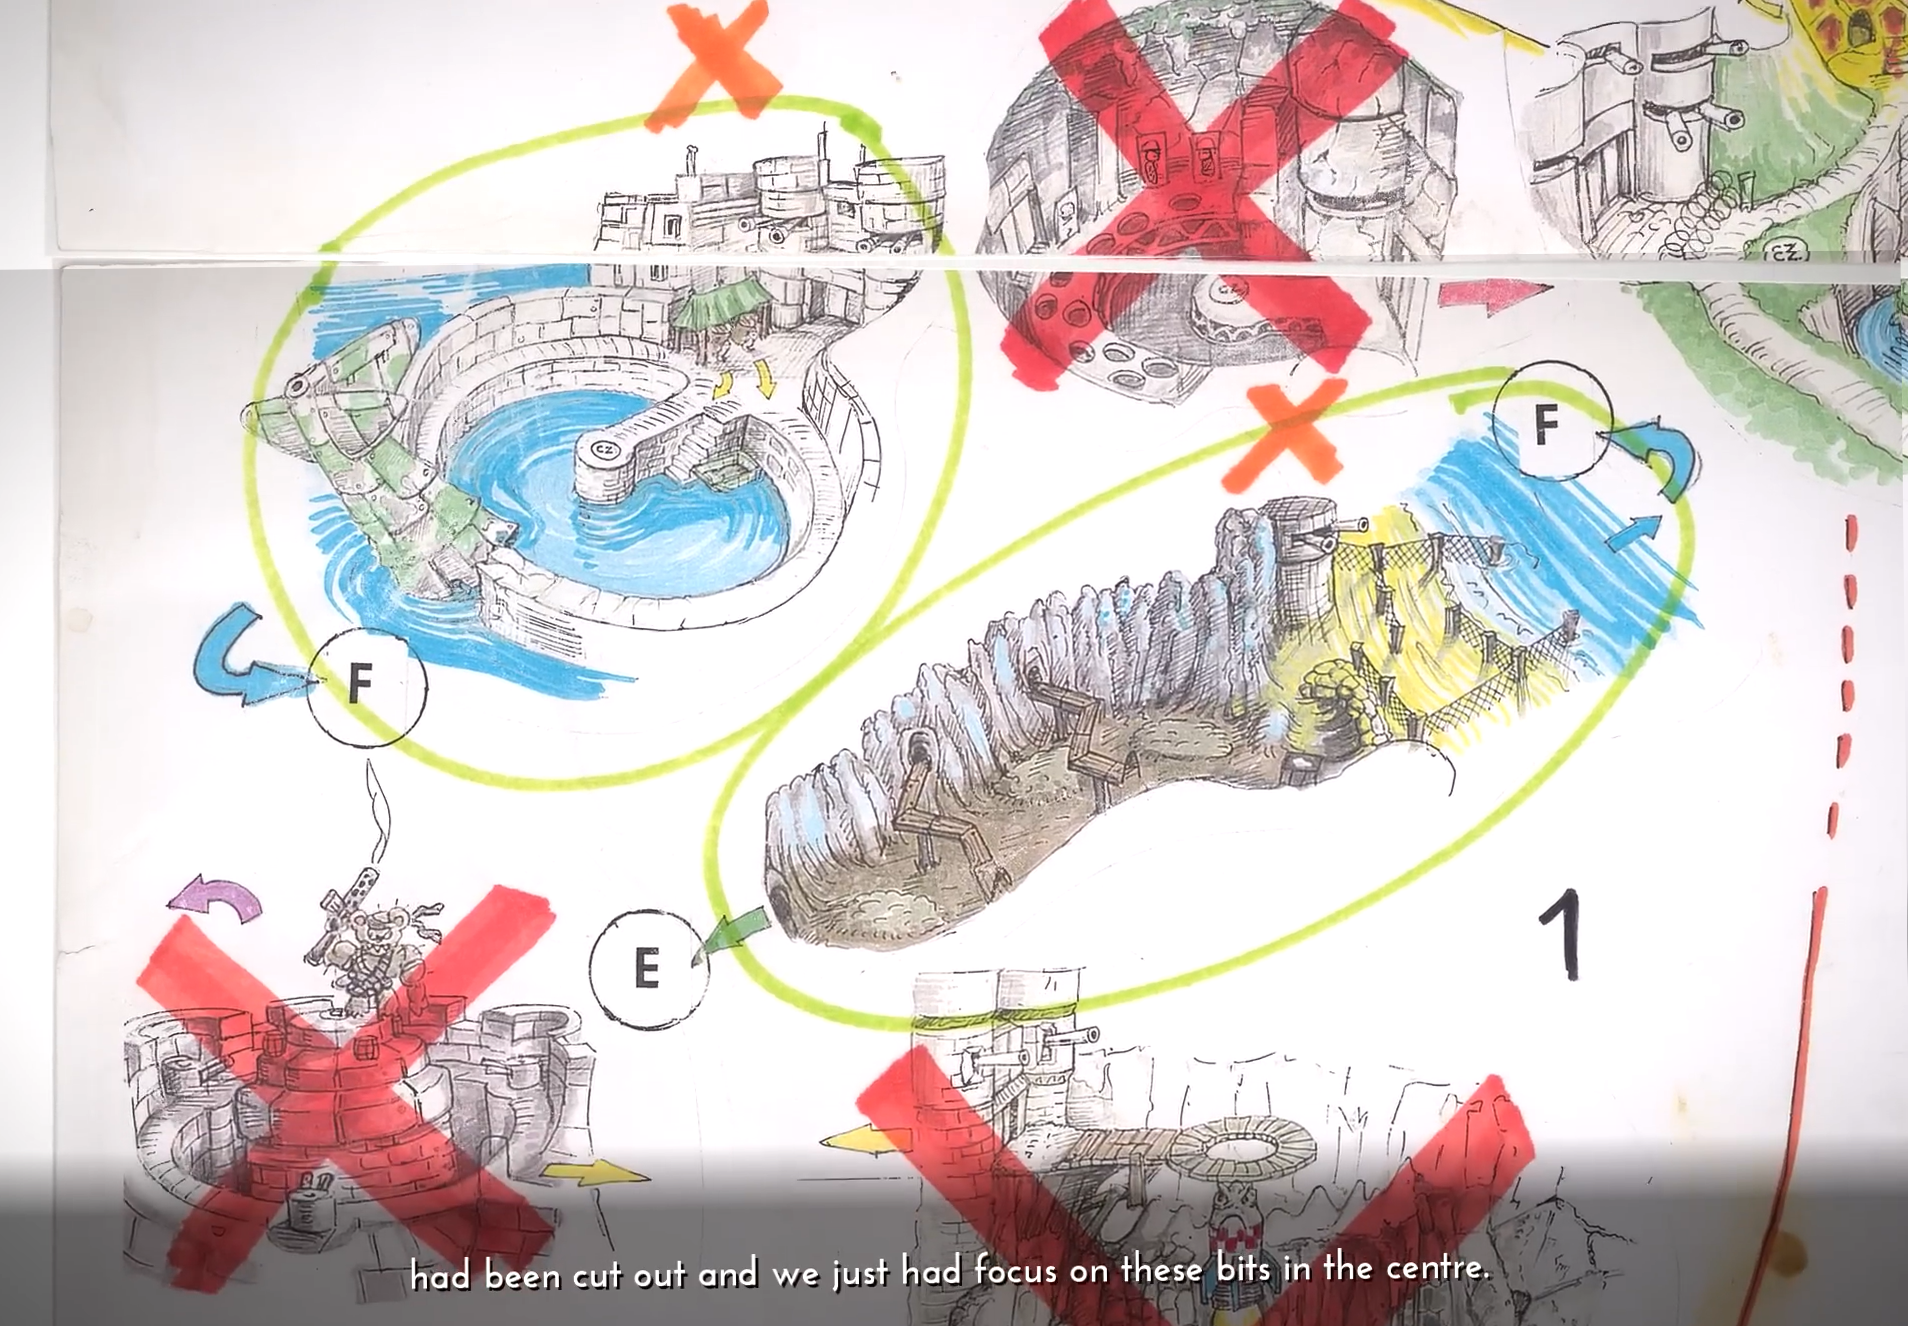
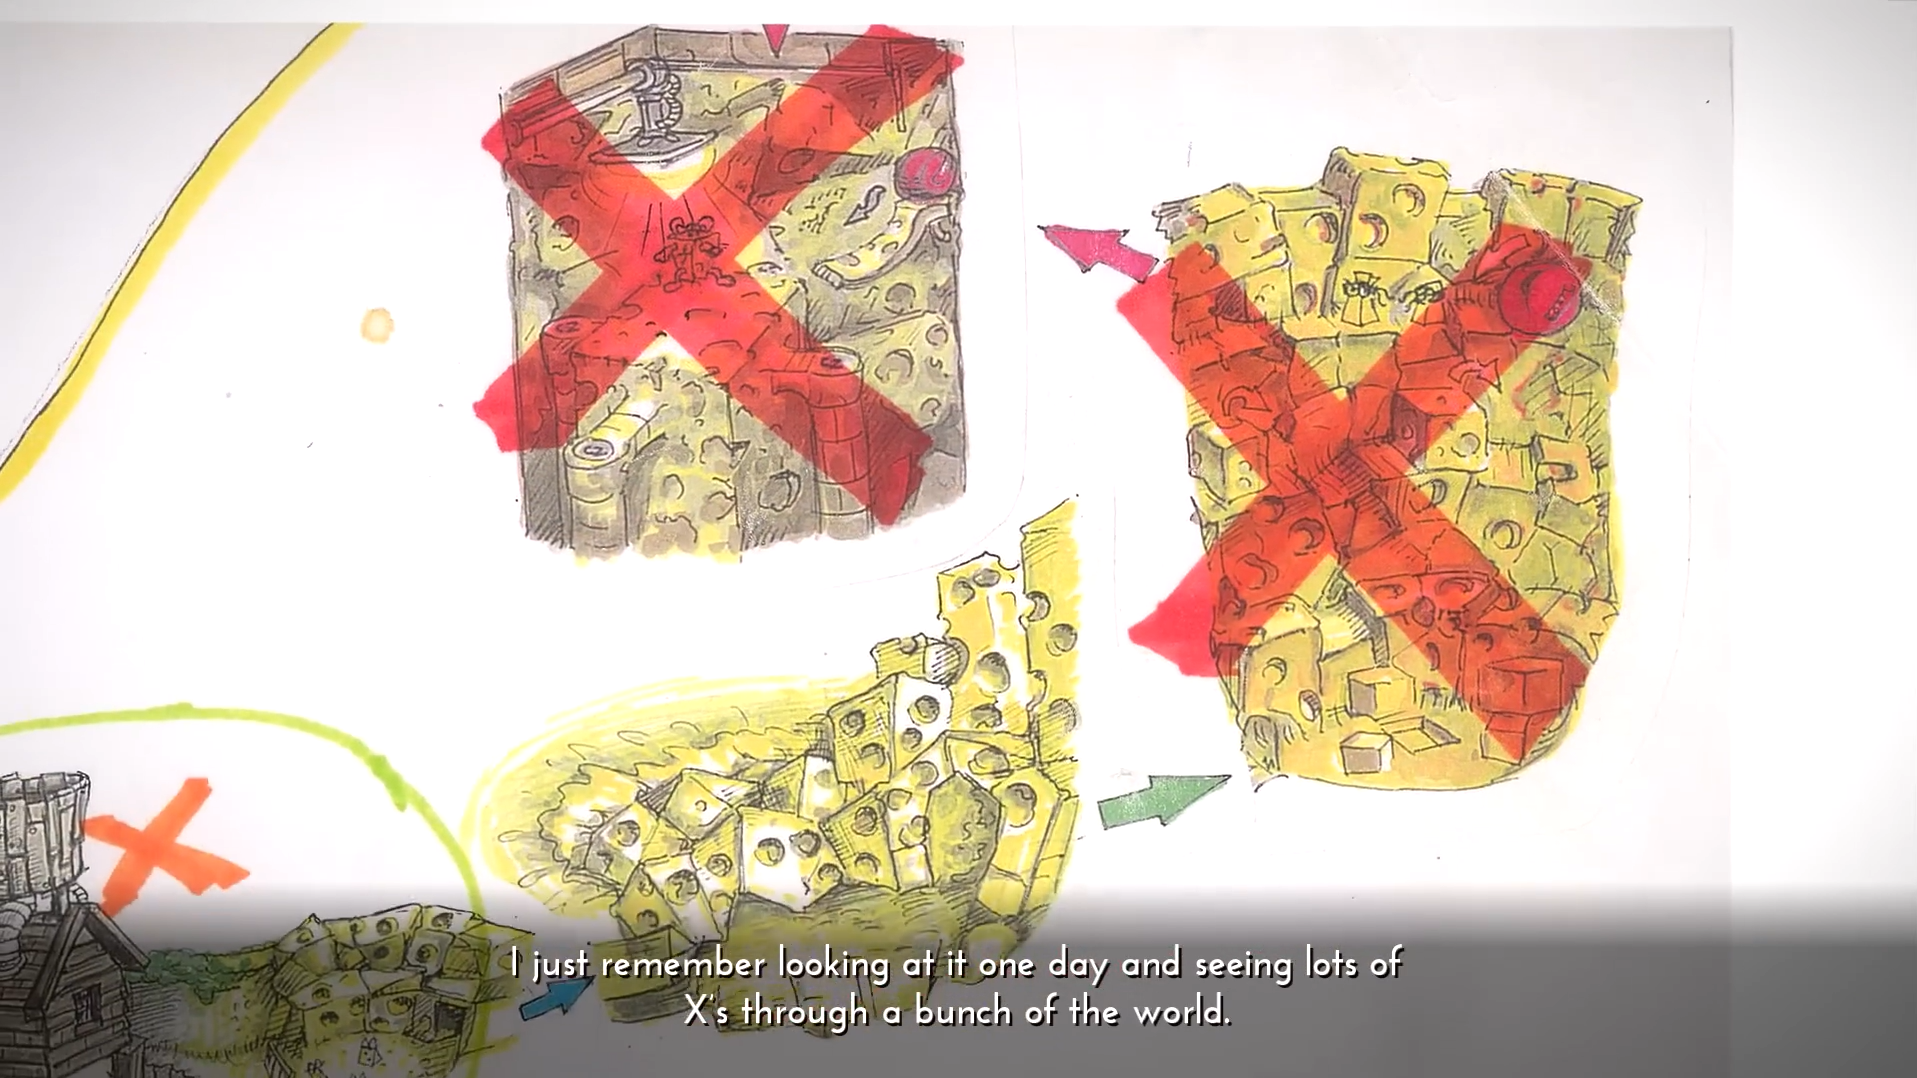
"I just remember looking at [the Structure Map] one day and seeing lots of X's through a bunch of the the world. We're like, "We want to get this done in time! We gotta get rid of all this shit!"
–Louise O'Connor recalls the crunch as the team scrapped planned worlds and segments out of necessity leading up to the launch of Conker's Bad Fur Day1
Moving on from Twelve Tales: Conker 64, the small team inside a Dutch Barn on the Manor Farm property began to transform the cute and innocent adventure into something new altogether. Now lead by artist and designer Chris Seavor, the Conker crew had newfound impetus to turn the entire game around in just a short time - and a good thing too, as they would need to do just that to ensure that the red squirrel saw release on the Nintendo 64 in the twilight years of the consoles life.
While it might seem that the biggest transformation had already occurred from Twelve Tales, the development of Conker's Bad Fur Day was filled with narrative ideas and gameplay concepts too close to the chopping block; entire sub-chapters and unseen areas cut for time; cancelled boss fights and redacted characters - the surviving elements have all been recorded faithfully below, presented in chronological order.
Conker's Bad Fur Day#
Conker's Bad Fur Day - Structure Map#
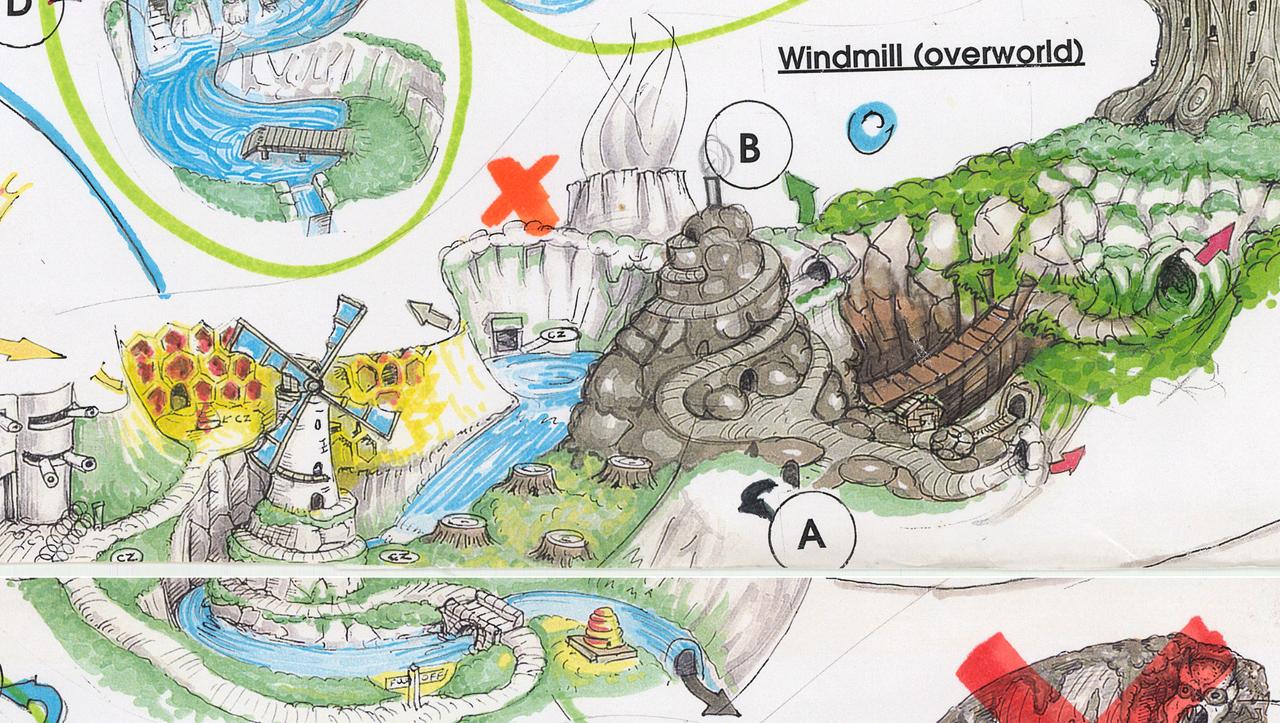
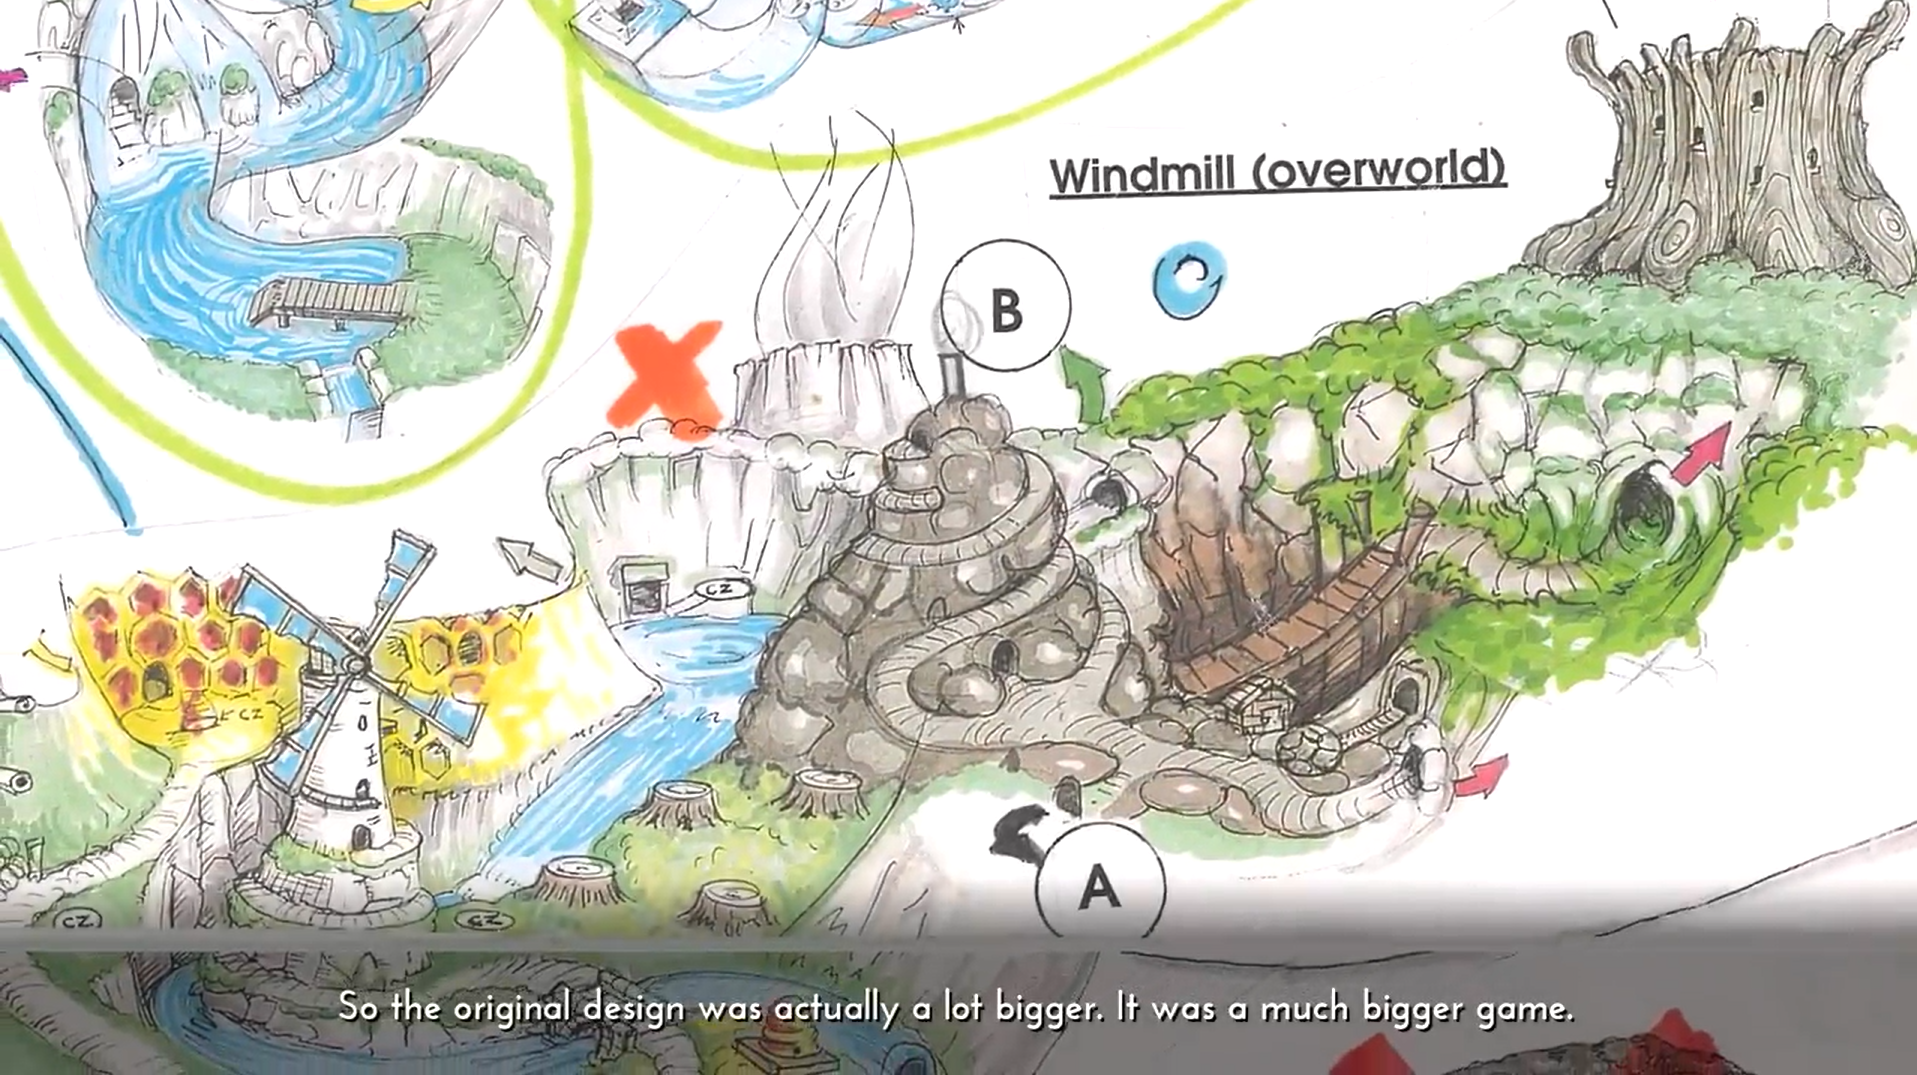
The Structure map, or "Master Map" is a visual patchwork of concept art from Chris Seavor presented on a single large sheet that details each area in the game (used and unused), with arrows indicating how each location is meant to connect to one another. The Structure Map and other design documents with concept art 23 were posted in full on Chris Seavors now-deleted Twitter, and was reposted (along with a closer view of the top rightmost corner) on his Bluesky. 4 In addition, a closer view of the Windy overworld in the center of the Structure Map was posted on Rare's Twitter, which was captured for the "Making Of Conker" segment in Rare Replay 56
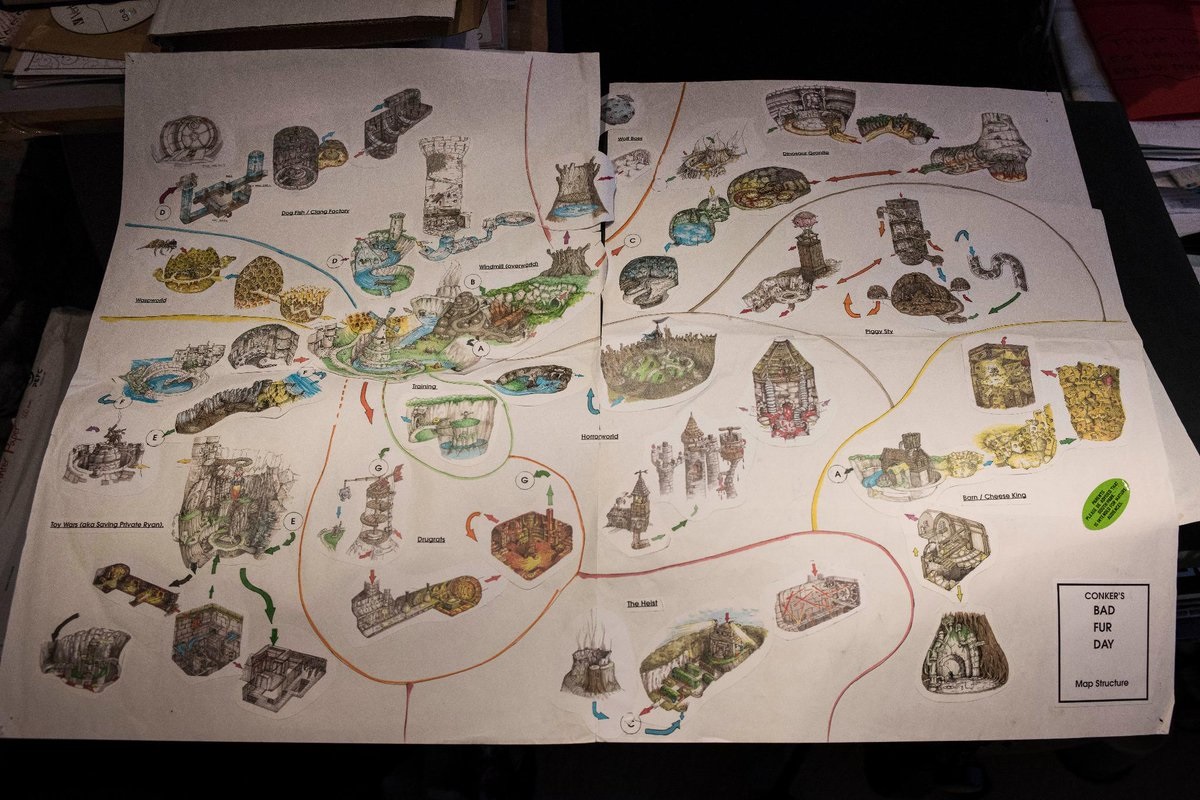
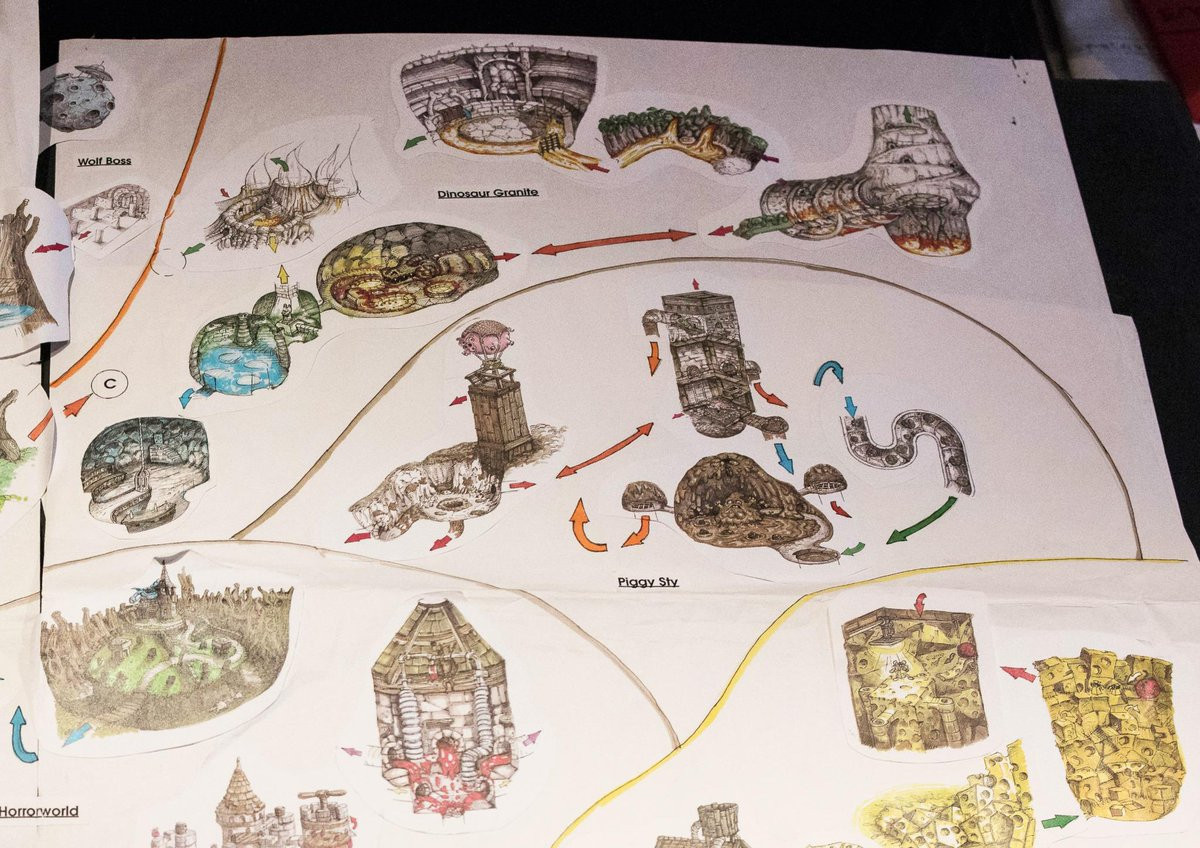
The Structure Map showcases many unseen areas which were removed during development, including the original interior of the windmill in "Drugrats", a sprawling kingdom of cheese in "Dick Cheesy", and an intended fight against a "Wolf Boss" as the climax of the game, instead of the Fairy Panther King, all of which are detailed below in their own respective sections. Note that not all areas of the Structure Map have not been uploaded at this time, and in some cases, concept art that isn't present on the Structure Map has been shared by Chris Seavor and the Gory Detail Twitter account.
Hungover#
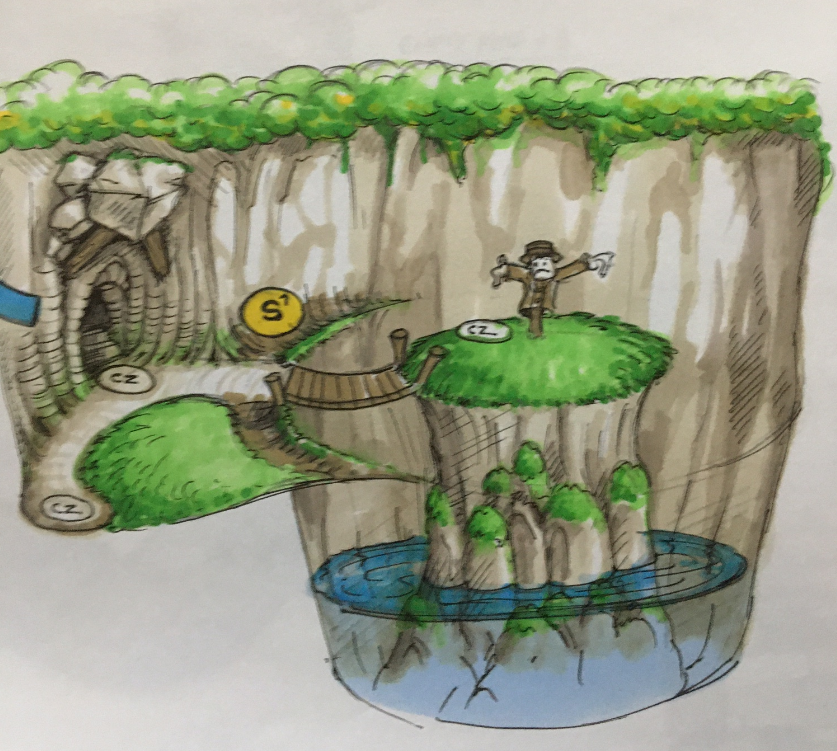
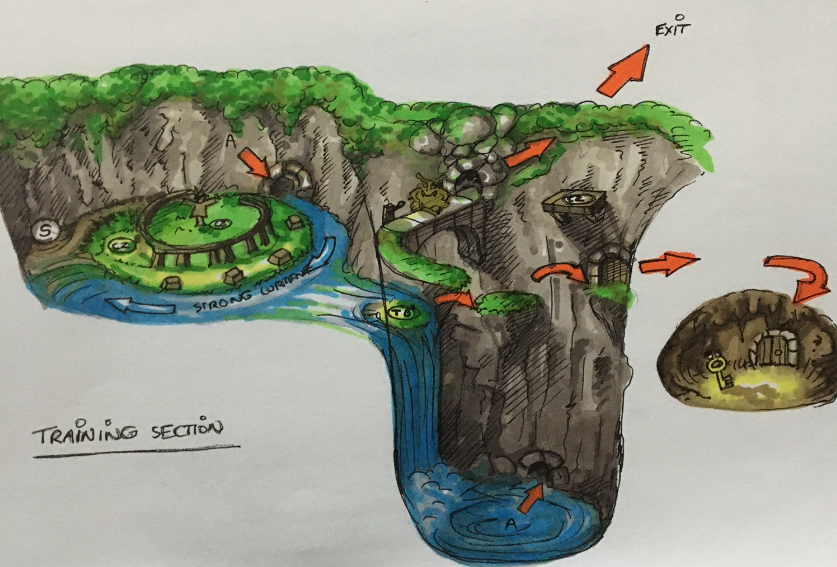
The Training Section was an area that saw heavy reiteration as development on Hungover became more ambitious, leading to an early concept with a wildly different start, and a revision that more or less matches the final game. 7 One element that had stayed consistent, going back Twelve Tales, was learning abilities from Birdy the Scarecrow as the tutorial mentor.

In the first iteration, players would regain consciousness on a cliff side where they would be tasked with crossing a short rope bridge to find Birdy on a small island. If the precarious collection of boulders over the entrance is any indication, Conker would need to learn about the Context Sensitive Pads in order to use a TNT Plunger to blast himself an exit as is seen in the final game.
In the second iteration, the training area has been expanded to introduce three new elements, namely the platforming section that requires the Helicoperty Tail move; the Key Chase which requires the Frying Pan; and the Gargoyle on the bridge the blocks the exit. There are some minor changes in the layout of this section, as it appears that the platforms would have provided a fork for players; going left would lead to the Gargoyle, and going right would lead to the Key Chase. In the final game, the land forms spiral up to the Gargoyle, passing the Key Chase, with rope bridges strung between each platform.
If players fall into the pool below the Gargoyle, they can travel through the cavern that warps them back to Birdy's section, as is the case in the final game. Not seen in this pool is the wad of cash behind bars that connects Hungover to the Spooky chapter.
One final redacted element are the four pieces of Anti-Gravity Chocolate surrounding Birdy's crop - in the early rendition of the Training Section, players would have been able to heal if they were injured by the fall or being tossed by the Gargoyle. However, in the final game, all damage incurred from fall damage or the Gargoyle has been disabled for Hungover.
This change could have been implemented to make the novice area more forgiving, or to serve the narrative, as Anti-Gravity Chocolate isn't formally introduced until Ze Professor throws it from the window during a cutscene that occurs after the player has progressed beyond Hungover.
Windy#
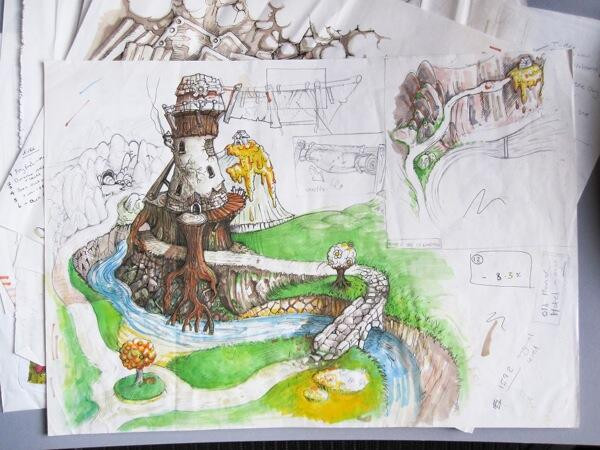
From the inception of Twelve Tales, "Windy", or as it was known "Windmill Glade" had served as a central hub for Conker - connecting all of the far-flung locations together to be accessed from the overworld. The same task is accomplished in Conker's Bad Fur Day, but as certain areas were forced to be trimmed, relocated and entirely redacted during development, the early Structure Map and Character Synopsis reflect earlier designs and ambitions, providing a comprehensive look at this evolving overworld.
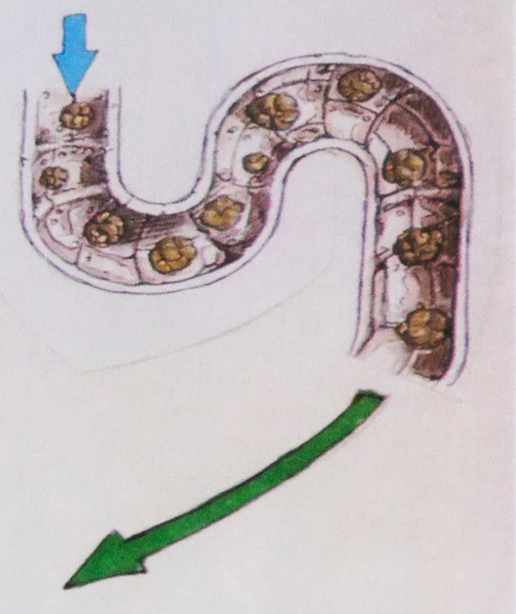
Uga Buga was originally meant to be accessed directly from Windy, found between the whirlpool leading to Catfish Pond/Bat's Tower and Poo Mountain. This is why a volcano can be seen on the Structure Map, and on the skybox between Bat's Tower and the Panther King's Castle in the final game. The Windy connection to Uga Buga was removed entirely from the overworld, and can be accessed instead by travelling through the U-Bend inside Poo Mountain after defeating the Great Mighty Poo in the final game.
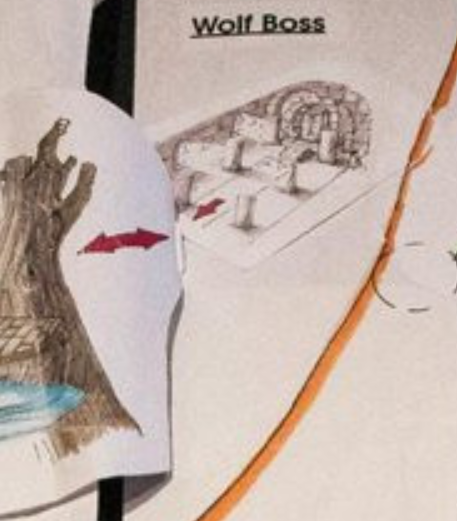
Similarly, the fork in the path that would have given Conker the choice between Poo Mountain and Barn Boys would have provided a third junction with Piggy Sty, a scrapped section expanded below. The foreboding bridge that would eventually lead to the Feral Reserve in Heist was originally planned to branch off to the interior of a large tree where Conker would fight a "Wolf Boss". While the interior and the Wolf Boss were both cut from Conker's Bad Fur Day, the large tree can still be seen from the overworld in the final game.
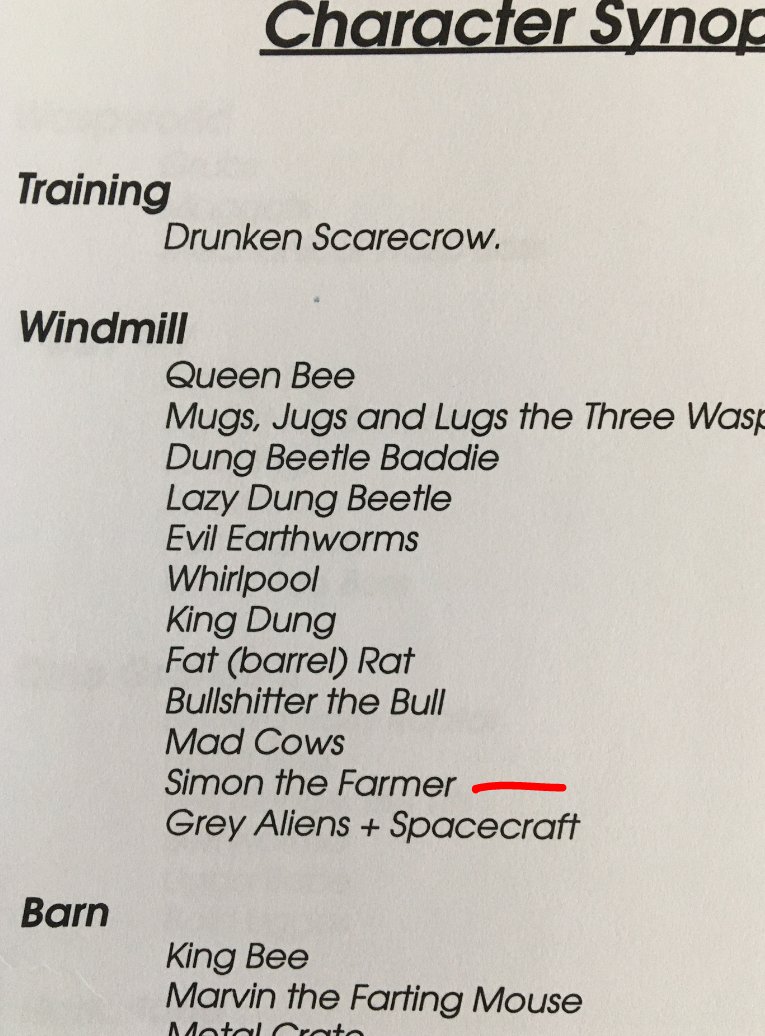
From a Character Synopsis sheet uploaded by Chris Seavor, we can see several cut characters that are not present in the final version of Conker's Bad Fur Day, these include "Simon the Farmer" (named after Simon Farmer, a production manager at Rare)8 and a group of Grey Aliens with a Spacecraft, presumably to transport Conker to the Moon, an unused area. In addition, the document provides the original names of several characters, including the Wasp enemies as "Mugs", "Jugs" and "Lugs", whereas in the final game they are referred to as Wayne and the Wankas. Similarly, the Great Mighty Poo was called "King Dung", Mr. Barrel was once called "Fat Rat", and the Bull, "Bugger Lugs" was once known as "Bullshitter the Bull".
One final name change was in store for the "Nasty/Nice" signpost, found at the base of Windy. The concept art seems to show that originally, "Nasty" would have been titled "Fuck", with "Nice" being replaced with "Off". Altogether, "Fuck Off". Charming.
Waspworld#
Retrieving the Queen's Hive from the Nasty Wasps was the first gameplay task conceived by Tim Stamper that the Conker's Bad Fur Day team were assigned to demonstrate the viability of the redesign. Having successfully shown that the admittedly violent conclusion provided a payoff to the task at hand, the team was given the green light to overhaul Twelve Tales: Conker 64 in this bold new direction. 9
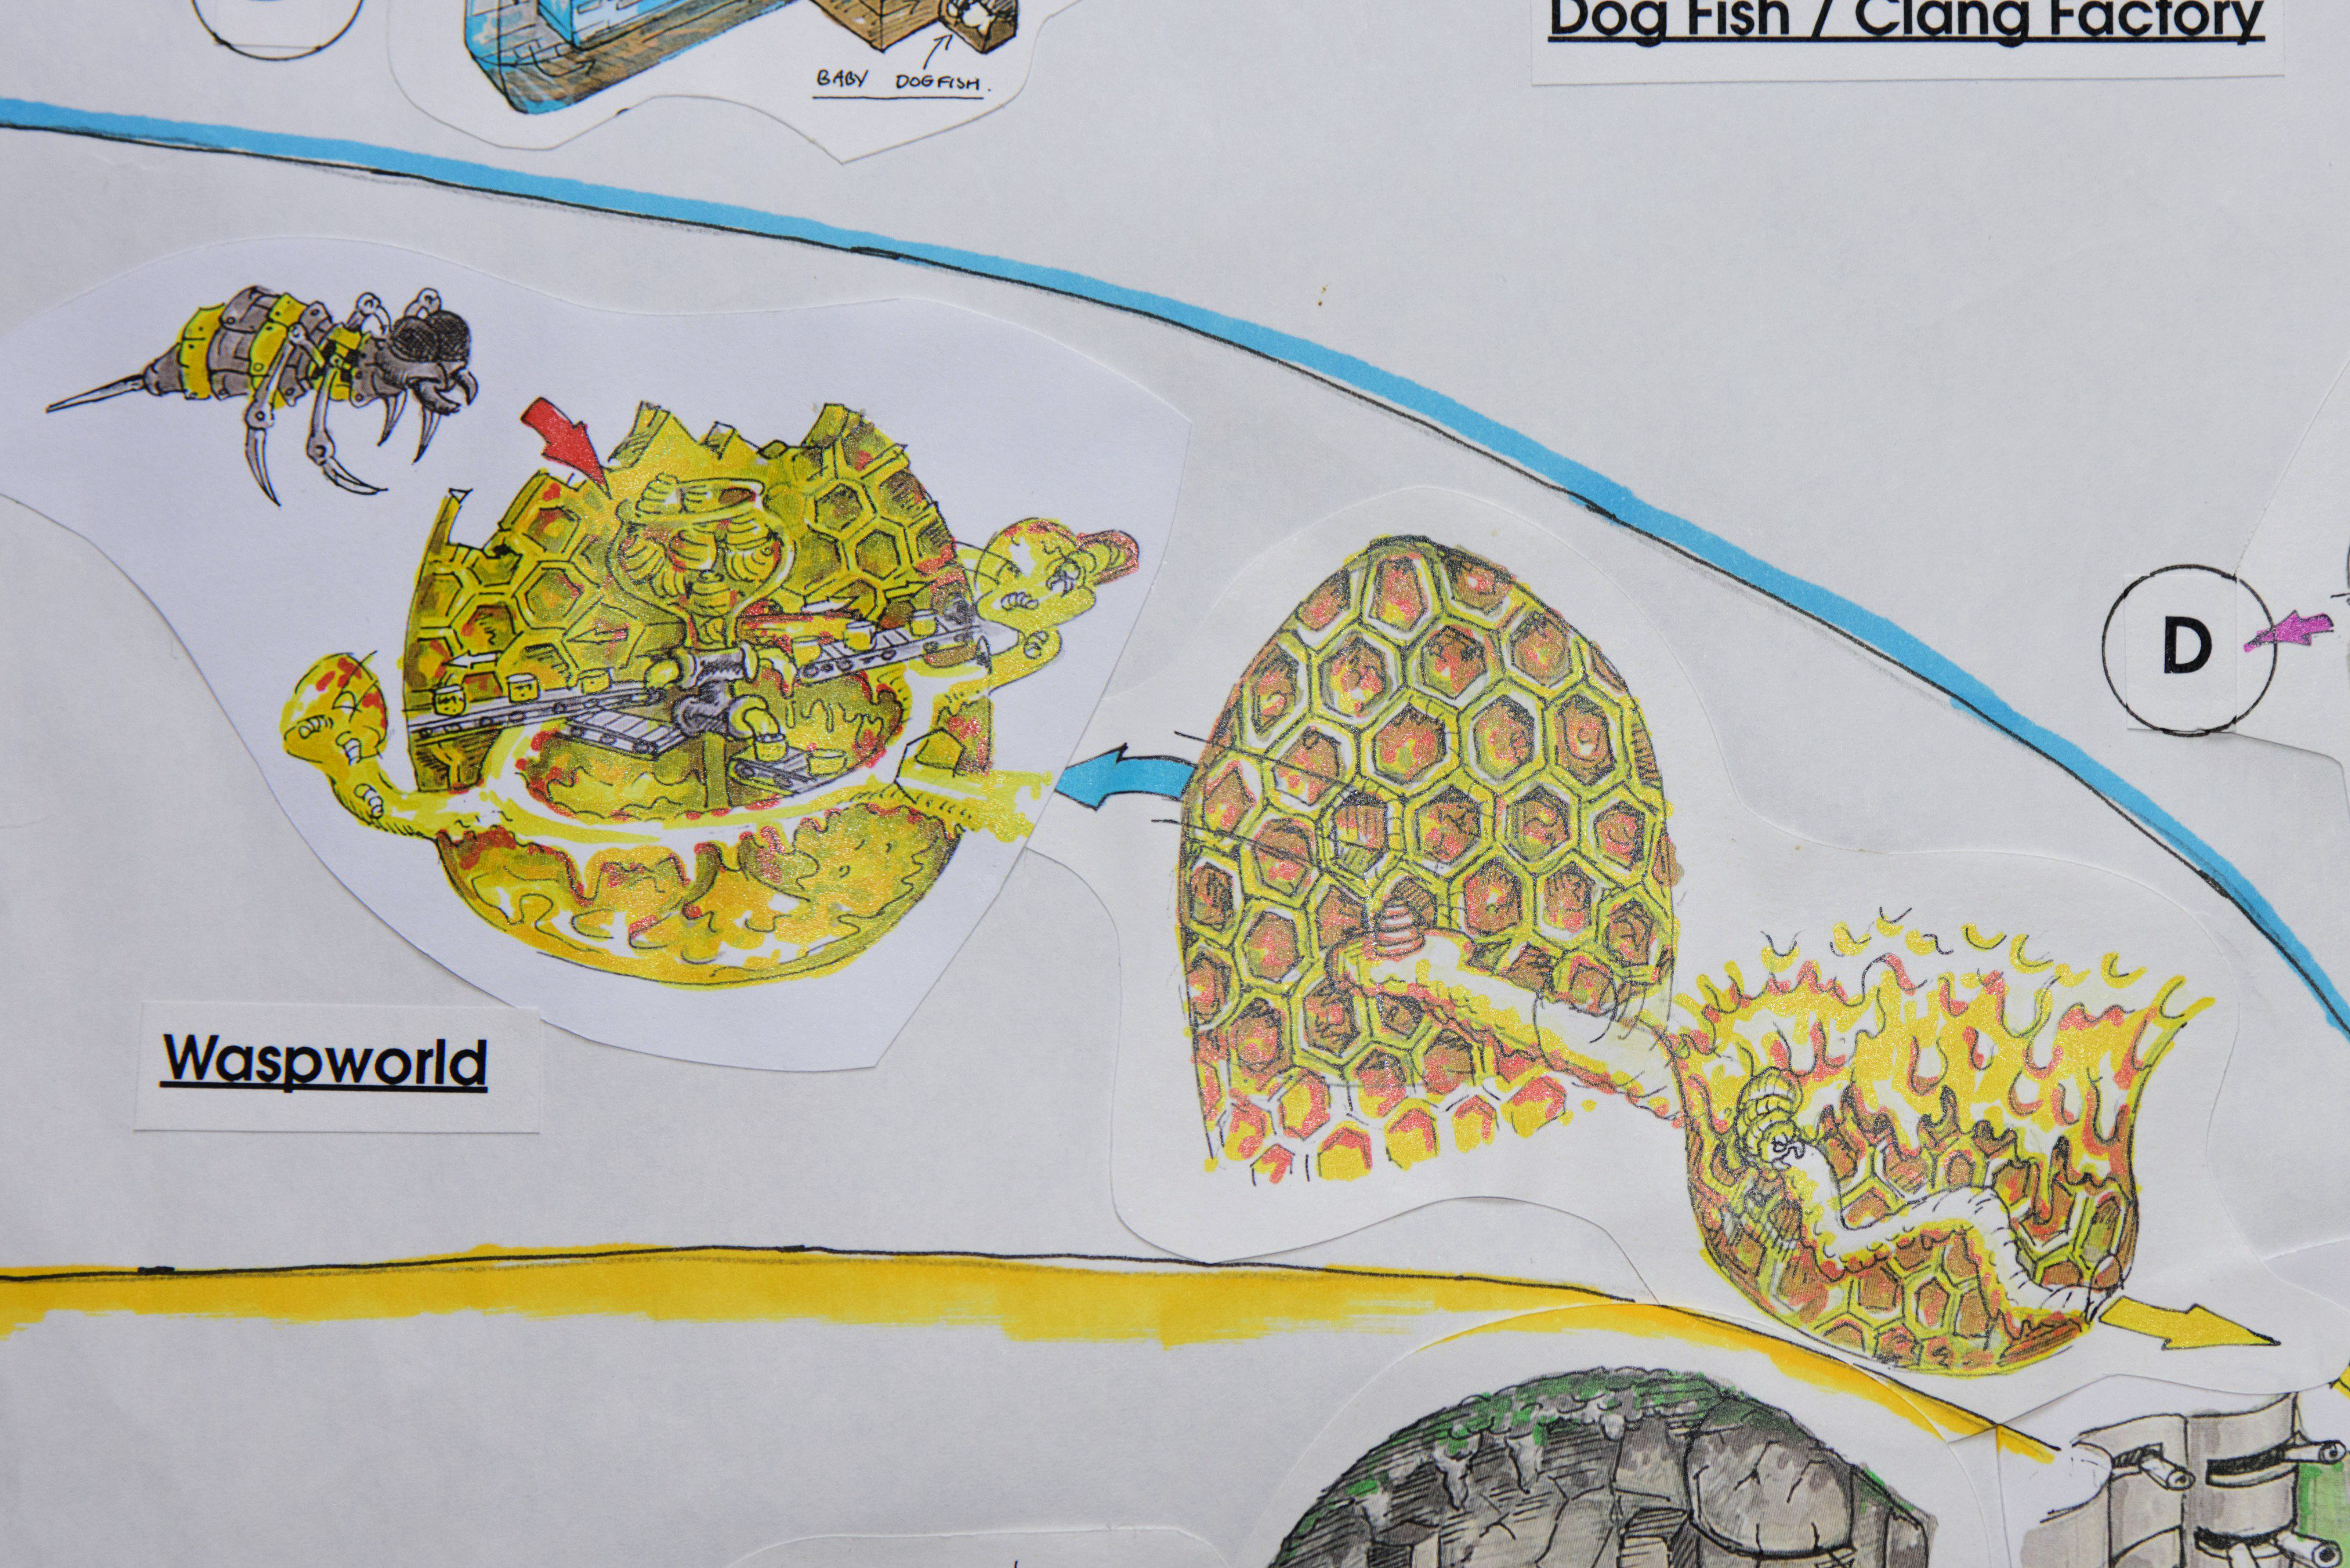
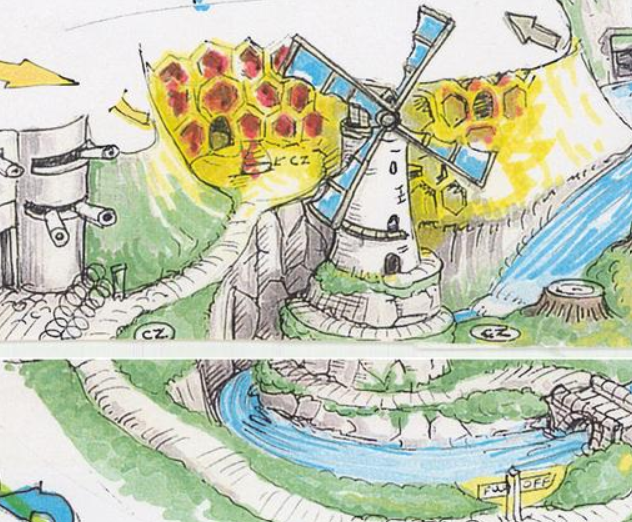
Per the first iteration of "Windy" above, the Wasp's Hive was originally portrayed as a standalone frowning beehive perched on a cliff. As development continued, the Wasp's hive was instead built into the cliff and moved closer to the entrance of "It's War". In the final game, Conker does venture inside the Wasp's hive during the deep insurgency mission, "Wasp's Revenge", but this interior was planned to host an entire chapter titled, "Waspworld" during development.
In this original vision, Conker would enter the Wasp's Lair to reclaim the Queen Bee's Hive a second time and follow a zig-zagging path that was blocked by a large larvae. Progressing beyond this point, Conker would discover the Hive at the end of a short trek, but would also find a honeycomb entrance deeper into the lair, just above. Leaping into this tunnel would allow Conker to arrive at the final area of the hive - the "Honey Factory", where he would battle against a giant robotic Wasp.
As development continued, Waspworld was downsized, with the boss battle against the giant robotic Wasp replaced with a shooting section, where players would leap inside the Queen Bee's stolen hive and use it as a turret to shoot at the surrounding wasps. 10 The Honey Factory was entirely removed from the game, with the interior of Waspworld featuring a single chamber where the captive Queen Bee Hive can be found. Lastly, the large larvae was taken from the scrapped zig-zagging path and moved up; placed at the entrance to the hive as a means to prevent players from entering the area too early in the narrative.
Drugrats#
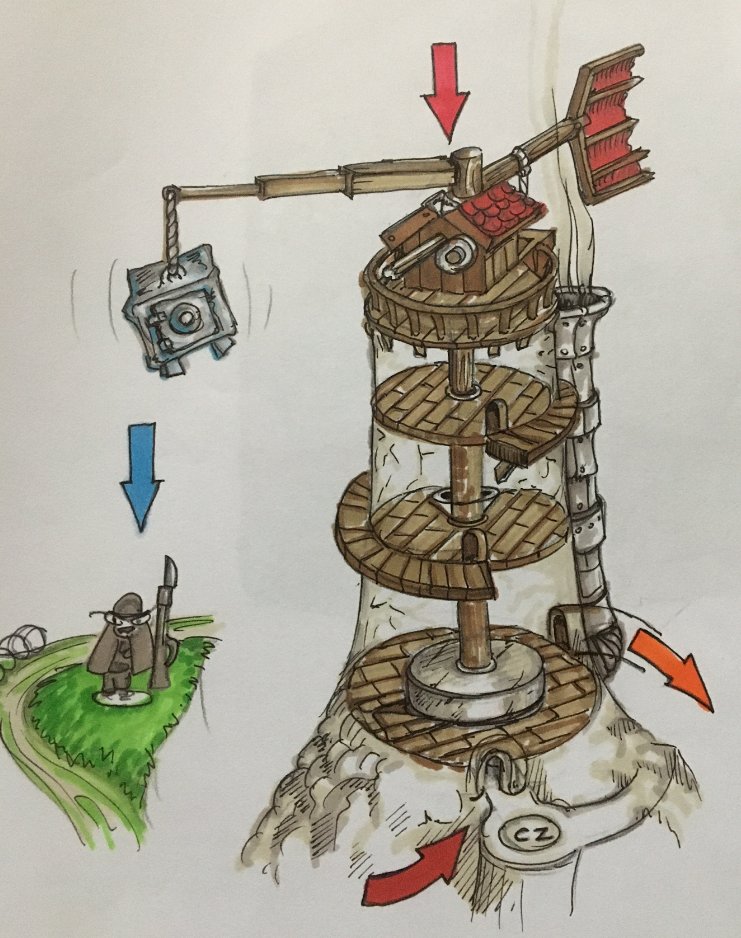
While the final game lampshades the idea that the Windmill contains the final level, only to be blown up by an airborne Rodent leading to the Heist, the truth is that at one point in development it did house its own self-contained chapter called "Drugrats", ostensibly parodying the "Rugrats" cartoon series of the time. In Drugrats, Conker would enter the Windmill and discover a family of rats inside, named Roach, Cornsacks, Floury, Doughy, Pooey and Mrs. Roach. 12
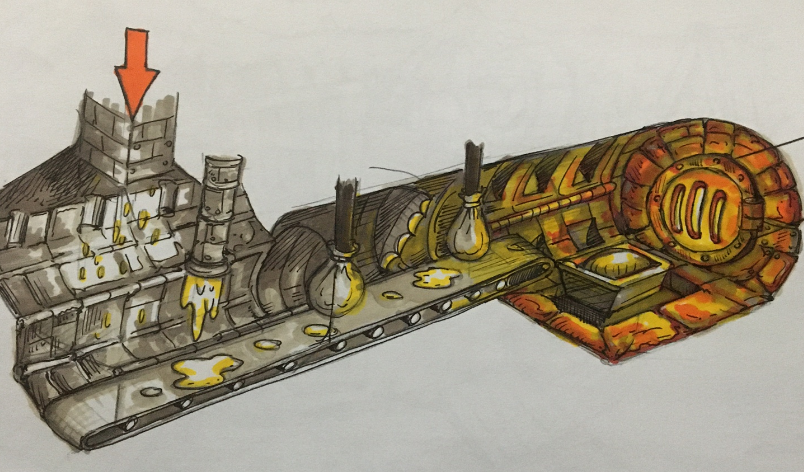
Conker would then travel beneath the Windmill where a conveyor belt would lead to a Boiler Room, echoing the Big Big Guy boss fight as seen in Bat's Tower. 13
Upon defeating the Boiler, Conker would then travel up the chimney, leading to the top of the Windmill.
The concept art suggests that Conker would use this elevated position to cause a comically large safe to fall onto the posted soldier below. This development was nearly in the final game, as during E3 2000, an SHC soldier could be seen in front of It's War, posted atop a Context Sensitive Pad. Given that Conker can't budge this soldier through normal means of melee interaction, crushing him with the safe would prove the only means to gain access to the Context Sensitive Pad beneath. Given the proximity of the aforementioned pad to It's War, it's entirely possible that Conker would use the ability to make progress into the chapter, with the SHC guard serving as the progression gate up to that point.
This gag seemed to exist during E3, and was even recovered in the ECTS build, but never made it into the final game, due to the Dragrats chapter being scrapped leading up to release. Other locations such as the interior of the Windmill, and the conveyor belt below were removed from Conker's Bad Fur Day, with the Boiler Boss being salvaged wholesale and repurposed for the finale within Bat's Tower.

Bat's Tower#
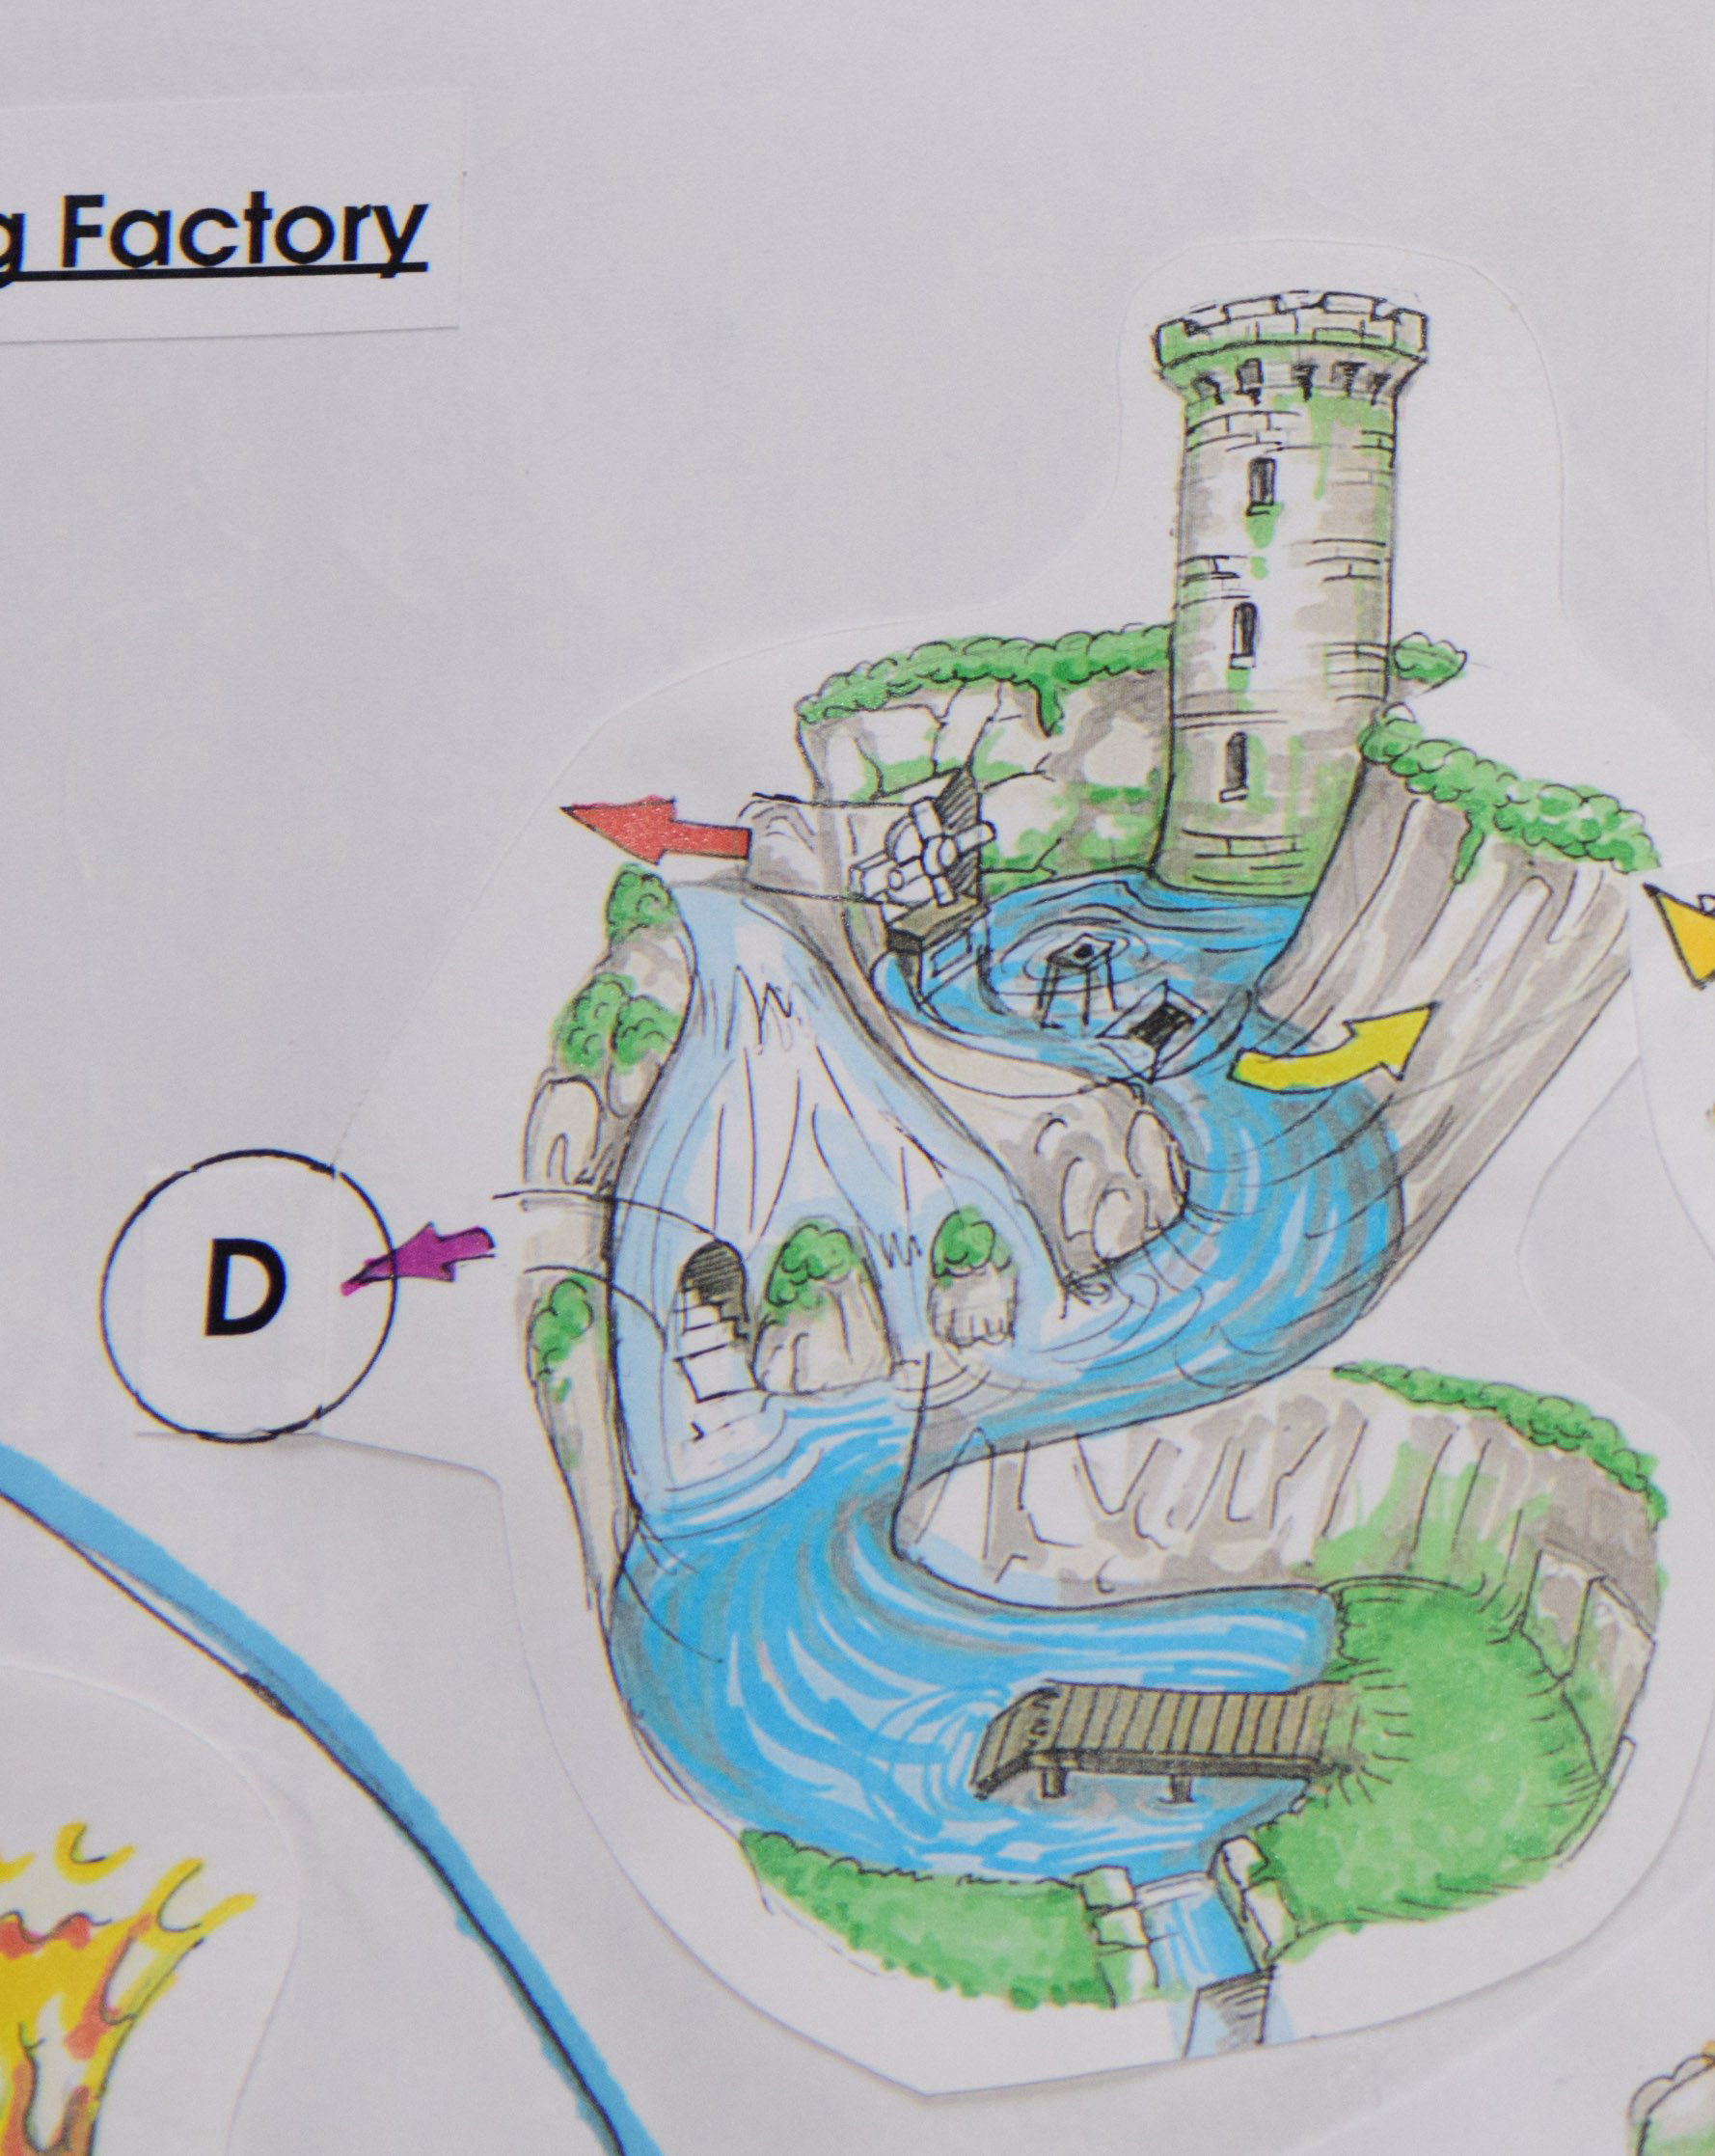
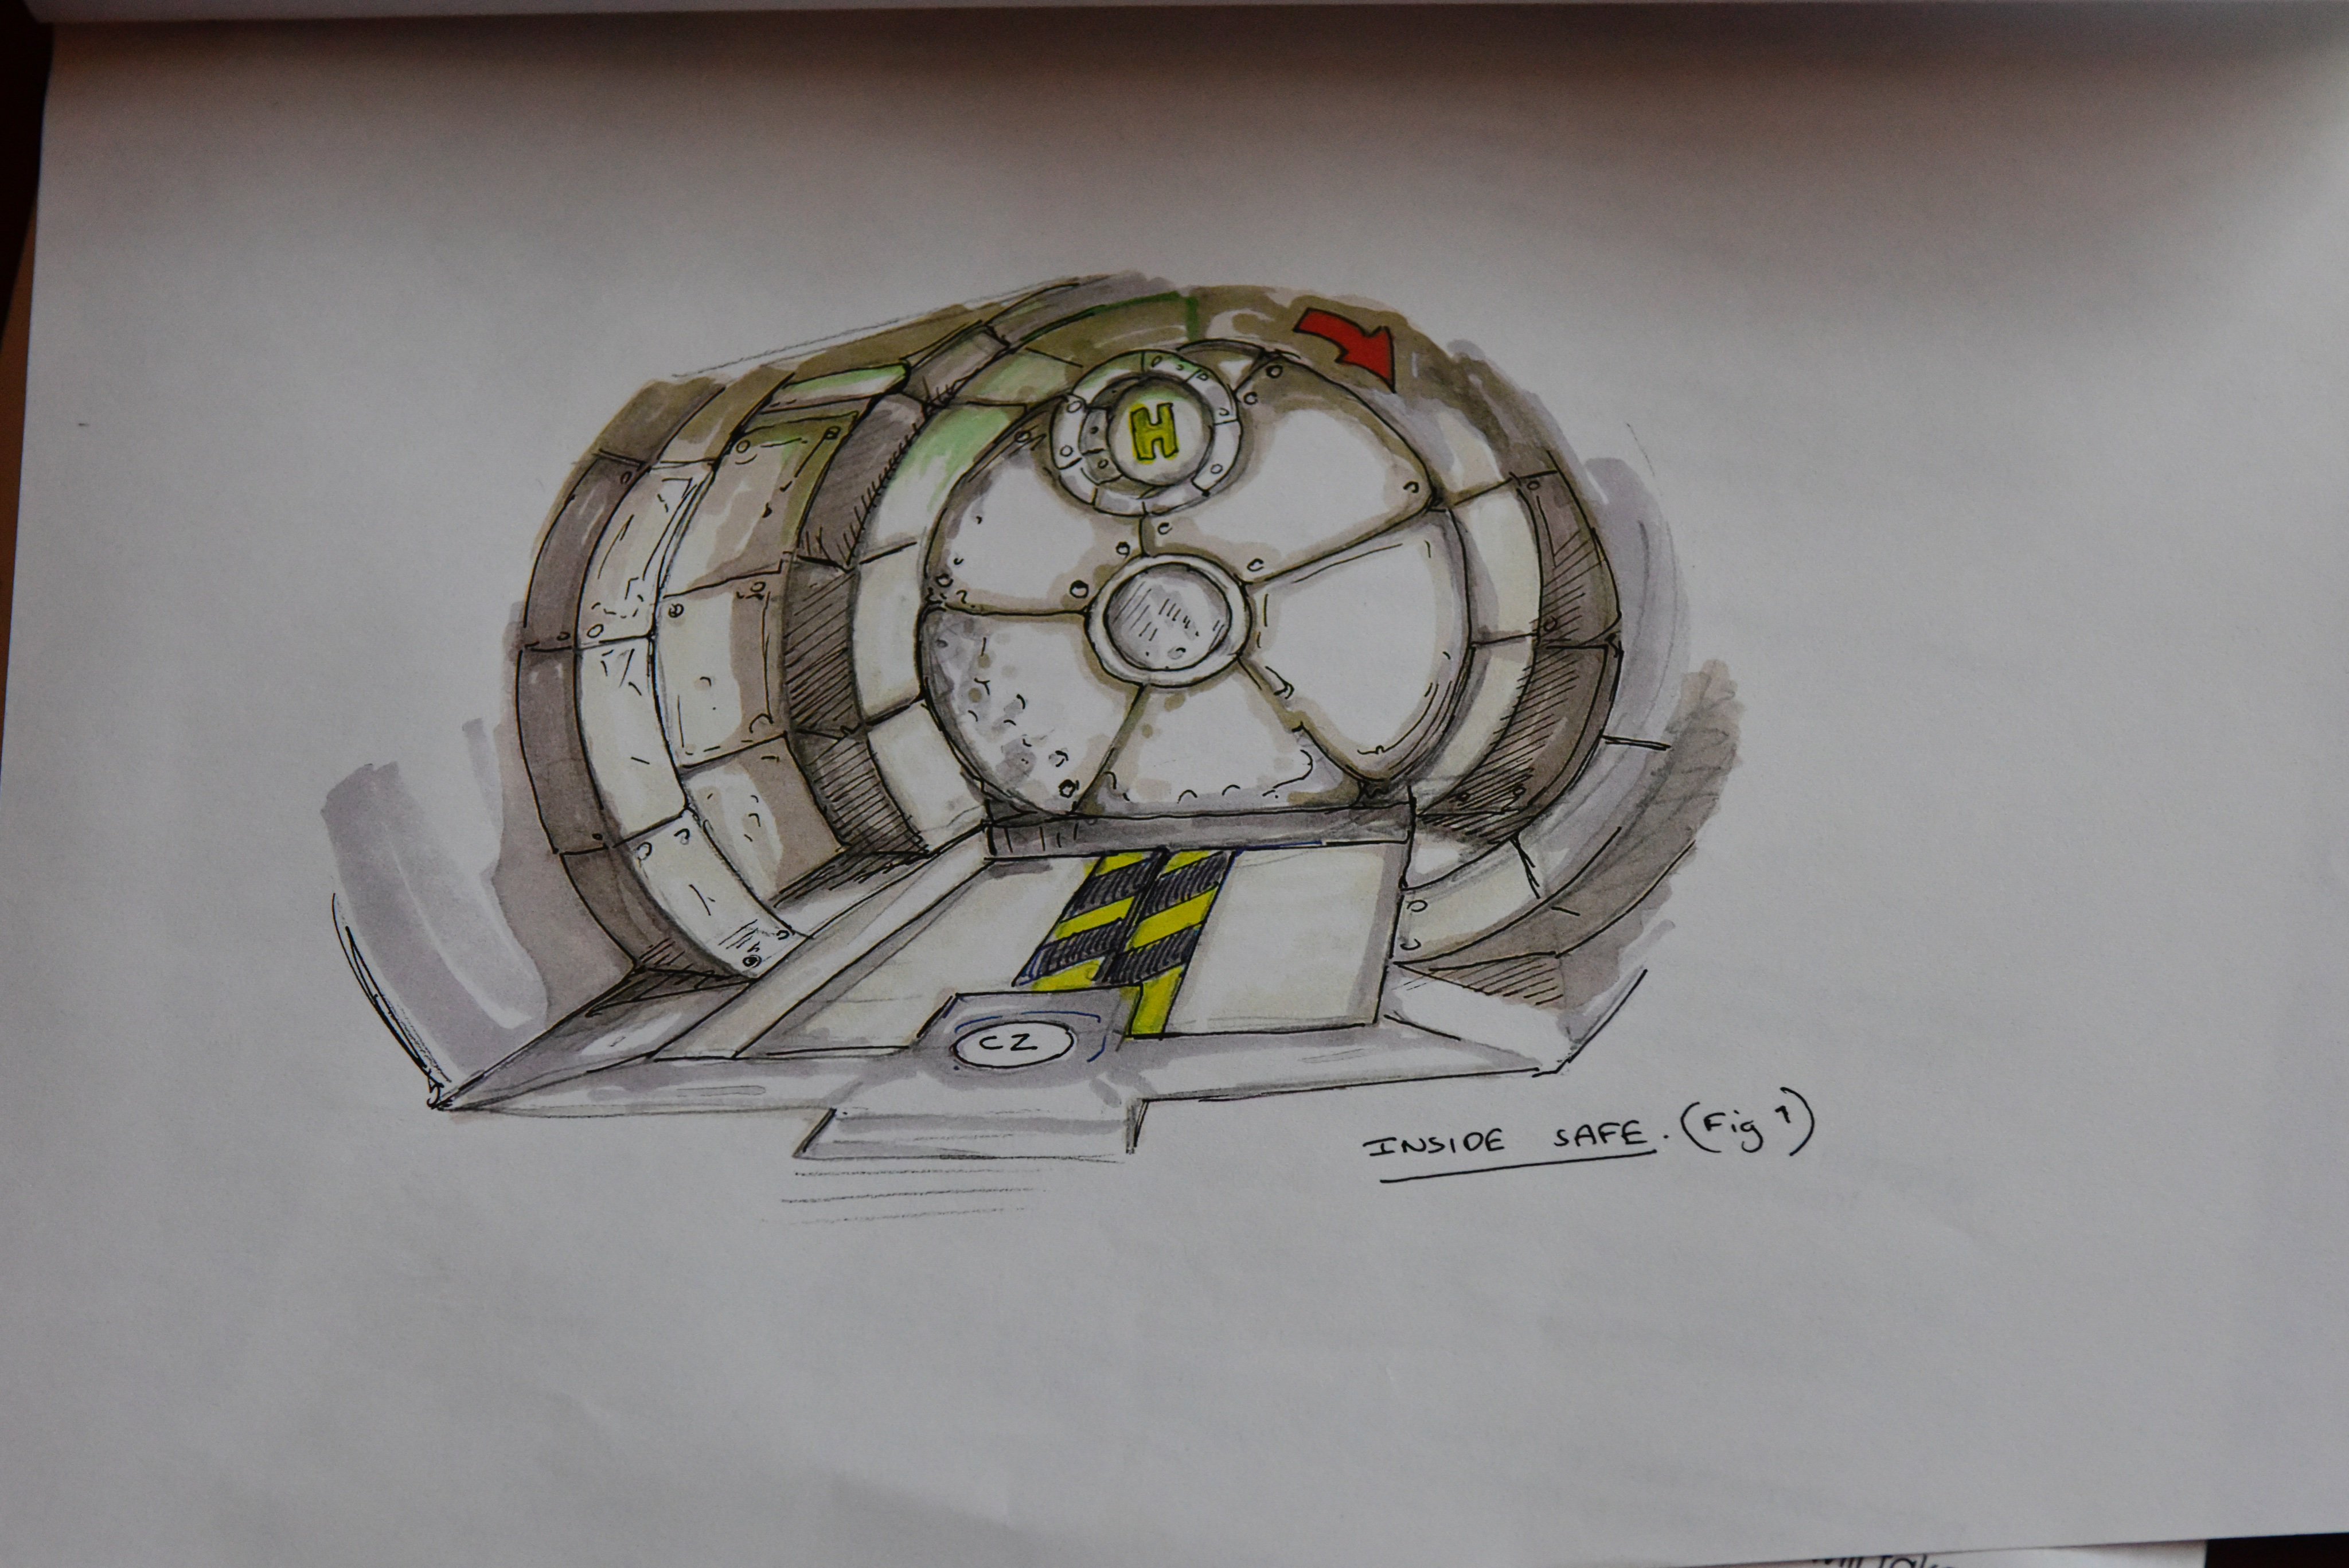
Catfish Pond originally presented three distinct challenges to the player with "Dogfish: Money Chase" in Clang's Lair, "Chase the Cogs" in Bat's Tower, and a separate challenge inside the safe with "Clang's Factory" which were then combined to create two challenges in the final game.
Originally, players could locate a hidden passage behind the waterfall in Catfish Pond that would have led an early version to Clang's Lair in which Conker must pursue a wad of cash that escapes into the open pool. Contending with Baby Dogfish that lurch out of their underwater grottos, Conker would pull a switch to open a gate, and scramble for oxygen in a vertical passage home to a Clang Swimmer. Swimming into the next dead-end chamber, Conker would avoid two further Clang Swimmers and be able to corner the wad of cash.
This map is preserved in the ECTS Demo, though is in an unfinished state, with missing textures. It is possible to make comparisons to the concept art, however, such as locating the alcoves where the Baby Dogfish are meant to dwell, as well as a non-functioning lever, and gate that would lead to the dead-end chamber.
Bat's Tower had always existed as a means to retract the Dogfish leash, with the Cog Chase being virtually identical to the final game. However, the platforming elements presented in the ascent were entirely different, and the only incentive for making the climb was unlocking the underwater passage for the Cog Chase, as it wasn't planned to have Conker climbing on the tower parapets for a wad of cash.
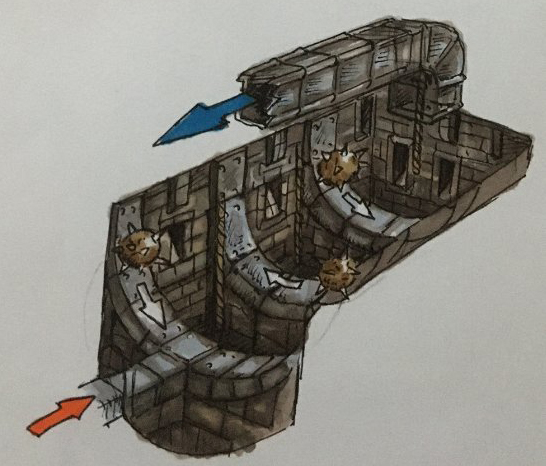
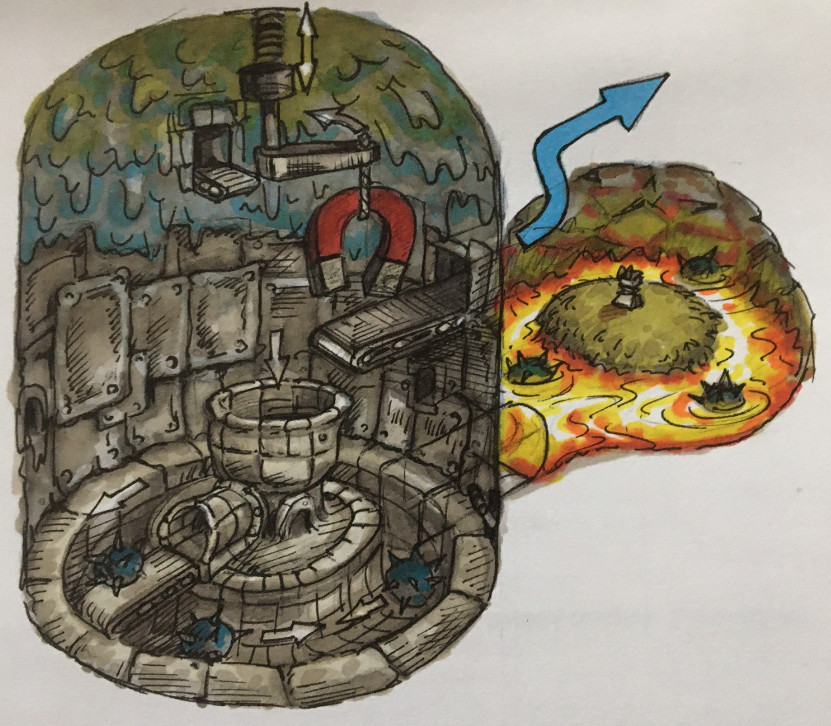
When the Dogfish's leash had been retracted, and the Catfish could approach the safe, Conker was originally meant to find a scrapped location called "Clang's Factory". Unlike the underwater tasks found in Clang's Lair, Conker would need to avoid roving Clang's in a dry castle-like environment. Starting off in a half-pipe with Clang's crossing the path like a pendulum, Conker could find a rope at the end of the chamber to to ascend through to a ventilation shaft on the ceiling. Crawling through the shaft would allow him to cover the stretch of the room backwards, and progress to the next floor above the entrance. Here, he would need to manipulate a large magnet to pull up the Clangs 14
, and then pull a lever to advance to an area filled with lava where a wad of cash was stranded on a central island. Retrieving this wad of cash and returning it to the Catfish would presumably set up the events of the Bullfish Escape.
As development continued, and deadlines loomed, the tasks in Catfish Pond were merged together with the areas modified heavily to accomplish this:
First, the passage behind the waterfall that would have originally lead to "Clang's Lair" was redacted, leaving only a secret dead-end chamber which rewarded exploratory players with an extra life in the final game. The wad of cash earned for this segment would instead be found at the top of Bat's Tower.
Next, the Clang's Factory segment inside the safe was removed entirely, replaced with the underwater "Money Chase" concept that was originally presented in Clang's Lair.
Finally, the "Money Chase" didn't result in Conker cornering the money in a dead-end shaft as presented in the early Clang's Lair. Instead, Conker would pursue the wad through to the Boiler Room, meeting with a gang of Fire Imps. This element too, was changed during development - originally, a single Fire Imp would consume the others to grow in size exponentially to become the "Big Big Guy" (with the cutscene still present in the ECTS Demo), whom Conker would then need to defeat. In the final game, the two remaining Fire Imps designate the Boiler as the "Big Big Guy" and pilot it from within. The Boiler Boss, of course, was the sole surviving element from the scrapped "Drugrats" chapter inside the Windmill.
One last idea was for an intended return visit to Catfish Pond later in the adventure where Conker would kill the Bullfish through electrocution or being blown up, reflecting the ending of Jaws 2 and Jaws 1, respectively. It was considered to have Marvin the Mouse make a reappearance, where after being thrown into the mouth of the Bullfish would have Conker shooting him with a rifle to explode, echoing the "Smile, you Son of a-" scene that caused the shark's death in Jaws. 15


Barn Boys#
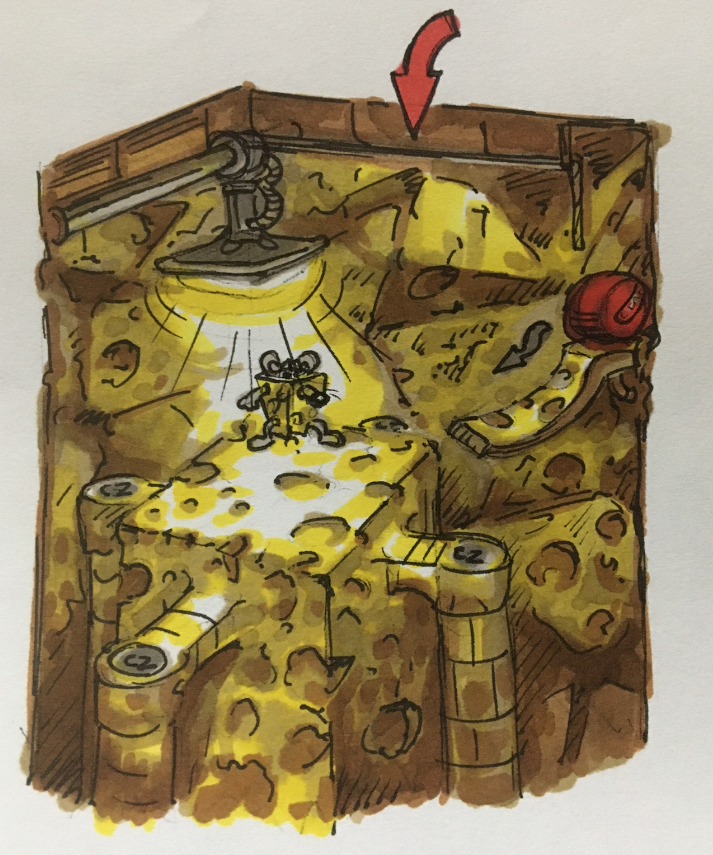
The original sketch of the barn provides an early "Plan View" in bottom right hand corner which differs considerably from the final game. For starters, Barn Boys lacks the large rain barrel that would provide the "Slam Dunk" objective, or the Cheese area where Marvin's food could be gathered. Another marked difference is that the water feature is on the wrong side of the map; in the final game, the area near the entrance to the barn is a dried moat, with the water found on the opposite side of the tunnel near the Sunflower. Also of interest from this sketch is a circular pool of water in the exact place that King Bee would reside in the final game.
One final change is in the layout of the barn itself, which was originally envisioned as having a single thatched roof between two buildings in an "L" Shape. The final layout gives the entrance of the barn a thatched roof, the second building receiving shingles, and both meeting up in a "T" shape.
The revisited sketch gives us a view of Barn Boys that is much closer to the final game, now including the cheese area lead to the scrapped Dick Cheesy chapter, seen below. The largest change involves the appearance of a hive inside the underground tunnel. In the final game, Conker can turn into an anvil and hit the Context Sensitive Pad inside the rain barrel during the events of "Slam Dunk" to unlock the gate to the aforementioned tunnel where a wad of cash and an extra life can be found. This early sketch seems to imply that Conker would find a beehive, potentially suggesting the encounter with King Bee would occur here rather than the entrance to the barn. The pathway to the Sunflower would also be complicated, as players could not reach the Sunflower from the circular fenced-in area near the barn entrance. In the final game, players can follow a thin path on the perimeter to travel from the entrance of the barn to the Sunflower.
A minor change seen in both sketches has the staircase leading up to the barn, which was modified to a gradual slope in the final game.
The interior of the barn remains consistent with the final game, with the only difference in layout being that the area across from Frankie is extended to the south so that the barn is in a "T" shape, rather than an "L" shape. This was done to remain consistent with the exterior, where the two buildings meet at the middle in a "T", rather than an "L" at the corner. A gameplay challenge was also added to the rafters, as in the original sketch, Conker could easily travel along the wide wooden rafter boards in a much more forgiving platforming section. In the final game, Conker must travel along a thin metal bar akin to a tightrope, broken up with Context Sensitive Pads that he'll need to use to down the dive-bombing Vampire Bats.
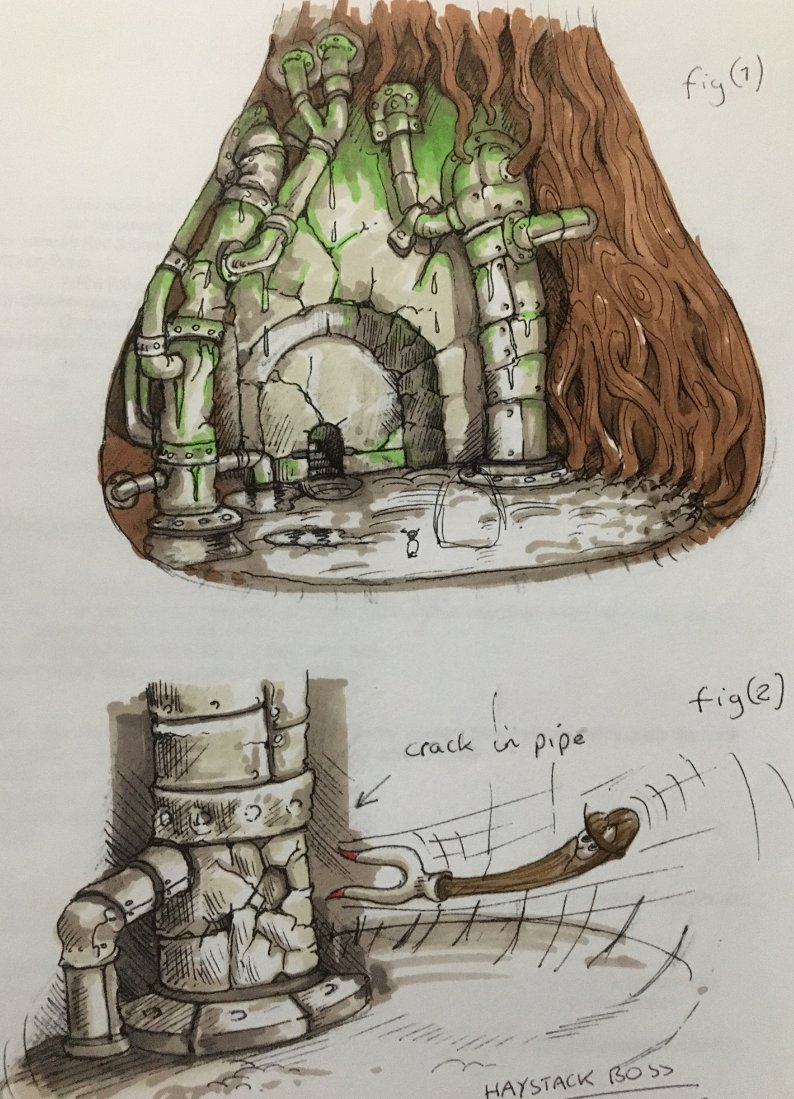
Underneath the barn for "Haybot Wars" is entirely different, with a vastly different arena layout. Given the staircase at the bottom of the sketch, it can be interpreted that players would simply be able to return to the barn using this passage after defeating the Haybot - in the final game, players will instead find an exit to the barn near the ceiling. To reach this exit, Conker must use the elevated Context Sensitive Pads to snip down active wires in a desperate climb against the flooding arena in "Frying Tonight"
The second sketch seems to imply that Frankie would break open the flooding pipes, stabbing his forks into them as experienced in the previous "Buff You" sub-chapter. In the final game, Conker must lure the Haybot into firing one of the SUZIE 9MM missiles towards the pipe, and then cause it to step into the resulting pool of water for a decommissioning electric shock.


Dick Cheesy#
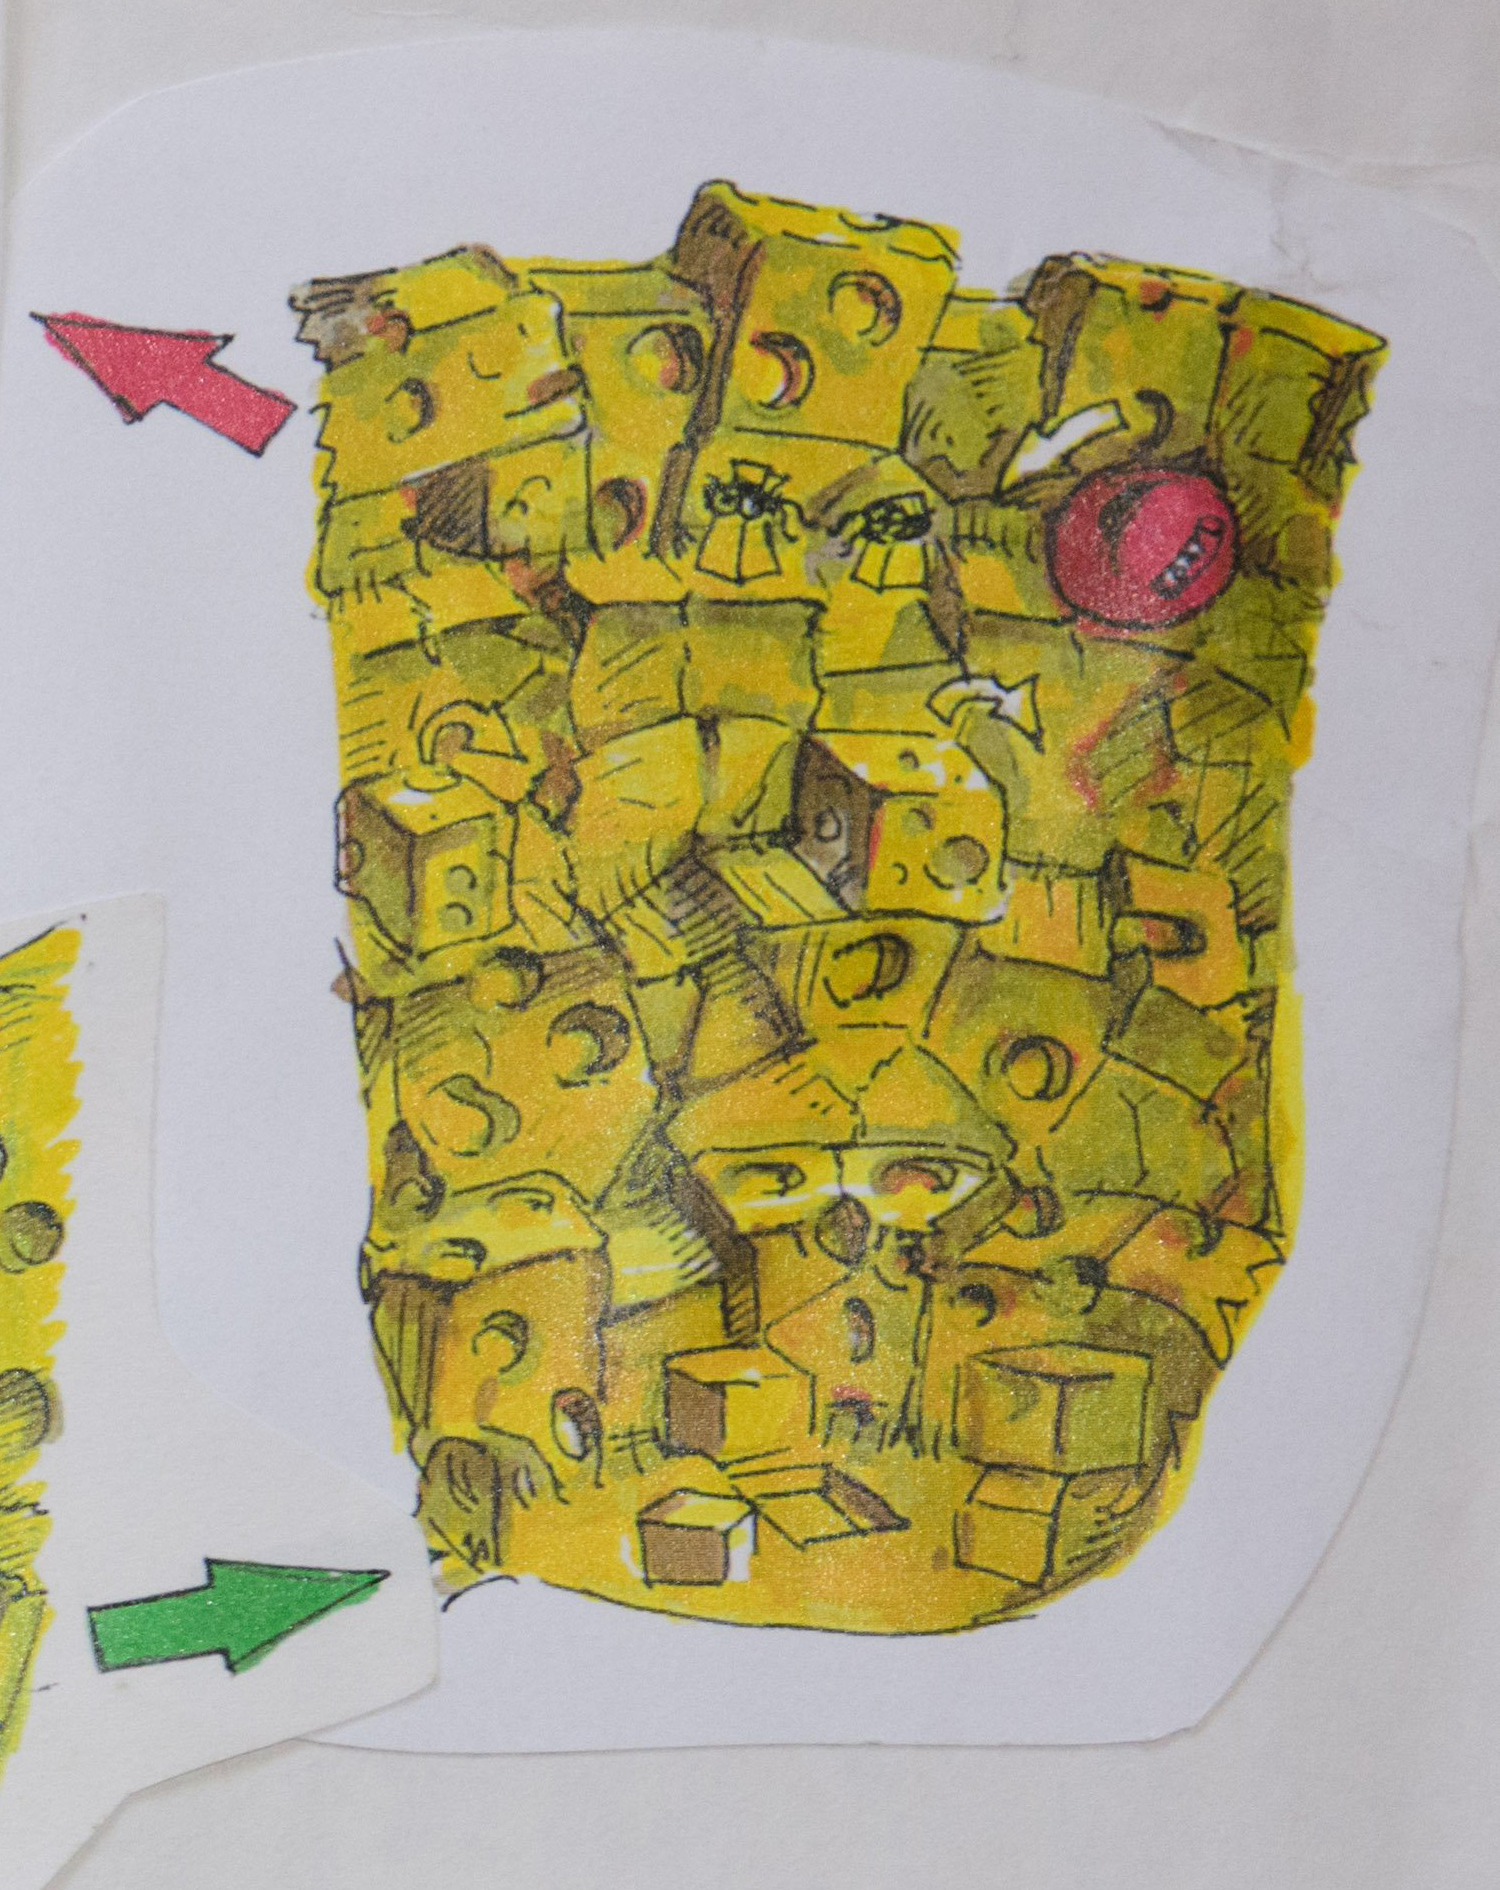
If you're especially investigative in the Barn Boys chapter, you'll discover that you can turn Conker into an anvil when you reach the end of platforming section in the Cheese area. This will cause Conker to slice through the cheddar wall to uncover an oddly spacious secret chamber harbouring an extra life. There is more to this secret, however, as during development, the dead-end was once a doorway which lead to a veritable land of cheese beyond. Welcome to Dick Cheesy, a pungent bit of platforming that owes its parody namesake to the 'Dick Tracy' detective film released in 1990. 23
As Conker ascends the winding path, he'll meet up with a trio of sentient French wedges, namely Camembert, Ninja Cheese and Cheese Crate, before he's whisked into confrontation with the big cheese himself - King Dick Cheesy III 24
, a mouse masquerading as King Cheese to lure all of the cheese to his lair. 25
While context sensitive pads are found in the cardinal directions of the boss arena, and rolling cheese wax boulders seem to act as hazards, very little is known about Conker's clash with King Dick - just that the French Cheeses would save him at some point during the adventure. 26
Unfortunately, the section and the French cheese allies were ultimately removed from Bad Fur Day. It's speculated that just as the Boiler Boss was repurposed from Drugrats, the appearance of Marvin the mouse (whom Conker feeds until he graphically explodes) might be a concept scrapped from Dick Cheesy and reused in Barn Boys.
Camembert was intended to be reused in the sequel, as an imprisoned French Resistance Cheese in Conker's Other Bad Day 27
- unfortunately, neither would come to fruition.

Piggy Sty/Sloprano#
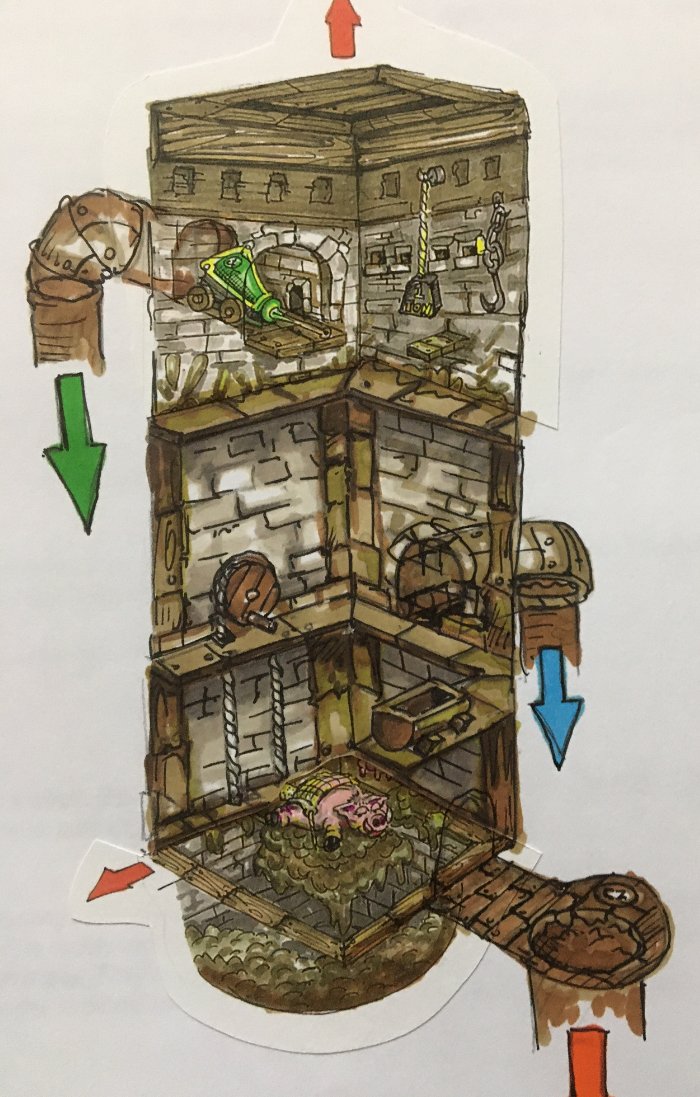
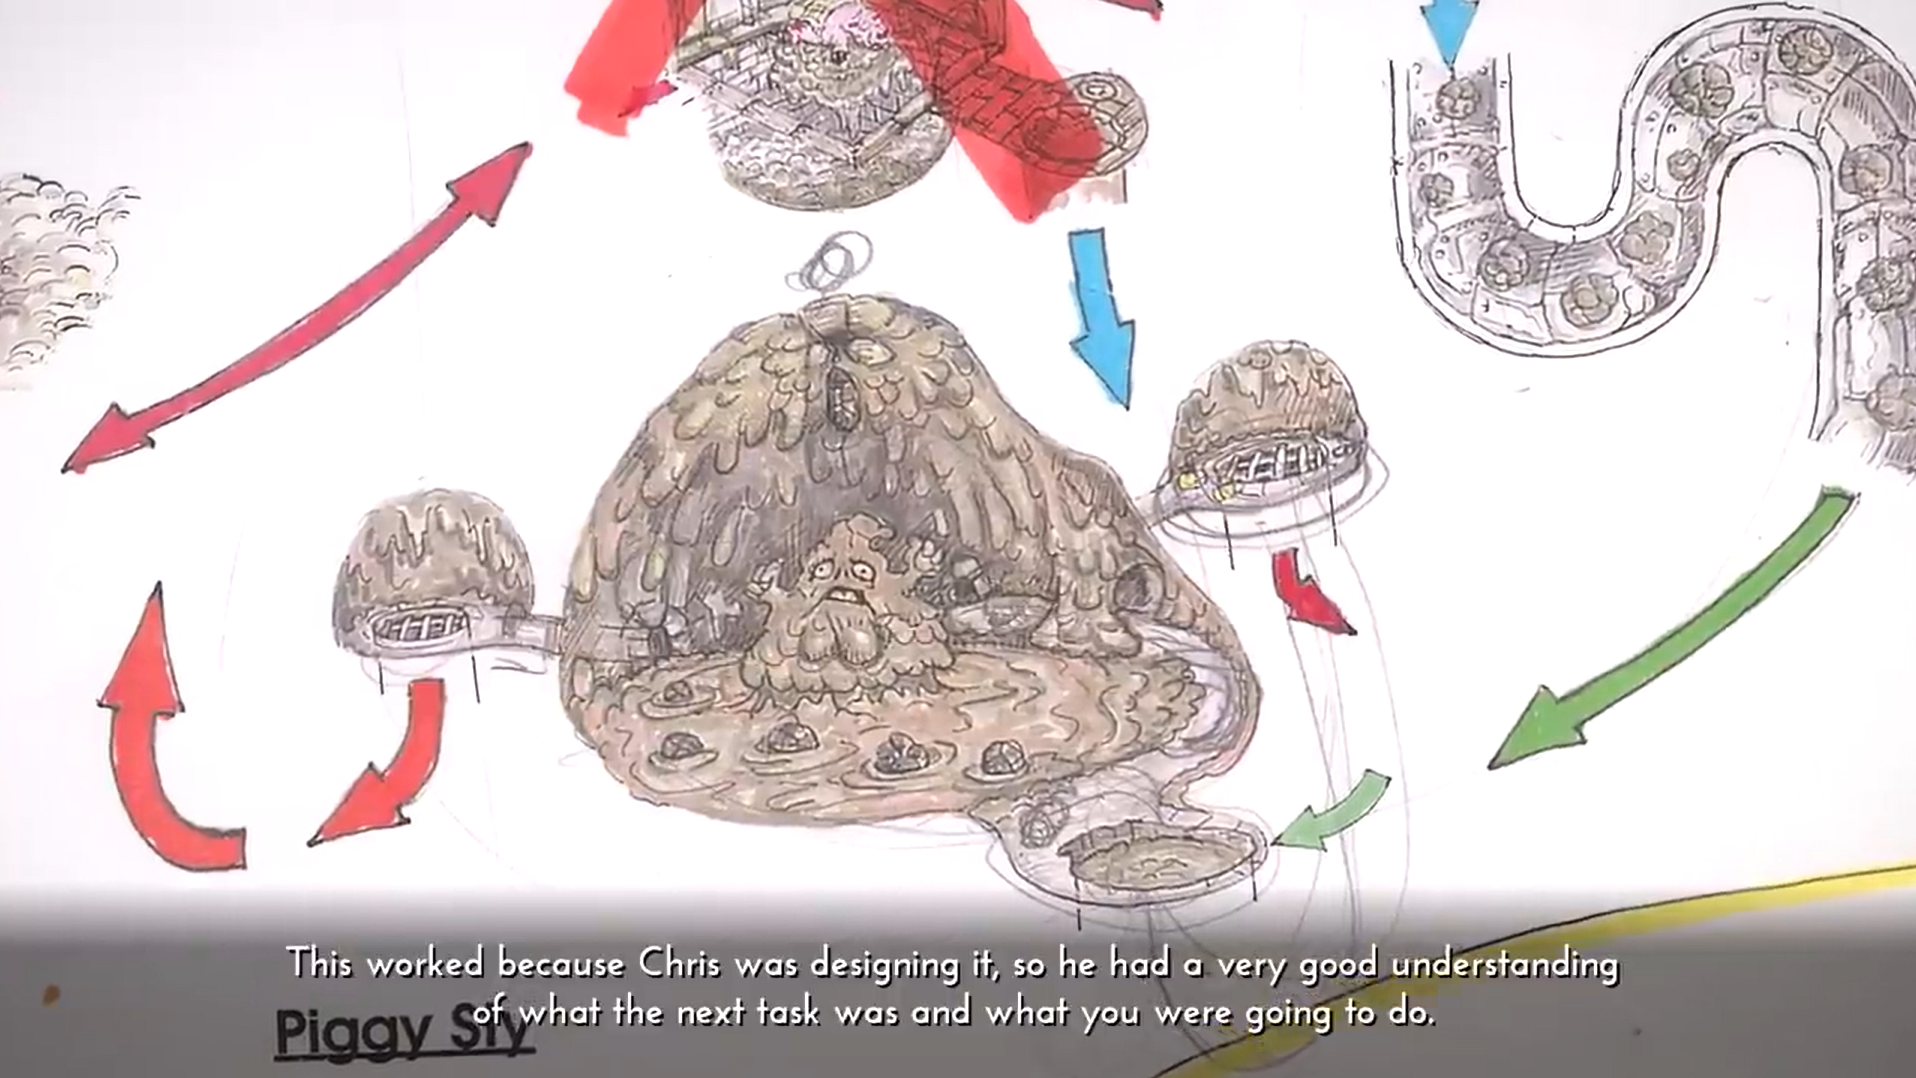
While the Great Mighty Poo might serve as the most memorable boss in Conker's Bad Fur Day, the original sequence of events that lead to the operatic conclusion was originally expanded beyond all expectations - more on that in a second. In "Piggy Sty", Conker would discover a massive, shiftless pig at the bottom of a tower with a cork in its rear end, facing away from a set of fireplace bellows at the top...
Oh no...
Upon reuniting the unlikely duo and doing away with the cork, the pig would find itself feeling rather inflated, becoming an impromptu hog air balloon as the basket follows it up, into the air. But wait, it gets better - from here, Conker could use his newfound vantage point to drop heavy objects from above to encourage the prune juice-filled cows below to explode. As development continued, the idea became more and more ambitious, with Chris Seavor admitting that the pig was eventually sidelined to become a cow dressed in fetish gear to push the envelope even further. 29
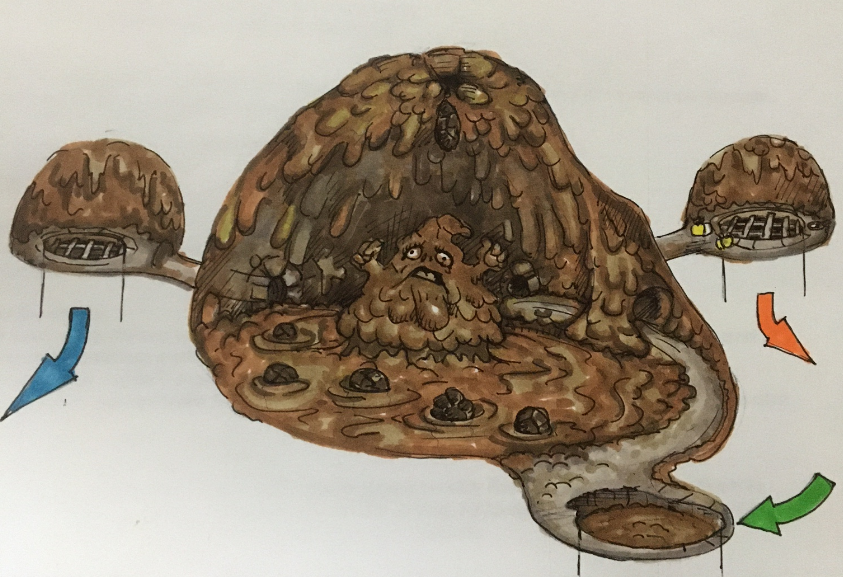
Eventually, however, with deadlines looming on the horizon it became obvious that something would need to give, and the flying pig was reluctantly grounded, never to soar again. For the most part, the Great Mighty Poo was left intact, with the only obvious difference from the concept was that Conker was originally meant to get across the arena using the bits and bobs of floating sewage as makeshift platforms. Delicious. According to Chris Seavor, the Great Mighty Poo was originally meant to be formed from the roof plopping down bits of him into place until fully formed, but this was changed to the more theatrical appearance where he rises from the murky depths. 30

Uga Buga#
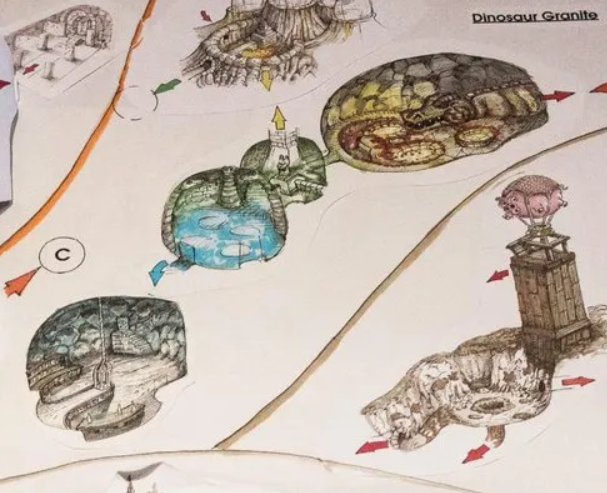
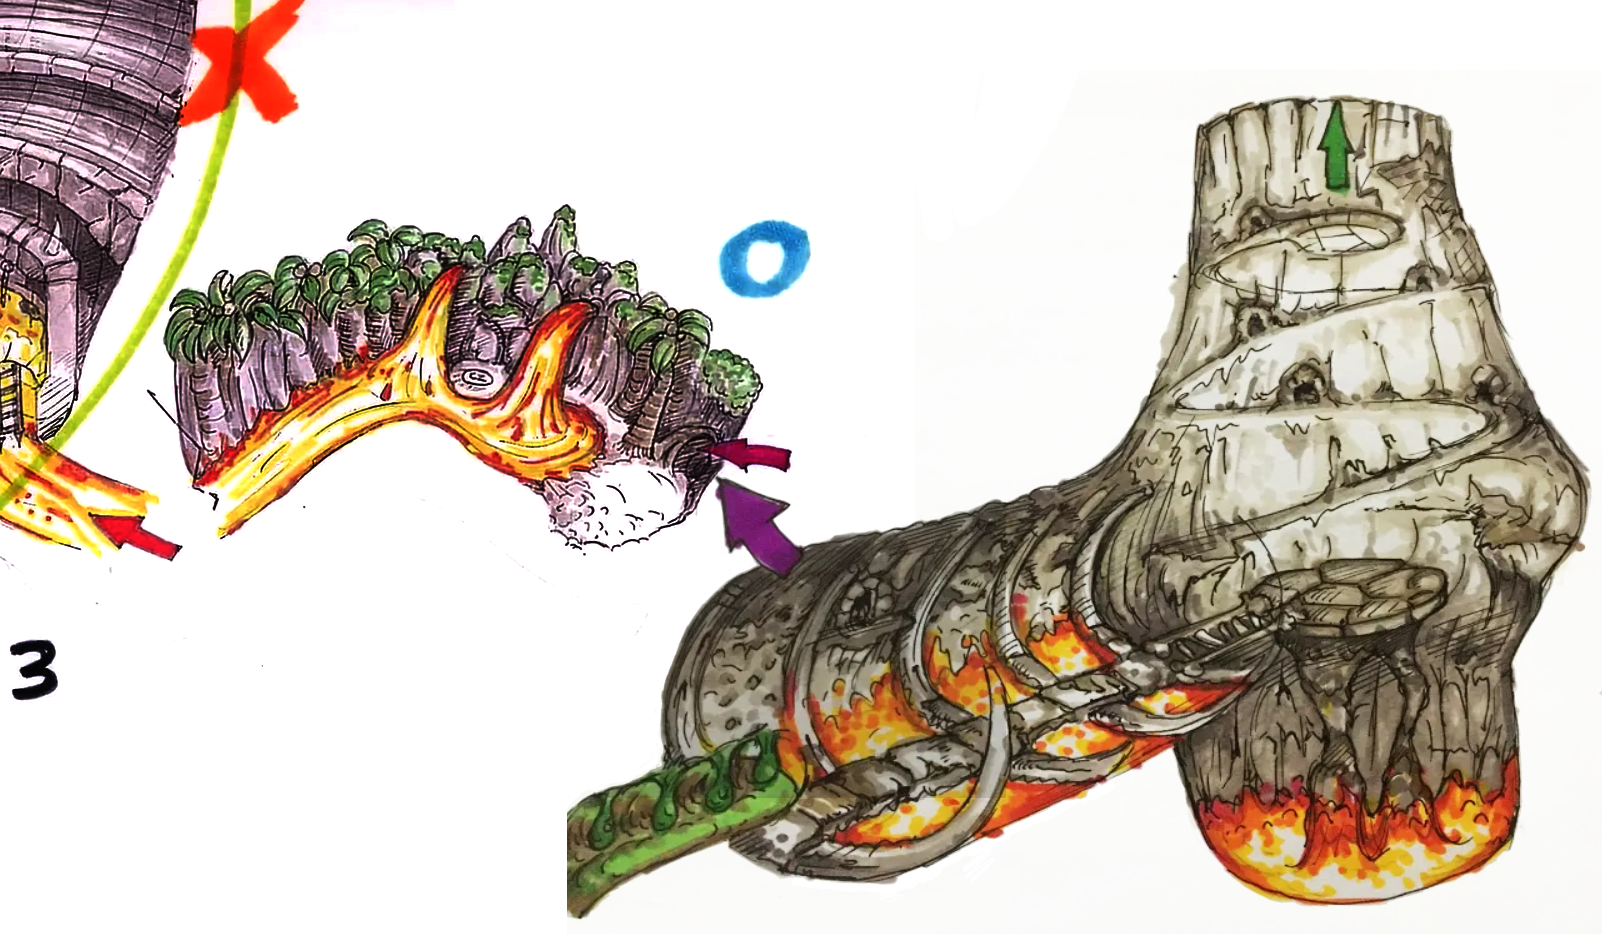
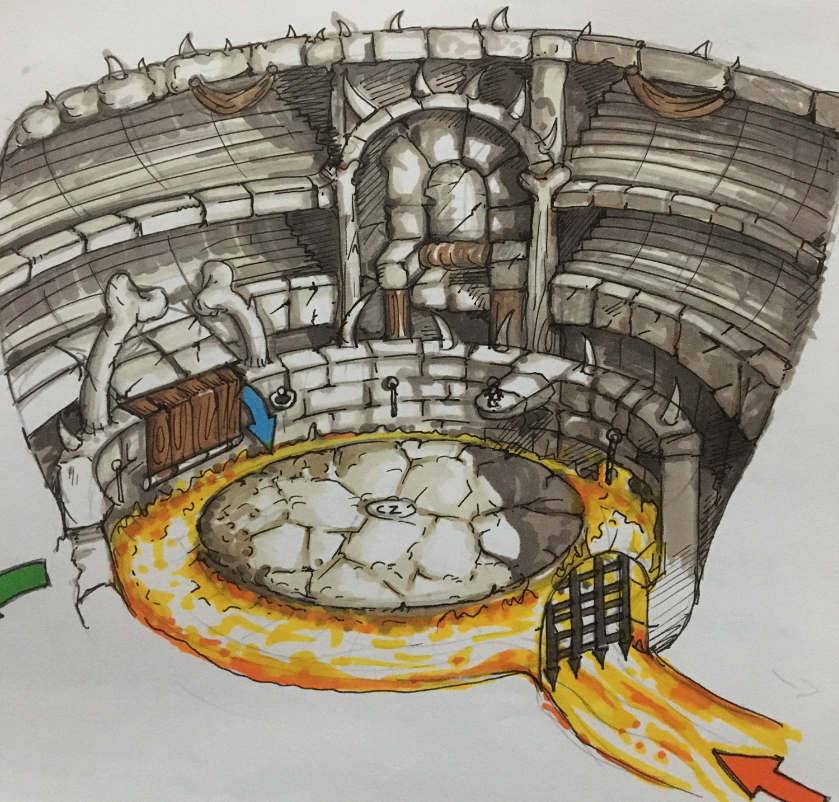
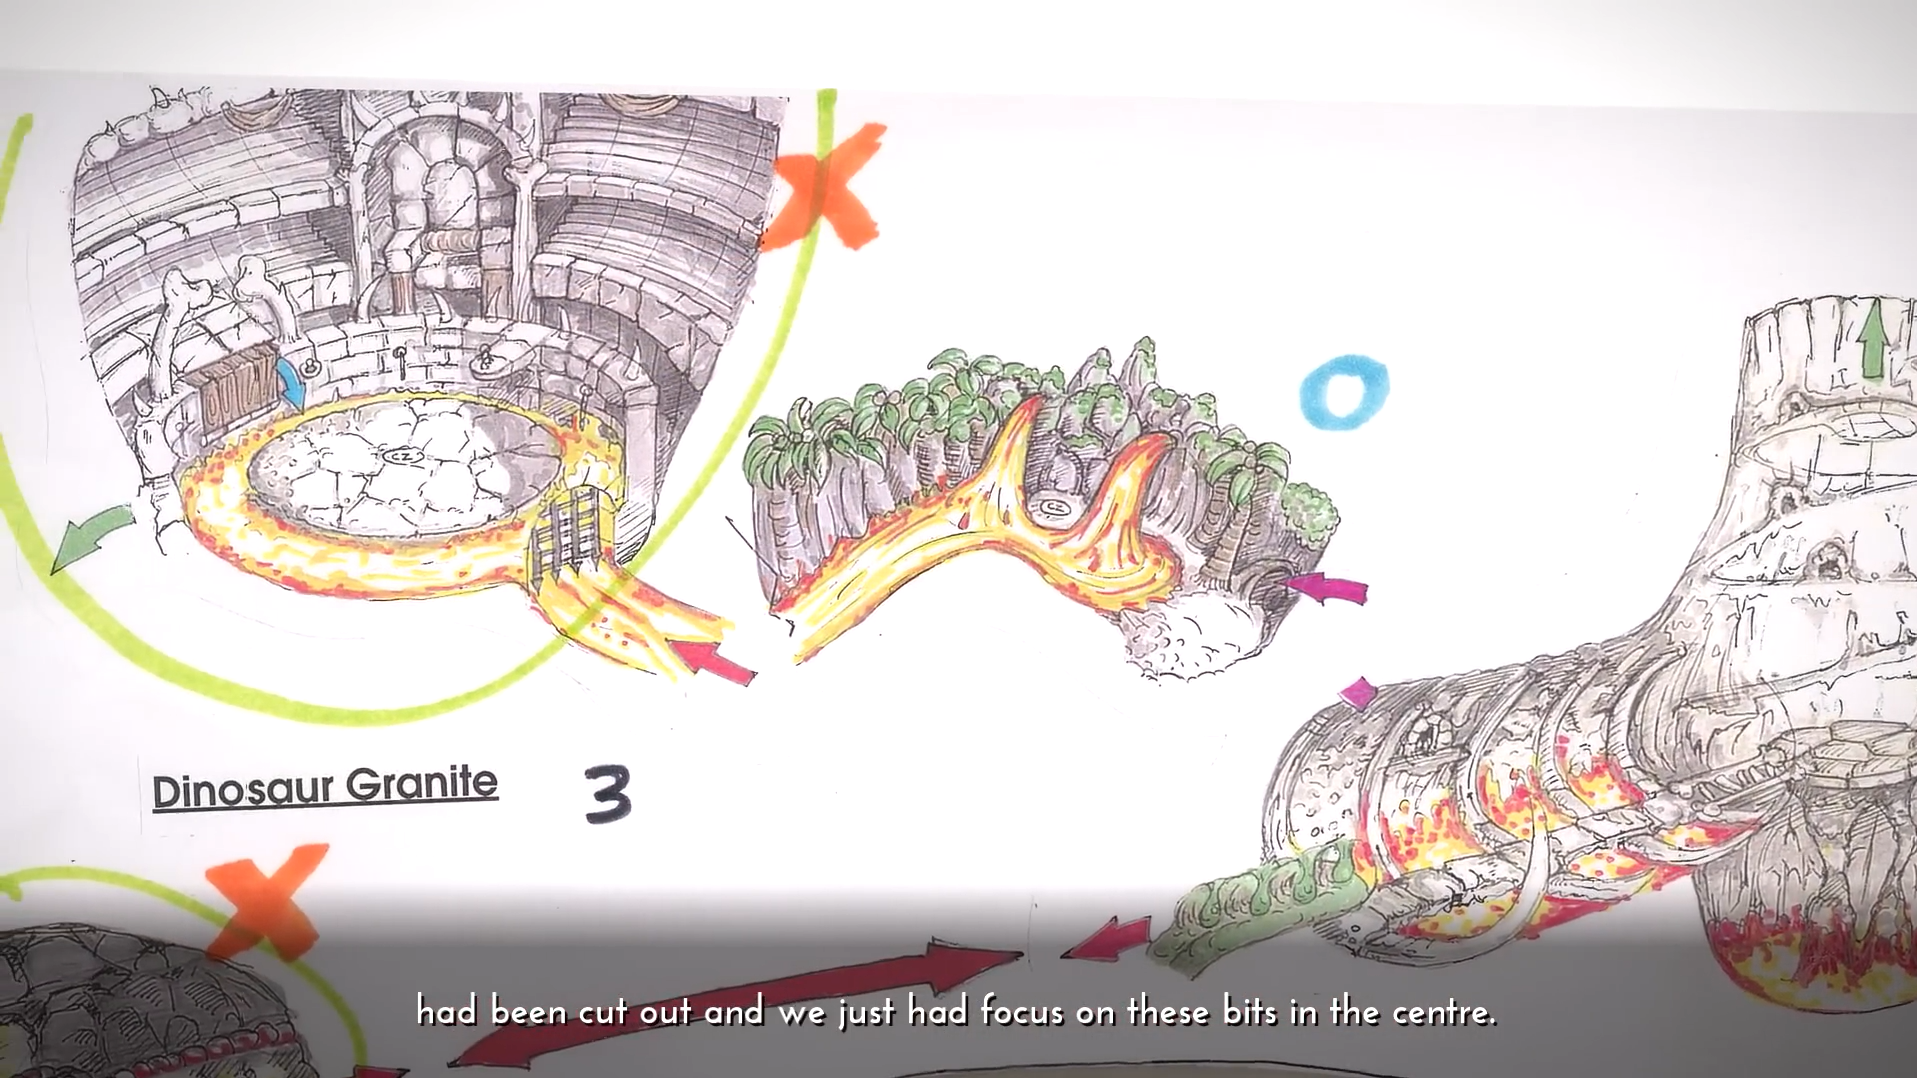
Conker's adventure into a prehistoric past with "Uga Buga", or "Dinosaur Granite" as it was known during development was one that seems to have stayed fairly consistent to the final game, as the concept art illustrates. The largest departure takes place when passing through the Dinosaur, where the path splits in an unused ribcage area:
To the left, Conker can jump to an alcove in the wall, which leads to a short lava path where Conker can find a Context Sensitive Pad in between two lava falls. It's likely given that the path continues to the arena with Buga the Knut, that Conker would use the Context Sensitive Pad to summon his Hoverboard, and then surf the length to the arena. If this is the case, the "Mugging" chapter where Conker must pursue the gang of cavemen along the course might not have been implemented, or is simply not depicted on the Structure Map. After defeating Buga the Knut, it seems that Conker would be able to leave the arena and find a path back to the beginning of Uga Buga, emerging from grotto in the wall of this area.
If Conker does not head left into the Surf Punk alcove, and instead continues heading straight through the ribcage, he'll find himself ascending a spiralling path inside the volcano, with a special explosive exit that loops back to the beginning of Uga Buga.
In the final game, both paths were merged so that progression was made more linear, with Conker bypassing the ribcage altogether to simply find himself inside the volcano. Unlike the original concept where Conker can emerge from the top of the volcano and loop back to the start of the area, the modified area has a ceiling that now serves as the Granite Dinosaur's ribcage. If Conker is successfully drops the Bomb into the volcano during the "Bomb Run" sub-chapter, the area will flood with lava, providing a path forward where he emerges on the racetrack for the "Mugged" section of the campaign. Recollecting his cash on hoverboard, and arriving at the area to face off against Buga the Knut will provide the loop back to the beginning of Uga Buga, as intended in the concept art.
One final difference is the original single-storey layout for the Rock Solid club, which seems to present an entirely different gameplay mechanic. Berri would have been kept in a bony birdcage hanging by a rope at the end of a catwalk rather than built into the wall, suggesting that the rope would be drawn up, allowing her to escape. In the final game, Conker must relieve himself on the rocky patrons and use his stream to steer them into the venues alcoves to make progress. This doesn't appear to be the case in the original design.



Spooky#
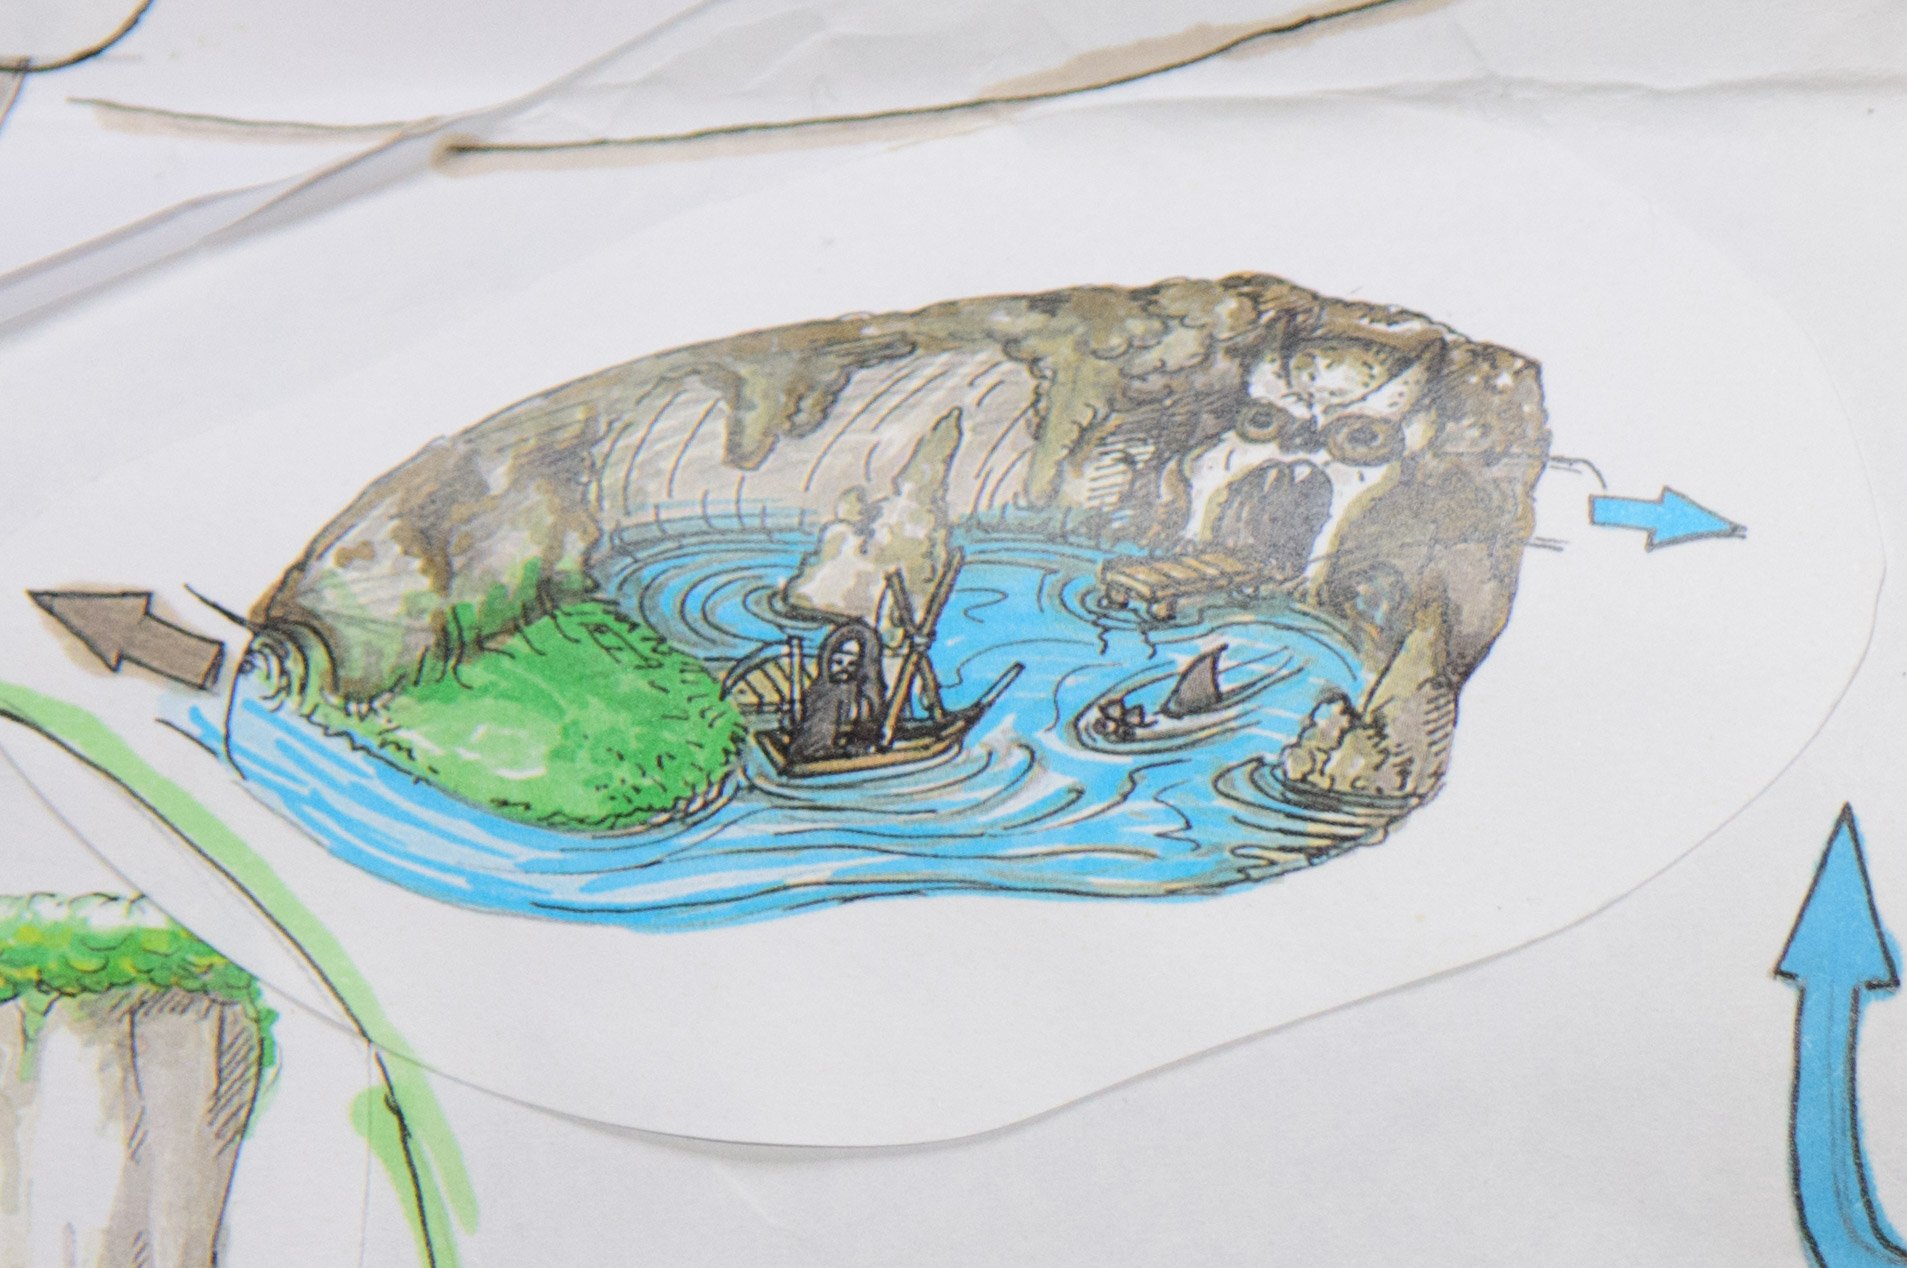
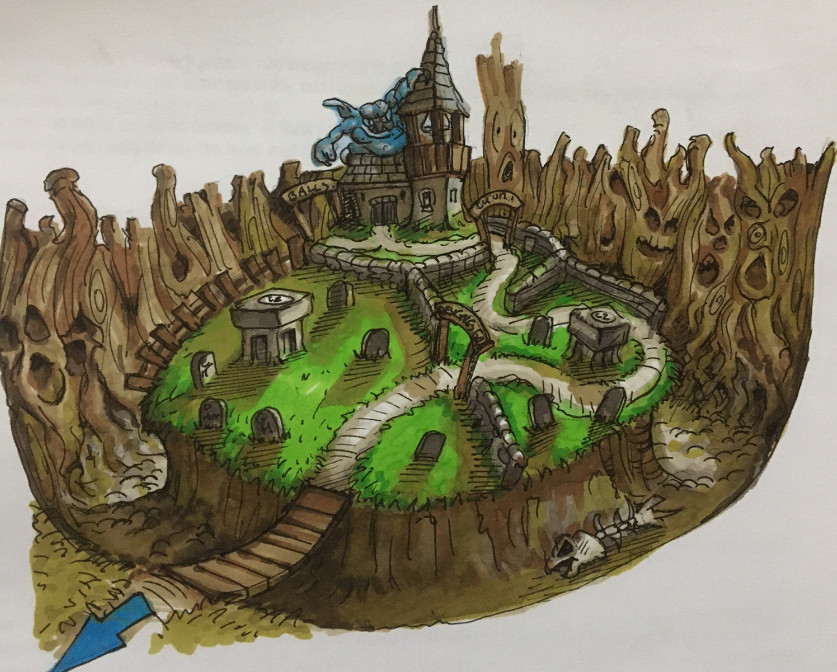
Spooky, or "Horrorworld" as it was known during development was almost entirely redesigned, with several set pieces dwarfing the original concept art. Immediate changes are seen at the start of the chapter where the cavern passage that Conker starts in never opens to the cemetery gate, but remains as a rocky interior. On the shoreline, Gregg the Grim Reaper can be found floating on a dinghy near the late Bullfish from Bat's Tower - in the final game, he stands on the dock and swipes at Catfish. It's likely given this setup that Conker would need to ride with Gregg across the water, mirroring the Ferryman's passage on the River Styx. Once reaching the other side, Conker would disembark on the adjacent dock and pass through the cavern's maw to discover the cemetery where the largest shift in development awaits...
Hardly finished discussing Gothic Architecture, the Gargoyle from Hungover has returned for revenge, perching himself on the roof of the church! 37 As Conker attempts to travel the winding path to the church, the Gargoyle will provide the red squirrel with an unwanted headstone, as he hurls large rocks from above. 38 From the concept art, Conker can reach a pair of mausoleums, and find Context Sensitive Pads on their roofs. It's likely then, that he would be able to return fire on the Gargoyle to defeat it a second time. In the final game, Conker must instead use the Shotgun that Gregg has provided to slay the undead - once 12 souls have been put to rest, Gregg will open the gate to the narrow path up to the Vampire House.
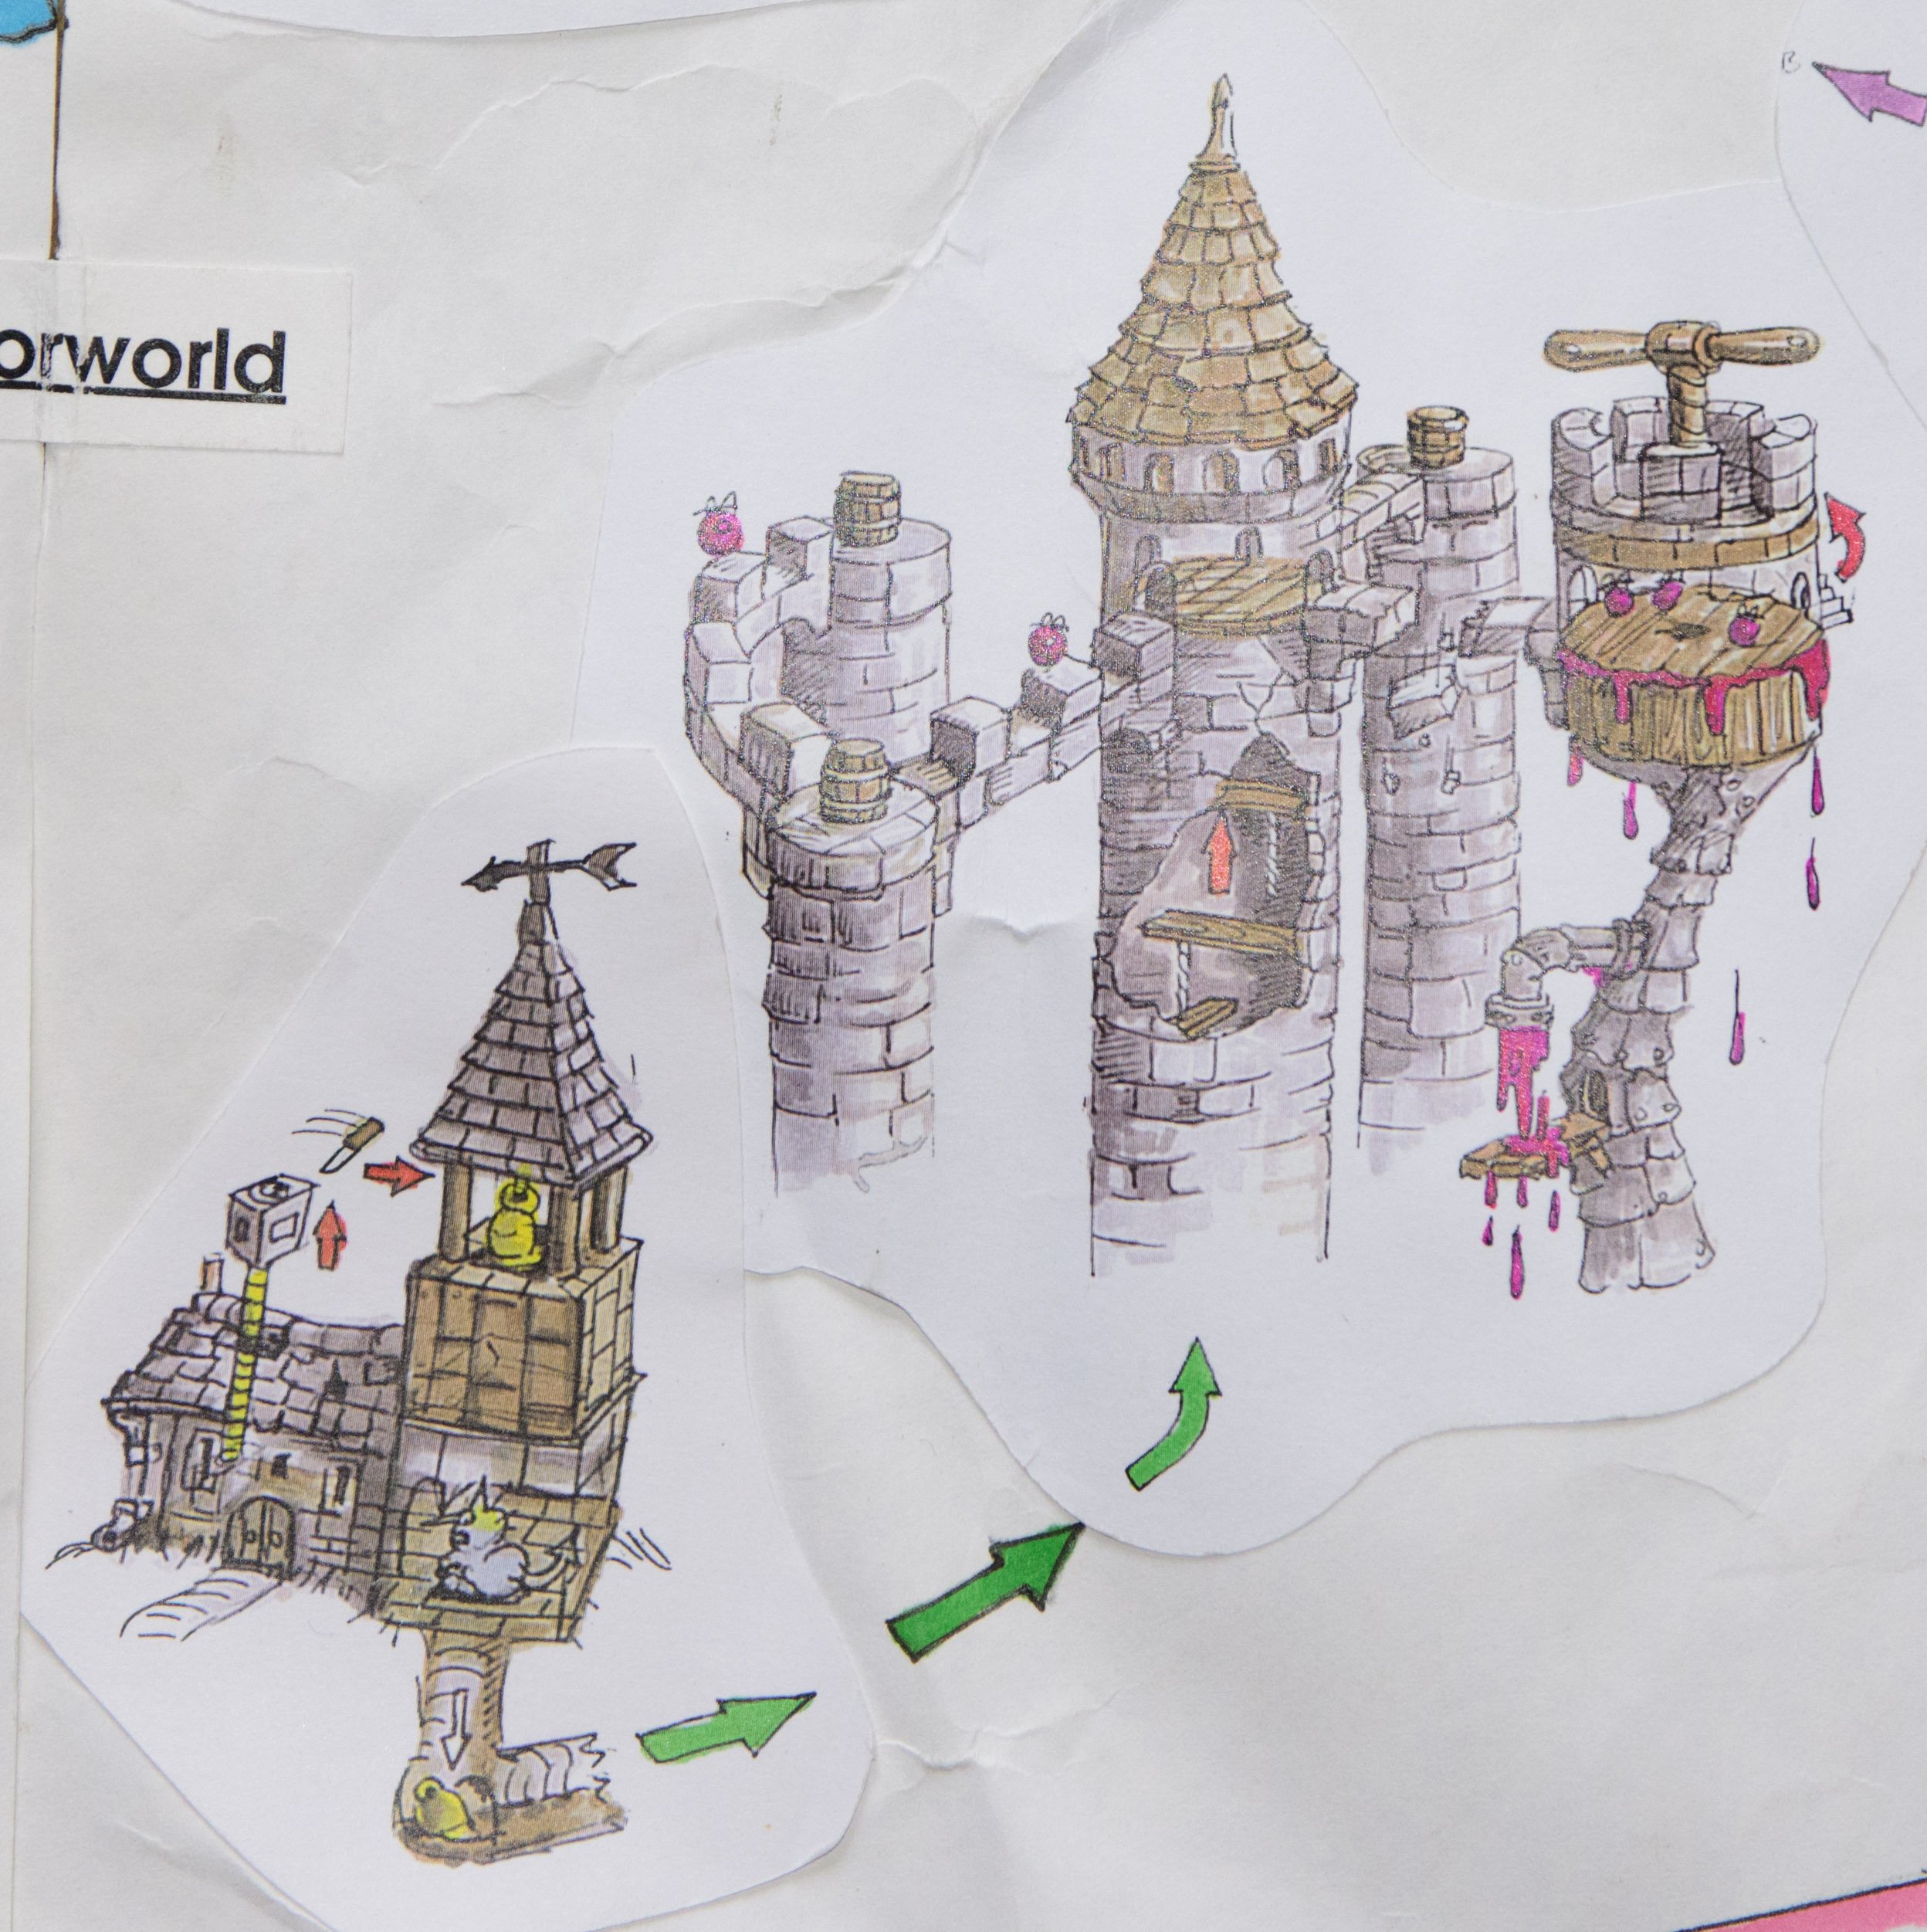
Inside the Church, Conker will discover an immovable creature underneath the belfry. In order to progress, Conker must elevate himself through the roof, and throw knives at the rope holding the heavy bell. Provided that Conker can slice through the rope, the bell will fall through the tower, hitting the creature below, and sending them both through the floor. From this point, Conker can follow the bell through to a secret passage, linking up to the next section...
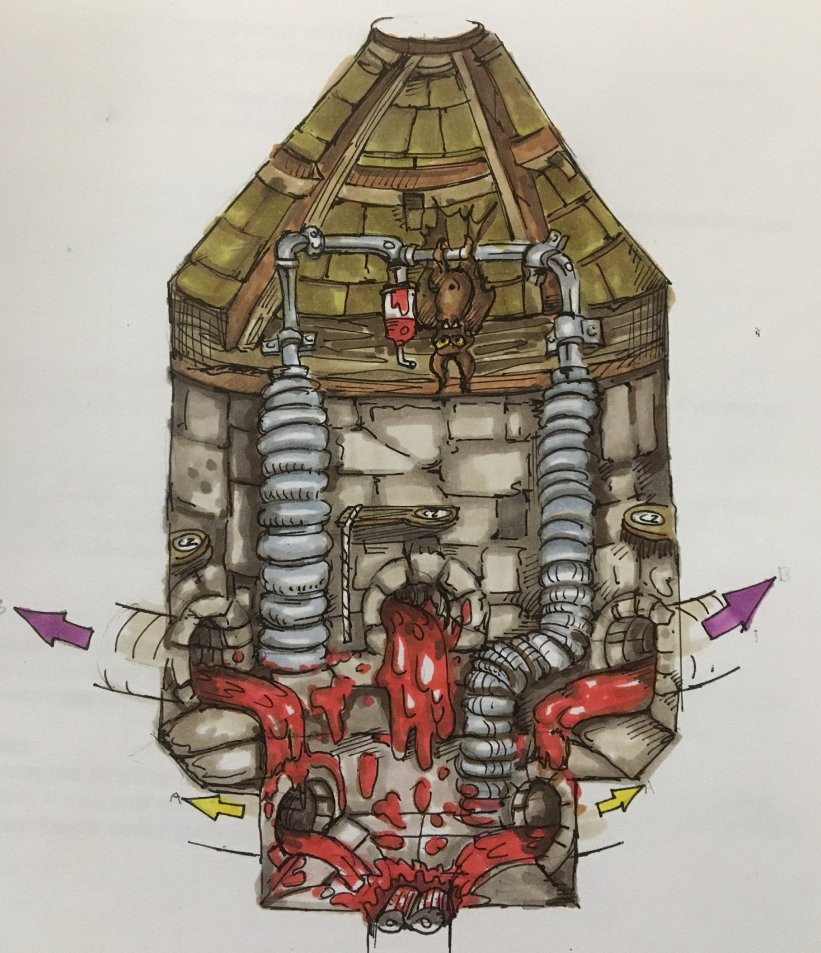
Now finding himself in a tower, Conker must ascend using the hanging ropes until he emerges on the battlements of an aging castle. Here, he can discover sentient Prunes on the parapets, with one of the towers modified into a large vice-like crushing platform to make Prune Juice. Inside the largest tower, Conker will find a large Vampire Bat, possibly Count Batula, sucking blood from a pump apparatus that bears similarity to the one in the final game. It's possible that given the presence of the Prunes that defeating Count Batula wouldn't have relied on Conker overfeeding him with Villagers until he falls into the grinding wheel as in the final game, but rather switching his stream of blood with one of prune juice, for an equally explosive consequence.
It's War#
"Toy Wars (aka Saving Private Ryan)" had shifted considerably during development, with many of the conceptualized setpieces showcasing an entirely different direction for the notoriously ambitious chapter. Unlike the final game where the completion of "Spooky" served as a prerequisite for opening the door to "It's War" following a cutscene, players would set events in motion during the "Drugrats" chapter inside the Windmill. Defeating the Boiler in the Windmill would allow Conker to travel up the chimney where a comically large safe could be found on the roof, precariously dangling over a SHC Squirrel soldier posted in front of the barbed wire entrance. As the soldier happens to be standing at attention atop a Context Sensitive Pad that is thus rendered unusable, Conker is tasked with giving the soldier an informal dismissal with the airborne payday. Having cleared the way, Conker would then be able to use the Context Sensitive Pad to unlock the entrance to It's War and begin the chapter, leading to the first removed area...
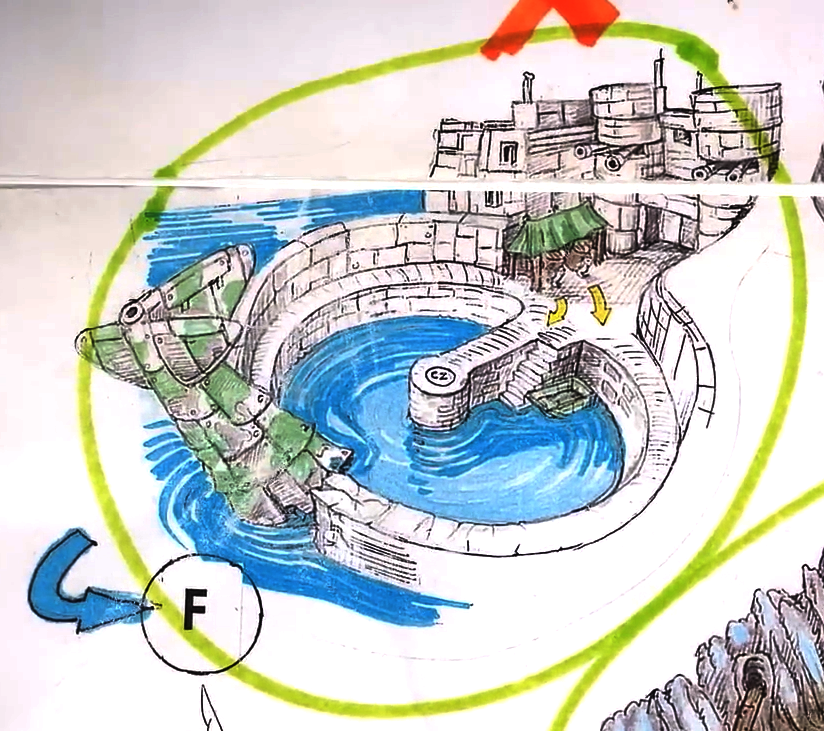
Beyond the entrance, Conker would have originally entered Basic Training, where his aim would be tested against cardboard adversaries. Provided that Conker can use the Context Sensitive Pad provided to prove himself capable, he'll open the door to The Bay to begin "TNT". This Basic Training challenge area was removed from Conker's Bad Fur Day - passing through the entrance to It's War in the final game will take Conker directly to The Bay to begin "TNT".
As in the final game, Conker can discover two unfortunate TNT Imps and volunteer for an escort mission to clear the plane that blocks the opening to The Bay. Unlike the final game, the TNT Imps appear to be taking shelter under a canopy on the ground level, whereas the final game has them fouling up the bathroom on the second-storey. Further, Conker must push both Imps downhill towards a metal crate that prevents them from diving (and exploding) into The Bay, whereas this detail appears to be missing in the original concept. It's also unknown if the underwater rings for the "Power's Off" segment were designed, as the water appears to be clear.
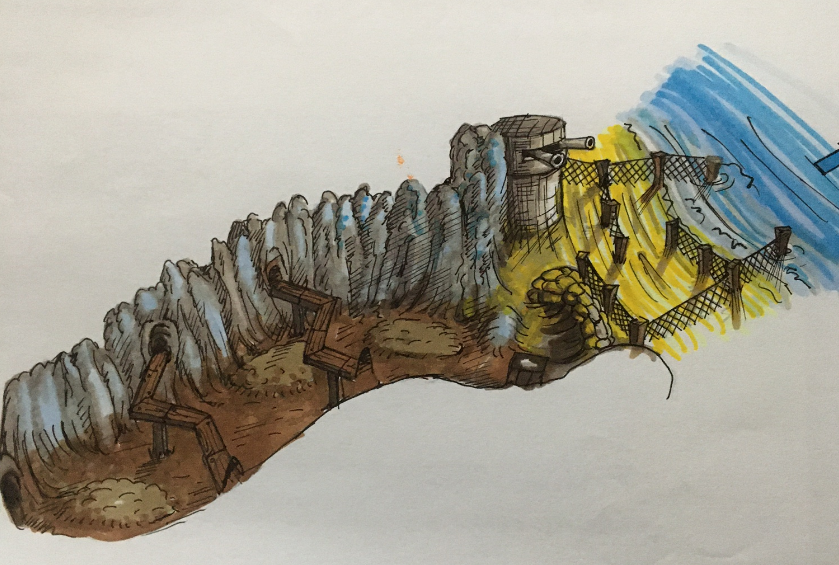
Sailing out from The Bay will begin the Saving Private Ryan parody with "The Assault", where Conker must make landing on the beach, and avoid the onslaught from the Machine Gun Nests. While the final game has Conker zigzagging through the length of barbed wire fence until he's reached the door to the interior, the original concept art would have had Conker pressing on much further, advancing beyond the Machine Gun Nests as he waged through the mud and passed beneath plank walkways to the next area in an all-new section.
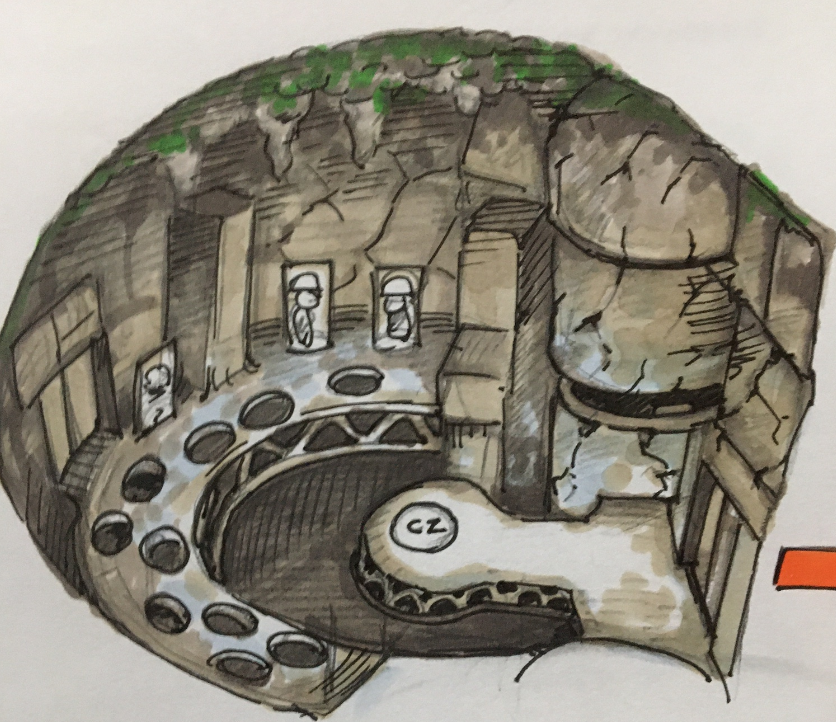
The "Missile Command" was intended to be a war-torn area placed above a missile silo. Conker would be tasked with leaping over landmines, clearing barbed wire hurdles and passing grottos with extending bandsaws as he made his ascent, coming up just short of the boss area, seen above with a ring platform. Requiring a much-needed boost, Conker would focus his sights on tunnelling deeper into the missile silo, in the hopes of launching a rocket to reach the highest point.
From the Structure Map, Conker would travel through a doorway and arrive in a thin hall that mimicked the close-quarters flame thrower segment seen in "Sole Survivor". From here, the path would split in two directions:
The first path would lead to a watchtower in the center of a large chasm, which was realized in the final game as the sub-chapter "The Tower".
The second path would lead to the interior of the missile silo, where Conker would be tasked with refuelling the rocket. Given the appearance of the barrel, and the tricky routing, it's likely that this task would be similar to Marble Madness, where Conker would need to navigate the fuel around the room without falling from the track. Provided that Conker can refuel the rocket, he'll blast out of the silo, climbing up through to Missile Command in at attempt to arrive at the ringed platform at the top.
It's possible at this point that the rocket would pass the unboarding platform entirely, leading to the cancelled area, The Moon, but if it had managed to stop in time on the first pass, Conker would be able to disembark on the ringed platform and meet the boss - a Rambo-inspired Tediz supersoldier totting a machine gun.
While "The Tower" and elements of the flamethrower hallway would be repurposed for sections during It's War, the Missile Command, Missile Silo and The Rambo-inspired Tedi Boss areas were redacted entirely.
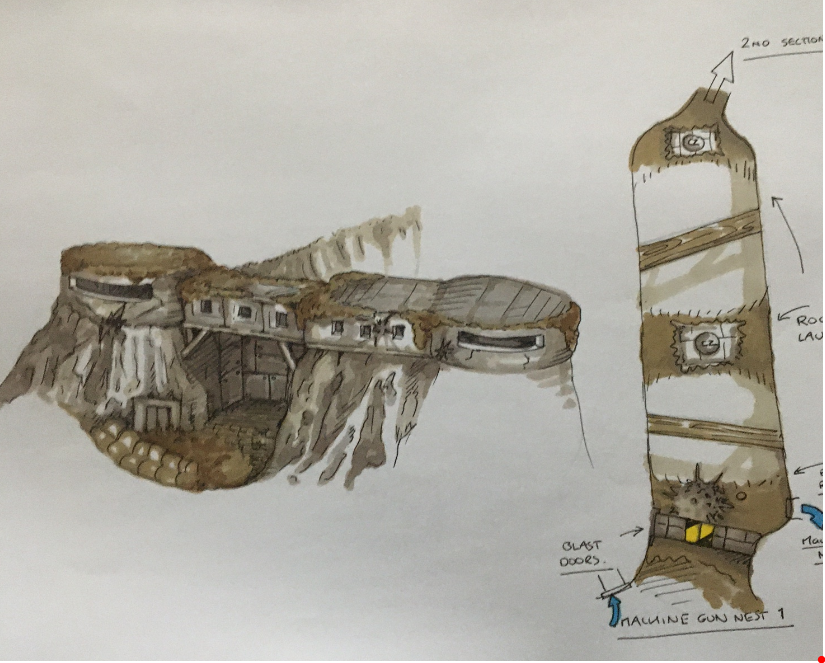
The next reiteration of "It's War" returned to the beach with a revised plan for The Assault. This time, the path between the machine gun nests is blocked by a large pair of blast door, just as it appears in the final game. In the concept art, Conker would have used a door next to the path to enter the machine gun nests where he would leap over landmines and encounter Tediz opposition before locating a lever at the final nest, which would open the blast doors below. From here, Conker would gain access to a Context Sensitive Button on the path that would provide him with a Rocket Launcher as he progressed into the next section. Instead, Conker passes through the same door and infiltrates the Tediz base through the munitions storage room which leads to a long hallway, as seen in "Sole Survivor". Passing through "Casualty Dept." will bring Conker into the Machine Gun Nests, where he'll take out the Tediz manning the 'Murder Hole' before occupying the turret himself. The second Machine Gun Nest does not appear to have a turret, instead dedicated to a conveyor belt with Spider Mine parts. At no point during this section does Conker use a lever to open the blast doors and proceed to a second section via the Beach - the Blast Doors will remain shut for the entirety of It's War.
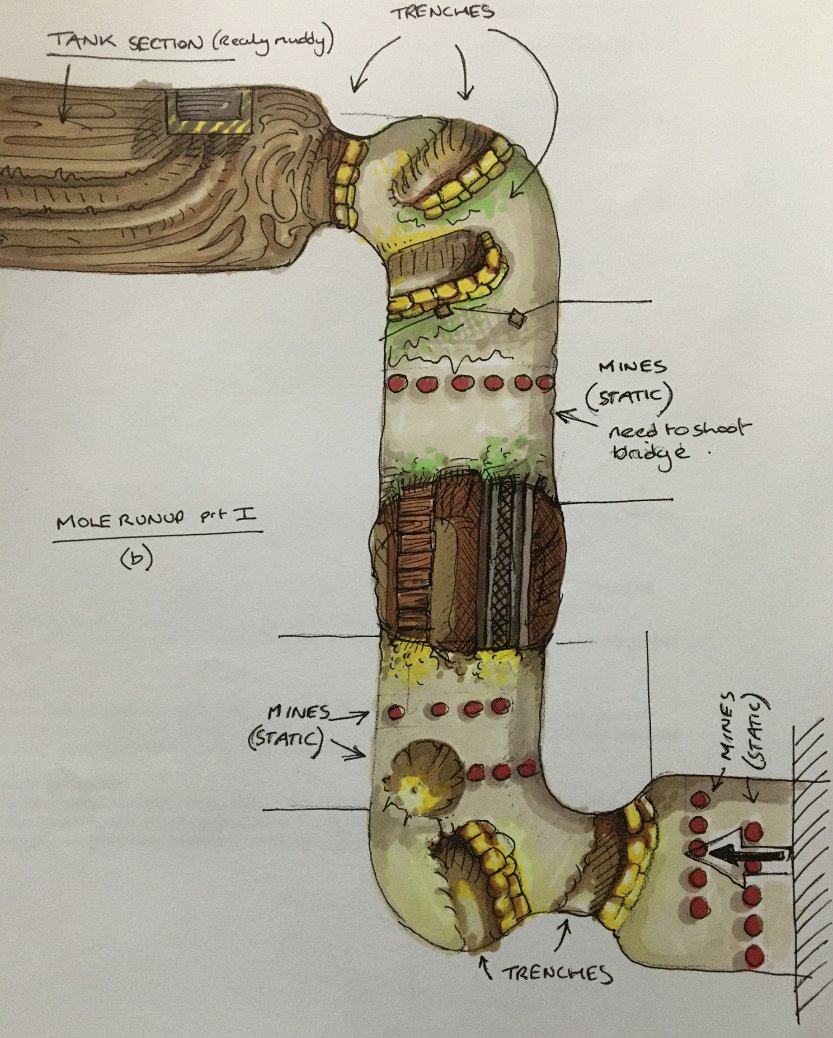
Further designs give an insight into an earlier "Saving Private Rodent" where the path to the Tank, called "Mole Runup" was originally much shorter, with different gameplay elements. In this early design, Conker wouldn't contend with Spider Mines, but rather nefariously placed static mines arranged in rows that would prompt careful weaving. The final string of mines would be arranged in a single line without gaps, prompting Conker with shooting them out to make a path. In the final game, Conker must escort Rodent through a sprawling Spider Mine path, intermittently ducking behind him during heavy shelling.
The "Little Girl/Experiment" replaced the Rambo-inspired Tedi as the final boss of the It's War chapter, with the War Arena receiving two modifications from its concept art: The stone pathway that Conker follows after dropping into the level has been replaced with a long metal platform with ramps on either side, making it impossible for the Tank to navigate during retreat. In addition, the platforms with Context Sensitive Pads where Conker must sink the Submarines during the "Little Girl" segment are not present, suggesting that the section was added later.




The Moon#
The Moon was originally planned as the final level in Conker's Bad Fur Day. 44 Following the events of "It's War/Toy Wars", Conker would refuel a rocket in a missile silo, and blast off into space. On the Moon, Conker would be equipped with a Context Sensitive Jetpack, and begin thrusting himself into parts unknown. 45
It's possible that the return trip to Windy would have required the assistance of the "Grey Aliens" seen on the Windmill Character Synopsis, and their Spacecraft, included in the concept art.
Unfortunately, sending Conker to space proved to be too ambitious for the remaining time on the schedule for a single setpiece, and so it was removed from Conker's Bad Fur Day. Given the narrative in the final game with Rodent sailing through the air and destroying the Windmill at the end of It's War, it's possible that the original plan was to have the rocket returning to earth where it would crash into the Windmill, allowing for the events of Heist.

Heist#
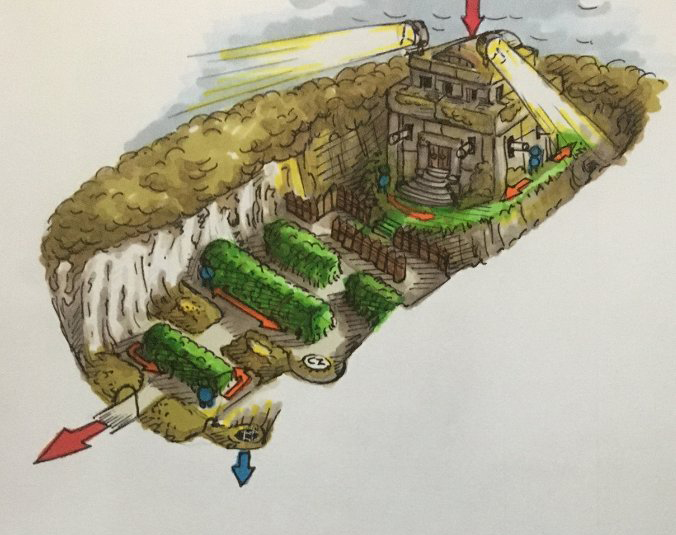
As in the final game, Conker would travel into the destroyed windmill to find a hidden pathway at its base that would tunnel through to the Feral Reserve Bank. Unlike the final game, however, the Heist Chapter featured an extended stealth section outside of the Feral Reserve Bank. In this uphill battle, Conker would need to remain undetected by avoiding the eyes of watchful searchlights and patrolling guards as they paced around the hedges. According to Chris Seavor, the stealth segment might have been scrapped due to the lack of humor rendered from the scenario. 46
Once Conker had arrived at the bank, he'd ascend to the roof where he would drop in through the ceiling to the room just outside of the Vault, ala Mission Impossible.
While the area outside the Vault Door does make an appearance in Conker's Bad Fur Day, the daunting grid of lasers blue lasers is played as a visual gag during the cutscene. Not so in the concept art, where the intention was to have Conker jumping carefully between ropes as the lasers moved around the space in a deadly fashion. 47
In the final game, the area outside Vault Door was preceded by the Matrix Lobby, in one of the most iconic setpieces in Conker's Bad Fur Day.


Wolf Boss#
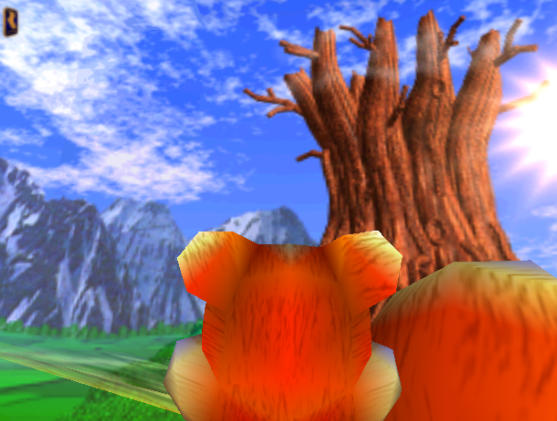
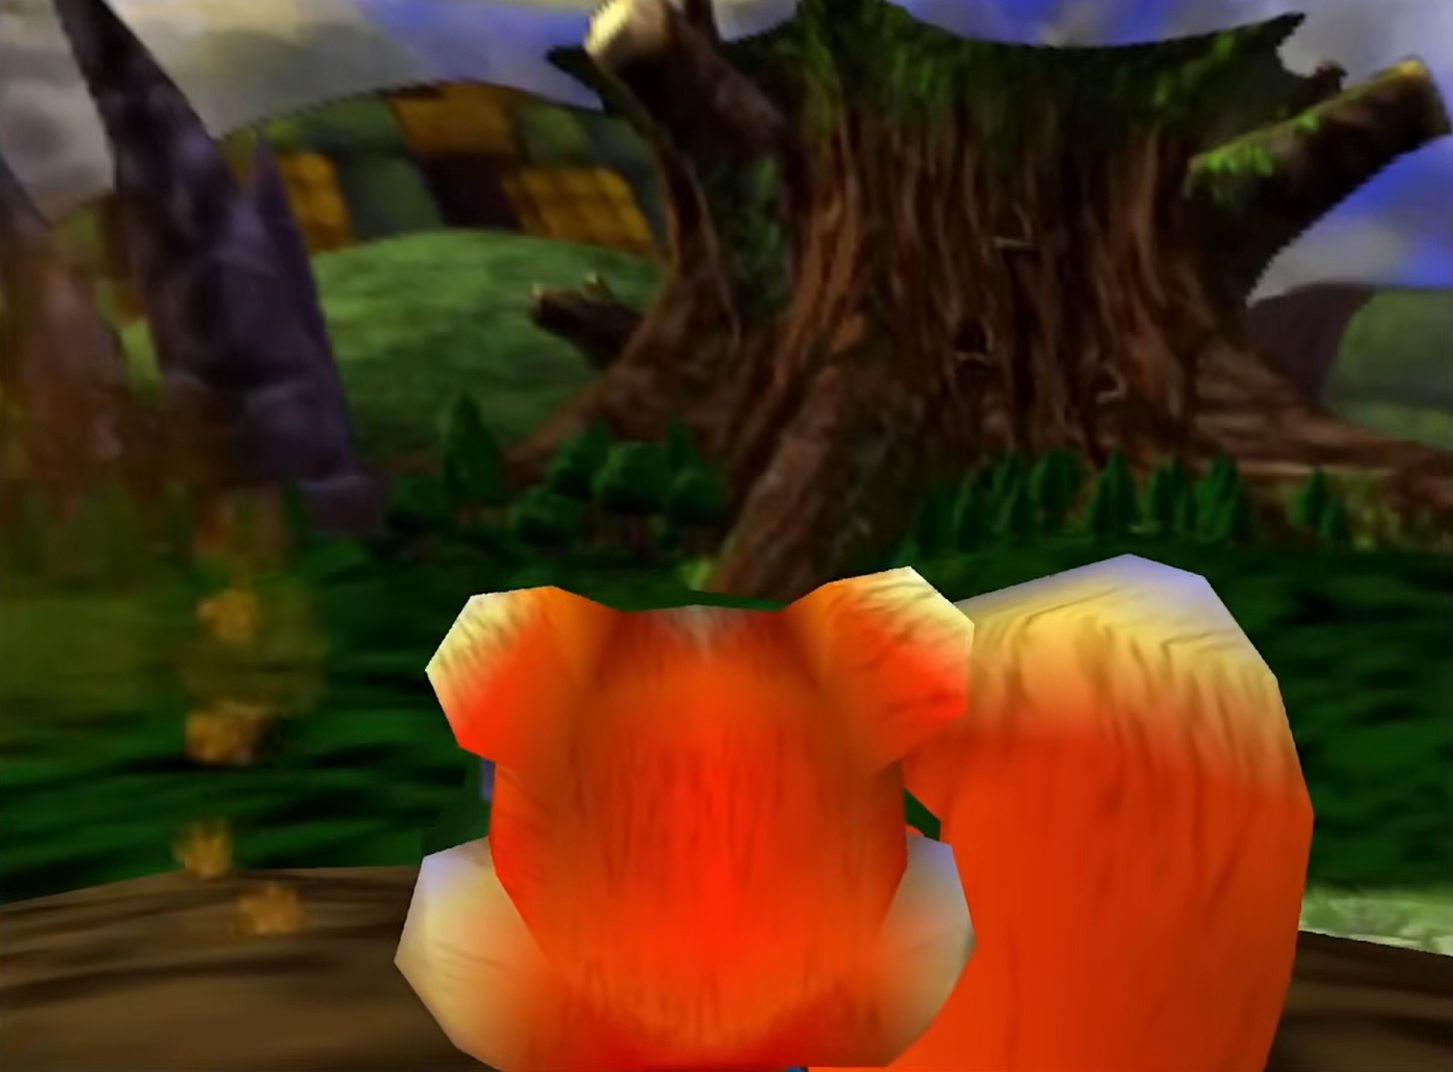
In the original Structure Map for "Windmill (Overworld)", a large, towering tree can be seen beyond Poo Mountain - this detail is preserved in the ECTS Demo where the original Skybox for Windy has been found, placing the tree just beyond the entrance for the Feral Reserve, where the Fairy Panther King's Castle would appear in the final game. 50
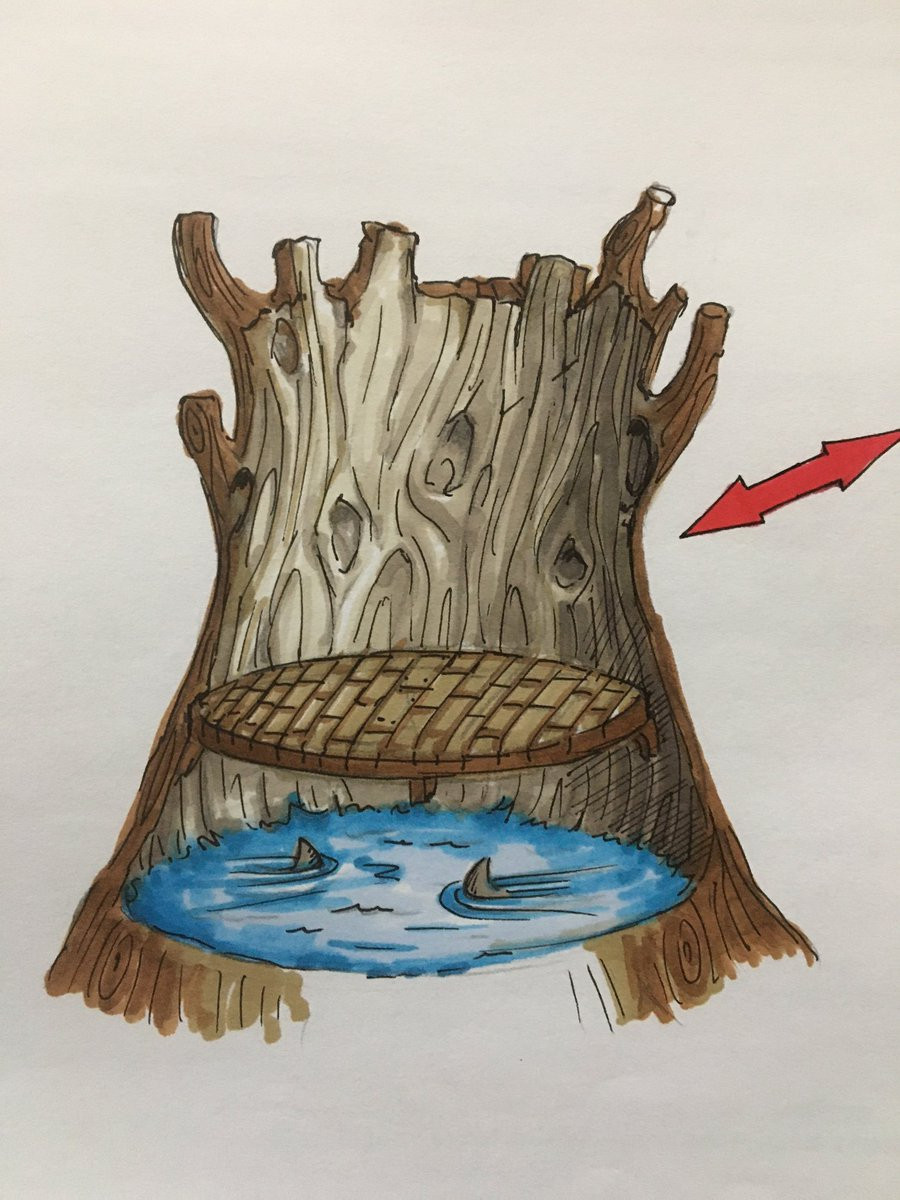
This is intentional, as the tree would have originally lead to the final boss, which at the time was a Wolf instead of a Panther, with Wolf Henchman standing in for Weasels. 51 The process for reaching the aforementioned Big Bad "Fur Day" Wolf is still unknown, but from the Structure Map we can see that Conker would have somehow gotten inside the hollow tree, standing on a large wooden platform in its middle and finding mechanical sharks in a pool of water below. Doing something here would lead out of the tree and into the Throne Room, which is called "Wolf Boss" on the Structure Map.
In the final game, all story points converge at the Feral Reserve where Conker meets the Fairy Pather King inside The Vault. The skybox was altered to reflect this change, as the area beyond Poo Mountain is now occupied by the Fairy Panther King's Castle, with the redesigned tree relocated to the Hungover tutorial area, residing between the Tediz Island and Count Batula's Manor. The Panther King's Throne Room is never visited outside of cutscenes, and the interior of the tree with mechanical sharks was redacted from the final game.
Original Ending#
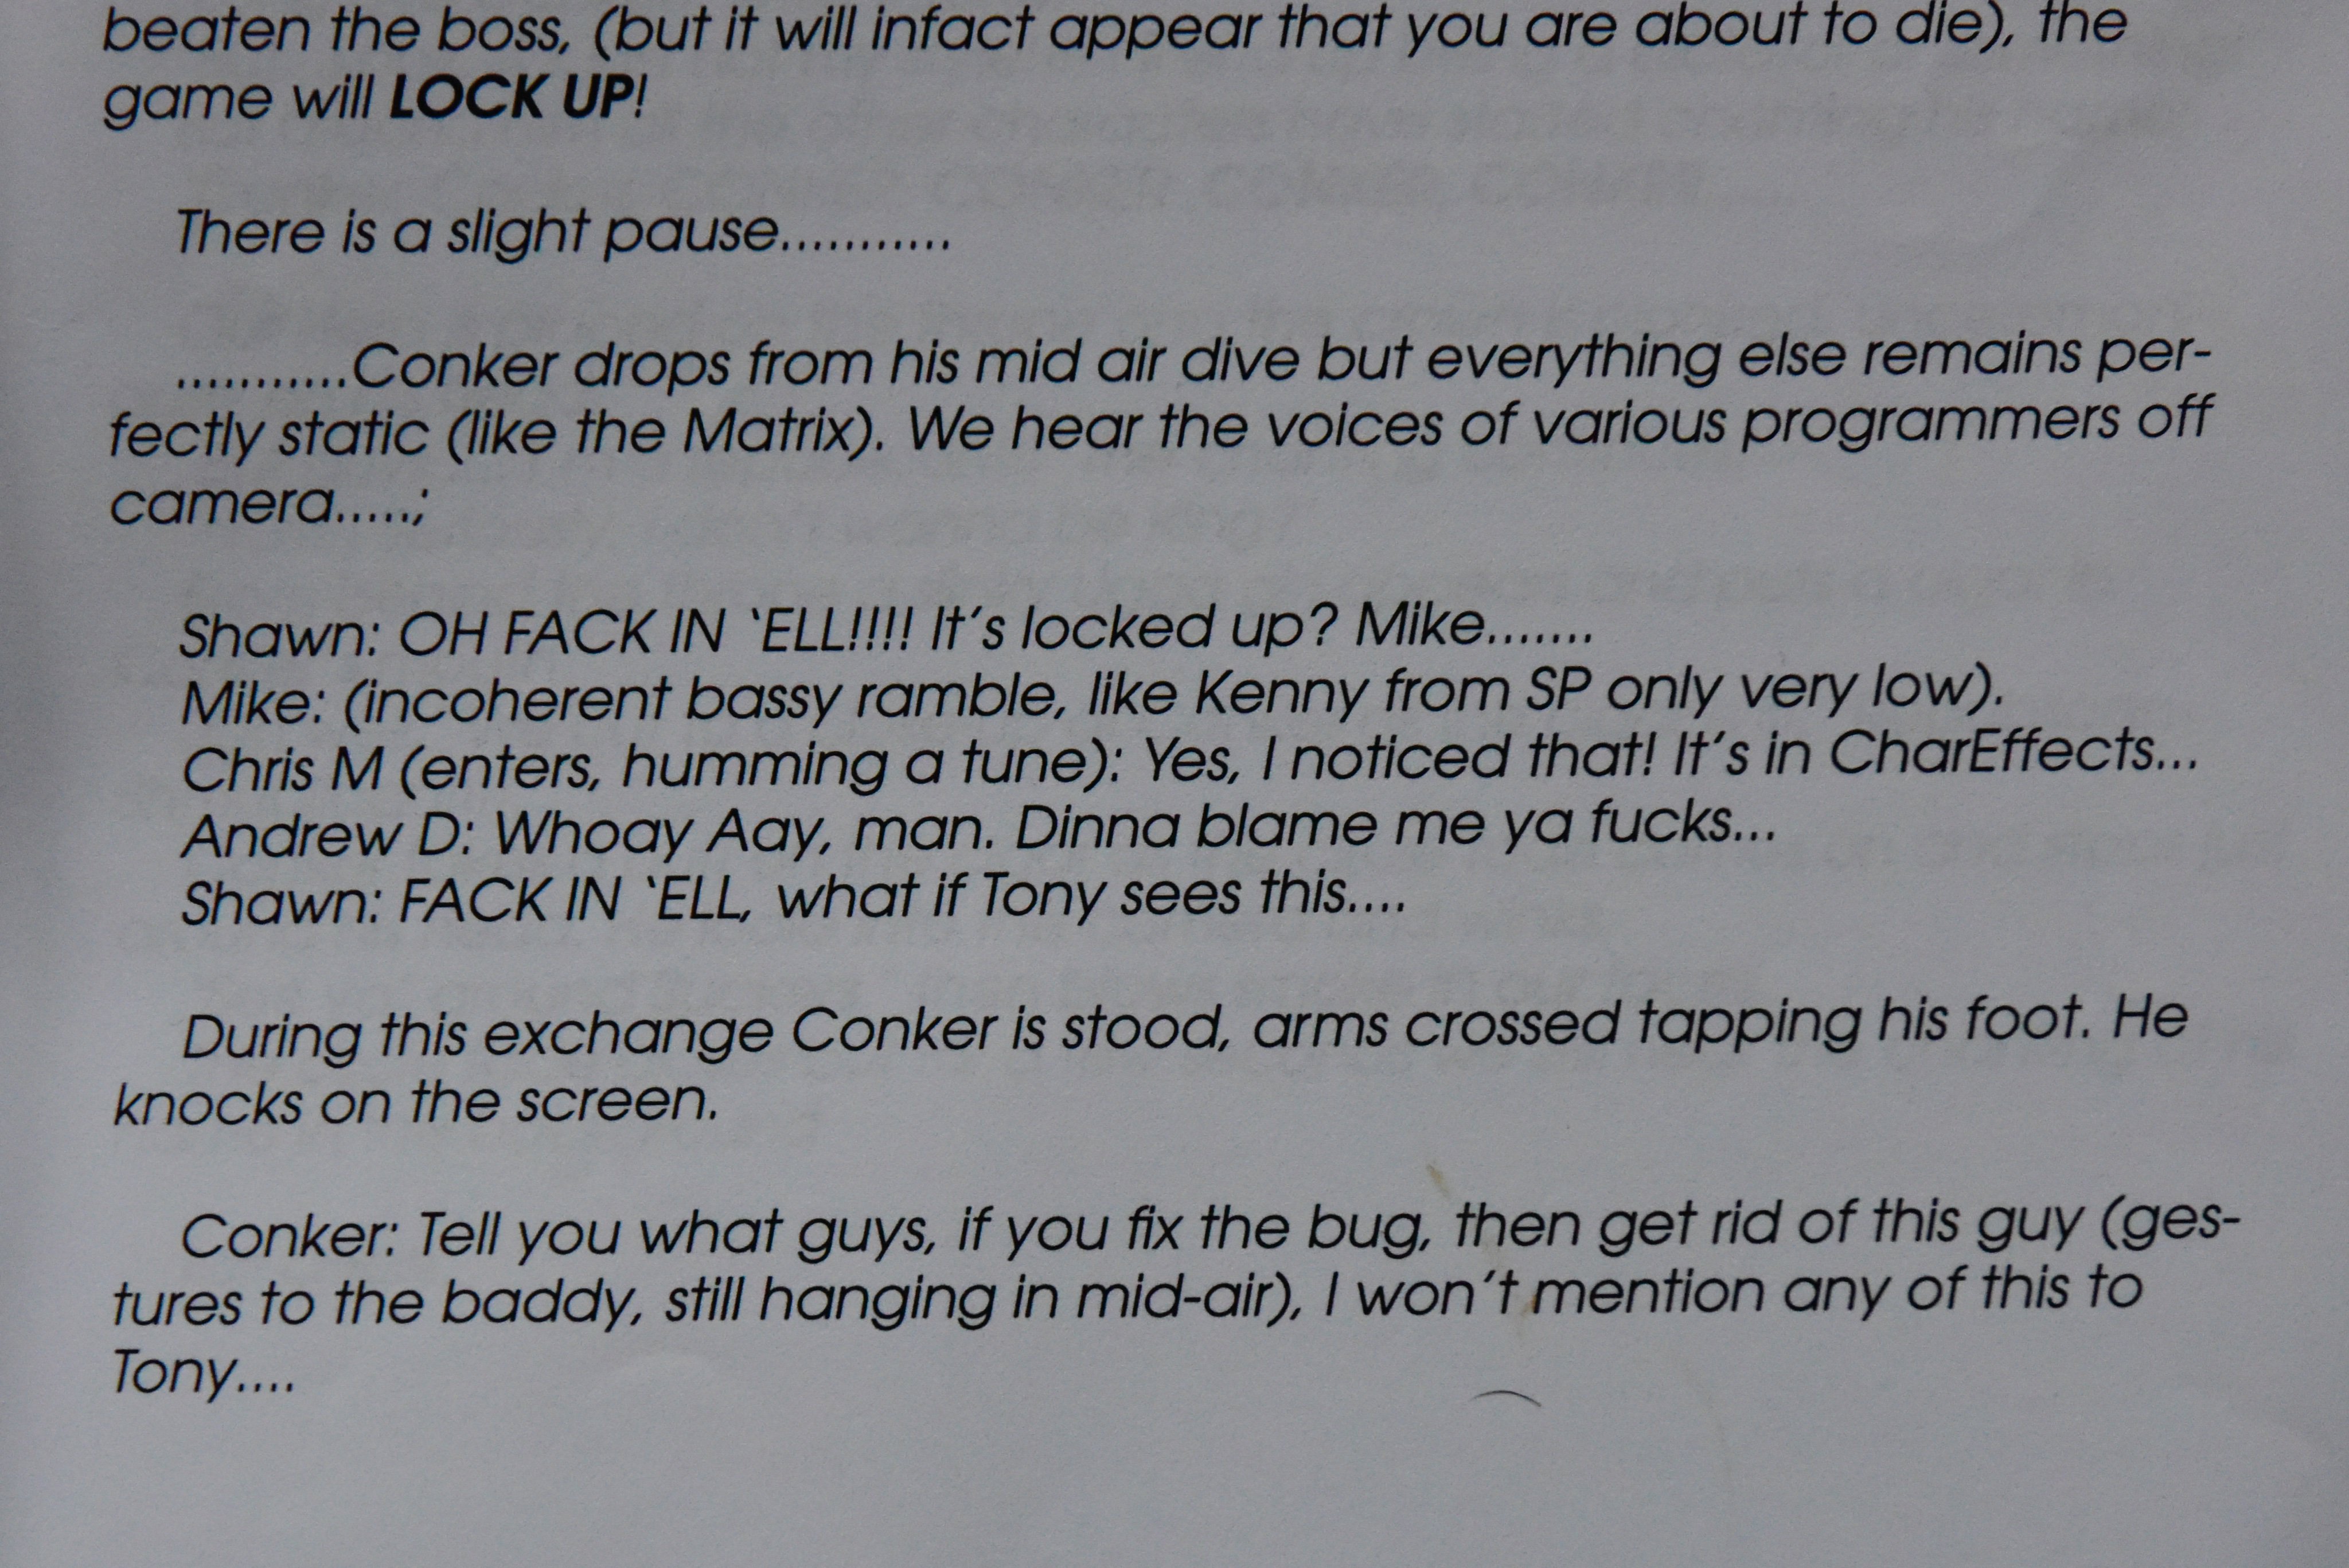
Famously, Conker features a deus ex machina ending that puts the squirrel seconds away from death, only to have the game seemingly lock-up at the most critical moment, allowing Conker to bargain with a lone programmer into getting the upper hand over the final boss. Originally, this ending was meant to allow for the software engineers of Conker's Bad Fur Day (Shawn Pile, Mike Currington, Chris Marlow, Andrew Davies) to receive voiced cameos in an extended sequence as they react to the crash, discussing it amongst themselves. Upon the mention of being found out by another software engineer (Tony Wong) Conker seizes his opportunity to gain favour with the programmers to avoid Tony finding out about the lock-up.
In the final game, the single programmer that helps Conker is voiceless, identified only as "C:>" and types all responses in green text on the bottom of the screen.
The game was also meant to feature a post-credit sequence with an ironic twist, wherein Berri - who survived at this point in development - is rescued from the dungeon by Wolf Henchmen on King Conker's orders. Not to free her, mind, but rather to use her kneeling frame to serve as a table leg and prevent the milk from spilling, just as the previous king had desired with Conker's capture.
In the final game, Berri's death fills Conker with regret, leading to a post-credit sequence where he finds himself drinking once more at the Cock & Plucker, shambling out of the pub in a new direction, inferring the start of an entirely new 'bad fur day'.
Pre-E3#
Watch on YouTubeWatch on YouTubeWatch on YouTubeWatch on YouTubeWatch on YouTubeWatch on YouTube
This build of the game appears somewhat different from the build shown off at E3.52
Conker's Bad Fur Day Nintendo 64 Gameplay_2000_05_09:
Pre-E3 |
Final |
|---|---|
 |
|
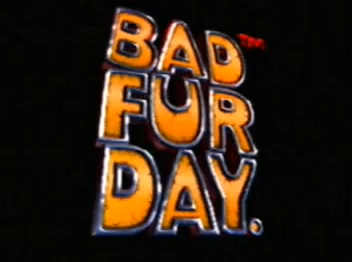
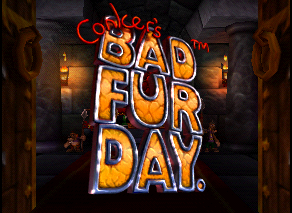
- The neon "Conker's" is not present in the logo, reading as just "Bad Fur Day". (0:01)
- The title card for "Starring Conker & Berri" is missing. (0:21)

- An extra piece of Cheese appears behind the throne's armrest on frame left. In the final game there is only one in this scene. (1:00)
- Franky the Pitchfork appears behind the throne's armrest on frame left. In the final game, he is in front to feature his bandaged middle (1:04)

- An Uga Buga Caveman appears in front of Conker's throne. He is not present in this scene during the final game. (1:04)
- Marvin the Mouse looks intact with a wide-eyed expression. In the final game, Marvin is stitched and bandaged together with a half-lidded expression. (1:10)
- Ron and Reg, the Paintbrush and Paint Pot are not present. In the final game they are in front of Franky the Pitchfork. (1:13)

- An SHC Squirrel holds a rifle on frame left. In the final game, this soldier is replaced with Rodent, holding his shield. (1:16)

- The large disembodied hand of the Haybot hangs from the ceiling on frame left. This is removed in the final game.(1:19)
- Barry the Bat is hanging upside down near the throne, on frame right. This is removed in the final game. (1:20)
- The Weasel Henchmen that previously served the Fairy Panther King are missing. In the final game, they are on either side of the throne. (1:35)
- Once again, the neon "Conker's" is not present in the logo, reading as just "Bad Fur Day". (1:44)
Nintendo Mania E3 2000 Conker Footage
- The "Nasty/Nice" signpost is missing, with the patch underneath populated by flowers from Twelve Tales: Conker 64. (0:04)
- Bat's Tower has some different textures and uses the early skybox restored in the ECTS Demo. (0:22)
- The sign behind the Bullfish reads "RIGHT" during the encounter. The sign during the encounter should read "WRONG", as Conker hasn't gotten the code yet.(0:28)
- The head Catfish is missing her lorgnette opera glasses. (0:31)
- The Machine Gun Beehive is missing the viewport for the Queen's eyes. In the final game, the Machine Guns are moved down so that the Queen's eyes can be seen through the viewport. (0:38)
- The special censorship characters in text bubbles are missing, so swears are instead written with dashes covering them up (for example, "F--k" instead of "⭐️💀⚡️🌀") (0:47)
- Originally, Conker would have needed to reach one of the corners in the Boiler Room for the Context Sensitive Pad to allow him to urinate. In the final game, Conker can urinate anywhere after he's drunk. (0:55)
- Windy uses the early skybox restored in the ECTS Demo. (0:57)
- Conker proclaims, "Oh my giddy arse" during the entrance of Buga the Knut. In the final game, this is censored to "Oh my giddy aunt." (1:05)
Conker's BFD E3 2000 reaction audience
- The Big Big Guy says his balls of brass were polished to the eighth degree, instead of the Nth. (1:42)
Conker's Bad Fur Day Nintendo 64 Gameplay_2000_05_19_2
- The Bay during "It's War" seems to set during the day. In the final game, the chapter is set at night. (0:01)
- The original Tediz Island with its central tower design can be seen in the distance. (0:03)
- The Bay used to feature swimming Clangs as an obstacle during the "Power's Out" sub-chapter. They were removed in the final game. (0:16)
- The Fire Imps used to have different fire effects, and could cast flames out as a ranged attack. (0:40)
- Originally, Conker would have needed to reach one of the corners in the Boiler Room for the Context Sensitive Pad to allow him to urinate. In the final game, Conker can urinate anywhere after he's drunk. (0:46)
Conker's Bad Fur Day Nintendo 64 Gameplay_2000_05_19_1
- The shoreline around Catfish Pond is bare. In the final game, the shoreline is lined with a fence, potentially to guide players towards the dock on return. (0:05)
- The spot where Conker lands features animated grass. In the final game, the grass was replaced with dandelions. (0:27)
- A piece of Ant-gravity Chocolate was added near the entrance in the final game. (0:27)
Conker's Bad Fur Day Nintendo 64 Gameplay_2000_05_19
- Mr. Big Cog was originally female, as reflected in the concept art for Bat's Tower. This design of Mrs. Big Cog with rouge, lipstick and heavy eyeliner can be seen for a split-second at the beginning (0:00)
- The special censorship characters in text bubbles are missing, so swears are instead written with dashes covering them up (for example, "F--k" instead of "⭐️💀⚡️🌀") (0:01)
- Bat's Tower was excessively retextured. (0:02)
- The SHC Squirrel encountered during "Sole Survivor" carried the Walkie-Talkie removed in the final game for unknown reasons. (0:19)
- Early text changes for "Sole Survivor" documented on the ECTS Demo/Text Changes page. (0:20)
E3 Promo Trailer#
Watch on YouTubeThe game was first shown off at E3 2000, with numerous differences compared to the final game.
- A title screen of the "Bad Fur Day" logo lacking the neon "Conker's" is present at the start of the game, with an attract mode of Conker diving through Clang's Lair. The final game does not feature an attract mode, leading directly to the walk into the Cock & Plucker from the Nintendo/Rare introduction. The title screen has been recovered in the ECTS Demo.
- The bartender is one of the Rock Men from Uga Buga. In the final game, the bartender is a mustachioed squirrel. (1:07)
- During E3, the frontend of Conker's Bad Fur Day that would have been used to select files was instead made into an interactive chapter select. Selecting the bartender where Multiplayer could normally be found enabled the chapter select for "WAR", providing options for "Beach Assault" and "Tediz", likely early titles for "The Assault" and "Sole Survivor". (1:11)
- The SHC Squirrel encountered during "Sole Survivor" carried the Walkie-Talkie removed in the final game for unknown reasons. (4:37)
- Early text changes for "Sole Survivor" documented on the ECTS Demo/Text Changes page. (4:37)
- When the SHC Soldier Squirrel is killed, his dead body lies in a completely different position, and disappears when the cutscene is over. (5:17)
- Conker holds an early design for the Machine Guns. In the final game the design is a lot less bulky. (5:41)
- When Conker is at full health, he can accidentally eat chocolate by passing through it, thereby wasting it. This was changed in the final game where the chocolate is made transparent when phased through and noncollectable at full health. (5:58)
- The pause menu is somewhat incomplete. The fonts and digits options are notably in a temp state, and the "Quit/Continue" option doesn't require the control stick, but rather a confirmation choice using the A button alone. (11:59)
- One Fire Imp tells the other to, "Shove it up your arse." In the final game, this was changed to, "Shove it up your ass." (12:50)
- The starting position for selecting the "Marvin" Barn Boys chapter is different, placing Conker in front of Marvin rather than the entrance to Barn Boys. This is also the case in the ECTS Demo (13:09)
- The window for "Game 2" file selection in the Cock & Plucker is a chapter selection for Bat's Tower, called "BATS" where players can select "Mr. Big Cog" and "Bullfish". (17:45)
- An unconscious Fire Imp that's had too much to drink can be seen lying down near screen left. In the final game, this space is occupied by The Weasles band. (17:45)
- The bathroom saloon doors for "Game 1" file selection in the Cock & Plucker is a chapter selection for Uga Buga, called "UG" where players can select "Raptor" and "Biga Bona". (19:04)
- The sobbing Queen Bee can be seen on frame left, next to the grandfather clock. In the final game, this space is occupied by a pair of SHC Squirrels. (19:08)
- Conker rides on the early Purple Hoverboard model found in the ECTS Demo. The final version is black, with a Skull. (19:08)
- A context-sensitive spot is near the "It's War" entrance with an SCH soldier standing on it.
Promo Trailer#
Watch on YouTubeA promo trailer created by Rare, seemingly earlier than the E3 build mentioned above.
- The sound quality is noticeably cleaner on many of the voice clips.
- It's raining in the beginning of the intro cutscene and the skybox is a pure dark-green color in "The Assault". (0:12)
- Conker rides on the early Purple Hoverboard model found in the ECTS Demo. The final version is black, with a Skull. (1:05)
- The bullseye target for the Bull is incorrectly textured (1:11)
- The insides of the barn have completely different textures and has a different lever design. (1:18)
- Inside the Vault in Catfish Pond has different textures, The 'OPEN' Wheel isn't spinning unlike later builds. (1:23)
- Bat's Tower has some different textures and a skybox set at night. (1:24)
- The Cog's flywheel was originally a bright green color. The final game is dark brown. (1:25)
- Barn Boys uses the early skybox restored in the ECTS Demo. (1:40)
- An unused bird-like enemy lunges out from the air pockets chambers in "Clang's Lair". (1:44)
- The columns seen during the first meeting with Gregg are missing their Skull Candles. (1:50)
- The insides of the barn have completely different textures, and seems to show a removed trapdoor (2:17)
- Tanks multiplayer has no map and is using a weapon icon for the baseball bats you get by default in Heist. (2:32)
- All three Wasps are using the same model instead of unique models seen in later builds. (2:33)
- Poo mountain's textures are different and they aren't animated (2:36)
- The front of the Poo Cabin barrel isn't textured. (2:36)
- Windy uses the early skybox restored in the ECTS Demo. The towering tree can be seen beyond Poo Mountain instead of the King Panther's Castle. (2:36)
- The grassy patch in front of "It's War" features the Context Sensitive Pad meant for the SHC Squirrel standing guard. Both were removed in the final game. (2:37)
- The entrance to "It's War" is just a slope instead of the military themed entry seen in the later builds. (2:37)
- Conker can see through the gap in The Bay towards Tediz Island, but the Context Sensitive Pad to fire a Slingshot at the TNT Imps isn't up, making that scenario impossible. (2:38)
- The Tediz Island seen from The Bay looks different, taller than it does in the final game. Perhaps it featured a tower in the center, originally. (2:38)
- The Ugga Buga Arena's skybox in "Raptor Food" is blue. It doesn't use the orange seen in the final, or the early skybox seen in the ECTS Demo). (2:57)
- The gate and wall behind Franky features older textures (3:22)
- Gregg's dialogue bubble are white instead of black. (3:28)
- Tripped lasers remove only one unit of health. In the final game, tripped lasers remove two units. (3:56)
- The SHC Squirrel encountered during "Sole Survivor" carried the Walkie-Talkie removed in the final game for unknown reasons. (4:02)
- Early text changes for "Sole Survivor" documented on the ECTS Demo/Text Changes page. (4:08)
- The Machine Gun Beehive is missing the viewport for the Queen's eyes, and the openings on the side for the additional weaponry during "Wasps' Revenge". In the final game, the Machine Guns are moved down so that the Queen's eyes can be seen through the viewport. (4:32)
- A segment of an unused cutscene where a Fire Imp eats one of his fellow Fire Imps to become the Big Big Guy. (4:34)
Conker's Bad Fur Day E3 Showroom Floor#
Watch on YouTubeA video taken at E3 2000 from the Showroom Floor.
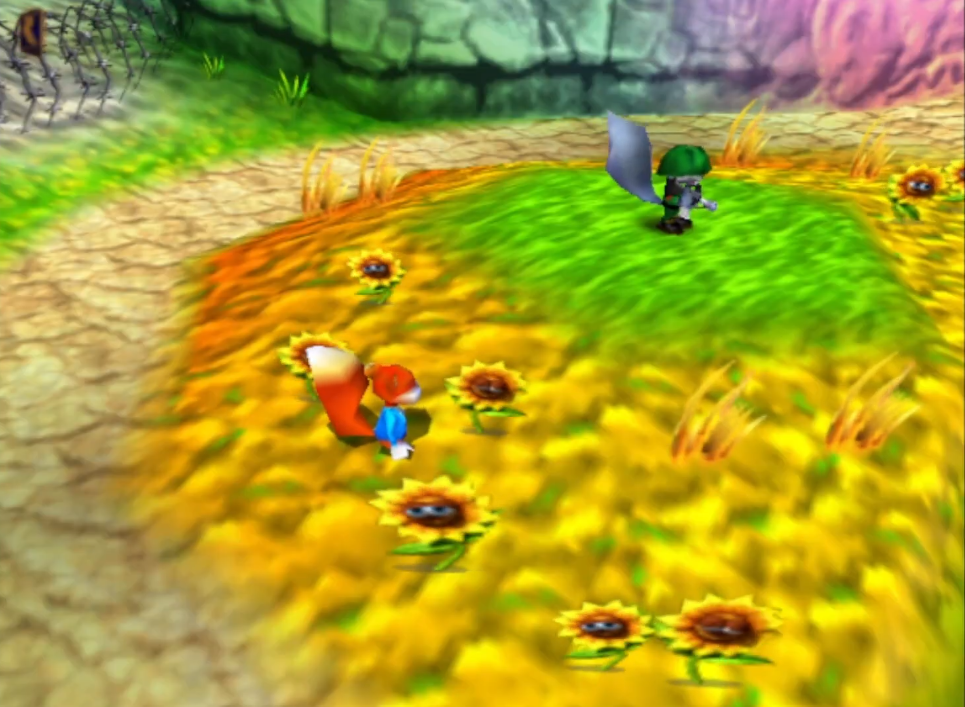
Nintendo E3 2000 Press Kit Screenshots#

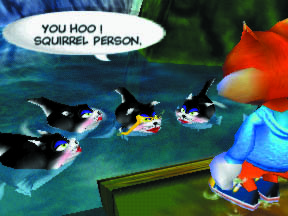



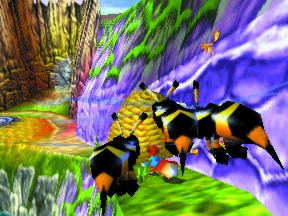

The Making of Conker's Bad Fur Day#
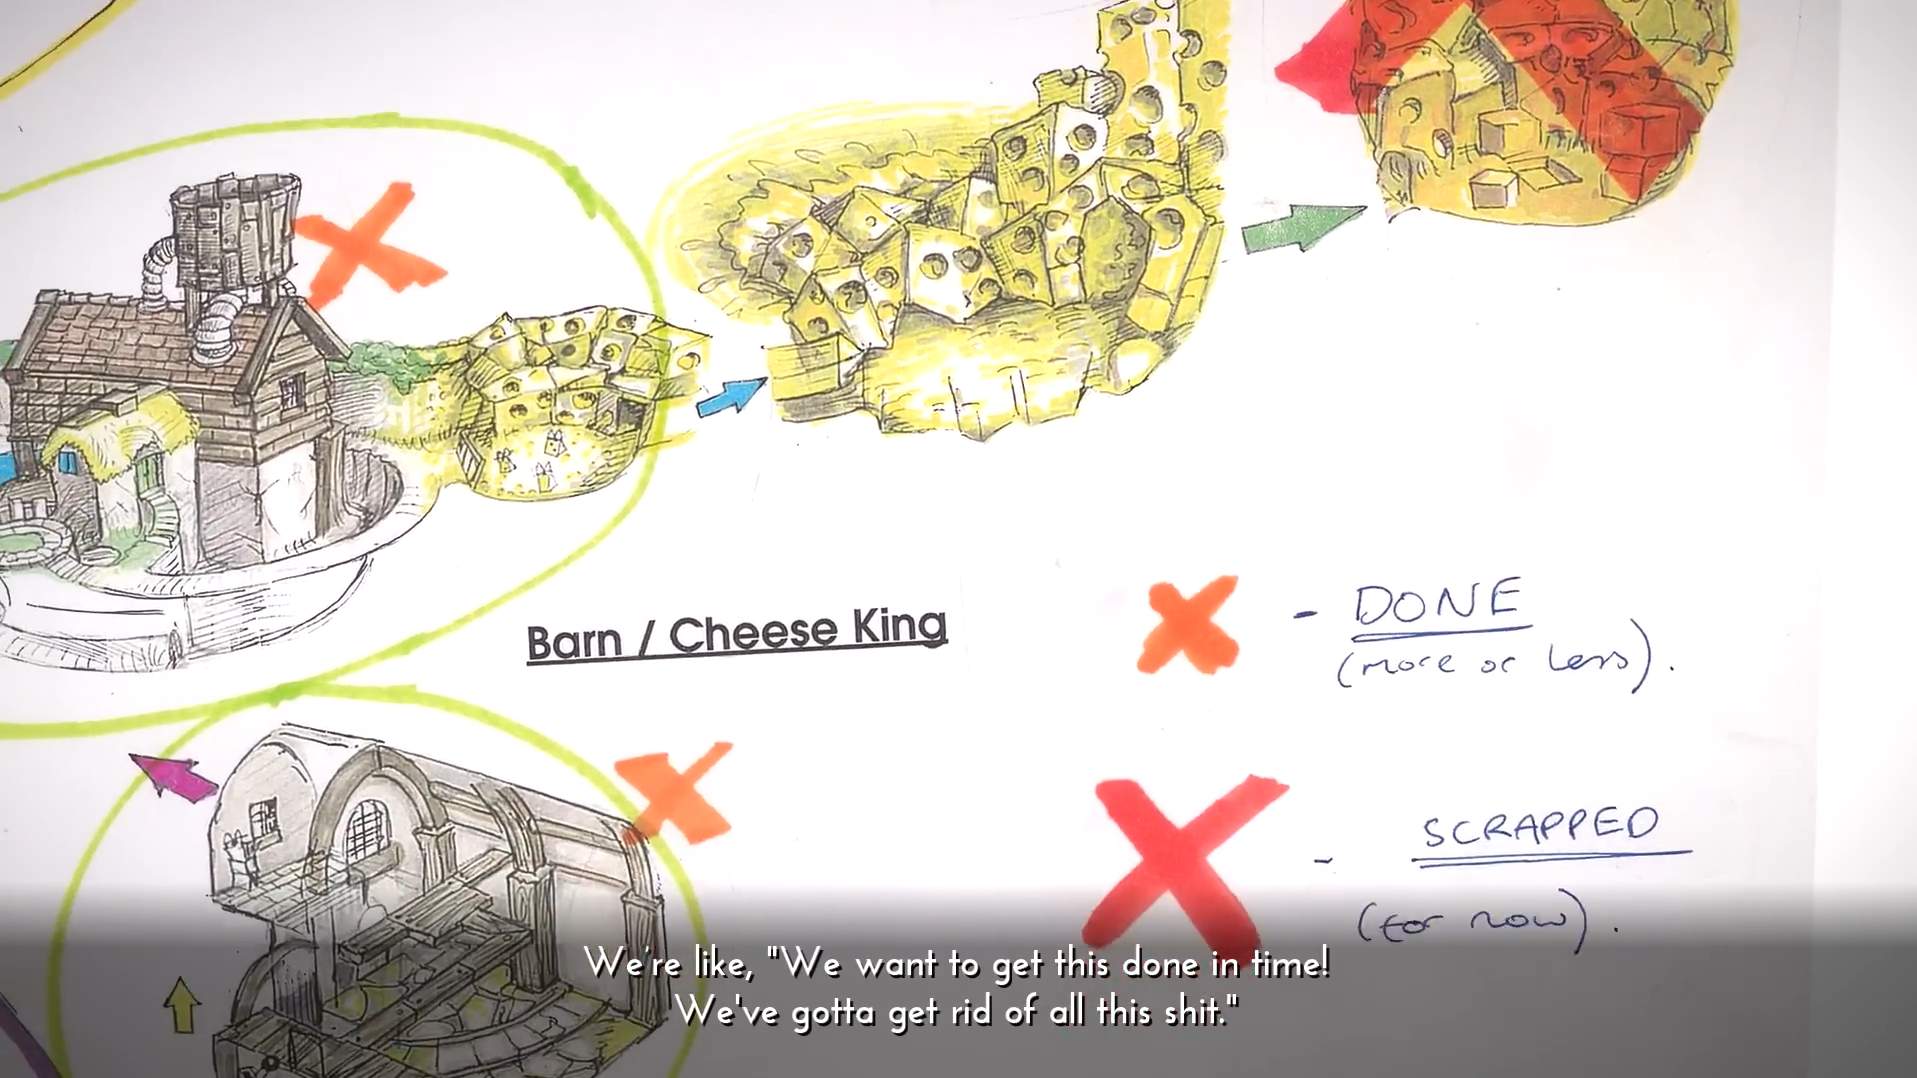
Watch on YouTubeOn August 4th 2015, An unlockable "Making Of" featurette for Conker's Bad Fur Day was included in the 30-year compilation collection, Rare Replay. Throughout the video, snippets of the Structure Map are shown up close. In contrast to the Structure Map that Chris Seavor had shared on his Twitter/Bluesky, the one featured in Rare Replay has been used as a progress marker: giant red X's marked over areas were scrapped from the final game, and smaller orange X's are used to designate which areas were (more or less) completed.
References#
- Rare Replay - The Making of Conker's Bad Fur Day - Rare Replay - The Making of Conker's Bad Fur Day↩︎
- "I found a pile of BFD design docs, which i thought i'd lost.... Stuff i used to give out to people when they were tasked with making assets and prototyping gameplay... might post some clips..." - Chris Seavor's Twitter↩︎
- "A load of level design stuff as well..... Original sketches, which forgotten i'd even done..." - Chris Seavor's Twitter↩︎
- [https://bsky.app/profile/conkerhimself.bsky.social/post/3lb2m4yrrn22h "Good Mornin' !! #gamedev↩︎
- Windy Overworld - Rare Ltd.'s Twitter↩︎
- Rare Replay - The Making of Conker's Bad Fur Day - Included in Rare Replay↩︎
- "First iteration of Beardy Intro.. then second....." - Chris Seavor's Twitter↩︎
- "Lol.. Forgot about this.. Could have been your international claim to fame Mr.. @Sootyfoot" - Chris Seavor's Twitter↩︎
- [ https://youtu.be/tNFkrFp59FA?si=h2tJkCxPiOAsyvNV&t=283 "The first task"] - CONKER'S BFD : DIRECTOR'S COMMENTARY PRT 4↩︎
- "The Wasp's honey factory was going to be a whole storyline, but got turned into a shooting section instead." - Chris Seavor's Twitter↩︎
- "Wasp World" - Conker's Bad Fur Day" - Chris Seavor's Gory Detail Twitter↩︎
- The Drugrats - Chris Seavor's Gory Detail Twitter↩︎
- "The Drugrats storyline was going to be all inside and underneath the Windmill.. Again, i cut it for time reasons, but also for a 4th wall breaking joke abut final levels" - Chris Seavor's Twitter↩︎
- "Picking up clangs with magnets" - Chris Seavor's Twitter↩︎
- Original BullFish Death Sequence - Chris Seavor's Gory Detail Twitter↩︎
- "Under Cog Tower... More or less the same as it ended up." - Chris Seavor's Twitter↩︎
- "Conker's Bad Fur Day, one from the vault!" - Chris Seavor's Gory Detail Twitter↩︎
- "Couple more from the Dogfish area that did make it in." - Chris Seavor's Gory Detail Twitter↩︎
- "...and that bloody tower...made it in! I'll dig up something juicy for 75 re-tweets on my original tweet :) #ConkerTatFromTheVault" - Chris Seavor's Gory Detail Twitter↩︎
- "Paper, pencil and markers! Those were the days!...Chris now uses Post-its, pencil & markers!" - Gory Detail Twitter↩︎
- "First level i ever sketched out properly.. pretty close." - Chris Seavor's Twitter↩︎
- "Barn Boys early sketches..." - Chris Seavor's Twitter↩︎
- "Dick Cheese... PI !!" - Chris Seavor's Twitter↩︎
- Dick Cheesy Characters - Chris Seavor's Gory Detail Twitter↩︎
- "Yup, disguised as King Cheese to lure all the little cheesys to his lair." - Chris Seavor's Bluesky↩︎
- "Nah, no one's seen this in 20 years. At one point Conker is rescued by French Cheeses .. No, really...." - Chris Seavor's Twitter↩︎
- Camembert Cameo - Conker's Other Bad Day Design Document↩︎
- "The scrapped cheese level..." - Chris Seavor's Twitter↩︎
- Chris Seavor - Conker's Bad Fur Day: Directors Commentary - Part 14↩︎
- ".......and the Mighty Poo in his first sketch...... Slightly different level design, he original was to be formed from the ass in the roof... In the end we just went for the easy option and have him rise from the depths." - Chris Seavor's Twitter↩︎
- "The scrapped piggy storyline..." - Chris Seavor's Twitter↩︎
- UGGA !!!! - Chris Seavor's Twitter↩︎
- ......... Misc things... - Chris Seavor's Twitter↩︎
- "Character Design 101, tells you everything you need to know. Conker's Bad Fur Day." - Chris Seavor's Gory Detail Twitter↩︎
- "Imagine Joe Pesci and you got the voice and style" - Chris Seavor's Gory Detail Twitter↩︎
- "Chris went down the Godfather route, rather than Goodfellas, in the end." - Chris Seavor's Gory Detail Twitter↩︎
- The Gargoyle Returns - Chris Seavor's Bluesky↩︎
- "I don't quite remember.. He did throw rocks though... The premise i was yet to work out i think..." - Chris Seavor's Twitter↩︎
- "Bad Fur Day Missile Command? #TooMuchStuffToDoItAll" - Chris Seavor's Gory Detail Twitter↩︎
- "Refueling a rocket to get to the Moon... Conker was going to have a context zone Jetpack, but was a ton of work for one section so scrapped along with the moon (moved into OBD)" - Chris Seavor's Twitter↩︎
- "more war stuff original Rambo esque boss..." - Chris Seavor's Twitter↩︎
- "extended War sections, scrapped (more tanks stuff)" - Chris Seavor's Twitter↩︎
- "Misc war stuff..." - Chris Seavor's Twitter↩︎
- "The final level was meant to be the moon, but that idea got dropped for reasons of time..." - Chris Seavor's Bluesky↩︎
- "Refueling a rocket to get to the Moon... Conker was going to have a context zone Jetpack, but was a ton of work for one section so scrapped along with the moon (moved into OBD)" - Chris Seavor's Twitter↩︎
- "Originally the Heist level included a whole stealth section out side the vault.. guards / lights that kinda thing.. Scrapped i think because i couldn't get any jokes out of it......" - Chris Seavor's Twitter↩︎
- "It involved careful jumping between ropes as lasers moved in a pattern... Would have drove people even more crazy than the exit from War. (damn, should've done it now heh!)" - Chris Seavor's Twitter↩︎
- "Originally the Heist level included a whole stealth section out side the vault.. guards / lights that kinda thing.. Scrapped i think because i couldn't get any jokes out of it......" - Chris Seavor's Twitter↩︎
- "Misc removed sections.... Picking up clangs with magnets... and the Vault door which became the Matrix lobby ...." - Chris Seavor's Twitter↩︎
- Original Windy Skybox - Bunnysuefly's Bluesky↩︎
- "This is a big one! Seems Beri was not always destined for death!" - Chris Seavor's Gory Detail Twitter↩︎
- E3 Press Conference↩︎
